Add API to Policy Manager
Learn how to add a simple API to the Policy Manager Management Console, configure associated Policies and Contracts, and send a test request.
On this page:
- Introduction
- Step 1: Install and Configure Policy Manager
- Step 2: Add API to Policy Manager
- Step 3: Configure Policies
- Step 4: Create Contracts
- Step 5: Send Test Request
- Auditing Use Cases
Introduction
Learn how to add a simple API to the Policy Manager Management Console, configure associated Policies and Contracts, and send a test request.
Step 1: Install and Configure Policy Manager
Install and configure Policy Manager.
Refer to the applicable installation instructions; go to Installing the Akana API Platform.
Step 2: Add API to Policy Manager
This example uses the Swagger Petstore API, available at http://petstore.swagger.io/. The JSON for this API is available at http://petstore.swagger.io/v2/swagger.json. To keep it simple, we will just register the Get Pet by ID operation at http://petstore.swagger.io/#/pet/getPetById.
There are three main steps:
Add Organization
- Log in to the Policy Manager Management Console.
- From the Organization Tree, click Registry.
- From the Actions Portlet on the right, click Add Organization.
- Indicate where you'd like to place the organization on the Organization Tree. Click Next.
- Give your organization a name, as shown below.

- click Finish, and then click Close.
Register API
- From the Organization Tree, click on the organization you created.
- From the Actions Portlet on the right, click Create Physical Service.
- Select the Create Without Using Service Descriptor Document option and click Next.
- On the Service Details, specify the following, then click Next.
- Name—The name of the API.
- QName and Localpart—in the Advanced Options section. This information is used internally by the system to uniquely route to a service or API. If you don't specify values, they are assigned automatically.
- On Schema Import Options, select Use Existing Schemas and click Next.
- Click Add Operation. Specify an optional name and description and click Next.
- The Operation Details page gives you the opportunity to specify Schema elements/types for your operation. For simplicity's sake, under Schemas, click >> to assign anyType to Input and "Output. Leave Fault blank, and click Next to continue.
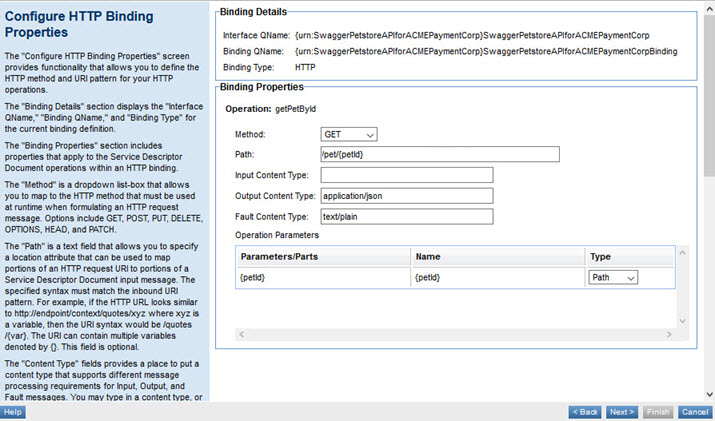
-
On the Configure HTTP Binding Properties page, choose the following and click Next. Add the following values, shown in the illustration below:
- Method—This example uses the getPetbyId operation.
- Path—This is the path for your operation. You can also use regular expressions. For more information, refer to the help panel to the left of the page.
- Next, choose how you would like to manage the Service (API). Select Manage through a Virtual Service option. This will create a proxy service that is hosted in the container. Click Next.
- In Virtual Service Provider Organization, ensure that the correct organization is selected and click Next.
- Select the container that you created when registering the Network Director and click Next.
- Select the first Access Point in the list. Provide a name and click Next.
- In HTTP Details, enter a Location; for example, /posts.
- Click Finish, and then click Close.
When you've finished, you'll have two services: a physical service and a virtual service.
Add Access Point to Physical Service
- From the Organization Tree, select Organization > Services of the physical API you're registering.
- Select the Access Points tab and click Add Access Point.
- Leave all defaults for the Service Details and Binding Details.
- Add a WSDL Port Name and click Next.
- Under the HTTP Details section, enter the API web address for our example: http://demo.akana-dev.net:3005/posts in the Location field and click Finish.
Step 3: Configure Policies
Next you will configure your APIs with the policies you want Akana to enforce.
- From the Organization Tree, select the organization you’d like to apply the policies to.
-
Click Policies. In the Operational section of the Policy Attachments Portlet click Manage. For our example, we will set up an operational policy. The choices are:
- Compliance checks that the service is compliant with your set of standards.
- Operations does security and monitoring for the service.
- QoS (Quality of Service) does things like ensure availability, speed, etc.
- From the Manage Operation Attachments window, click Policies > Operational Policies.
- Choose DetailedAuditing then click Apply.
You can find all descriptions of the policies in the Organization Tree.
Step 4: Create Contracts
A contract gives someone (typically another application,) authorization to access an API.
- From the Organization Tree, select your organization.
- Click Offer Contract from the Actions Portlet. The Add Contract Wizard launches.
- Enter the contract details.
- In the Access Controls, select the anonymous contract option (i.e., second option) and click Next.
- Select the Provider Organization and click Finish.
Your contract is now in draft mode. Next you must activate it:
- Navigate the Organization Tree to find your Organization. In the Contracts folder find your contract.
- Scroll down to the Consumers section. You'll see your contract in Draft state.
- Click on the contract. In this example, it shows as Anonymous.
- Review the contract, then in the Contracts Actions Portlet click Activate Contract, and then click OK.
Step 5: Send Test Request
To send a test request, you will need the endpoint.
- You can find this in the Policy Manager Organization Tree, under {specific Organization} > Services > API.
- Select the Access Points tab.
- Find the URL, and then copy the URL and paste into a browser window. You should get a successful response.
- Verify that the requests are coming through by checking the audit logs. You can see the logs by selecting the organization, then the API. From the API page, click Monitoring > Logs. You'll see request details.
Auditing Use Cases
The following detailed use cases illustrate how to perform basic or detailed auditing of an entire message and view the message metrics in Policy Manager.