CA SiteMinder Use Cases
Learn how to use CA SiteMinder in a variety of different usage scenarios.
On this page:
- Use Case #1: Using CA SiteMinder as Application Identity
- Use Case #2: Using Username/Password Security with WS-Security Policy
- Use Case #3: Using SMSESSION Cookie with HTTP Security Policy (Network Director)
- Use Case #4: Using SMSESSION Cookie with HTTP Security Policy (Intermediary for Microsoft)
- Use Case #5: Basic Authentication using CA SiteMinder Identity
- Use Case #6: Using Binary Security Token with WS-Security Policy
- Use Case #7: Set Up CA SiteMinder to Support Single Sign-On with Community Manager
Use Case #1: Using CA SiteMinder as an Application Identity
Learn how to use CA SiteMinder as an application identity.
Steps:
- Introduction
- Step 1: Create Policy
- Step 2: Attach Policies
- Step 3: Configure Outbound Identities
- Step 4: Configure Message Processing
- Step 5: Test Configuration
Introduction
This use case will use the Manage Outbound Identity option to send the CA SiteMinder identity to a downstream service that is enforcing Basic Authentication using the HTTP Security Policy. The consuming application (AccountManagerDocLiteralWrappedService_vs3_vs0) does not have a security policy and will only be used to pass the CA SiteMinder identity to the downstream application (AccountManagerDocLiteralWrappedService_vs3).
Step 1: Create Policy
- Launch the Policy Manager Management Console. In the Policies folder, use Add Policy to create the following policy configurations.


Step 2: Attach Policies
- Attach the policies to a virtual service.

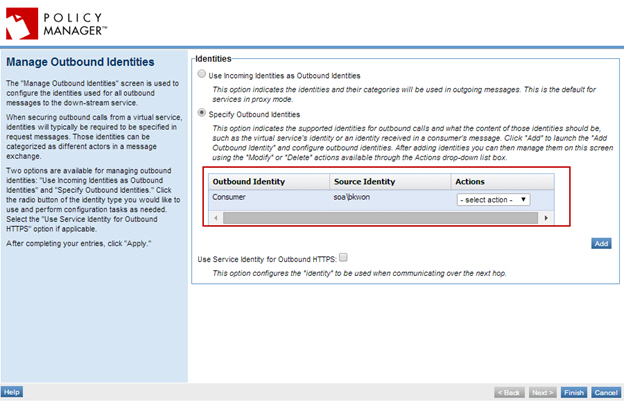
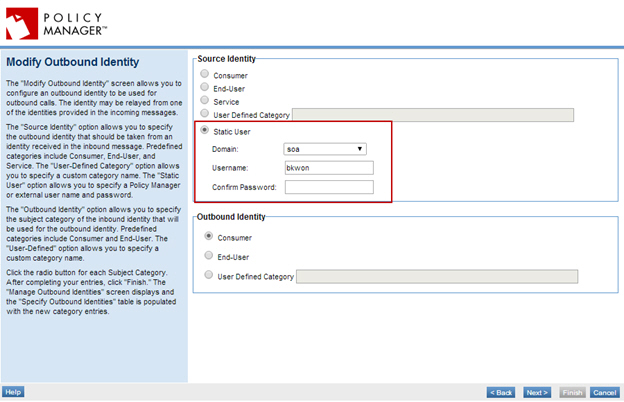
Step 3: Configure Outbound Identities
- On the Service Details of the virtual service, select Manage Outbound Identities from the Actions Portlet.
- Select Specify Outbound Identities, then click Add and configure the identity as illustrated below.
Step 4: Configure Message Processing
- On the Service Details of the virtual service, select Configure Message Processing in the Actions Portlet set Preserve Binding Headers to All.

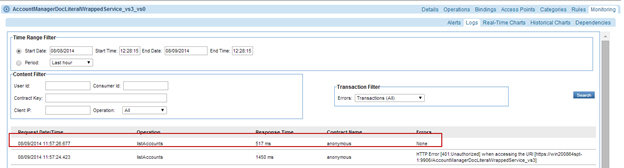
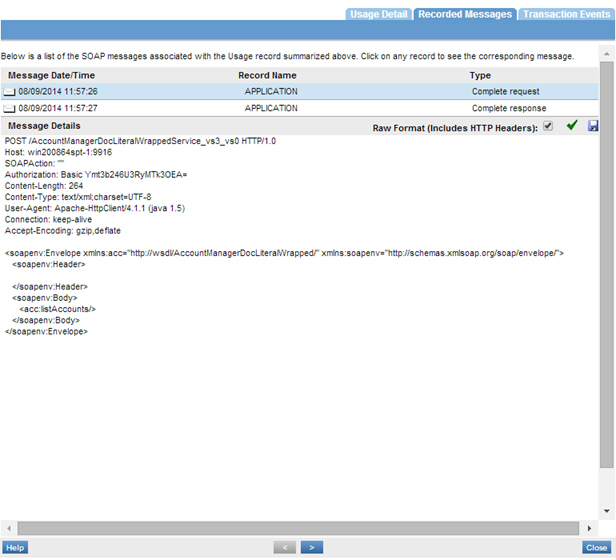
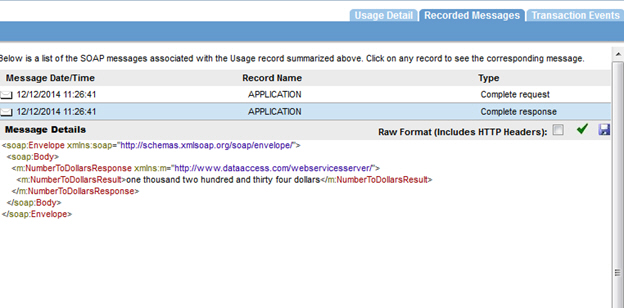
Step 5: Test Configuration
- Send requests to the virtual service and the usage data in the Services > Monitoring section.
Use Case #2: Using Username/Password Security with WS-Security Policy
Learn how to authenticate a web service request with CA SiteMinder Username/Password with a WS-Security Policy.
Steps:
- Introduction
- Step 1: Create Policies
- Step 2: Attach Policies
- Step 3: Select UsernamePassword in Client
- Step 4: Test Configuration
Introduction
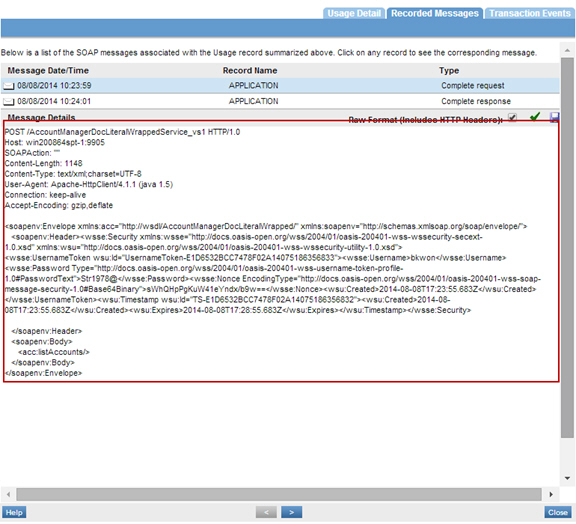
The WS-Security Username/Password Use Case client authentication is performed with a Username Token which appears at the SOAP layer as a signed supporting token that is always sent from the client to the service. The user is authenticated using username/password pass in the WS-Security header.
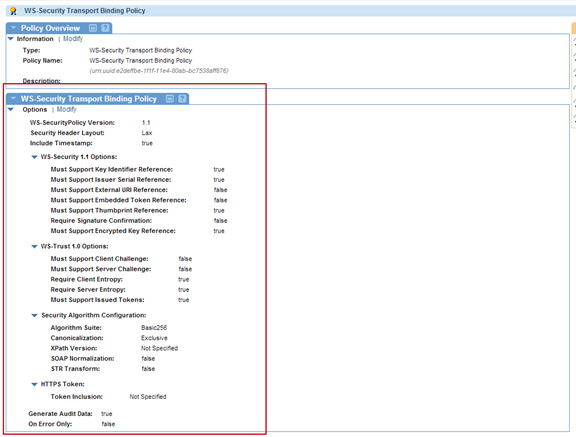
This use case is composed of the Authentication Policy, WS-Security Transport Binding Policy, and WS-Security Supporting Tokens Policy Authentication Policy.
Step 1: Create Policies
- Launch the Policy Manager Management Console. In the Policies folder, use Add Policy to create the following policy configurations.
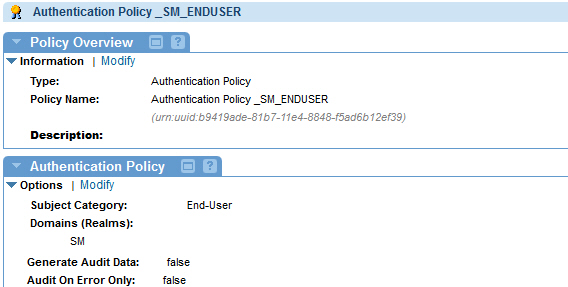
Policy Name Configuration Requirements Authentication Policy - Subject Category = End-User
- Domain (Realms) = CA SiteMinder
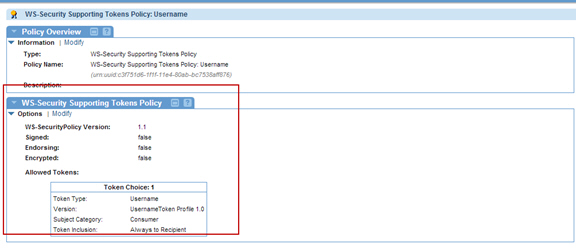
WS-Security Transport Binding Policy Use default configuration. WS-Security Supporting Tokens Policy Use default configuration with the following changes:
On the Specify Supporting Token Options screen:
- Click Add Token Choice
- Select the Token Choice
- Click Add Token
On the Add Supporting Token screen:
- Token Type = Username
- Token Inclusion - Always to Recipient
- Subject Category - Consumer
On the Specify Username Token Options screen:
- Version = UsernameToken profile 1.0
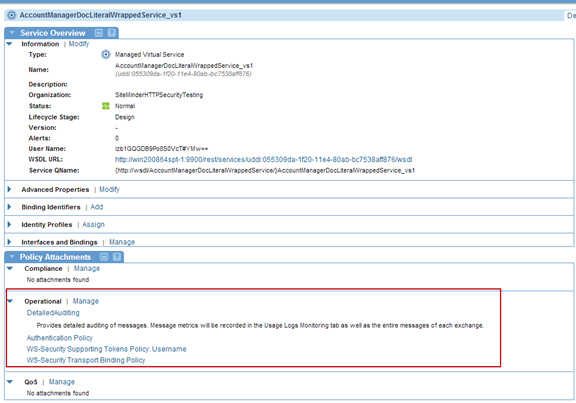
Step 2: Attach Policies
- Attach the policies to a virtual service.
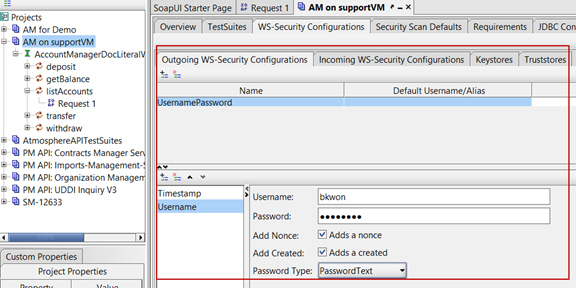
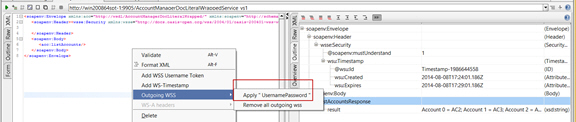
Step 3: Select UsernamePassword in Client
- Launch SOAPUI and select UsernamePassword for Outgoing WS-Security Configurations.
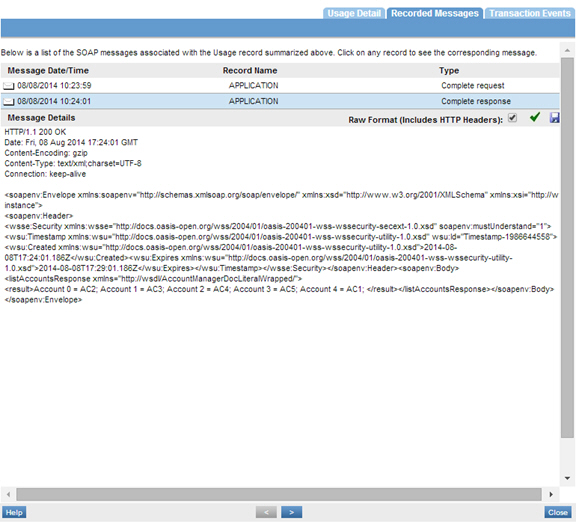
Step 4: Test Configuration
Send requests to the virtual service and the usage data in the Services > Monitoring section.
Use Case #3: Using SMSESSION Cookie with HTTP Security Policy
Learn how to authenticate a web service request with CA SiteMinder using an SMSESSION cookie with an HTTP Security Policy.
Steps:
- Introduction
- Step 1: Confirm SiteMinder Administrative Settings
- Step 2: Configure CA SiteMinder Identity System
- Step 3: Create Virtual Services
- Step 4: Create Policies
- Step 5: Attach Policies
- Step 6: Enable Preserve Transport Headers
- Step 7: Test Configuration
Introduction
When a user in SiteMinder protected realm is authenticated, a cookie called SMSESSION is generated. This use case will test authentication of this SMSESSION cookie using HTTP Security Policy. To generate the SMSESSION cookie, we will first use Basic Authentication.
Step 1: Confirm SiteMinder Administrative Settings
- Confirm that the SiteMinder Agent Configuration Object in the CA SiteMinder Administrative UI has a parameter called AcceptTPCookie with the value yes.
Step 2: Configure CA SiteMinder Identity System
- Configure a CA SiteMinder Identity System. This step should have been completed as part of the initial configuration. See Configure CA SiteMinder Identity System in Policy Manager 7.x. for more information. Configuration of the Login Process Options screen and Identity System integration is not required.
Step 3: Create Virtual Services
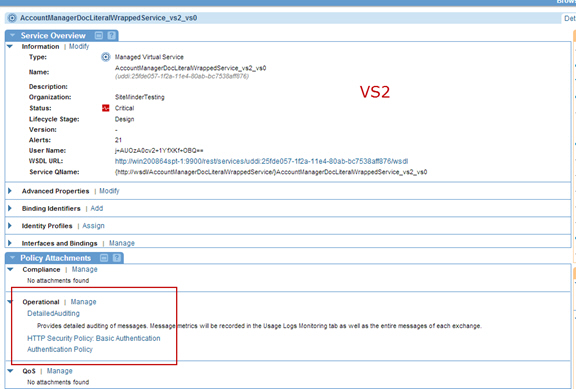
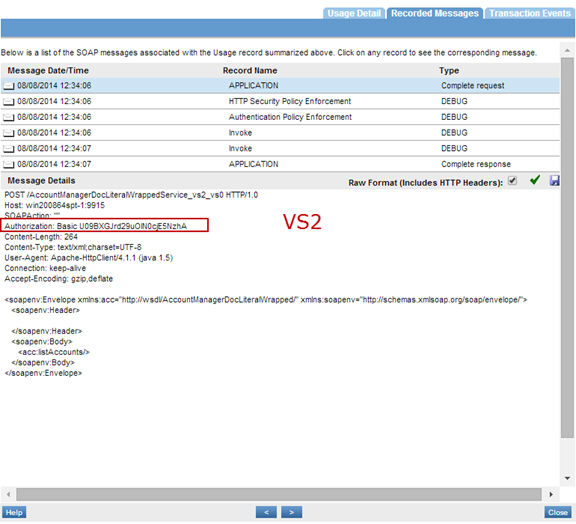
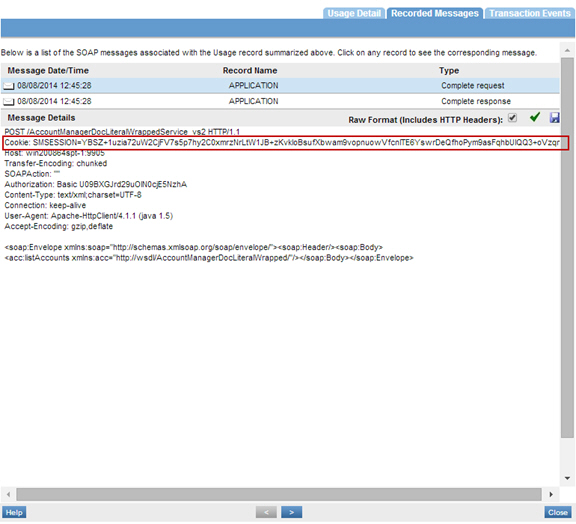
- Create a Virtual Service (VS1) then virtualize this Virtual Service again (VS2). Host each Virtual Service on a separate Network Director (ND).
Step 4: Create Policies
In the Policies folder, use Add Policy to create the following policy configurations for VS1 and VS2.
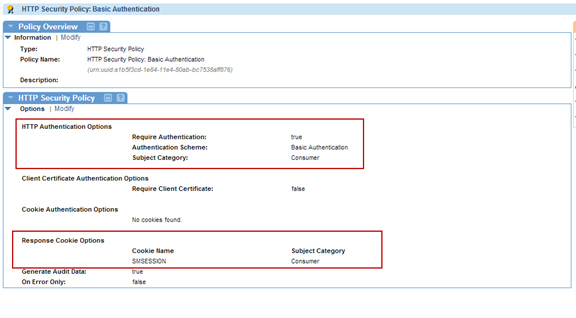
- Create an HTTP Security Policy with Basic Authentication, and a Response Cookie called SMSESSION.
- Create an HTTP Security Policy with Cookie Authentication.
Step 5: Attach Policies
- Attach the HTTP Security Policy with Basic Authentication to VS1.
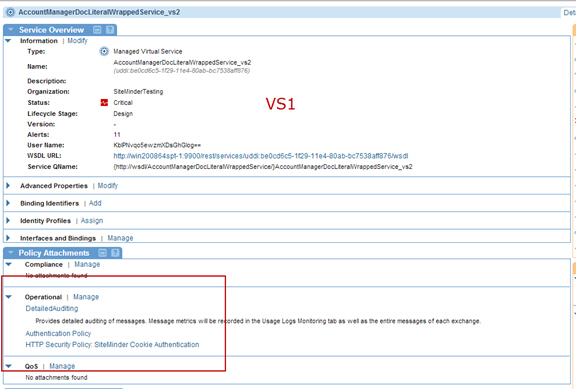
- Attach the HTTP Security Policy with Cookie Authentication to VS2.
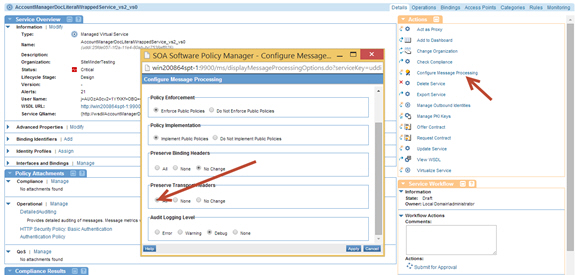
Step 6: Enable Preserve Transport Headers
- On the Service Details page of VS1 select Configure Message Processing in the Actions Portlet. Set Preserve Transport Headers to All to preserve this cookie header downstream.
Step 7: Test Configuration
- Send requests to VS1 and VS2 and view the usage data in the Services > Monitoring section.
Use Case #4: Using SMSESSION Cookie with HTTP Security Policy (Intermediary for Microsoft)
Learn how to authenticate a web service request with CA SiteMinder using an SMSESSION cookie with an HTTP Security Policy.
Steps:
- Introduction
- Step 1: Confirm SiteMinder Administrative Settings
- Step 2: Configure CA SiteMinder Identity System
- Step 3: Create Virtual Service
- Step 4: Create Policies
- Step 5: Attach Policies
- Step 6: Test Configuration
Introduction
When a user in SiteMinder protected realm is authenticated, a cookie called SMSESSION is generated. This use case will test authentication of this SMSESSION cookie using HTTP Security Policy. To generate the SMSESSION cookie, we will first use Basic Authentication.
Step 1: Confirm SiteMinder Administrative Settings
- Confirm that the SiteMinder Agent Configuration Object in the CA SiteMinder Administrative UI has a parameter called AcceptTPCookie with the value yes.
Step 2: Configure CA SiteMinder Identity System
- Configure a CA SiteMinder Identity System. This step should have been completed as part of the initial configuration. See Configure CA SiteMinder Identity System in Policy Manager 7.x. for more information. Configuration of the Login Process Options screen and Identity System integration is not required.
Step 3: Create Virtual Service
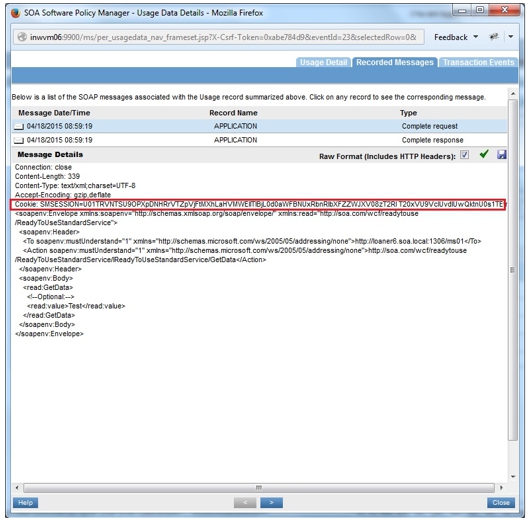
- Create a Virtual Service (VS1). Host a Virtual Service on Intermediary for Microsoft (IMS) container
Step 4: Create Policies
In the Policies folder, use Add Policy to create the following policy configurations for VS1.
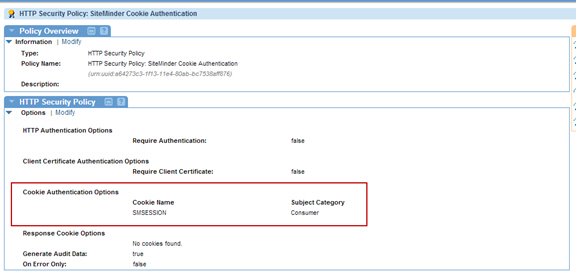
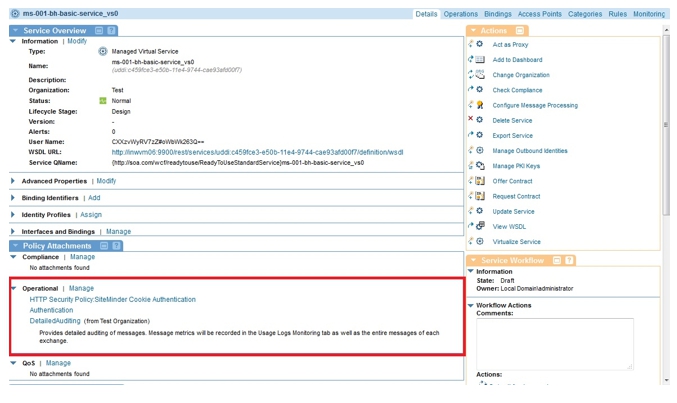
- Create an HTTP Security Policy SiteMinder Cookie Authentication. Specify Cookie Name as SMSESSION on the Cookie Authentication Options screen.
- Create an Authentication Policy with the CA SiteMinder Domain and Subject-Category Consumer selected.

Step 5: Attach Policies
- Attach Detailed Auditing, Authentication, and HTTP Security Policy SiteMinder Cookie Authentication policies to VS1.
Step 6: Test Configuration
- Send requests to VS1 and view the usage data in Services > Monitoring section.
Use Case #5: Basic Authentication using CA SiteMinder Identity
Learn how to authenticate a web service request with CA SiteMinder Identity.
Steps:
Introduction
The Basic Authentication Use Case is performed with a CA SiteMinder Identity that is always sent from the client to a service that is enforcing Basic Authentication using the HTTP Security Policy.
Step 1: Create Policy
In the Policies folder, use Add Policy to create the following policy configuration.
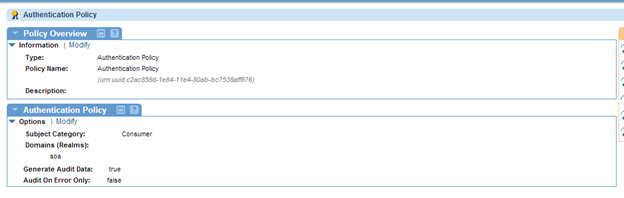
- Create an Authentication Policy with Subject Category = Consumer, and Domain (Realms = CA SiteMinder).
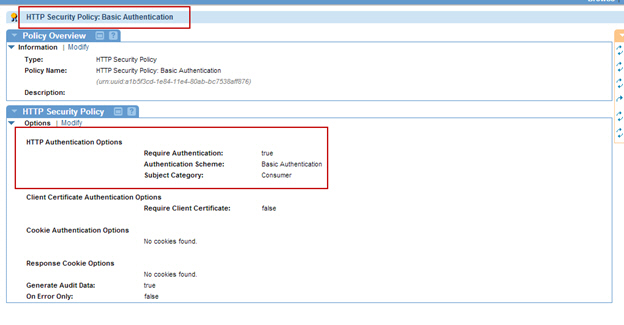
- Create an HTTP Security Policy with Require Authentication = True, Authentication Scheme = Basic Authentication, and Sub Category = Consumer.
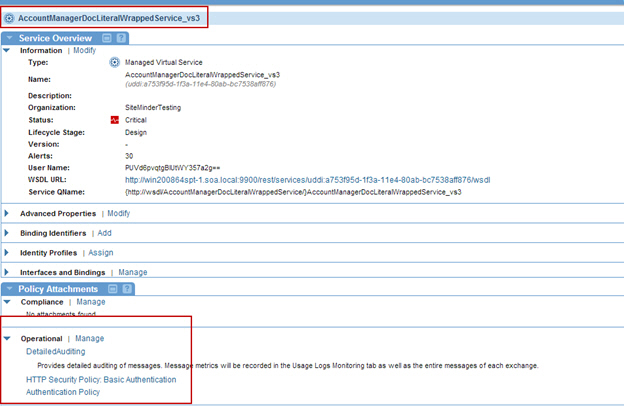
Step 2: Attach Policies
- Attach the policies to a virtual service.
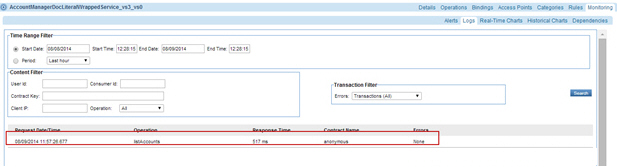
Step 3: Test Configuration
- Send requests to the virtual service and the usage data in the Services > Monitoring section.

Use Case #6: Using Binary Security Token with WS-Security Policy
Learn how to authenticate a web service request with CA SiteMinder Binary Security Token with a WS-Security Policy.
Steps:
- Introduction
- Step 1: Create Policies
- Step 2: Attach Policies
- Step 3: Send Request
- Step 4: Test Configuration
Introduction
The WS-Security Binary Token Use Case client authentication is performed with a Binary Token which appears at the SOAP layer as a signed supporting token that is always sent from the client to the service. The user is authenticated using a Binary Token password in the WS-Security header.
This use case is composed of the Authentication Policy, WS-Security Transport Binding Policy, and WS-Security Supporting Tokens Policy.
Step 1: Create Policies
In the Policies folder, use Add Policy to create the following policy configurations.
- Create an Authentication Policy with Subject Category = End-User, and Domain (Realms = CA SiteMinder).
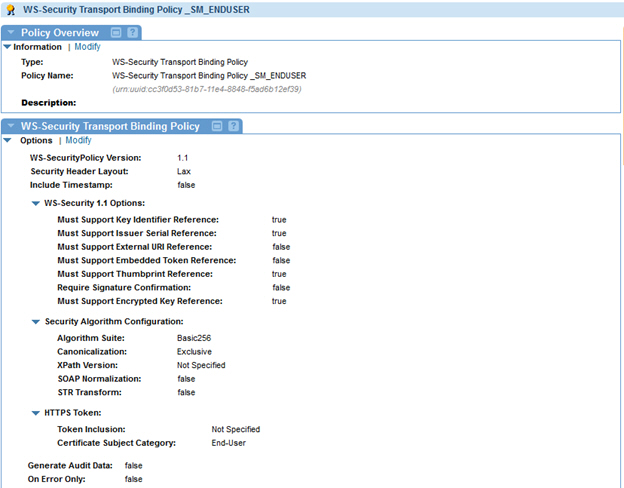
- Create a WS-Security Transport Binding Policy with HTTPS Token > Certificate Subject Category = End-User.
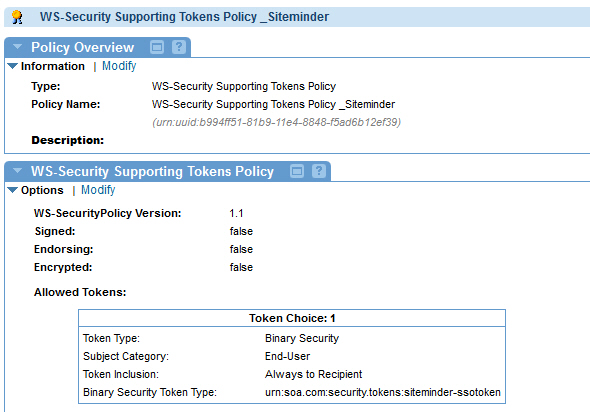
- Create a WS-Security Supporting Tokens Policy and configure as follows:
Screen Name Configuration Steps Specify Supporting Token Options - Click Add Token Choice
- Select the Token Choice
- Click Add Token
Add Supporting Token - Token Type = Binary Security
- Token Inclusion = Always to Recipient
- Subject Category = End-User
Specify Binary Security Token Options - Binary Security Token Type = urn:soa.com:security.tokens:siteminder-ssotoken
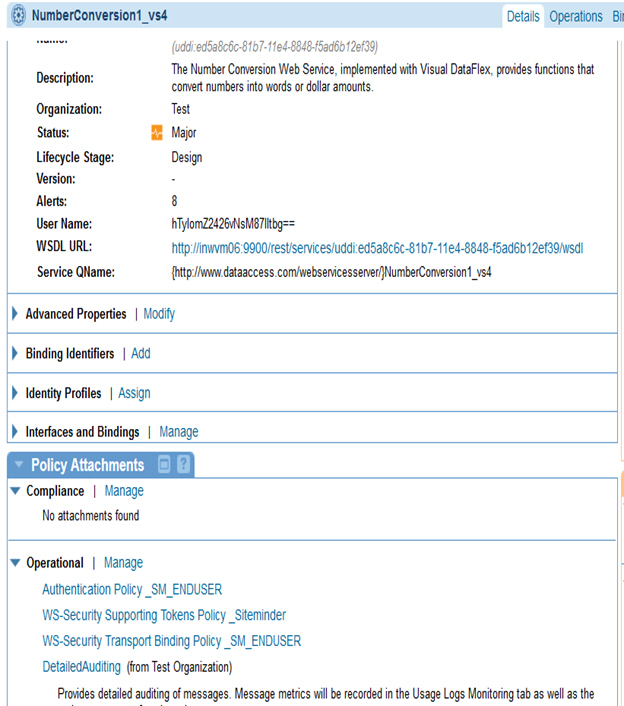
Step 2: Attach Policies
- Attach the policies to a virtual service.
Step 3: Send Request
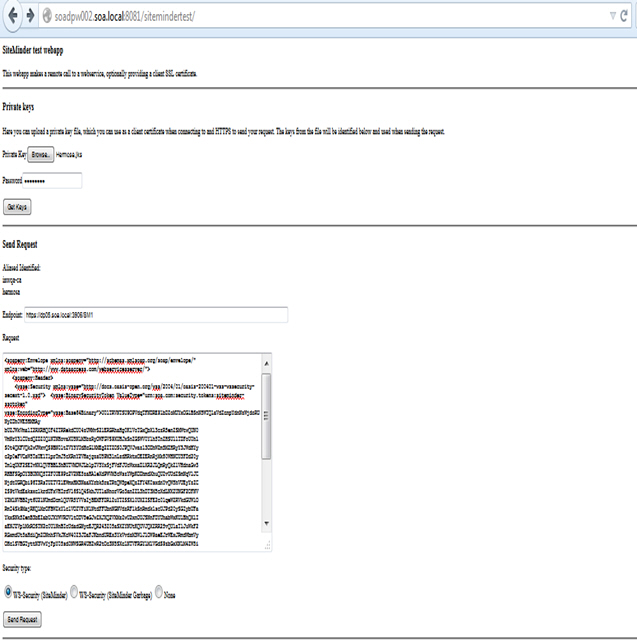
Send a request from the SiteMinder Client or SOAP UI as illustrated below:
Option 1: Send Request with SiteMinder Client
- Launch the SiteMinder client and send request with the Binary Security Token.
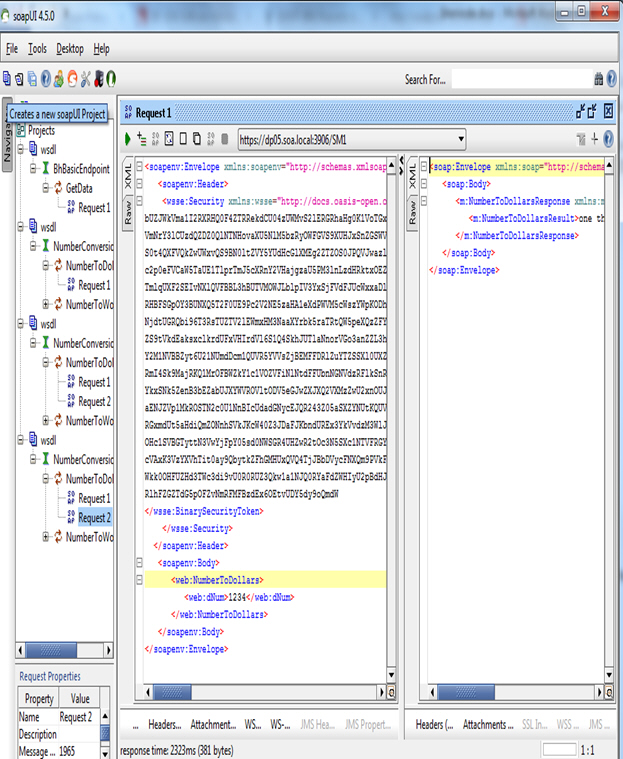
Option 2: Send Request from SOAP UI
- Launch SOAPUI and send a request with the Binary Security Token.
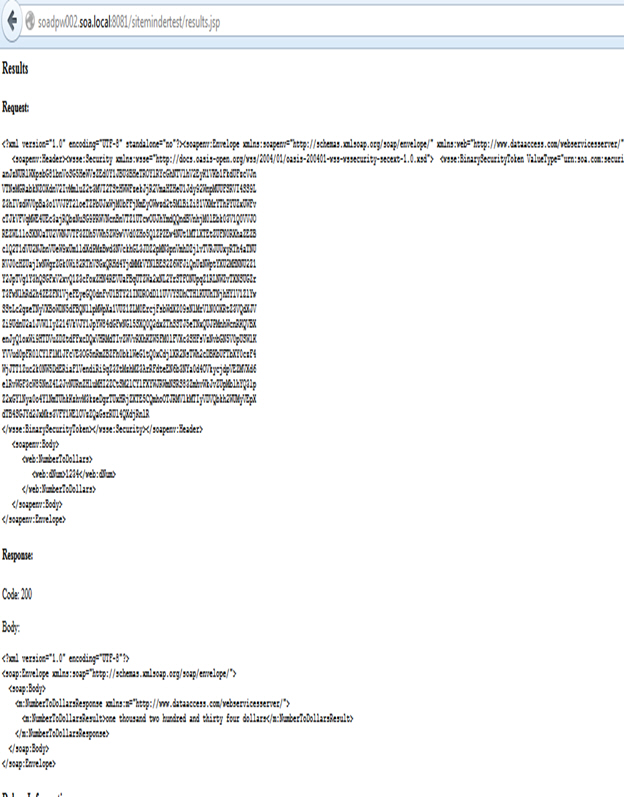
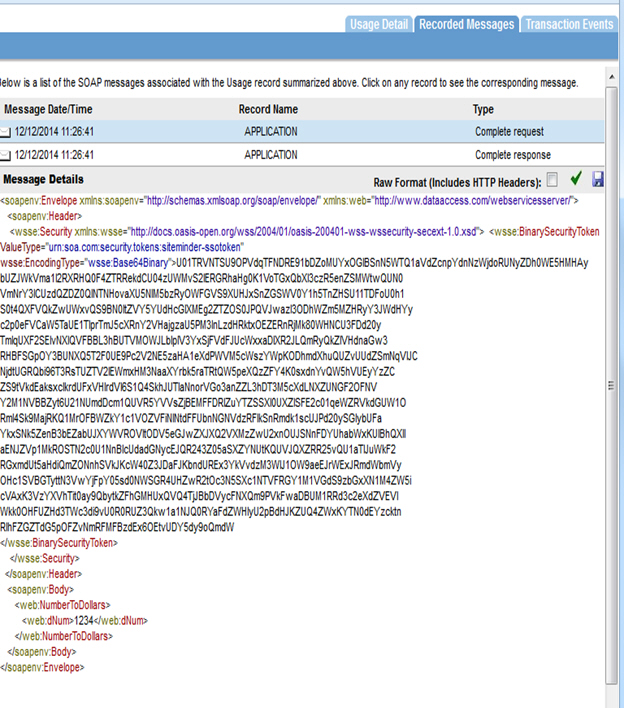
Step 4: Test Configuration
- Send requests to the virtual service and view the usage data in the Services > Monitoring section.
Use Case #7: Set Up CA SiteMinder to Support Single Sign-On with Community Manager
Learn how to set up CA SiteMinder and create login for Community Manager.
Steps:
- Introduction
- Set up CA SiteMinder Login for Enterprise API Platform
- Step 1: Define Domain for Enterprise API Platform Access Control
- Step 2: Define SOA Authentication Realm
- Step 3: Define the Global Policies for Community Manager
- Step 4: Protect the Community Manager Login Redirect Page
- Complete Integrate CA SiteMinder with Policy Manager Steps
- Set up OAuth Provider Domain to use CA SiteMinder in Community Manager
Introduction
Akana API Platform (Community Manager) uses CA SiteMinder facilities in two ways:
- To authenticate credentials and SSO tokens for the CA SiteMinder Identity System defined in Akana Policy Manager.
- To perform a CA SiteMinder managed login process when connecting to the Akana API Platform portal (Community Manager) or when issuing an OAuth/OpenID access token.
Note: Community Manager must be installed and configured prior to performing these configuration tasks.
Set up CA SiteMinder Login for Enterprise API Platform
Customers who are integrating with other Akana Products (e.g., Akana Enterprise API Platform) must create a global on/off accept rule for agents. Many of the properties defined in this section are referenced when you configure the CA SiteMinder Identity System in Policy Manager, and enable Single Sign-On functionality with other Akana products.
The setup process is accomplished by performing the following configuration tasks in CA SiteMinder:
- Define a domain for access control
- Define an authentication realm
- Define global policies
- Protect login redirect page
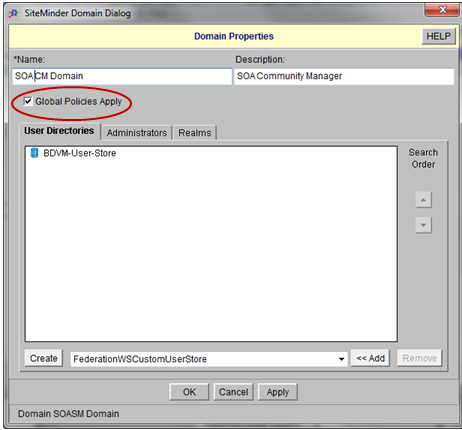
Step 1: Define Domain for Enterprise API Platform Access Control
The domain contains all the access control definitions that Akana Enterprise API Platform will use When the CA SiteMinder Identity System is defined in Policy Manager, the Identity System is associated with the Domain.
When you check Global Policies Apply, this enables responses to be processed from authentication requests in the Domain. In addition, checking this option adds the CA SiteMinder resource to the Admin > Domains section of the Enterprise API Platform portal so it is available for selection when you define an OAuth Provider.- Launch the CA SiteMinder Domain Dialog and create a new CA SiteMinder Domain.
- Verify that the Global Policies Apply checkbox is checked.
Step 2: Define SOA Authentication Realm
Akana Enterprise API Platform uses a common, bare Realm to authenticate all credentials and SSO tokens under the CA SiteMinder Identity System.
- Define a Realm using the Basic Authentication Scheme.

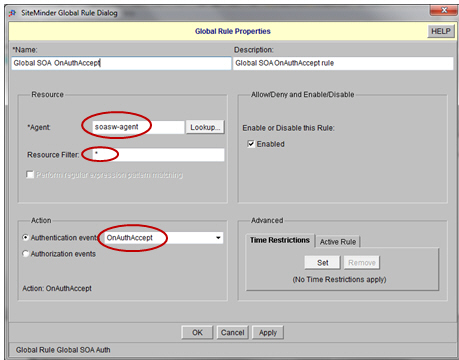
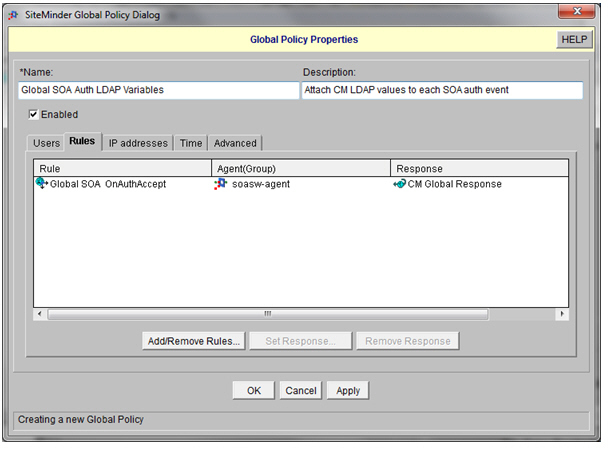
Step 3: Define the Global Policies for Community Manager
Global Policies must be defined to allow user information to be extracted from LDAP and passed into Akana Enterprise API Platform. This is to allow Enterprise API Platform to know the name and email address of the user logging into Enterprise API Platform using CA SiteMinder.
- Define a Global Rule as follows:
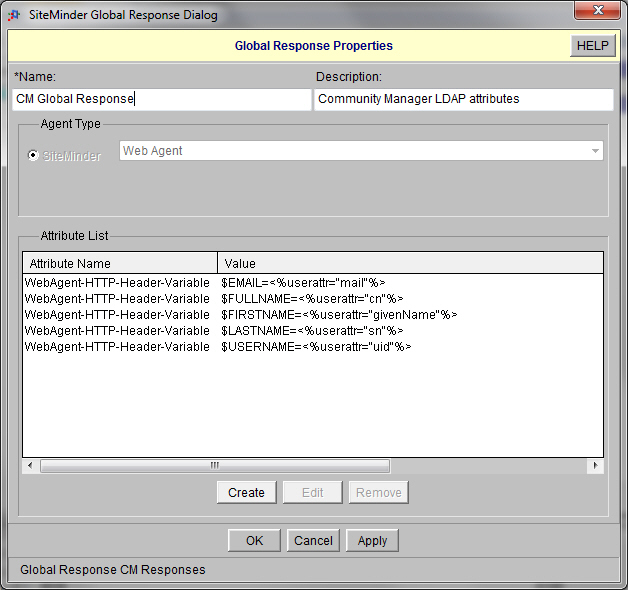
- The next step is to configure a Global Response Object. The Global Response Object facilitates the log in to the Enterprise API Platform via CA SiteMinder. The purpose of the Global Response Object is to get information from the CA SiteMinder controlled User Directory into the Enterprise API Platform.
Define Global Responses as follows (customer’s LDAP attributes may be different).
- Define a Global Policy as follows:
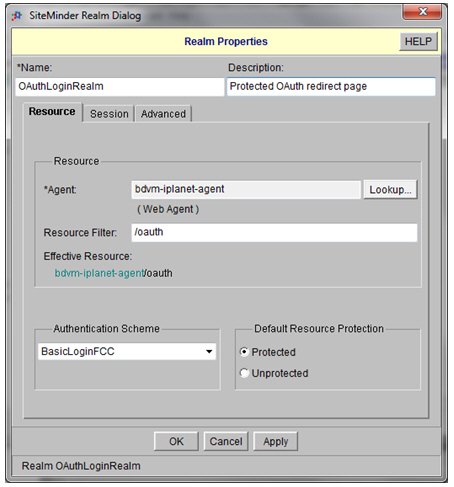
Step 4: Protect the Community Manager Login Redirect Page
The Akana SiteMinder Security Provider feature includes a small HTML page that will redirect a browser to a specified URL. This page must be loaded onto the customer’s web site and placed under protection of the customer’s SiteMinder Web Agent. After the page is loaded, perform the following steps to protect it.
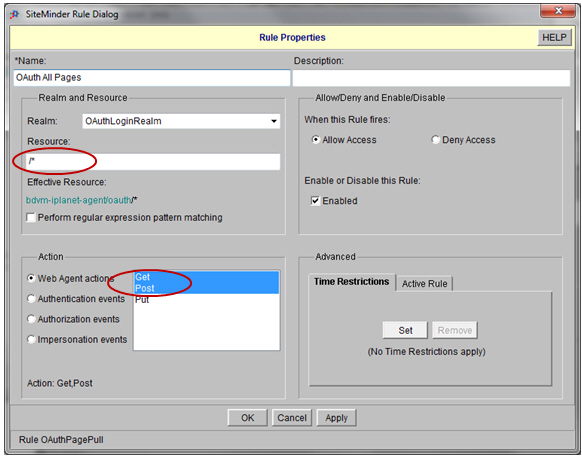
- Define a new Realm if necessary. (Some customers will already have appropriate Realms defined).
- Define a Rule under the Realm:
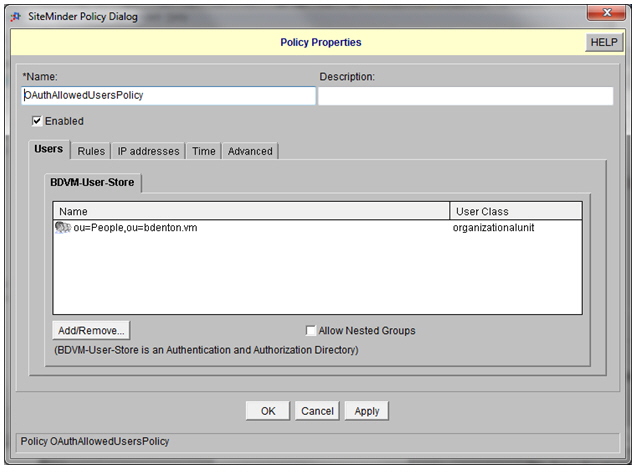
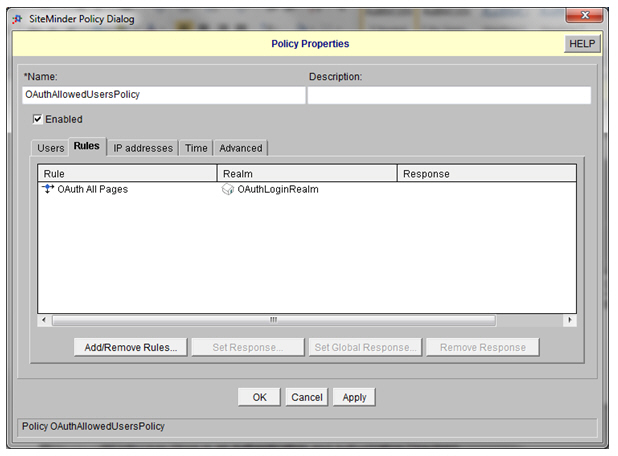
- Define a Policy to protect the redirection page and on the Rules tab:
Complete Integrate CA SiteMinder with Policy Manager Steps
Complete steps 1-6 outlined in Integrate CA SiteMinder with Policy Manager. For Step 6, use the Configure CA SiteMinder Identity System in Policy Manager (Integrate other Akana Products).
Set up OAuth Provider Domain to use CA SiteMinder in Community Manager
The final step in the process is to install the OAuth Provider features to the Community Manager container, launch the Akana API Platform portal (Community Manager) and enable the domain in the More > Admin > Logins section of the platform or select it as a Resource Owner Authentication Domain when defining an OAuth Provider.
for more information, refer to Domains (Community Manager developer portal help).