Security Roles and Role Memberships
Learn how to manage security roles and role memberships in Policy Manager.
Location in Policy Manager Management Console: Workbench > Browse > Security.
On this page:
- Security Summary
- Role Definitions
- Role Memberships
- Use case: creating a custom role with Monitor permission only
Security Summary
In Policy Manager, the security summary page is the starting point for defining and managing:
- Role definitions: A defined set of permissions associated with a role name. Here, you can add and manage role definitions.
- Role memberships: The list of role definitions is displayed. Here, you can assign the role to specific users or groups of users, and therefore give them the permissions associate with the role.
Role definitions and memberships represent the object-based security that controls access to Policy Manager functionality.
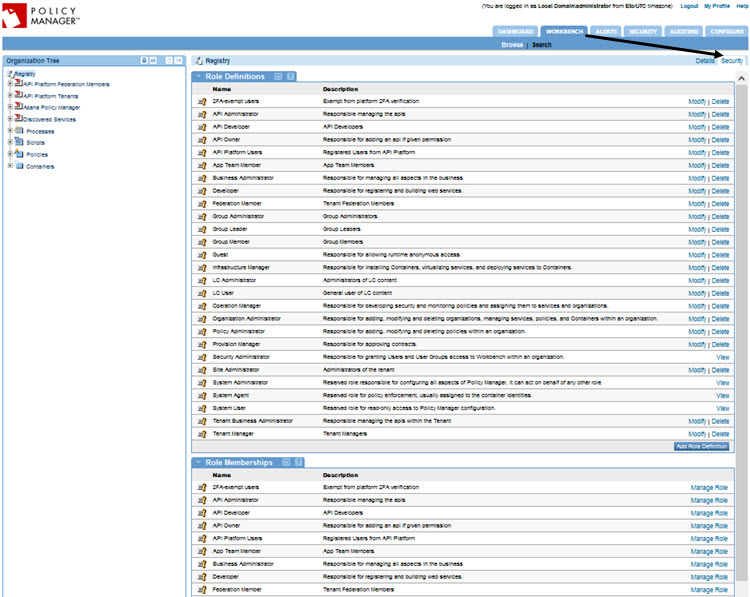
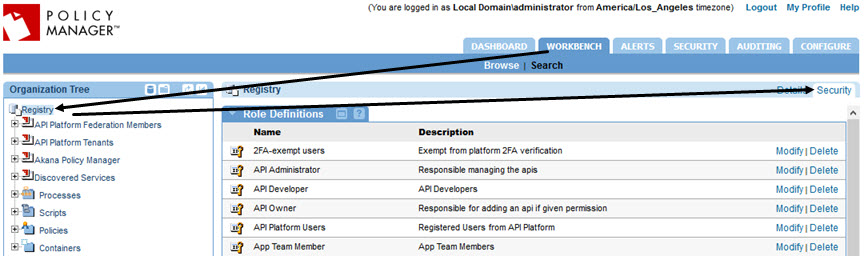
In Policy Manager, go to Workbench > Security. Role Definitions are shown at the top of the page, and Role Memberships at the bottom. An example is shown below.
Role Definitions
About role definitions
In Policy Manager, a Role Definition is essentially a template that represents the baseline rules that can be used throughout Policy Manager as a Role Membership. It is a defined set of permissions associated with a role name.
Default installation of Policy Manager includes a set of default roles representing common tasks associated with the Akana infrastructure. A few are reserved for system use; others, you can edit. You can also add new role definitions.
For details of the defaults, see Default role definitions below.
Each Role Definition is replicated to the Role Memberships section of the page. This displays on the Details page of each Sub-Organization. The Manage Role function within the Role Membership Portlet is used to assign Users/User Groups to each Role. Assigned User/User Groups have access to the functional areas defined within the role definition. You can assign a base set of User/User Group assignments at the Root Organization level and then customize the assignments at different Organization tiers.
To manage roles, you can:
- Add a new role definition
- Modify an existing role definition
- Delete a role definition
- View a role definition
Default role definitions
For role definitions, see:
Reserved role definitions
The role definitions shown below are reserved for system use and cannot be edited.
| This setting... | Controls this feature... |
|---|---|
| Security Administrator |
The Security Administrator Role:
|
| System Administrator | The System Administrator role is a Super User/Reserved role. The behavior of this role is different from every other role. This role does not contain privileges as part of its configuration, because assignment to this role provides complete access to all Policy Manager functionality. This role should be used exclusively by system administrators responsible for managing a Policy Manager production site. |
| System Agent | The System Agent is a reserved role for read-only access to Policy Manager configuration. |
| System User |
In order to allow access Policy Manager functionality, you must assign the System User role to each user who will be accessing the system. This role allows users to view Policy Manager data. As a general practice, it's best to assign this role to each user, in the Workbench > Security > Role Membership section of the relevant sub-organization that the user will be associated with, immediately after creating the user. |
Editable role definitions
The role definitions shown below are system defaults that can be modified.
| This setting... | Controls this feature... |
|---|---|
| Developer Role |
The Developer Role:
|
| Guest | This role allows anonymous runtime access. |
| Infrastructure Manager |
The Infrastructure Manager Role:
|
| Operation Manager |
The Operation Manager Role:
|
| Organization Administrator |
The Organization Administrator is responsible for:
|
| Policy Administrator |
The Policy Administrator Role is responsible for:
|
| Provision Manager |
The Provision Manager Role is responsible for:
|
Add a role definition
When you add a role definition, it's added to the Role Memberships list so that you can assign that role to users and groups.
To add a role definition
- Log in to the Policy Manager Management Console as the Administrator.
- Click the Workbench tab and then, on the left, click Registry.
- On the right, click the Security tab. The security summary page is displayed.
- In the Role Definitions section, at the bottom, click Add Role Definition. The Add Role Definition page is displayed, as shown below.
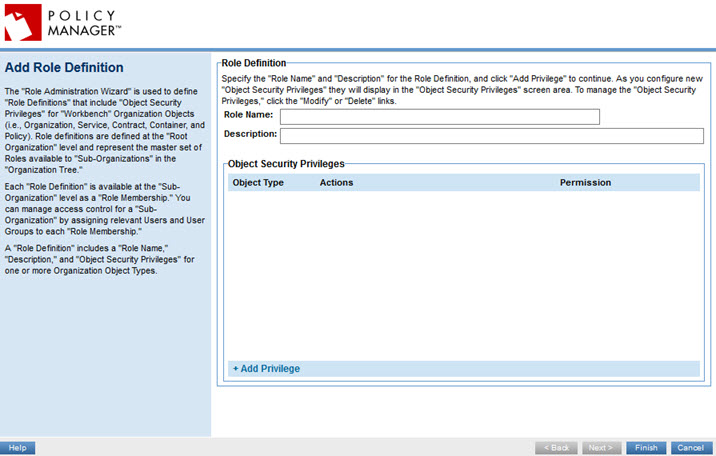
- Specify a brief but clear name for the role, and a description.
- Click Add Privilege to add a privilege to the new role. See To add or update the security privileges for a role below.
- When done, click Finish.
When you add a new role, the Role Memberships list refreshes to show the new role. You can now assign the new role to users and groups. See Role Memberships.
Modify a role definition
For an existing role, you can modify:
- The role definition (name and description)
- The security privileges (what resources the privileges relate to, such as apps or contracts, and what access to the resources they relate to, such as read-only or modify)
- The permissions: whether the privileges define what the role can do or what the role cannot do.
To modify a role definition
- Log in to the Policy Manager Management Console as the Administrator.
- Click the Workbench tab and then, on the left, click Registry.
- On the right, click the Security tab. The security summary page is displayed.
- In the Role Definitions section, choose the role that you want to modify. On the right, click Modify.
- At the Modify Role Definition page, change one or more values, as needed:
- Role Name
- Description
- Object Security Privileges: You can add a new security privilege for the role, or modify or delete existing security privileges. If you add or modify, you'll see the Select Object Type page, where you can choose from a list of object types that the security privilege applies to: for example, contract, policy, script, app, certificate, or deployment zone. For more information, see To add or update the privileges for a role below.
- Permissions: choose Allow selected actions or Deny selected actions.
- Click Finish to save changes.
To add or update the security privileges for a role
- Log in to the Policy Manager Management Console as the Administrator.
- Click the Workbench tab and then, on the left, click Registry.
- On the right, click the Security tab. The security summary page is displayed.
- In the Role Definitions section, choose the role that you want to modify.
- On the right, click Modify. The Modify Role Definition page appears, as shown below.
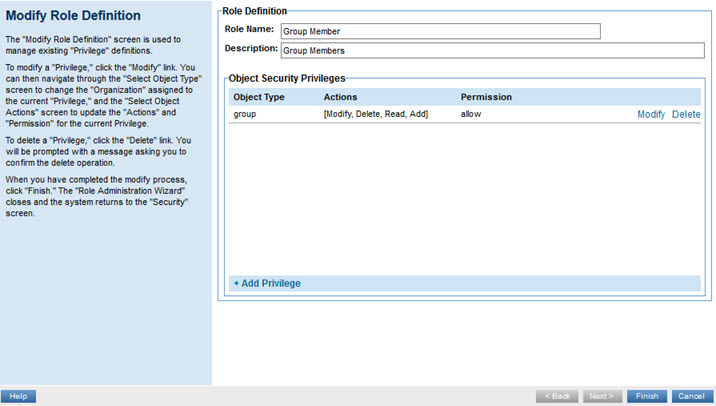
- Click Add Privilege.
- On the Select Object Type page, choose the object type; for example, group. Click Next.
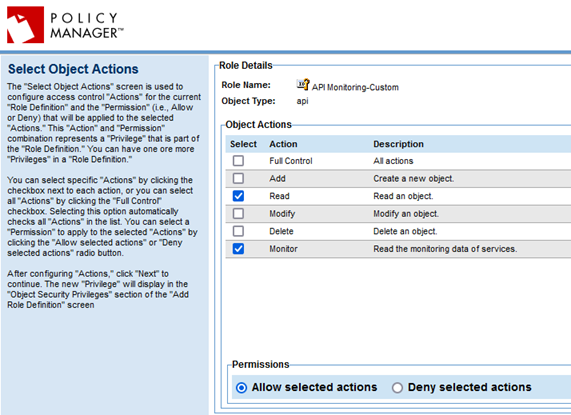
- On the Select Object Actions page, specify:
- Object Actions: Choose Full Control or one or more of the following: Read, Add, Modify, or Delete.
- Permissions: Must be one of the following: Allow selected actions or Deny selected actions.
- Click Next.
- Review the changes on the Modify Role Definition page, and then click Finish.
Delete a role definition
To delete a Role Definition
- Log in to the Policy Manager Management Console as the Administrator.
- Click the Workbench tab and then, on the left, click Registry.
- On the right, click the Security tab. The security summary page is displayed.
- In the Role Definitions section, choose the role that you want to delete.
- On the right, click Delete, and confirm at the prompt. The role is deleted.
View a role definition
To view a role definition
- Log in to the Policy Manager Management Console as the Administrator.
- Click the Workbench tab and then, on the left, click Registry.
- On the right, click the Security tab. The security summary page is displayed. There are two scenarios:
- Reserved roles such as System Administrator: click the View link to the right. The View Role page is displayed, with information about the role. An example is shown below.
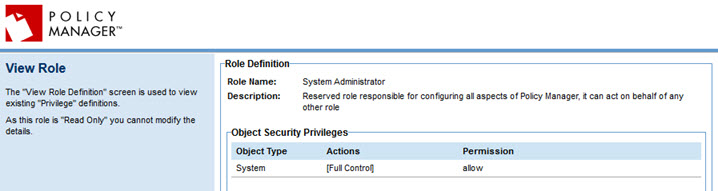
- Non-reserved roles: All other roles, whether default or user-defined, can be edited. To view information about the role, click Modify. The Modify Role Definition page appears, with information about the role. When done, click Cancel.
- Reserved roles such as System Administrator: click the View link to the right. The View Role page is displayed, with information about the role. An example is shown below.
Role Memberships
About role memberships
You can add or modify the role membership for all types of roles; reserved default roles, editable default roles, or user-defined roles.
Note: the default role memberships affect many of the default activities that specific users and user groups can perform; for example, the Site Admin and API Admin in the Community Manager developer portal. It's best not to change the defaults unless you're really sure of what you're doing.
Assign a role to a user
You can assign a role to a specific user in Policy Manager.
The procedure below assigns the System Administrator role. The process works exactly the same for all roles.
To grant System Administrator permission
- Log in to the Policy Manager Management Console as the Administrator.
- Click the Workbench tab and then, on the left, click Registry.
- On the right, click the Security tab, as shown below.
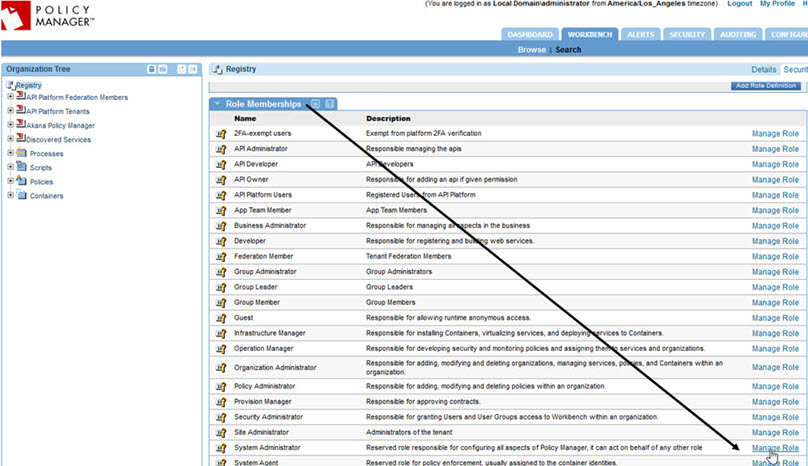
- In the right pane, scroll down to the Role Memberships section, and find the System Administrator role. On the right, click Manage Role, as shown below.
- In the Object Based Security Role page, use the search feature to locate the user. In the example below, choosing Contains with no value and clicking Save returns a full list of users. Click the username in the left pane and click the arrow icon (>>) to move the admin user to the right pane, to assign the role.

- Click Apply. The admin user now has the System Administrator role and can use the API.
Note: You can also grant permissions in the Community Manager developer portal: Administration > Users. See How do I assign security roles to users for my organization? (Community Manager developer portal help). However, you might find that the System Administrator permission isn't displayed on the list since these permissions are senior to the Community Manager developer portal.
View role memberships
To view role memberships
- Log in to the Policy Manager Management Console as the Administrator.
- Click the Workbench tab and then, on the left, click Registry.
- On the right, click the Security tab. The security summary page is displayed. Here, you can view the users and groups that have membership in a specific role.
- On the second part of the page, Role Memberships, find the role, and click Manage Role.
- In the Object Based Security Role page, users and groups who have role membership are displayed in the right column. An example is shown above.
- When done, click Cancel.
Use case: creating a custom role with Monitor permission only
You might want to create a custom role so that certain users can have Monitor permission, to view an API's analytics information in the Community Manager developer portal, without those users being able to view and modify private APIs unless invited.
By default, when you add Monitor permission, the system automatically adds Read permission so that users can view APIs. In most cases, Read is the lowest level of access and Monitor is one step up from that. However, if you want to create a scenario where users with Monitor permission can only view API analytics, and cannot view private APIs, you can do that. For example, you might want to manage view permission via Private API groups, or you might have personnel dedicated only to viewing analytics information.
To create and assign a custom role with only Monitor permission allowed, follow the procedures below:
- Create the custom role: To create a custom role with only Monitor permission
- Assign the new role to a user: To assign the new custom role to a specific user
To create a custom role with only Monitor permission
- Log in to the Policy Manager Management Console as the Administrator.
- Click the Workbench tab and then, on the left, click Registry.
- On the right, click the Security tab. The security summary page is displayed. For an illustration, see Assign a role to a user above.
- In the Role Definitions section, at the bottom, click Add Role Definition. The Add Role Definition page is displayed.
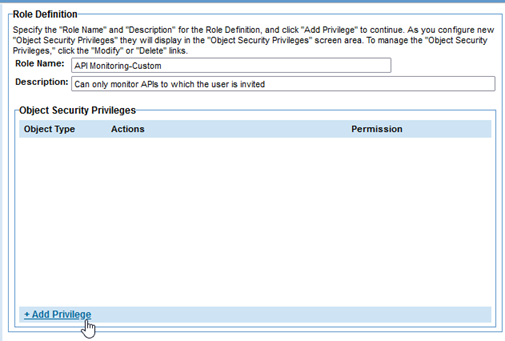
- Specify a brief but clear name for the role, and a description. In this example:
- Role: API Monitoring-Custom
- Description: Can only monitor APIs to which the user is invited
- Click Add Privilege to add a privilege to the new role, as shown below. See To add or update the security privileges for a role.
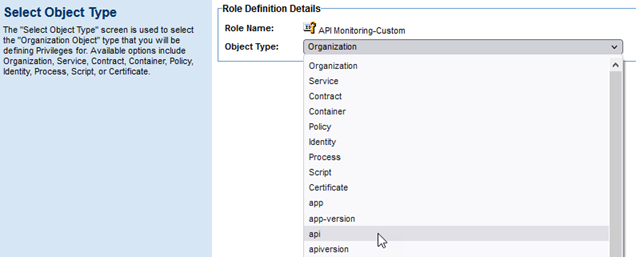
- On the Select Object Type page, from the Object Type drop-down list, choose api, as shown below. Click Next.
- On the Select Object Actions page, specify the following, as shown below:
- Object Actions: Choose Read and Monitor.
- Permissions: Leave the default, which is Allow selected actions.
- Click Next.
- Click Add Privilege again. Choose the apiversion object type, and click Next.
- Assign the same permissions as you did for the api object type in Step 8, and click Next.
- Click Add Privilege again. Choose the api object type, and click Next.
- On the Select Object Actions page, specify the following:
- Object Actions: Choose Read.
- Permissions: Choose Deny selected actions.
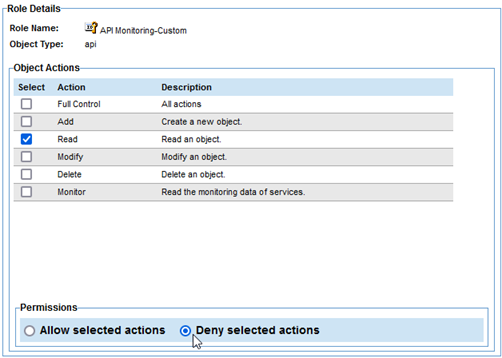
- Click Next to return to the Modify Role Definition page. The permissions should look something like the below.
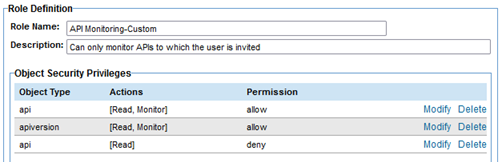
- Click Finish.
At this point, you've defined a role that allows users to view and monitor APIs, but does not allow users to view private APIs unless they are invited. Users with this role cannot modify APIs.
To put this custom role into use, assign it to a user. See To assign the new custom role to a user below.
To assign the new custom role to a user
In this procedure you are assigning the new custom role to a specific user, within the context of a specific API. See also: Assign a role to a user.
- Log in to the Policy Manager Management Console as the Administrator.
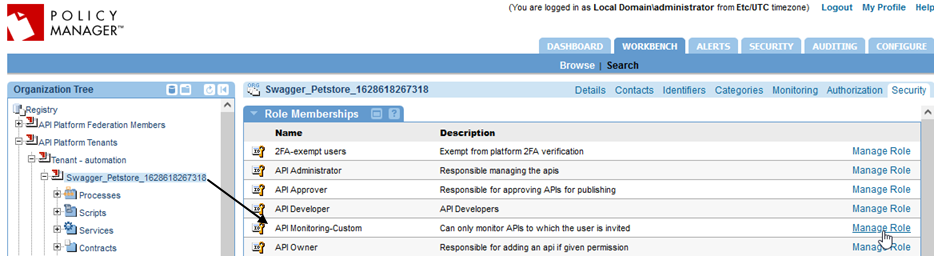
- Click the Workbench tab and then, on the left, navigate to API Platform Tenants, then your tenant, then the API for which you want to grant monitoring-only access.
- On the right, click the Security tab, find the custom role you created in To create a custom role with only Monitor permission above, and click the Manage Role button, as shown below.
- In the Object Based Security Role page, use the search feature to locate the user. Click the username in the left pane and click the arrow icon (>>) to move the user to the right pane, to assign the role. For an illustration, see To grant System Administrator permission (Step 5).
- Click Apply. The specified user now has the customized monitoring role for this API.