Community Manager Customization Use Case: Separating the Community Manager developer portal and Admin Portal
Use case describing the steps required to create two themes, developer theme and admin theme, both extending from Hermosa theme. The developer theme has customization and the admin theme does not.
On this page:
Overview
The following instructions describe the steps to take in a sample use case where there are two themes:
- One for Site Administrators, using Hermosa theme.
- One for all other users (mainly app developers), using Hermosa theme, with customization.
Backup and Preparation
It's important to be prepared so that if anything goes wrong you can revert to the previous state, or fix as needed.
Preparation:
- It's important that the Admin Portal is accessible at all times. In case there is any error or issue with creating new themes, this is the back door so that you can fix as needed. One easy way to do this is to add a Hermosa theme and assign a virtual host which will not be used in the new themes. The virtual host must be unique per theme. If you already have a Hermosa theme, make sure Site Admin access is available.
- The new developer and admin themes must have unique virtual host names. Make sure you have you have them ready. In this example:
- developer theme = developer.acmepaymentscorp.com
- admin theme = admin.acmepaymentscorp.com
Backup of existing customization files:
To back up the existing customization files, follow the steps below.
- Log in as a Site Admin and go to the Admin section.
- Go to More > Admin > File Manager.
- In the Resources section, click File Manager to access the /resources folder.
- Download the customization files to a safe location.
- In Admin > Site:
- Versions prior to 2019.1.11 only: Make sure you added out-of-the-box Hermosa theme as one of the themes, required to support extending from Hermosa theme. In 2019.1.11 and later, this is not required.
- If the Virtual Host/Vanity Hostnames which we will be using for new admin theme and developer theme are already in use for any other themes, make sure you delete them from those themes. The virtual host must be unique per theme.
- Delete all the directories in /theme/ directory. There might be /default and /hermosa directories in the theme directory.
Change the Themes
When changing themes, do one theme at a time. Make sure you always have access to the theme which has Site Admin access. In this use case, it is the Hermosa theme (Preparation step 1).
- Log in to the Admin Portal.
- Go to the Admin > Site page.
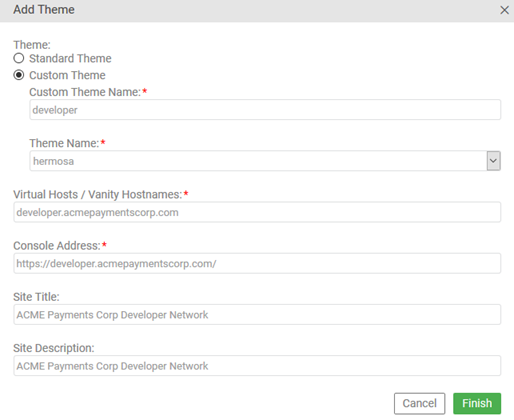
- Add a new custom theme for developers:
- Enter a Custom Theme Name: developer (all lower case is the naming convention).
- Select the Theme Name: hermosa.
- Enter all the virtual host details for the developer theme.
- Enter the Console Address for the developer theme.
- Enter a Site Title and Description.
- Access the developer theme and make sure everything is working.
An example of the configuration for the Community Manager developer portal is shown below:
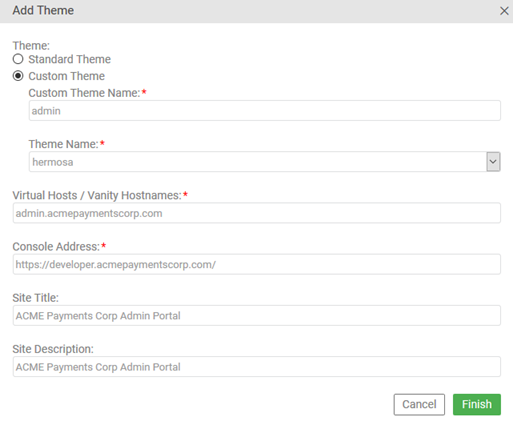
- Add a theme for the Admin Portal:
- Enter a Custom Theme Name: admin (all lower case is the naming convention).
- Select the Theme Name: hermosa.
- Enter all the virtual host details for the admin theme.
- Enter the Console Address for the admin theme.
- Enter a Site Title and Description.
- Access the admin theme and make sure everything is working.
An example of the configuration for the Admin Portal is shown below:
- For the developer theme customizations:
- Go to More > Admin > File Manager.
- In the Resources section, click File Manager to access the /resources folder.
- Navigate to the theme directory.
- Create a theme/developer folder structure, and then upload the customization files you require for the developer theme.
The full folder structure will be: /resources/theme/developer.
Note: Don’t upload the entire ZIP file that you downloaded in Backup of existing customization files above. The ZIP file might contain a theme/hermosa directory, and if you upload it you will customize the out-of-the-box Hermosa theme.
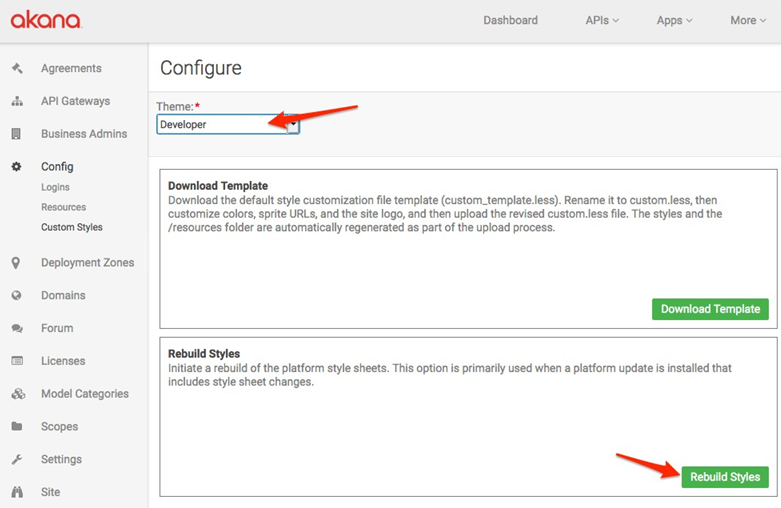
- Rebuild styles for the developer theme, only if you have custom.less in your customization files, as shown below.
After creating the additional themes, the Site Themes should look similar to the example below that corresponds to your version.
Versions prior to 2019.11:
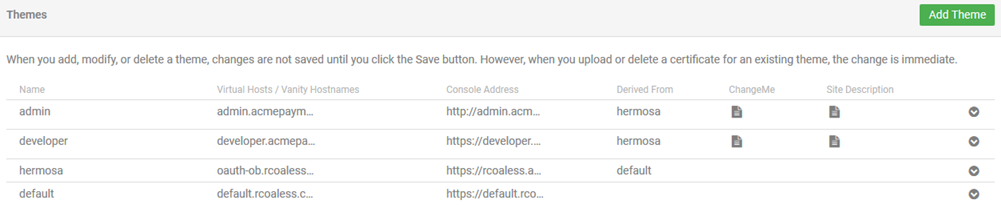
Version 2019.1.11 and later:

- If needed, customize the admin theme also. See Optional: customizing the admin theme below.
Optional: customizing the admin theme
- Log in as a Site Admin and go to the Admin section.
- Go to More > Admin > File Manager.
- In the Resources section, click File Manager to access the /resources folder.
- Navigate to the theme directory.
- Create a theme/admin folder structure, and then upload the customization files you require for the admin theme.
The full folder structure will be: /resources/theme/admin.
Note: Don’t upload the entire ZIP file that you downloaded in Backup of existing customization files above. The ZIP file might contain a theme/hermosa directory, and if you upload it you will customize the out-of-the-box Hermosa theme.
- Rebuild styles for the admin theme, only if you have custom.less in your customization files.
Customize Email Templates (versions earlier than 2019.1.11)
Note: In version 2019.1.11 and later, customizing the email templates is not needed.
In this use case, since both the developer and the admin themes are based on the Hermosa theme, not Default theme, you will also need to add the email template property/value pairs to the THEME_IMPL_PROPERTIES table. Each of the templates that exist for default must be inserted for a THEMEIMPL set to hermosa.
An example query is shown below. Run this query to insert all the values for the hermosa theme.
SQL statements (click here to download a file):
insert into THEME_IMPL_PROPERTIES select DISTINCT 'hermosa', 'app.detail.view.contextpath', 'app/{app.dn}/versions/{app.version.dn}/details' FROM THEME_IMPL_PROPERTIES WHERE 0 = (SELECT COUNT(PROPERTY_NAME) FROM THEME_IMPL_PROPERTIES WHERE PROPERTY_NAME = 'app.detail.view.contextpath' AND THEMEIMPL = 'hermosa');
insert into THEME_IMPL_PROPERTIES select DISTINCT 'hermosa', 'docs.address', 'https://help.akana.com/content/current/cm/0_intro/index_cm.htm' FROM THEME_IMPL_PROPERTIES WHERE 0 = (SELECT COUNT(PROPERTY_NAME) FROM THEME_IMPL_PROPERTIES WHERE PROPERTY_NAME = 'docs.address' AND THEMEIMPL = 'hermosa');
insert into THEME_IMPL_PROPERTIES select DISTINCT 'hermosa', 'home.dashboard.path', 'home/dashboard' FROM THEME_IMPL_PROPERTIES WHERE 0 = (SELECT COUNT(PROPERTY_NAME) FROM THEME_IMPL_PROPERTIES WHERE PROPERTY_NAME = 'home.dashboard.path' AND THEMEIMPL = 'hermosa');
insert into THEME_IMPL_PROPERTIES select DISTINCT 'hermosa', 'home.email.change.path', 'home/updateemail' FROM THEME_IMPL_PROPERTIES WHERE 0 = (SELECT COUNT(PROPERTY_NAME) FROM THEME_IMPL_PROPERTIES WHERE PROPERTY_NAME = 'home.email.change.path' AND THEMEIMPL = 'hermosa');
insert into THEME_IMPL_PROPERTIES select DISTINCT 'hermosa', 'home.email.change.path.extension', 'home/updateemail?code={email.changecode}&email={email.newEmail}' FROM THEME_IMPL_PROPERTIES WHERE 0 = (SELECT COUNT(PROPERTY_NAME) FROM THEME_IMPL_PROPERTIES WHERE PROPERTY_NAME = 'home.email.change.path.extension' AND THEMEIMPL = 'hermosa');
insert into THEME_IMPL_PROPERTIES select DISTINCT 'hermosa', 'home.forgotpassword.path', 'home/forgotpassword' FROM THEME_IMPL_PROPERTIES WHERE 0 = (SELECT COUNT(PROPERTY_NAME) FROM THEME_IMPL_PROPERTIES WHERE PROPERTY_NAME = 'home.forgotpassword.path' AND THEMEIMPL = 'hermosa');
insert into THEME_IMPL_PROPERTIES select DISTINCT 'hermosa', 'home.forgotpassword.reset.path', 'home/forgotpassword/reset' FROM THEME_IMPL_PROPERTIES WHERE 0 = (SELECT COUNT(PROPERTY_NAME) FROM THEME_IMPL_PROPERTIES WHERE PROPERTY_NAME = 'home.forgotpassword.reset.path' AND THEMEIMPL = 'hermosa');
insert into THEME_IMPL_PROPERTIES select DISTINCT 'hermosa', 'home.forgotpassword.reset.path.extension', 'home/forgotpassword/reset?email={user.email}&resetCode={password.resetcode}' FROM THEME_IMPL_PROPERTIES WHERE 0 = (SELECT COUNT(PROPERTY_NAME) FROM THEME_IMPL_PROPERTIES WHERE PROPERTY_NAME = 'home.forgotpassword.reset.path.extension' AND THEMEIMPL = 'hermosa');
insert into THEME_IMPL_PROPERTIES select DISTINCT 'hermosa', 'home.learnmore.collaborate.path', 'learnmore/app_collaborate_collaboration.htm' FROM THEME_IMPL_PROPERTIES WHERE 0 = (SELECT COUNT(PROPERTY_NAME) FROM THEME_IMPL_PROPERTIES WHERE PROPERTY_NAME = 'home.learnmore.collaborate.path' AND THEMEIMPL = 'hermosa');
insert into THEME_IMPL_PROPERTIES select DISTINCT 'hermosa', 'home.learnmore.golive.path', 'learnmore/app_go_live.htm' FROM THEME_IMPL_PROPERTIES WHERE 0 = (SELECT COUNT(PROPERTY_NAME) FROM THEME_IMPL_PROPERTIES WHERE PROPERTY_NAME = 'home.learnmore.golive.path' AND THEMEIMPL = 'hermosa');
insert into THEME_IMPL_PROPERTIES select DISTINCT 'hermosa', 'home.learnmore.stayinformed.path', 'learnmore/app_stay_informed.htm' FROM THEME_IMPL_PROPERTIES WHERE 0 = (SELECT COUNT(PROPERTY_NAME) FROM THEME_IMPL_PROPERTIES WHERE PROPERTY_NAME = 'home.learnmore.stayinformed.path' AND THEMEIMPL = 'hermosa');
insert into THEME_IMPL_PROPERTIES select DISTINCT 'hermosa', 'home.login.registration.path', 'home/login/{registration.code}' FROM THEME_IMPL_PROPERTIES WHERE 0 = (SELECT COUNT(PROPERTY_NAME) FROM THEME_IMPL_PROPERTIES WHERE PROPERTY_NAME = 'home.login.registration.path' AND THEMEIMPL = 'hermosa');
insert into THEME_IMPL_PROPERTIES select DISTINCT 'hermosa', 'home.signup.invitation.path', 'home/signup/{invitation.code}' FROM THEME_IMPL_PROPERTIES WHERE 0 = (SELECT COUNT(PROPERTY_NAME) FROM THEME_IMPL_PROPERTIES WHERE PROPERTY_NAME = 'home.signup.invitation.path' AND THEMEIMPL = 'hermosa');
insert into THEME_IMPL_PROPERTIES select DISTINCT 'hermosa', 'home.signup.path', 'home/signup' FROM THEME_IMPL_PROPERTIES WHERE 0 = (SELECT COUNT(PROPERTY_NAME) FROM THEME_IMPL_PROPERTIES WHERE PROPERTY_NAME = 'home.signup.path' AND THEMEIMPL = 'hermosa');
insert into THEME_IMPL_PROPERTIES select DISTINCT 'hermosa', 'home.siteadmin.email.change.path.extension', 'home/forgotpassword/reset?email={email.newEmail}&resetCode={email.changecode}' FROM THEME_IMPL_PROPERTIES WHERE 0 = (SELECT COUNT(PROPERTY_NAME) FROM THEME_IMPL_PROPERTIES WHERE PROPERTY_NAME = 'home.siteadmin.email.change.path.extension' AND THEMEIMPL = 'hermosa');
insert into THEME_IMPL_PROPERTIES select DISTINCT 'hermosa', 'signupconfirm.path', 'signupconfirm/{signup.code}' FROM THEME_IMPL_PROPERTIES WHERE 0 = (SELECT COUNT(PROPERTY_NAME) FROM THEME_IMPL_PROPERTIES WHERE PROPERTY_NAME = 'signupconfirm.path' AND THEMEIMPL = 'hermosa');
insert into THEME_IMPL_PROPERTIES select DISTINCT 'hermosa', 'url.path.hash.delimiter', '/#/' FROM THEME_IMPL_PROPERTIES WHERE 0 = (SELECT COUNT(PROPERTY_NAME) FROM THEME_IMPL_PROPERTIES WHERE PROPERTY_NAME = 'url.path.hash.delimiter' AND THEMEIMPL = 'hermosa');
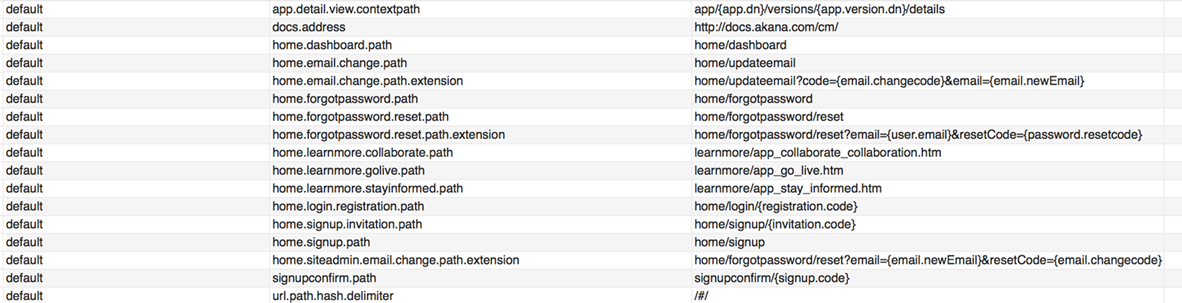
An example of the property/value pairs to update, in the database, is shown below. The three database columns shown below are: THEMEIMPL, PROPERTY_NAME, PROPERTY_VALUE.
Copy these property/value pairs, from Default theme:
And set them up for Hermosa theme (with the value in the THEMEIMPL column set to hermosa):
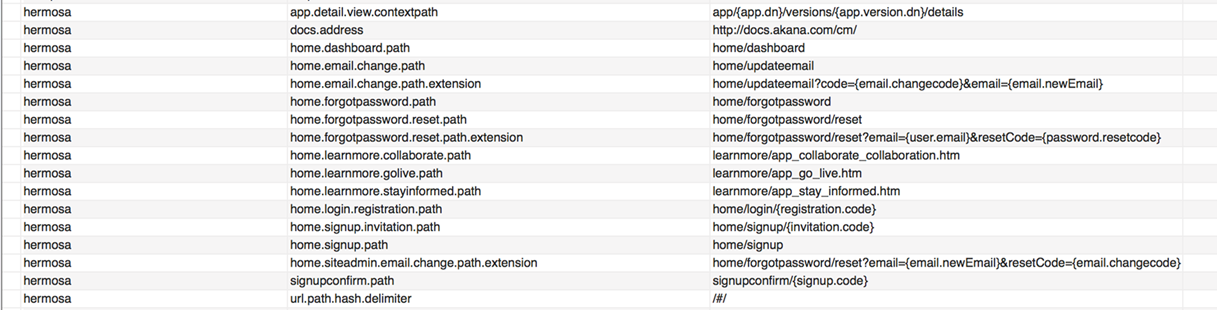
What you are doing is: for each row that has the value default in the first column shown above, the THEMEIMPL column, insert a corresponding row with the THEMEIMPL value set to hermosa.