Example SimpleDev Customization
Note: Simple Dev theme is deprecated in version 2020.2.0, and will be removed in a future release.
This document describes the process of creating the demodev.eap.soa.com branding for the demo tenant. It provides a step-by-step guide for how to create this exact brand, these steps will be pretty much universally applicable. The steps sort of build on each other, and if you skip ahead you may miss some important instructions. But I'm going to give you the option of doing just that by giving you links to some of the main sections below.
On this page:
- Customizing Styles
- Add a new logo Logo
- Replace the Homepage Header
- Replace the Footer
- Change the Style of the homepage header
Customizing Styles
We use a compiled CSS model called Less to manage styles in the product. There are three easy steps for changing styles:
- Download the style template (or a prior customized version of it):
- Log in as a Site Admin and go to the Admin section.
- Go to More > Admin > Customization.
- From the Theme drop-down list, choose the theme.
Important: you MUST make sure you select the theme for which you want to change the styles before you take any of the actions on this page. By far the most common reason for your style changes not taking effect is that you applied them to the wrong theme (and all sort of other badness can happen to your other theme style if you're not careful). Trust me on this, I know.
- If you have not yet performed any customizations then you need to download the template, rename it to custom.less and edit it (basically follow the instructions in the custom styles configuration screens). The template is a very useful document, it explains what all the options are and what they do.
- If you have already applied some customizations then you will need to download the current custom.less file and apply your changes directly to this.
- Edit the custom.less file changing colors, fonts, logo, etc. You can add your own CSS directly to the end of the file and can even override specific styles from the UI if you want to, more on this later (in the section Style of the homepage header, including a treatise on why it's not the best idea and why you should only do it if you really have to.
Note: you have to uncomment any of the parameters in this file in order for your changes to take effect.
- Upload your edited custom.less file. Make sure you have read and followed the Important note above. Uploading a new custom.less file will automatically trigger a style rebuild. There is also an option to manually trigger a new rebuild in case you've done something foolish with your actual style.css file (which you should never touch directly, so I'm not going to tell you where it is, although the curious amongst you will find it really easily).
As usual, to see the results of your change you will need to clear your browser cache and then go and check your site again.
Changing the Logo
Changing the logo is pretty easy. It involves two steps:
- Upload the new logo file. Notes:
- Get an appropriately sized logo. Optimally, a logo for a SimpleDev-based theme would be 228x60px.
- Use the Resources File Manager under More > Admin > File Manager and then choose Resources (make sure you use the Resources File Manager, not the Content File Manager). Browse to Style/images (you might need to create the images folder), and upload your new logo file into that folder. Remember the name you have chosen for this new file.
- Change your custom.less to point to the new logo file - see above for instructions on how to customize styles.
As ever, to see the results of your change you will need to clear your browser cache and then go and check your site again.
Homepage Header
For this branding we want a homepage with no header at all so that we can use a more free-form document structure to layout the message we want.
Note: all other pages will retain the standard header.
The steps are actually pretty easy; just figuring out where to find the source artifacts and where to put the resulting code are the challenging bits. What we're going to do is to replace the default header.ejs with a version that uses some simple if statements to detect if it's dealing with the welcome page, and display something different if it is. This is a useful technique that I'm sure we'll apply elsewhere.
The premise is easy. We'll do this:
- Find the source header.ejs file.
- Access the com.soa.atmosphere.theme.simpledevXXXXX.jar from your repository (e.g. $PRODHOME$/sm70/lib/cm-7.2.0)
- Extract the archive to your file system using your favorite archive (zip) tool
-
Browse through the archive to find the file (in this case - META=INF/resources/SOA/Dev/header/views/header.ejs)
- Note: there will be a header.js (not ejs) file in the header directory. This is not what you're looking for; you need to head on down a level into views to find the .ejs file.
- Note: remember the path where you found your file. You're going to need it later.
- Edit the file appropriately, in this case I'm being a bit aggressive and am taking out the whole thing conditionally, but you can see from the example here how this construct works for more subtle edits:
- Upload the new header.ejs file to the right location using Hermosa theme (or the API).
- You will use the File Manager ( More > Admin > File Manager) as a Site Admin in Hermosa Theme to do this.
Note: yes, you have to use a different theme for this. All the admin for your tenant (including configuring your SimpleDev theme) is done using either Hermosa Theme, whichever one you are using. Admin functions are not available in SimpleDev theme.
- You could use the File Manager and manually recreate the directory structure for all the files uploading changed files as you go. However, assuming you're going to be changing more than one thing, an easier approach is to duplicate the directory structure you need on your local file system, and zip the whole thing whenever you make a change. This will also make it much easier to apply the same set of customizations to more than one tenant or instance. In this case, the easiest approach for me was to create a structure SOA/Dev/header/views and put my new header.ejs file in views. Then I zip up the whole SOA structure, go to More > Admin > File Manager, then choose Resources and click File Manager.
Note: Make sure you're using the File Manager for the Resources structure, not the Content structure. Browse into theme, choose the name of your theme (in my case I have developer on one tenant and simpledev on another), and then upload your newly created zip archive to this location (/resources/theme/developer or /resources/theme/simpledev in my case).
- At this point you will need to clear the browser cache. I'm going to say that again, in caps. CLEAR THE BROWSER CACHE. OK, now you can view your site and you should see your shiny new header.
- You will use the File Manager ( More > Admin > File Manager) as a Site Admin in Hermosa Theme to do this.
In my case I actually need to do something a little different with my header that involves messing with the CSS. For details on how to do this, see below.
Replacing the Footer
Replacing the footer involves replacing the footer.ejs file. The process for finding and replacing this file is the same as for the header, as described in Homepage Header above. In this case you will add your customized file to your local file structure in SOA/Dev/footer/views/footer.ejs.
In most cases replacing the footer will likely be a bit more complex because you will probably also need to drag some styles along with the new footer. In my case I took the complete footer html structures from our corporate site (www.akana.com), this meant bringing along the css sprite image for the social icons, and grabbing all the CSS that drove that. The steps here were:
- Find the footer.ejs file and copy it to the right place in my local file structure so that it would be included in my next zip update.
- This file provides the content of the footer, using the html footer element. In our out of the box SimpleDev theme this will be placed in an unstyled div at the bottom of the page. The default footer is styled by a css class of "soa-ui-cm-footer". I chose to keep this class and its associated styles and drop my content into the middle of this. Essentially I just replaced everything between the opening and closing divs with my content:
<div class="soa-ui-cm-footer">
...
My content in here
...
</div>
- My content made a bunch of references to its own defined css classes, so I had to copy the appropriate section of the www.soa.com CSS into the end of my custom.less file (see Customizing Styles above).
Note: because my original footer was in an HTML div using a id of footer instead of using the html footer element, I had to change all my CSS elements from applying to an id of footer to applying to the element (remove the #). For example:
#footer .credits .social {
  margin-top: 30px;
  text-align: center;
}
to:
footer .credits .social { margin-top: 30px; text-align: center; } - Having made the css changes and uploaded the new custom.less, all you need to do is save your new footer.ejs file, package up your zip archive and upload it as described in Homepage Header above.
Now clear your browser cache and enjoy your elegant custom footer.
Homepage Header with CSS Modifications
I don't like to make things easy for myself, and so simply replacing the content of the header really wasn't enough for me. What I really wanted to do was replace the header with a blank space with just a login button on the top right. I wanted to use the existing login control, which meant I couldn't just go into layout.ejs (more on this in a bit) and remove the header, I needed to change the styles of the header, remove all the things I didn't want in the header, and change the style of the LOGIN control to a button, and make sure all this only happened on the homepage. This is actually quite a bit easier than you might think.
The basic process includes:
- Changing style means adding some new classes to our custom.less file that override specific style instructions and then applying these classes only when we are on a particular page.
For example to override the header background and border we add this to custom.less:
.soa-ui-cm-header-container-welcome {
  background: none;
  border-bottom: none;
}
Which contains instructions from:
.soa-ui-cm-header-container {
  background: #f8f8f8;
  border-bottom: 1px solid #d2d2d2;
}
Because these styles are in custom.less they will appear towards the very bottom of the generated styles and so will if applied to an element will override the default styles.
To apply these new styles selectively on the welcome page I can embed the following in my class definitions for the appropriate elements:
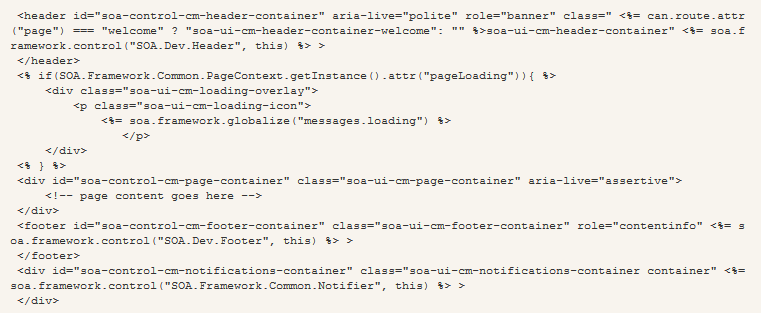
{% raw %}<%= can.route.attr("page") === "welcome" ? "soa-ui-cm-header-container-welcome": "" %>{% endraw %} - The header.ejs file doesn't include its own outer wrapping definition, so to change the style of the full width header we actually need to change a style definition in the primary layout view (layout.ejs).
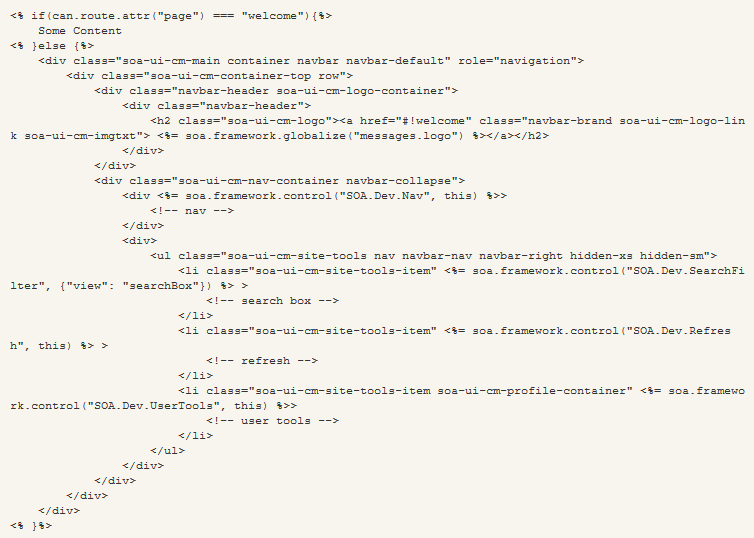
In my case I only want these styles to apply when I'm on the welcome page, so I'm going to use the above class override so that my final layout.ejs ends up looking like this:
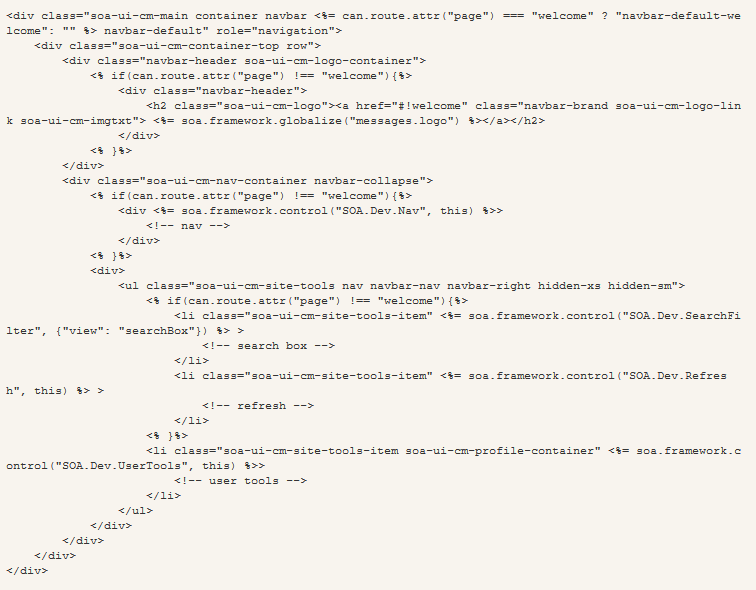
- Removing all the menus from the header, except for the usertools (the login link or profile dropdown is matter of tweaking the header.ejs a little. I'm going to use the same
{% raw %}<% if(can.route.attr("page") !== "welcome"){%>....<% }%>{% endraw %}construct I use in layout, but this time I'm not using an inline form because I'm using it to change more significant pieces of the html structure. There are three occurrences of this in this file; one that takes out the logo, one that takes out the nav links, and one that removes the search bar. I also have an inline instance that overrides the styles of the whole navbar, this adds the following css override which is defined in custom.less:.navbar-default-welcome { background: none; border: none; }The result of all this is a new header.ejs file that looks like:
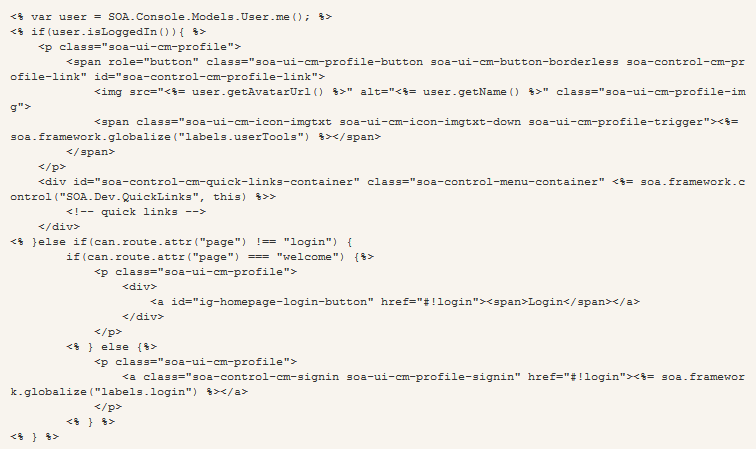
- The last step is to replace the text "Login" link with a nice shiny button. I cheated a bit and browsed through the UI looking for some buttons I liked. I liked the Style of the Login button from the login page, so I just used that. Then I opened up the usertools.ejs file and had at it. While I was at it I decided to remove the element where the product welcomed me, that was annoying. See if you can spot the changes:
And that's it for now.