App Security Options and Setup
It's important to set up authentication for the messages your app sends to an API you’re using. Authentication protects the sender, the receiver, and the message itself. It’s important that the security is strong enough that a third party couldn’t pose as the sender, pose as the receiver, and/or view or change the message content.
Authentication and security are particularly important when money and sensitive personally identifiable information are involved.
Once your app is registered, it's important to set up authentication so that the app can use the API to process messages securely.
This document provides information about the various security options available to you and the steps that you'll need to take to set up the option you choose.
Note: This topic provides information about setting up your app to authenticate with an API hosted on the platform. For implementation information and examples for a specific API you're using, refer to the documentation for that API.
On this page:
- App Security Overview
- HMAC Signature with Shared Secret
- Hash/Digest with Shared Secret
- RSA Signature with PKI
- Reference Notes and Procedures
- Error Codes and Descriptions
App Security Overview
This section provides general information about the security mechanisms available on the platform to provide authentication. It includes:
- Security Mechanisms Available
- Including Token in Request Message
- Token Structure
- Authentication Realm
Security Mechanisms Available
In the platform, as part of setting up your app, you’ll need to choose the security mechanism you’ll use for authentication of your messages. You can choose between these options:
The first two use a Shared Secret value generated by the platform for your app, but use different algorithms for constructing the signature; the last mechanism uses RSA security with public/private key.
Below are some points about the various security mechanisms to help you determine which approach is best for your app.
- All approaches, Shared Secret and RSA, Signature with PKI, are very secure. All use a secret key combined with hashing and encoding, and are sent via HTTPS.
- The Shared Secret approaches are easier to implement since you don't have to generate public and private keys.
- The HMAC Signature with Shared Secret and PKI approaches are a little more secure than Hash/Digest with Shared Secret, although all three approaches are very secure.
- The PKI approach is more complex to implement than Shared Secret approaches since it requires external key generation.
- HMAC Signature with Shared Secret is compatible with the OAuth 1.0 standard. However, this standard is now deprecated (see OAuth Core 1.0 specification)(external site).
- HMAC Signature with Shared Secret offers a library support and examples based on the programming language.
- With all options, F5 to ND hop in DMZ would not cause any problems as the signature is still valid and encrypted.
Note: The platform also supports OAuth 1.0a and OAuth 2.0.
Including Token in Request Message
There are three ways you can include the token in the request message:
- In the Authorization header
- In a cookie. The default name for the cookie is Atmosphere, but the Administrator can change it by modifying the settings for the AtmosphereApplicationSecurityPolicy.
- As query/POST parameters
Token Structure
In order for the platform to recognize your app, you must construct a token and send it with the request message.
The values that make up the token, and the way it's constructed, vary according to the security mechanism you're using. The table below lists all token values and indicates the security mechanisms for which each is valid. The specific values and their sequence depend on the specific security mechanism you choose; the procedures for setting up each security mechanism include exact instructions for constructing the token for that mechanism.
Note: Each value includes a prefix, the value of which is determined by the Site Admin. In the table below, and everywhere in this document, we use a fictitious company name, acmepaymentscorp, for the prefix; for example, acmepaymentscorp_app_id. In your installation it will be some other value; for example, it might be the Tenant ID. If you're not sure what value to use, consult your site administrator.
| Name | Used By | Description |
|---|---|---|
| acmepaymentscorp_app_id | All | The AppID assigned to the app in the platform. |
| acmepaymentscorp_nonce | All |
A random string, uniquely generated for each request. The nonce allows the server to verify that a request has never been made before and helps prevent replay attacks when requests are made over a non-secure-channel. For more information, see Generating a Nonce Value. |
| acmepaymentscorp_secret_digest | Hash/Digest with Shared Secret | A value produced by concatenating the nonce, the timestamp, and the Shared Secret, hashing the combined value using SHA-1, and then Base-64 encoding the result. You can also URL-encode the result, but this isn't required. |
| acmepaymentscorp_signature_method | All |
A value indicating the signature method. Valid values:
|
| acmepaymentscorp_signature | HMAC Signature with Shared Secret, RSA Signature with PKI | The signature value. For information on how the signature value is calculated, see Composing the Signature: HMAC Signature with Shared Secret or Composing the Signature: RSA Signature with PKI. |
| acmepaymentscorp_timestamp | All |
The timestamp of the request, expressed as the number of milliseconds since January 1, 1970 00:00:00 GMT. The timestamp must be a positive integer and must be greater than or equal to the timestamp used in previous requests. For more information, see Generating the Timestamp. |
| acmepaymentscorp_version | All | The platform version. Optional. If present, the value must be 1.0. |
Authentication Realm
Every authentication mechanism offered by the platform includes a specific authentication parameter, realm, that identifies the fact that the message comes from the realm for your app. The realm parameter is optional.
There are two potential scenarios:
- If the incoming message is not signed, the platform expects the AppID and doesn't look for the realm value.
- If the incoming message is signed, the platform looks for the realm parameter. If it exists, the platform uses the same realm value when sending an authentication challenge. If the value isn't specified, the platform uses this value:
realm = "http://atmosphere"
The value for the realm is configured for the platform in the API Gateway by the Administrator (in the Akana Administration Console, Configuration Properties > com.soa.atmosphere.console > security.config.realm).
When constructing the signature, do not include the realm in the signature base string (see later sections for specific instructions).
Note: When you're testing an API with Test Client, the Community Manager developer portal sets the value of the realm parameter automatically; you don't need to set it for Test Client purposes.
For more information about use of the realm parameter in authentication, refer to the Access Authentication Framework section of the HTTP Authentication standard for Basic and Digest Access Authentication.
HMAC Signature with Shared Secret
When you use the HMAC Signature with Shared Secret option, you do not need to send the Shared Secret. You just use it to create the signature.
This approach essentially follows the mechanism laid out in the OAuth 1.0 specification (deprecated; see OAuth Core 1.0 specification).
This section includes:
- Authenticating with HMAC signature: Process Flow
- HMAC Signature with Shared Secret: Header Example
- HMAC Signature with Shared Secret: Signing Requests with the Shared Secret
- Composing the Signature: HMAC Signature with Shared Secret
- Constructing the Signature Base String (HMAC Signature with Shared Secret)
- Signature Base String: Examples (HMAC Signature with Shared Secret)
- Computing the Signature Value (HMAC Signature with Shared Secret)
- Compatibility with OAuth 1.0 (a deprecated standard)
- Java Example: Creating an HMAC Signature with Shared Secret
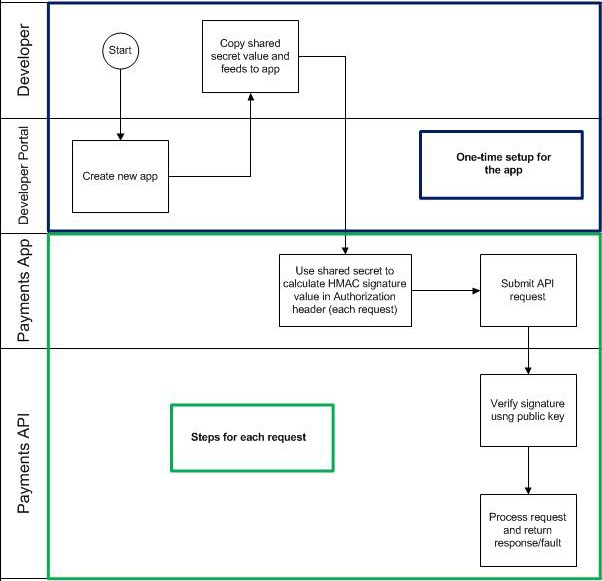
Authenticating with HMAC Signature with Shared Secret: Process Flow
The process flow diagram below shows an overview of API request authentication with HMAC Signature with Shared Secret.
HMAC Signature with Shared Secret: Header Example
If you choose the HMAC Signature with Shared Secret authentication mechanism, your HTTP Authorization header must include the values shown below. For definitions of each value, refer to Token Structure.
- acmepaymentscorp_app_id
- acmepaymentscorp_nonce
- acmepaymentscorp_signature_method
- acmepaymentscorp_signature
- acmepaymentscorp_timestamp
- acmepaymentscorp_version
Below is an example of an Authorization header with app authentication parameters, when you use the HMAC Signature with Shared Secret approach.
Note: The value for the realm is determined by the www-Authenticate header. Make sure the value you set in the Authorization header is correct for your installation. For more information about the realm value, see Authentication Realm.
Authorization: acmepaymentscorp realm="http://acmepaymentscorp",
  acmepaymentscorp_app_id="myplatform-AS0iTmhoGaE6Y9sWhUkvcL6T",
  acmepaymentscorp_nonce="4572616e48616d6d65724c61686176",
  acmepaymentscorp_signature_method="HMAC-SHA1",
  acmepaymentscorp_signature="wOJIO9A2W5mFwDgiDvZbTSMK%2FPY%3D",
  acmepaymentscorp_timestamp="137131200",
  acmepaymentscorp_version="1.0"
HMAC Signature with Shared Secret: Signing Requests with the Shared Secret
The Shared Secret is a binary hashed value, generated within the secure environment of the platform and known only to you and to the platform. For more information, see What is a Shared Secret?
With the HMAC Signature with Shared Secret security mechanism, you do the following:
- Compose the Signature. See Composing the Signature: HMAC Signature with Shared Secret.
- Hash the result using the SHA-1 secure hashing algorithm.
- Encode the hashed value using the Base64 encoding scheme.
- URL-encode the result. For example, you could use the encodeURIComponent() JavaScript function.
- Assign the URL-encoded result as the value for the acmepaymentscorp_signature parameter.
- Send it in the HTTP Authorization message header.
Composing the Signature: HMAC Signature with Shared Secret
The basic process for computing the digital signature is to:
- Construct a Signature Base String based on:
- Request URL
- Request parameters
- POST body parameters (if the POST body is of the URL-encoded type; otherwise the POST body is ignored)
- Apply the hash and signature algorithm against the Signature Based String.
Note: The acmepaymentscorp_signature parameter must be excluded from the Signature Base String.
Constructing the Signature Base String (HMAC Signature with Shared Secret)
The process of constructing the Signature Base String consists of three steps:
- Normalize request parameters: see To normalize request parameters.
- Construct request URL: see To construct the request URL.
- Concatenate request elements: see To concatenate request elements.
For instructions, refer to Constructing the Signature Base String.
Signature Base String: Examples (HMAC Signature with Shared Secret)
Below are two examples of the Signature Base String for HMAC/Shared Secret authentication.
For a POST request:
POST&https://api.com/Payments/Funds&acmepaymentscorp_app_id=myplatform-AS0iTmhoGaE6Y9sWhUkvcL6T&acmepaymentscorp_nonce=1326409129918&
acmepaymentscorp_signature_method=HMAC-SHA1&acmepaymentscorp_timestamp=1326409129918&acmepaymentscorp_version=1.0
For a GET request:
GET&https://api.com/Payments/FundDetails&a=1&acmepaymentscorp_app_id=myplatform-AS0iTmhoGaE6Y9sWhUkvcL6T&acmepaymentscorp_nonce=1326409129918&
acmepaymentscorp_signature_method=HMAC-SHA1&acmepaymentscorp_timestamp=1326409129918&acmepaymentscorp_version=1.0&id=123
Computing the Signature Value (HMAC Signature with Shared Secret)
Once you have the signature base string, the next step is to compute the signature with the AppSecret using the HMAC_SHA1 algorithm.
There are three steps:
- Base64-encode the signature value.
- URL-encode the result into a string.
- Set the string as the value for the acmepaymentscorp_signature parameter.
For example, let's say the value of the signature is:
g682XYDko3%2BqIn0xmFfLTbtGgO%2Fa5vrOOgeJ4iOu0Myx99Pq84triSJLdxVq8KlMcKrJjbd96pEbU3tA2
In this example, the Authorization header would look something like this:
Authorization: acmepaymentscorp realm="http://acmepaymentscorp",
acmepaymentscorp_app_id="myplatform-AS0iTmhoGaE6Y9sWhUkvcL6T",
acmepaymentscorp_nonce="1326409129918",
acmepaymentscorp_signature_method="HMAC-SHA1",
acmepaymentscorp_signature="g682XYDko3%2BqIn0xmFfLTbtGgO%2Fa5vrOOgeJ4iOu0Myx99Pq84triSJLdxVq8KlMcKrJjbd96pEbU3tA2",
acmepaymentscorp_timestamp="1326409129918",
acmepaymentscorp_version="1.0"
Compatibility with OAuth 1.0 (a deprecated standard)
HMAC Signature with Shared Secret is compatible with the OAuth 1.0 standard. However, this standard is now deprecated (see OAuth Core 1.0 specification).
Java Example: Creating an HMAC Signature with Shared Secret
Below is an example of how to create an HMAC signature with Shared Secret in Java.
  // get an hmac_sha1 key from the raw key bytes
SecretKeySpec signingKey = new SecretKeySpec(secKey.getBytes(), "HmacSHA1");
  // get an hmac_sha1 Mac instance and initialize with the signing key
Mac mac = Mac.getInstance("HmacSHA1");
mac.init(signingKey);
  // compute the hmac on input data bytes
byte[] rawHmac = mac.doFinal(signatureBaseString.getBytes());
  // base64-encode the hmac
String resultSignature = org.apache.commons.codec.binary.Base64.encodeBase64String(rawHmac);
Hash/Digest with Shared Secret
The Shared Secret is a binary hashed value, generated within the secure environment of the platform and known only to you and to the platform. For more information, see What is a Shared Secret?
With the Hash/Digest with Shared Secret security mechanism, you do the following:
- Combine the Shared Secret with two other values.
- Hash the result using the SHA-1 secure hashing algorithm.
- Encode the hashed value using the Base64 encoding scheme.
- Optional: You can also URL-encode the result, but this isn't required.
- Assign the result as the value for the acmepaymentscorp_secret_digest parameter.
- Include this parameter in the HTTP Authorization message header.
The API verifies each incoming request using the Shared Secret.
More information about the shared secret approach is given in these sections:
- Authenticating with the Hash/Digest with Shared Secret: Process Flow
- Sample Header With Authorization Parameters (Hash/Digest with Shared Secret)
- Hashing With the SHA-1 Secure Hash Algorithm
- Encoding the base string into bytes
- Java Example: Creating a Shared Secret Hash
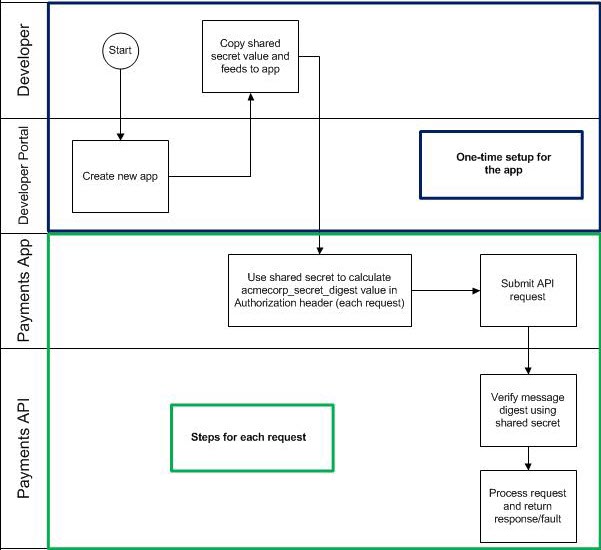
Authenticating with the Hash/Digest with Shared Secret: Process Flow
The process flow diagram below shows an overview of API request authentication with the shared secret security mechanism.
Sample Header With Authorization Parameters (Hash/Digest with Shared Secret)
If you choose the Hash/Digest with Shared Secret authentication mechanism, your HTTP Authorization header must include the values shown below. For definitions of each value, refer to Token Structure.
- acmepaymentscorp_app_id
- acmepaymentscorp_nonce
- acmepaymentscorp_secret_digest
- acmepaymentscorp_signature_method
- acmepaymentscorp_timestamp
- acmepaymentscorp_version
Below is an example of an Authorization header with app authentication parameters, when you use the Hash/Digest with Shared Secret approach. The sequence of the parameters isn't significant, but all parameters must be present with valid values.
Note: The value for the realm is determined by the www-Authenticate header. Make sure the value you set in the Authorization header is correct for your installation. For more information about the realm value, see Authentication Realm.
Authorization: acmepaymentscorp realm="http://acmepaymentscorp",
  acmepaymentscorp_app_id="development-AS0iTmhoGaE6Y9sWhUkvcL6T",
  acmepaymentscorp_nonce="1326409129918",
  acmepaymentscorp_secret_digest="wOJIO9A2W5mFwDgiDvZbTSMK%2FPY%3D",
  acmepaymentscorp_digest_method="SHA1",
  acmepaymentscorp_timestamp="1326755565940",
  acmepaymentscorp_version="1.0"
Hashing With the SHA-1 Secure Hash Algorithm
SHA-1 is a cryptographic hash function, broadly used and trusted.
When you hash a value with SHA-1, the hash function returns a 160-bit string. This is the message digest. The value is hashed and sent with the message; at the receipt point, the value is hashed again, and the two hash values are compared. When the two hash values match, it is a secure, reliable indication that the message hasn't changed; the message at the receipt point is an accurate duplication of the message at the send point.
If you're using the Shared Secret security mechanism, you concatenate the nonce, the timestamp, and the Shared Secret, and then you hash that combined value using SHA-1. You then encode the result, and send it in the message header as the value for the acmepaymentscorp_secret_digest parameter.
The formula for computing the hash is:
acmepaymentscorp_secret_digest = Base64 ( SHA-1 ( nonce + created + AppSecret ) )
Below is an example of a hashed base string:
1326409129918+1326755565940+2d9d42b42a4e2abc1fa5489d5081e03b95818ffd
Encoding the base string into bytes
When you concatenate the nonce, timestamp, and app secret into a base string to be hashed, you'll need to make sure the concatenated value is a byte value before hashing. The hashing algorithm requires the input parameter to be in bytes. Depending on your app, you might need to use encoding to get a byte value. If so, use UTF-8 encoding.
Below is an example using Java.
MessageDigest md = MessageDigest.getInstance("SHA1");
md.update(baseString.getBytes("UTF-8")); or
md.update(baseString.getBytes());
String digest = encodeAsBase64String(md.digest());
Note: The example above is part of a larger Java sample for a specific API. For more information, refer to the implementation examples for the API you're using.
Java Example: Creating a Shared Secret Hash
Below is an example of how to create the acmepaymentscorp_secret_digest value in Java.
  //Use the shared secret of app on file
String sharedSecret = "1008877afabf32efb31f9c974dbeaa688bed0769";
  // Generate the nonce value
Import java.security.SecureRandom:
Random rand = SecureRandom.getInstance ("SHA1PRNG");
long nonce = rand.nextLong();
  // Get the timestamp in milliseconds
long timestamp = System.currentTimeMillis();

  // Concatenate the nonce, timestamp, and Shared Secret
String baseString = String.valueOf(nonce) + String.valueOf(timestamp) + sharedSecret;
  // Hash the concatenated value into a message digest using SHA-1
MessageDigest md = MessageDigest.getInstance("SHA1");
md.update(baseString.getBytes());
  // Encode the message digest using Base-64 encoding
String digest = encodeAsBase64String(md.digest());
RSA Signature with PKI
When you register your app in the platform, you can set up app security in the Security Credentials section of the app's Details page.
If you want to use Public Key Infrastructure (PKI) for secure message signing, click the button to choose Public Key Integration. You'll need to get a public/private key pair and upload the public key to the platform, as explained later in this document. In the custom app code you will sign the API requests using the private key. The API verifies each incoming request using the public key.
More information about authenticating with PKI is given in these sections:
- Authenticating with PKI: Process Flow
- Generating a Public/Private Keypair
- Sample Headers (PKI Approach)
- Signing Requests with Private Key
- Composing the Signature: RSA Signature with PKI
- Constructing the Signature Base String (PKI Approach)
- Signature Base String: Example (PKI Approach)
- Signing the Signature Base String and Encoding the Signature (PKI Approach)
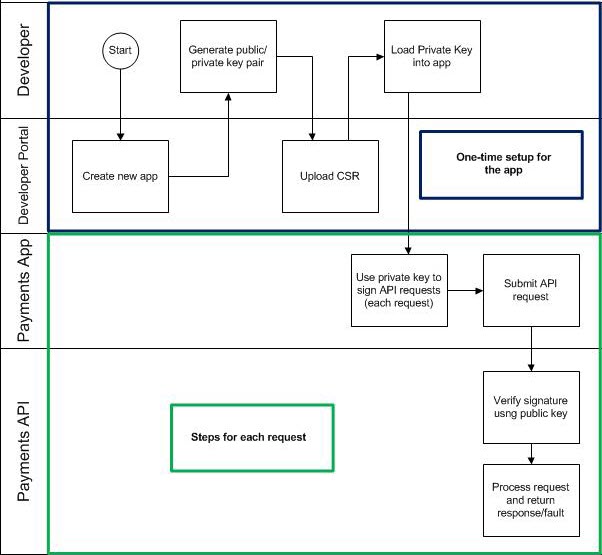
Authenticating with PKI: Process Flow
The process flow diagram below shows an overview of API request authentication with PKI.
Generating a Public/Private Keypair
The first step is to generate the public/private keypair for your app.
For a detailed example, refer to Generating PKI Key Pair with Certificate Using OpenSSL later in this document.
Sample headers (PKI approach)
This section gives some sample headers, including:
- Sample header with authorization parameters (PKI approach)
- Sample header without authorization parameters (PKI approach)
Sample header with authorization parameters
Below is an example of an Authorization header with app authentication parameters. Make sure you list the parameters in the sequence shown below.
Note: The value for the realm is determined by the www-Authenticate header. Make sure the value you set in the Authorization header is correct for your installation. For more information about the realm value, see Authentication Realm.
Authorization: realm="http://acmepaymentscorp",
  acmepaymentscorp_app_id="acmepaymentscorp-7FSXeNRkVRJ8XtAurgaea65R",
  acmepaymentscorp_nonce="1323732744354",
  acmepaymentscorp_signature_method="SHA1withRSA",
  acmepaymentscorp_signature="wOJIO9A2W5mFwDgiDvZbTSMK%2FPY%3D",
  acmepaymentscorp_timestamp="1323732744354",
  acmepaymentscorp_version="1.0"
Sample header without authorization parameters
Below is an example of an Authorization header for an API that doesn't require authentication.
Authorization: realm="http://acmepaymentscorp",
acmepaymentscorp_app_id="http://www.acmepaymentscorp.com/app/101",
acmepaymentscorp_signature_method="NONE"
Note: In case the client, such as an Ajax client in the browser or an Android app, cannot set the HTTP Authorization header, you can set the required parameters in the HTTP query string.
Signing Requests with Private Key
The signature process for signing the request with private key follows a similar approach to the OAuth 1.0 standard. The platform uses an HTTP Extension header to support its app authentication scheme. The name of this extension header is configurable; the examples in this document use a fictitious value, acmepaymentscorp. The extension header uses the standard HTTP Authorization header and WWW-Authenticate response header to pass app-related authentication parameters. The HTTP query string can also be used to pass authentication data for cases where the app cannot directly manipulate HTTP headers.
WWW-Authenticate header
API providers can indicate their support for the extension by returning the HTTP WWW-Authenticate header in response to app requests for protected resources. Below is an example:
WWW-Authenticate: acmepaymentscorp realm="http://acmepaymentscorp"
Authorization header
Apps should send their credentials in the HTTP Authorization header. If you choose the Public Key Integration approach for your app security, your HTTP Authorization header must include the values shown below.
Important: The sequence of the header attributes is critical and must exactly match the order below.
- acmepaymentscorp_app_id
- acmepaymentscorp_nonce
- acmepaymentscorp_signature_method
- acmepaymentscorp_signature
- acmepaymentscorp_timestamp
- acmepaymentscorp_version
Composing the Signature: RSA Signature with PKI
When using the RSA Signature with PKI authentication approach, there are several steps to composing the signature:
- Constructing the Signature Base String (PKI Approach)
- Signing the Signature Base String and Encoding the Signature (PKI Approach)
Constructing the Signature Base String (PKI Approach)
The first step in composing the digital signature is to create the content. Once that's done, the data is signed using the signature algorithm.
Note: The acmepaymentscorp_signature parameter must be excluded from the Signature Base String.
The process of constructing the Signature Base String consists of three steps:
- Normalize request parameters: see To normalize request parameters.
- Construct request URL: see To construct the request URL.
- Concatenate request elements: see To concatenate request elements.
For instructions, refer to Constructing the Signature Base String.
Signature Base String: Example (PKI Approach)
Below is an example of the Signature Base String when using the RSA with PKI approach.
POST&https://api.sandbox.yoursandbox.com/APIName/Payment/v1/MethodName
&acmepaymentscorp_app_id=acmepaymentscorp-7FSXeNRkVRJ8XtAurgaea65R
&acmepaymentscorp_nonce=1323732744354&acmepaymentscorp_signature_method=SHA1withRSA
&acmepaymentscorp_timestamp=1323732744354&acmepaymentscorp_version=1.0
Signing the Signature Base String and Encoding the Signature (PKI Approach)
Once the Signature Base String is constructed, the next step is signing:
- Use the SHA-1 algorithm to generate the hash of the Signature Base String.
- Sign the hashed value using the private key of the app.
- Base64-encode the signature value. For instructions, see Encoding with the Base64 Encoding Scheme.
Note: Base64 encoding should not include the CRLF (carriage return/line feed) every 72 characters which is part of strict Base64 encoding. Instead, the whole Base64 encoded string should be without line breaks.
- Optionally, URL-encode the result into a string.
- Set the string as the value for the acmepaymentscorp_signature parameter.
Reference Notes and Procedures
This section includes overview information about the authentication process and specific details and procedures about aspects of the process of composing the signature. It includes:
- Generating the Timestamp
- Generating a Nonce Value
- Constructing the Signature Base String
- Generating PKI Key Pair with Certificate Using OpenSSL
- Java Developers: Generating a Keystore and CSR with the JDK Keytool
- Encoding with the Base64 Encoding Scheme
- What If the Private Key or Shared Secret Is Compromised?
Generating the Timestamp
The timestamp of the request is sent in the message header, for both Shared Secret and PKI security mechanisms. In the Shared Secret mechanism it is also used in creating the Secret Digest.
The timestamp must be in Unix epoch time, expressed as the number of milliseconds since January 1, 1970 00:00:00 GMT. The timestamp must be a positive integer and must be greater than or equal to the timestamp used in previous requests. In most implementations, the timestamp is taken from the host server. It's important that the timestamp in the message is accurate; if the timestamp is off, the message might be rejected.
For more information on Unix epoch time, and examples of implementation of the timestamp in different programming languages, see http://www.epochconverter.com (scroll down).
A Java example of generating the timestamp is shown below.
  // Get the timestamp in milliseconds
long timestamp = System.currentTimeMillis();
Generating a Nonce Value
A nonce is a random string that is uniquely generated for each request. The nonce allows the API providers to verify that a request has never been made before. A nonce is sent in the message header for both Shared Secret and PKI security mechanisms. In the Shared Secret mechanism, the same nonce value sent in the message header is also used in creating the Secret Digest.
The way you create the nonce will depend on your development environment. Most programming languages include a method for creating a nonce. Below is an example of generating a nonce value in Java:
  // Generate the nonce value
Import java.security.SecureRandom:
Random rand = SecureRandom.getInstance ("SHA1PRNG");
long nonce = rand.nextLong();
Constructing the Signature Base String
Constructing a Signature Base String is part of the app security implementation for two approaches:
This process includes the steps listed below:
- Normalize request parameters: see To normalize request parameters below.
- Construct request URL: see To construct the request URL below.
- Concatenate request elements: see To concatenate request elements below.
To normalize request parameters
Collect the request parameters, sort them, and concatenate them into a normalized string.
Parameters to include:
- All parameters in the acmepaymentscorp HTTP Authorization header except the realm parameter which must not be included.
- Parameters in the HTTP POST request body (with a content-type of application/x-www-form-urlencoded).
- HTTP GET parameters added to the URLs in the query part.
Note: The acmepaymentscorp_signature parameter MUST be excluded.
Normalize the parameters into a single string following the steps below:
- Sort by parameter name, using lexicographical byte value ordering. If two or more parameters share the same name, sort by value. For example:
a=1, c=hi%20there, f=25, f=50, f=a, z=p, z=t
- When parameters are sorted, concatenate them into a single string. For each parameter, separate the name from the corresponding value by an equals (=) character (ASCII code 61), even if the value is empty. Each name-value pair is separated by an ampersand (&) character (ASCII code 38). For example:
a=1&c=hi%20there&f=25&f=50&f=a&z=p&z=t
To construct the request URL
The Signature Base String includes the absolute URL for the request, tying the signature to a specific endpoint. The URL used in the Signature Base String:
- Must include the scheme, authority, and path.
- Must exclude the query and fragment.
If the absolute request URL is not available to the API Provider (it is always available to the Application), it can be constructed by combining these three things:
- The scheme being used
- The HTTP Host header
- The relative HTTP request URL
URL scheme and authority must be lowercase and must include the port number.
Note: HTTP default port 80 and HTTPS default port 443 must be excluded.
For example, this request:
http://example.com:80/resource?id=123
Would be included in the Signature Base String as:
http://example.com/resource
To concatenate request elements
The following items must be concatenated in order into a single Signature Base string. Each item is encoded and separated by an ampersand (&) character (ASCII code 38), even if empty.
- The HTTP request method used to send the request. Value must be uppercase, for example: POST, GET, PUT.
- The request URL.
- The normalized request parameters string. Note that the acmepaymentscorp_signature parameter, scheme, and realm are excluded.
Once you've created the Signature Base String, the next step is to compute the signature. Depending on the approach you're using, refer to the applicable next step:
- Computing the Signature Value (HMAC Signature with Shared Secret)
- Signing the Signature Base String and Encoding the Signature (PKI Approach)
Generating PKI Key Pair with Certificate Using OpenSSL
You can use the OpenSSL open source product to produce a public/private key pair. For more information on OpenSSL, refer to www.openssl.org.
To create a public/private key pair with OpenSSL
- From the URL given above, download the applicable openssl archive file for your operating system.
- Unzip the contents to a folder; for example, C:\openssl.
- Launch the command-line utility cmd.exe.
- Change location to the folder referenced in step 2; for example, cd c:\openssl.
- To get a certificate, do one of the following:
- Submit the certificate request (csr.csr) generated in the previous step to a certificate authority. The certificate authority will issue you an X.509 certificate. See To get a certificate issued by a certificate authority.
- Generate a self-signed certificate along with a public/private key pair. See To generate a self-signed certificate.
- Upload the certificate file, the result of either of the procedures above, to the Akana API Platform.
The keypair and certificate generation process includes the files shown below.
| File name | Key type | Comments |
|---|---|---|
| privatekey.key | private key |
Make sure you save a copy of the private key in a safe place. If you lose this key you will need to generate a new key pair. You will sign your request using the private key. For more information, see Composing the Signature: RSA Signature with PKI. |
| csr.csr | certificate signing request | Submit this to a Certificate Authority. When you get a certificate in response (see mycert.cer below), upload it to the Akana API Platform. |
| mycert.cer | X.509 cert (public key) | Upload this file to the Akana API Platform. The API uses this file for signature verification on your app's API calls. |
To get a certificate issued by a certificate authority
- Follow steps 1-4 of To create a public/private key pair with OpenSSL.
- At the command prompt, cut and paste or type the following:
C:\openssl>bin\openssl req -config openssl.cnf -out csr.csr -newkey rsa:2048 -keyout privatekey.key
- Enter data for the prompts that appear.
Note: Anything with an empty bracket set [] is not required.
Below is an example of what you might see in the command-line window.
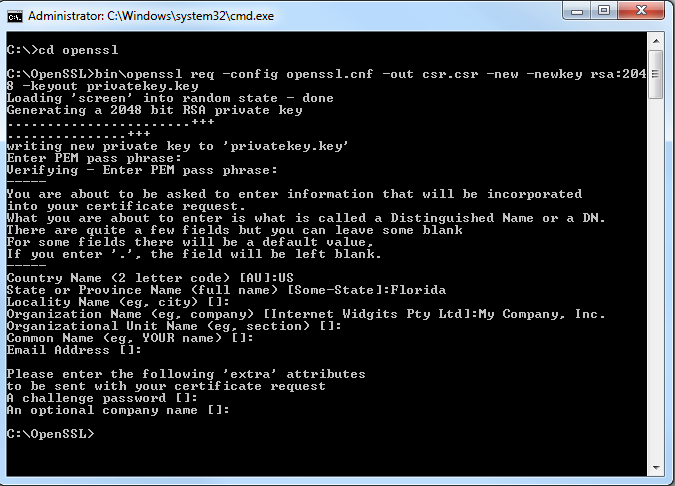
This process creates your public/private key pair and a certificate signing request (csr.csr file) in the c:\openssl folder.
- Submit the csr.csr file to a certificate authority. The certificate authority will issue you an X.509 certificate.
- Upload the certificate file to the Akana API Platform.
To generate a self-signed certificate
- Follow steps 1-4 of To create a public/private key pair with OpenSSL.
- At the command prompt, cut and paste or type the following:
C:\openssl>bin\openssl req -config openssl.cnf -out mycert.cer -x509 -newkey rsa:2048 -keyout privatekey.key
- Enter data for the prompts that appear. This process generates a self-signed X.509 certificate (mycert.cer).
Below is an example of what you might see in the command-line window.
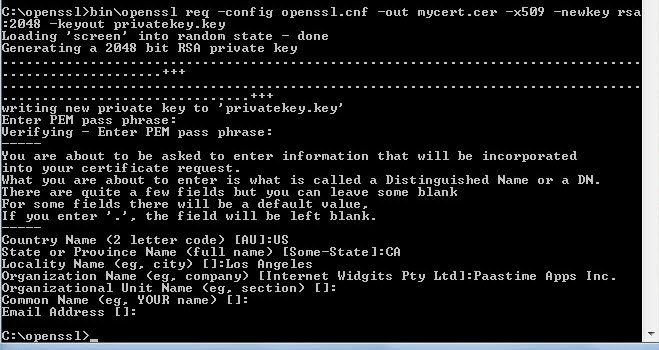
Note: Anything with an empty bracket set [] is not required.
- Upload the mycert.cer file to the Akana API Platform.
Java Developers: Generating a Keystore and CSR with the JDK Keytool
If you are a Java developer and have worked with cryptography in Java, you might be familiar with the concept of a keystore. A keystore is a file used to store and deploy certificates and private keys in a single package. You can create a keystore using OpenSSL as explained above. However, as a Java developer, it is probably far more convenient to use keytool, a key and certificate management utility that's distributed as part of the Java Development Kit (JDK).
You can use keytool to create both the keystore and the CSR associated with the private key in the keystore. Once you've created your CSR, you upload it to the platform just like any other CSR. Your Java code reads your private key, used for signing the base string used in API request headers, from the keystore file you create.
Since the keytool utility is part of the JDK, you don't have to download anything to create your Java keystore. Just follow the steps below.
Note: The procedure below assumes that your JDK bin directory is in your Windows system path.
To create a Java keystore using the keytool utility
- Open a command prompt.
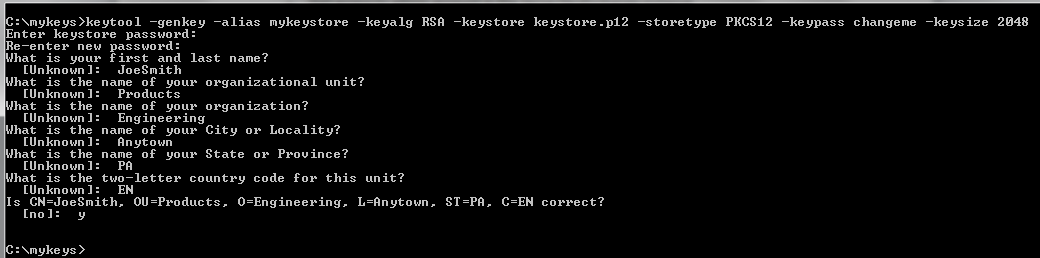
- Create the keystore file by typing the following:
keytool -genkey -alias <keystorealias> -keyalg RSA -keystore <keystore_filename>.p12 -storetype PKCS12 -keypass <password> -keysize 2048
- Create the CSR associated with the keystore created in step 2 by typing the following:
keytool -certreq -alias <keystorealias> -keystore <keystore_filename>.p12 -file <csr_filename>.csr -storetype PKCS12
The illustration below shows the steps to create a keystore called keystore.p12 with an alias of mykeystore and the password changeme.
The illustration below shows how to create a CSR called csr.csr from keystore.p12.

Note: For implementation examples, check the authentication documentation for the specific API you're using.
IMPORTANT: Upload the file CSR.csr to the portal.
Encoding with the Base64 Encoding Scheme
The Base64 encoding scheme converts binary data into an ASCII string. Encoding turns it into ASCII string format. It's common practice to encode data to make sure it remains intact without modification during transport by HTTP or HTTPS.
As part of setting up your app security, you'll need to encode the values shown below.
If you're using the Shared Secret method with hash/digest, you must encode the binary hash value that you created using the SHA-1 secure hash algorithm; if you're using HMAC or RSA signature, you'll need to encode the signature.
Whether you are sending a hash or a signature, you'll need to convert the binary data to ASCII to be sent in the request message, using the Base64 encoding scheme.
| If you are using this security mechanism... | Encode these parameters... |
|---|---|
| HMAC Signature with Shared Secret |
acmepaymentscorp_signature |
| Hash/Digest with Shared Secret |
acmepaymentscorp_secret_digest |
| RSA Signature with PKI |
acmepaymentscorp_signature |
What If the Private Key or Shared Secret Is Compromised?
If for any reason you know or suspect that your app's Shared Secret or private key might have been compromised, you must replace with a new one immediately. You can generate a new Shared Secret in the platform; you must get a new private key from the issuing authority. Follow the applicable procedure below.
To generate a new Shared Secret
- Go to App Details > Security Credentials.
- Click Regenerate Key.
- Copy the new key and use it in your app in place of the old one.
Note: It might take up to five minutes for the new key to take effect. During that time, messages sent using the new key will fail. It's best to wait for five minutes before sending messages with the new key.
To update your private key
- Generate a new keypair.
- Update:
- Upload the new key to the platform.
- Update your app to use the new key.
- Test.
Error Codes and Descriptions
If there's a problem with your HTTPS header, you might see one of the error messages shown below.
| Code | Description |
|---|---|
| 1010701 | Required HTTP header parameter missing. [{0}] |
| 1010702 | One or more invalid HTTP header parameters. |
| 1010703 | Invalid Nonce. The value of the acmepaymentscorp_nonce field has already been used. |
| 1010704 | Invalid timestamp. The value of the acmepaymentscorp_timestamp field is out of range. |
| 1010705 | Signature or digest algorithm is not supported. [{0}] |
| 1010706 | Signature or digest verification failed. |
| 1010707 | Missing nonce. The acmepaymentscorp_nonce field value is required. |
| 1010708 | Unable to verify signature. There is no public key associated with the app. |
| 1010709 | Authentication scheme is invalid or missing. |
| 1010710 | Invalid AppID. The value [{0}] in the acmepaymentscorp_app_id field is invalid or missing. |
| 1010711 | Unable to verify signature. There is no shared secret associated with the app. |
| 1010712 | Invalid timestamp. Timestamp must be Unix epoch time in milliseconds. |