Admin Console Tasks List (2022.1.0)
Learn about the options available on the Tasks list, in the redesigned Admin Console user interface in 2022.1.0.
Note: This document shows configuration tasks in the redesigned Admin Console user interface, which is available as an option in version 2022.1.0. For more information about the full list of configuration tasks in the traditional Admin Console user interface, see Using Configuration Actions. For configuration actions that are part of installation, go to Installing the Akana API Platform and open the installation instructions file. For information on how to log in to the new Admin Console user interface, see Logging In.
Valid in Version: 2022.1.0 and later
Table of Contents
- Introduction
- Tasks > All tab
- Tasks > Pending tab
- Full list of tasks
- Locating tasks on the list
- Locating back-end values
Introduction
As part of the installation process, in the redesigned Admin Console user interface, you can go to the Tasks menu option to run any pending installation tasks.
This document includes:
- An example of the All tasks list.
- An example of the Pending tasks list.
- A full list of tasks.
- In some cases, links to additional information about the task.
Note: Most tasks were available in earlier versions of the product. Some of the documentation files include navigation instructions and screen captures for earlier versions of the product. In the Admin Console you should easily be able to locate the same task in either user interface. If in doubt, if you're looking at instructions for the earlier user interface and are not sure of the navigation for the new UI, refer to Admin Console 2022.1.0—Overview.
For instructions on logging in to the redesigned Admin Console user interface, see Logging In in the Admin Console 2022.1.0 overview doc.
Tasks > All tab
An example of the All tasks list is below.
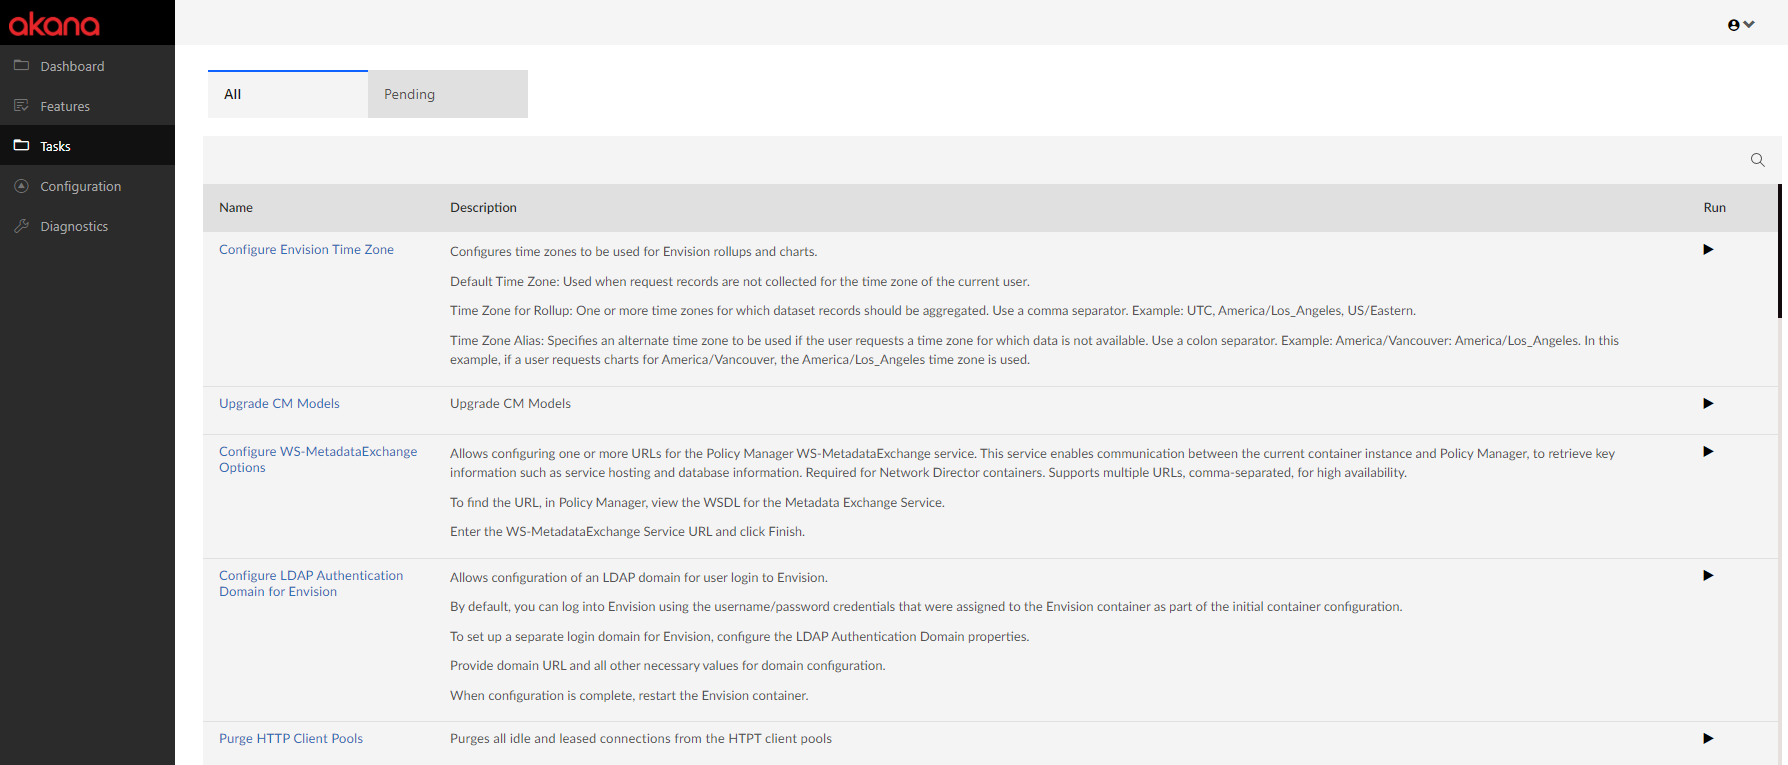
To quickly locate a specific task on the list, use the Search bar. See Locating tasks on the list.
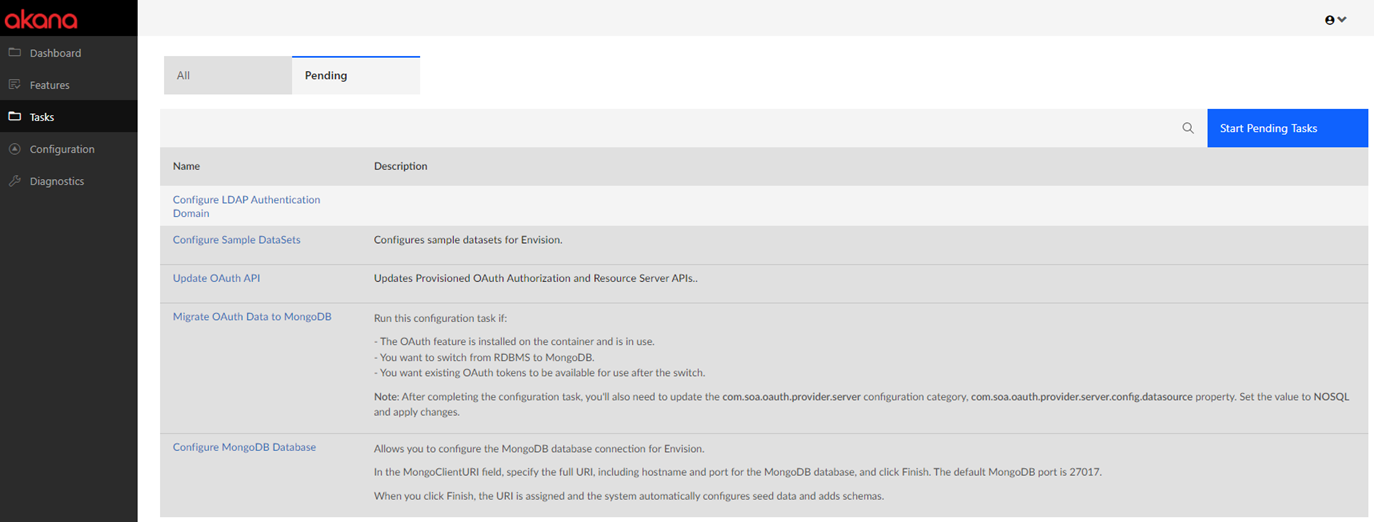
Tasks > Pending tab
At certain points during installation, tasks appear on the Pending tasks list. An example is shown below.
Full list of tasks
The table below includes a full list of tasks and their descriptions. In the Admin Console, in some instances, tasks only appear on the list if a separate installation ZIP file is applied.
To quickly locate a specific task on the list in the Admin Console user interface, use the Search bar.
Note: The list below is alphabetical.
| Feature | Description |
|---|---|
| Configure Envision Time Zone |
Configures time zones to be used for Envision rollups and charts.
See also: Configure Envision Time Zone (Envision only) in the Using Configuration Actions doc. |
| Add Container Listener |
Adds a listener to a container. See also: About Listeners. |
| Add Container to Cluster |
Add a managed container to a local cluster. See also: Add Container to Cluster in the Managing Containers doc. |
| Add Database |
Specifies the database to be used for the current container configuration. Containers in the same installation share the same database.
See also: Add Database in the Using Configuration Actions doc. |
| Configure CA SiteMinder Security Provider Options |
Allows CA SiteMinder configuration on the SiteMinder Security Provider Options page. Specify the file system location where the SiteMinder Web Agent product has been installed on the server for the current container. Installation of the CA SiteMinder Web Agent is required before installing and using the CA SiteMinder Security Provider. Specify the Web Agent Install Path (required) and click Finish, then restart the container to fully activate the CA SiteMinder Security Provider. For more information on CA SiteMinder, see CA SiteMinder/Policy Manager TOC. |
| Configure Database Schema |
Deploys database schemas for any installed features. |
| Configure Elasticsearch Global Configuration |
On this page you can set up or edit all the basic values that will apply to the Elasticsearch configuration across your entire implementation. For Deployment Mode, choose REST Client. REST Client mode: Define the Elasticsearch HTTP URLs. URLs may be a comma-delimited list. See also: Configure Elasticsearch Global Configuration in the Using Configuration Actions doc. |
| Configure External Keystore |
Allows you to configure an external keystore that will be used to store and manage Policy Manager PKI keys and certificates. If encryption is turned on, Policy Manager attaches the alias, and Network Director gets the private key from the external keystore using the alias provided by Policy Manager. If encryption is off, Policy Manager attaches the encrypted private key directly to the WSDL. For HSM, encryption is required. For other encryption engines, such as Sun JCE, encryption can be on or off. Specify the provider name and keystore type, location, and password, and then specify the encryption option. When done, click Finish. See also: Configure External Keystore Options. |
| Configure Kafka Brokers for Auditing |
Configures a Kafka Broker for usage monitoring. Bootstrap servers: One or more bootstrap servers, including hostname and port. Use a comma separator. Example: hostname1:port1,hostname2:port2. Only available when Kafka-related features are installed. See also: Configure Kafka Brokers for Auditing in the Using Configuration Actions doc, Using Kafka. |
| Configure LDAP Authentication Domain for Envision |
Allows configuration of an LDAP domain for user login to Envision. By default, you can log into Envision using the username/password credentials that were assigned to the Envision container as part of the initial container configuration. To set up a separate login domain for Envision, configure the LDAP Authentication Domain properties. Provide domain URL and all other necessary values for domain configuration. When configuration is complete, restart the Envision container. See also: Configure LDAP Authentication Domain (Envision only) in the Using Configuration Actions doc. |
| Configure MongoDB Database |
Allows you to configure the MongoDB database connection for Envision. In the MongoClientURI field, specify the full URI, including hostname and port for the MongoDB database, and click Finish. The default MongoDB port is 27017. When you click Finish, the URI is assigned and the system automatically configures seed data and adds schemas. See also: Configure MongoDB Database (Envision only) in the Using Configuration Actions doc. |
| Configure Sample Datasets |
Configures sample datasets for Envision. See also: Configure Sample Datasets (Envision only) in the Using Configuration Actions doc. |
| Configure SMTP Server Settings |
Configure SMTP server settings. |
| Configure WS-MetadataExchange Options |
Allows configuring one or more URLs for the Policy Manager WS-MetadataExchange service. This service enables communication between the current container instance and Policy Manager, to retrieve key information such as service hosting and database information. Required for Network Director containers. Supports multiple URLs, comma-separated, for high availability. To find the URL, in Policy Manager, view the WSDL for the Metadata Exchange Service. Enter the WS-MetadataExchange Service URL and click Finish. See also: Configure WS-MetadataExchange Options in the Using Configuration Actions doc. |
| Create a CM Tenant |
Add a tenant to Community Manager. |
| Create a CM Tenant Theme |
Add a Community Manager tenant theme. |
| Force Configuration Refresh |
Forces the container to reconfigure itself with updated configuration information from Policy Manager. The container periodically polls for configuration changes, but this task initiates an immediate configuration refresh. Refresh from Startup: Forces the container to refresh its configuration as it normally would at startup. All configuration information for the container is retrieved from Policy Manager. Refresh from Date: Forces the container to refresh its configuration only with changes since the specified date. For example, if the Refresh from Date value is five minutes earlier than the current time, all changes in the last five minutes are retrieved from Policy Manager. See also: Force Configuration Refresh in the Using Configuration Actions doc. |
| Initialize Repository Database |
Initialize the database. If necessary, a data upgrade will occur. Please wait for this process to complete, as cancelling the operation could cause data consistency problems. In the case of an Oracle database, providing the admin credentials allows granting of additional privileges, needed for maintaining text indexes, to the application user. See also: Initialize Repository Database in the Using Configuration Actions doc. |
| Install Configuration Data and Indexes in MongoDB |
The "Install MongoDB Collections" screen will install documents and index collections that are needed by the product when using MongoDB. See also: Install Configuration Data and Indexes in MongoDB in the Using Configuration Actions doc. |
| Manage Admin Console Administrator |
Allows update of the credentials for the Administrator for the Admin Console, including username and password. Old password is required to update the credentials. You can update username, password, or both. See also: Manage Admin Console Administrator in the Using Configuration Actions doc. |
| Manage Container Identity |
Allows you to configure the private key and certificate for the container when communicating with a governance console. In the Manage PKI Keys Wizard, the PKI Keys Details section displays the public key that has been generated and assigned to the object, if any. The Certificate Details section displays a summary of information for the certificate assigned to the current object, if any. Assigned certificates can be generated or imported using this wizard. Certificate information presented includes Subject DN, Issuer DN, Serial Number, Effective Date, and Expiration Date. The Key Management Options section provides functions for performing key and certificate management for the current object. You can generate, import, export, and/or delete, depending on the objects current configuration state. Make a selection in the Key Management Options section and then click Next to continue. See also: Manage PKI Keys in the Using Configuration Actions doc, also Configure External Keystore Options. |
| Migrate OAuth Data to MongoDB |
Run this configuration task if:
Note: After completing the configuration task, you'll also need to update the com.soa.oauth.provider.server configuration category, com.soa.oauth.provider.server.config.datasource property. Set the value to NOSQL and apply changes. See also: Migrate OAuth Data to MongoDB in the Using Configuration Actions doc. |
| Perform 7.2 to 8.0 Upgrade |
Performs 7.2 to 8.0 Upgrade of SLA Policies and Service Descriptor documents. See also: Upgrade SLA policies and Service Document Descriptors (when Akana PM 8.0 Upgrade tool is installed) in the Using Configuration Actions doc. |
| Perform 8.0 to 8.2 Upgrade |
Performs 8.0 to 8.2 Upgrade of Database Objects. See also: Upgrade Database Objects to 8.2 Model (when Akana PM 8.2 Upgrade tool is installed) in the Using Configuration Actions doc. |
| Perform 8.2 to 8.4 Upgrade |
Performs 8.2 to 8.4 Upgrade of Database Objects. See also: Upgrade Database Objects to 8.4 Model (when Akana 8.2 to 8.4 model upgrade tool is installed) in the Using Configuration Actions doc. |
| Perform Provisioning |
Initializes resources associated with the current feature set being installed. For example, if you install two features, Policy Manager Services and Policy Manager Console, and enable provisioning, the system adds system services, default policies, default workflows, and a default container to the Policy Manager Management Console, and creates a Policy Manager admin user account. In this scenario, if you did not enable provisioning, you would not be able to log in to the Policy Manager Management Console unless another Policy Manager container was provisioned. There might be scenarios where provisioning is not required. For example, if the current deployment is using a read-only database you could disable provisioning. Perform Provisioning: To enable provisioning, check the box and then click Finish. See also: Provisioning in the Using Configuration Actions doc. |
| Purge HTTP Client Pools |
Purges all idle and leased connections from the HTTP client pools. |
| Rebuild CM Styles |
Rebuild styles for all tenants using the installed software version's styles and tenants' customization parameters. See also: Rebuild CM Styles in the Using Configuration Actions doc. |
| Register a Container |
Register a managed container with PM/CM. See also: Managing Containers. |
| Remove Repository Library |
Removes a repository library. A task that collects the front-end values as an alternative to running an automation recipe to remove a repository library. |
| Restart Container |
Restarts the container. When features and bundles are installed or uninstalled, it is important to restart the container, to complete the update. To initiate container restart, click Next. See also: Managing Containers. |
| Set Lifecycle Repository Superuser Password |
This command sets the superuser password for the Lifecycle Repository console. Unchecking the box will disable superuser access. See also: Set Lifecycle Repository Password in the Using Configuration Actions doc. |
| Set Topology API Credentials |
This command sets the credentials for the Lifecycle Coordinator Topology REST API. Unchecking the box will allow unsecured access to the API. See also: Set Topology API Credentials in the Using Configuration Actions doc. |
| Synchronize Lifecycle Manager Data |
Used to trigger the creation of backing assets for APIs, Apps, Organizations etc. See also: Synchronize Lifecycle Manager Data in the Using Configuration Actions doc. |
| Unregister a Container |
Unregister a managed container from PM/CM See also: Managing Containers. |
| Update CM API |
Updates all Provisioned CM APIs including Federation Members' APIs and API proxies. See also: Update CM API in the Using Configuration Actions doc. |
| Update Container Listener |
Updates a container listener. For more information about managing listeners, refer to About Listeners. |
| Update OAuth API |
Updates Provisioned OAuth Authorization and Resource Server APIs. See also: Update OAuth API in the Using Configuration Actions doc. |
| Upgrade CM Models |
Upgrade CM Models. See also: Upgrade CM Models in the Using Configuration Actions doc. |
| Upgrade Elasticsearch indexes |
Upgrade Elasticsearch indexes to use latest mapping config. |
| Upgrade Policies and Contracts |
The "Update Workflow of Existing Policies and Contracts" screen adds the Policy Manager 7.2 "Policy Workflow" functionality to existing policy definitions, and updates "Contract Workflow." See also: Upgrade Policies and Contracts (when Akana PM 7.2 Upgrade tool is installed) in the Using Configuration Actions doc. |
| Upload Library Configuration |
Allows upload of a library configuration. A task that collects the front-end values as an alternative to running an automation recipe to upload a library configuration. |
Locating tasks on the list
You can use the Search feature to quickly locate a task on the list. See also: Using Search in the Admin Console. An example is shown below.
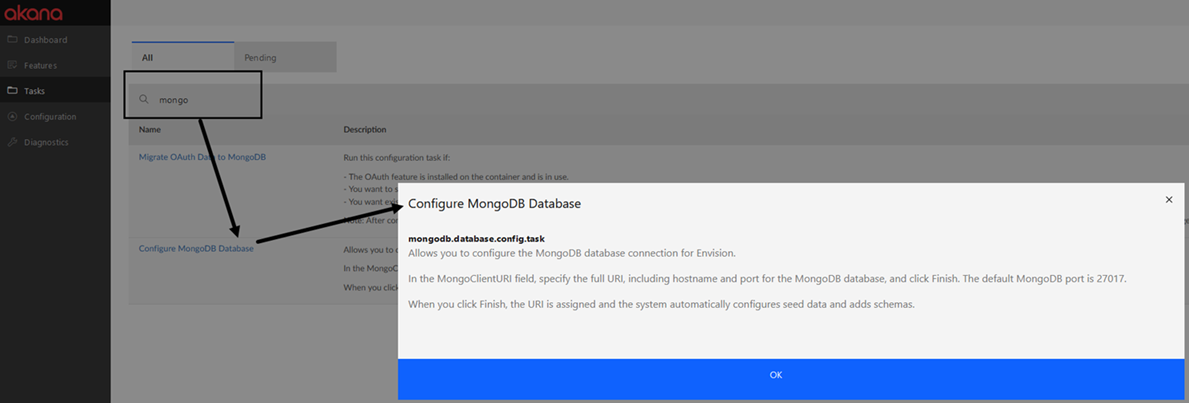
Locating back-end values
If you're using automation recipes, you might need to know the back-end value for a task, because those are the values that are referenced in the recipes.
In the redesigned Admin Console, you can easily view details about a specific task, including the back-end value. Just find the task on the All or Pending tasks list, and click the link in the task name.
In the example below, the user first uses the Search feature to look for tasks relating to MongoDB, and then clicks the task name to review the details. The back-end task name is mongodb.database.config.task.
For more information on using automation recipes, see Automation Reference Guide.


