Using the HTTP Headers Injection Policy
Learn how to use the HTTP Headers Injection policy to define headers, including header values, that will be added to messages being relayed to the client. You can use this to increase security.
For information about using policies in the context of the Community Manager developer portal, see Business Policies.
Valid in version: 2019.1.17 and later
Table of Contents
- Introduction
- Creating an HTTP Headers Injection Policy
- Configuring the HTTP Headers Injection Policy
- HTTP Headers Injection Policy options
- Activating a policy
- Attaching a policy
Introduction
The HTTP Headers Injection Policy allows you to automatically add specific headers on messages processed by the platform and relayed to the client.
You can add multiple headers, and provide a value for each. You can use this to increase security by adding headers that enforce security restrictions; for example, X-Frame-Options SAMEORIGIN or X-Content-Type-Options: nosniff.
Creating an HTTP Headers Injection Policy
The first step in creating a policy is to define the basic policy information.
To add an operational policy
- Go to Workbench > Browse > Organization and select Policies > Operational Policies. The Policies Summary is displayed.
- Click Add Policy.
- Choose the policy type and click Next.
- Specify a name (required) and description (optional) and click Finish. At the Completion Summary, click Close. The Add Policy Wizard creates a draft policy instance that you can then configure on the Policy Details page.
For more information, see Add Policy.
Configuring the HTTP Headers Injection Policy
Once you've defined the basic policy information, you can configure the technical details that determine how the policy works when it's attached to a service.
To configure an HTTP Headers Injection Policy
- Go to Workbench > Browse > Organization and select the Policies > Operational Policies folder. The Policies Summary is displayed.
- Find the policy on the list and double-click to go to the Details page for the policy.
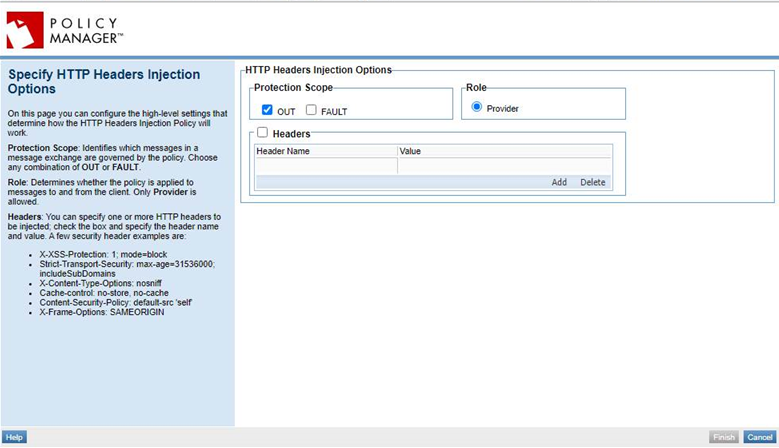
- In the second panel, click Modify to access the Specify HTTP Headers Injection Policy Options page.
- Choose one or more options. For details, see HTTP Headers Injection Policy options.
- Click Finish.
After you've configured your policy, you can activate it, then attach it to a web service, operation, or binding.
HTTP Headers Injection Policy options

On this page you can configure the high-level settings that determine how the HTTP Headers Injection Policy will work. Refer to the field descriptions below.
- Protection Scope
- Identifies which messages in a message exchange will be protected by the policy. Choose OUT, FAULT, or both:
- OUT: protects all outgoing messages.
- FAULT: protects all fault messages.
- Role
- Identifies the role that the platform takes in securing the messages.
- Provider, the only option, means that the platform acts as a provider to the client. Because this policy applies only to OUT or FAULT messages (response messages) or both, the policy is applied to response messages sent back from the platform to the client.
- The downstream service sends the response to the platform. The platform then implements the policy configuration, injecting the additional headers, and sends the message on to the client.
- Headers
- You can specify one or more HTTP headers to be injected. Check the box and specify the header name and value. A few security header examples are:
- Strict-Transport-Security: max-age=31536000; includeSubDomains
- X-Content-Type-Options: nosniff
- Cache-control: no-store, no-cache
- Content-Security-Policy: default-src 'self'
- X-Frame-Options: SAMEORIGIN
Activating a policy
When you create and configure a policy, the policy is in Draft state. When the policy configuration is complete, activate the policy: click Activate Policy and then confirm. See Activate a Policy.
A policy in Draft state is not available for general use. Once you activate the policy, it is in Active state and is available for use.
Attaching a policy
To use the HTTP Headers Injection Policy, go to the API > Implementation (select implementation) > Policies > Edit Policies (select HTTP Headers Injection policy).