Using the Open Banking Client Validation Policy
Learn how to use the Open Banking Client Validation policy to specify header names for certificate values that will be used by the back end for client authentication. This supports the client validation part of Mutual TLS per the requirements of the UK Open Banking specification.
Note: This policy requires that there is also an authentication policy attached to the API, such as the OAuth Security Policy.
For information about using policies in the context of the Community Manager developer portal, see Business Policies.
Valid in version: 2019.1.0 and later
Table of Contents
- Introduction
- Dependency for identifying the client
- Creating an Open Banking Client Validation Policy
- Configuring the Open Banking Client Validation Policy
- Open Banking Client Validation Policy options
- Configuring Security Audit Options
- Activating a policy
- Attaching a policy
Introduction
The Open Banking Client Validation Policy allows you to specify the custom HTTP headers that will be used to pass the client's certificate, Subject DN, and Serial Number. These headers are commonly set by the network device that is terminating the SSL session (in many cases, the load balancer). The specified header values are used for authentication of the client's X.509 certificate, to support the client validation part of Mutual TLS per the requirements of the UK Open Banking specification.
The certificate, SubjectDN and Serial number sent in the HTTP headers will be validated against the JWKS URL configured for the respective client application. The JWKS "use":"tls" claim in the key will be read to determine if the certificate is valid.
The example shown below, from a sample JWKS URL at https://keystore.openbanking.org.uk/0015800000jfAW1AAM/2SPmPNUU6KrtcgutPlkfBd.jwks, shows key configured with "use":"tls" claim (line 6):
01  {
02    "e":"AQAB",
03    "kid":"1uJmnEmIzSK6ecq_1pGFJmUVLD0",
04    "kty":"RSA",
05    "n":"8xh1iQgZYACLKEZJpTt8MvxWGhkKu5fzYGnHCqueg2Jd-s522FBp9dXm0-jOfIYFJkEk01WMJnpGYTBNHfZCOfibOu1Wkd8Fcr59xF2PPYck7co4VqlEy4F6XfpsaW0v3AVguuuHeIvS-AP1xTwRbUZQs7yA3Ky5-LvAcI1HFqtsbK34lqjPSSd0HMeUO9cMuRfZPlhIGmMZT_OSuVFq5Ln-2rgqLcSDipMgPiYn_331ZwpHDRmK6unob0q9534rkjig-4usSbM6VtCCON4l2zM6f8dvI4oUeP5ddwwWgIMJYr0K5qXGKMur4enOj6YtQ9vcZhw3d4E4uFONnsGLhQ",
06    "use":"tls",
07    "x5c":[
08      "MIIFxTCCBK2gAwIBAgIEWf9PwTANBgkqhkiG9w0BAQsFADBEMQswCQYDVQQGEwJHQjEUMBIGA1UEChMLT3BlbkJhbmtpbmcxHzAdBgNVBAMTFk9wZW5CYW5raW5nIElzc3VpbmcgQ0EwHhcNMTkwMTE0MTIyOTUwWhcNMjEwMTE0MTI1OTUwWjBhMQswCQYDVQQGEwJHQjEUMBIGA1UEChMLT3BlbkJhbmtpbmcxGzAZBgNVBAsTEjAwMTU4MDAwMDBqZkFXMUFBTTEfMB0GA1UEAxMWMlNQbVBOVVU2S3J0Y2d1dFBsa2ZCZDCCASIwDQYJKoZIhvcNAQEBBQADggEPADCCAQoCggEBAPMYdYkIGWAAiyhGSaU7fDL8VhoZCruX82BpxwqrnoNiXfrOdthQafXV5tPoznyGBSZBJNNVjCZ6RmEwTR32Qjn4mzrtVpHfBXK+fcRdjz2HJO3KOFapRMuBel36bGltL9wFYLrrh3iL0vgD9cU8EW1GULO8gNysufi7wHCNRxarbGyt+Jaoz0kndBzHlDvXDLkX2T5YSBpjGU/zkrlRauS5/tq4Ki3Eg4qTID4mJ/999WcKRw0Ziurp6G9Kved+K5I4oPuLrEmzOlbQgjjeJdszOn/HbyOKFHj+XXcMFoCDCWK9CualxijLq+Hpzo+mLUPb3GYcN3eBOLhTjZ7Bi4UCAwEAAaOCAqAwggKcMB0GA1UdEQQWMBSCEmNhcm1lLmFwaS5iYXJjbGF5czAOBgNVHQ8BAf8EBAMCB4AwIAYDVR0lAQH/BBYwFAYIKwYBBQUHAwEGCCsGAQUFBwMCMIIBUgYDVR0gBIIBSTCCAUUwggFBBgsrBgEEAah1gQYBATCCATAwNQYIKwYBBQUHAgEWKWh0dHA6Ly9vYi50cnVzdGlzLmNvbS9wcm9kdWN0aW9uL3BvbGljaWVzMIH2BggrBgEFBQcCAjCB6QyB5lRoaXMgQ2VydGlmaWNhdGUgaXMgc29sZWx5IGZvciB1c2Ugd2l0aCBPcGVuIEJhbmtpbmcgTGltaXRlZCBhbmQgYXNzb2NpYXRlZCBPcGVuIEJhbmtpbmcgU2VydmljZXMuIEl0cyByZWNlaXB0LCBwb3NzZXNzaW9uIG9yIHVzZSBjb25zdGl0dXRlcyBhY2NlcHRhbmNlIG9mIHRoZSBPcGVuIEJhbmtpbmcgTGltaXRlZCBDZXJ0aWZpY2F0ZSBQb2xpY3kgYW5kIHJlbGF0ZWQgZG9jdW1lbnRzIHRoZXJlaW4uMHIGCCsGAQUFBwEBBGYwZDAmBggrBgEFBQcwAYYaaHR0cDovL29iLnRydXN0aXMuY29tL29jc3AwOgYIKwYBBQUHMAKGLmh0dHA6Ly9vYi50cnVzdGlzLmNvbS9wcm9kdWN0aW9uL2lzc3VpbmdjYS5jcnQwPwYDVR0fBDgwNjA0oDKgMIYuaHR0cDovL29iLnRydXN0aXMuY29tL3Byb2R1Y3Rpb24vaXNzdWluZ2NhLmNybDAfBgNVHSMEGDAWgBSfSb9ONqesww8ryEf0HykbwHkLBTAdBgNVHQ4EFgQUlsyuIasI4NOaMUDsUDcZj8unei4wDQYJKoZIhvcNAQELBQADggEBAHmbK4XGuvBZ8HUS7NAeKsNN/9FqPF8ekcbPV4DWQGVrHXkn3cxohr++L9wq19CnwvZ6YyXFFMb15VbRynsW0xuOPcR85g5pGzT5Z2Wud/+CcI7GKr7KNE0HugnG8YqiEv08Er4v+9eHdpJMUYxYDeHoxeQXYY7fr2gG3mVUqrYvtaU2LNZ6hO2LH4vgL0lj6uhio2e8iK4RHsPdpTM73+2SQK4GI3aSPwcR9pbNy3Ijlo7qiJaPyXCpxiG1l+NjYefA/HaKavITECyynaCa4gNJC0upjzVUvQBtktw81gFCAN+8lfea9Bt40Qs1/xhpgRYm96ScDgqsAAIXHY7IOOs="
09    ],
10    "x5t":"cW4GMQV_tnEuf26KrCqsAuO6hqk=",
11    "x5u":"https://keystore.openbanking.org.uk/0015800000jfAW1AAM/1uJmnEmIzSK6ecq_1pGFJmUVLD0.pem",
12    "x5t#S256":"3hJVyverB5ZZcMrPpiTpaAQmJ4rak1Cs3gH-XLS2rr4="
13  }
When the platform receives the request message, it:
- Identifies the client. See Dependency for identifying the client below.
- Looks for the headers specified in this policy, and checks that the certificate values provided in these headers match a valid key configured with the "use":"tls" claim in the JWKS specified in the OAuth Profile for the client/application, which in the platform is represented by an app (see App OAuth Profile: Authentication Settings in the Community Manager developer portal help). If there is any mismatch (for example, headers are missing, header values don't match, JWKS URL is not provided), an error is returned.
The example below shows the headers that would need to be present in the message, using the sample header names used in Open Banking Client Validation Policy options below:
X-SSLClientCert: -----BEGIN CERTIFICATE-----MIIFxTCCBK2gAwIBAgIEWf9PwTANBgkqhkiG9w0BAQsFADBEMQswCQYDVQQGEwJHQjEUMBIGA1UEChMLT3BlbkJhbmtpbmcxHzAdBgNVBAMTFk9wZW5CYW5raW5nIElzc3VpbmcgQ0EwHhcNMTkwMTE0MTIyOTUwWhcNMjEwMTE0MTI1OTUwWjBhMQswCQYDVQQGEwJHQjEUMBIGA1UEChMLT3BlbkJhbmtpbmcxGzAZBgNVBAsTEjAwMTU4MDAwMDBqZkFXMUFBTTEfMB0GA1UEAxMWMlNQbVBOVVU2S3J0Y2d1dFBsa2ZCZDCCASIwDQYJKoZIhvcNAQEBBQADggEPADCCAQoCggEBAPMYdYkIGWAAiyhGSaU7fDL8VhoZCruX82BpxwqrnoNiXfrOdthQafXV5tPoznyGBSZBJNNVjCZ6RmEwTR32Qjn4mzrtVpHfBXK+fcRdjz2HJO3KOFapRMuBel36bGltL9wFYLrrh3iL0vgD9cU8EW1GULO8gNysufi7wHCNRxarbGyt+Jaoz0kndBzHlDvXDLkX2T5YSBpjGU/zkrlRauS5/tq4Ki3Eg4qTID4mJ/999WcKRw0Ziurp6G9Kved+K5I4oPuLrEmzOlbQgjjeJdszOn/HbyOKFHj+XXcMFoCDCWK9CualxijLq+Hpzo+mLUPb3GYcN3eBOLhTjZ7Bi4UCAwEAAaOCAqAwggKcMB0GA1UdEQQWMBSCEmNhcm1lLmFwaS5iYXJjbGF5czAOBgNVHQ8BAf8EBAMCB4AwIAYDVR0lAQH/BBYwFAYIKwYBBQUHAwEGCCsGAQUFBwMCMIIBUgYDVR0gBIIBSTCCAUUwggFBBgsrBgEEAah1gQYBATCCATAwNQYIKwYBBQUHAgEWKWh0dHA6Ly9vYi50cnVzdGlzLmNvbS9wcm9kdWN0aW9uL3BvbGljaWVzMIH2BggrBgEFBQcCAjCB6QyB5lRoaXMgQ2VydGlmaWNhdGUgaXMgc29sZWx5IGZvciB1c2Ugd2l0aCBPcGVuIEJhbmtpbmcgTGltaXRlZCBhbmQgYXNzb2NpYXRlZCBPcGVuIEJhbmtpbmcgU2VydmljZXMuIEl0cyByZWNlaXB0LCBwb3NzZXNzaW9uIG9yIHVzZSBjb25zdGl0dXRlcyBhY2NlcHRhbmNlIG9mIHRoZSBPcGVuIEJhbmtpbmcgTGltaXRlZCBDZXJ0aWZpY2F0ZSBQb2xpY3kgYW5kIHJlbGF0ZWQgZG9jdW1lbnRzIHRoZXJlaW4uMHIGCCsGAQUFBwEBBGYwZDAmBggrBgEFBQcwAYYaaHR0cDovL29iLnRydXN0aXMuY29tL29jc3AwOgYIKwYBBQUHMAKGLmh0dHA6Ly9vYi50cnVzdGlzLmNvbS9wcm9kdWN0aW9uL2lzc3VpbmdjYS5jcnQwPwYDVR0fBDgwNjA0oDKgMIYuaHR0cDovL29iLnRydXN0aXMuY29tL3Byb2R1Y3Rpb24vaXNzdWluZ2NhLmNybDAfBgNVHSMEGDAWgBSfSb9ONqesww8ryEf0HykbwHkLBTAdBgNVHQ4EFgQUlsyuIasI4NOaMUDsUDcZj8unei4wDQYJKoZIhvcNAQELBQADggEBAHmbK4XGuvBZ8HUS7NAeKsNN/9FqPF8ekcbPV4DWQGVrHXkn3cxohr++L9wq19CnwvZ6YyXFFMb15VbRynsW0xuOPcR85g5pGzT5Z2Wud/+CcI7GKr7KNE0HugnG8YqiEv08Er4v+9eHdpJMUYxYDeHoxeQXYY7fr2gG3mVUqrYvtaU2LNZ6hO2LH4vgL0lj6uhio2e8iK4RHsPdpTM73+2SQK4GI3aSPwcR9pbNy3Ijlo7qiJaPyXCpxiG1l+NjYefA/HaKavITECyynaCa4gNJC0upjzVUvQBtktw81gFCAN+8lfea9Bt40Qs1/xhpgRYm96ScDgqsAAIXHY7IOOs=-----END CERTIFICATE-----
X-SSLClientCertDN: CN=2SPmPNUU6KrtcgutPlkfBd, OU=0015800000jfAW1AAM, O=OpenBanking, C=GB
X-SSLClientCertSN: 5c:da:9f:e6
Dependency for identifying the client
You can attach this policy to any API. However, there must also be a way of identifying the client.
There are two ways you can provide the policy with the necessary information to identify the client:
- If the policy is attached to a client application, there must be an authentication policy attached to the API, to set the consumer (app) subject. The policy gets the information from the Consumer Subject Category. Examples of authentication policies you can use:
- If the policy is attached to the platform API's AuthorizationServerTokenAPI Service, the policy gets the authentication information from the client_id parameter. Requests sent to this endpoint always have the client_id in the parameters in either the GET or POST request.
Creating an Open Banking Client Validation Policy
The first step in creating a policy is to define the basic policy information.
Note: When creating this policy for the Authorization Endpoint, the policy must be created in the Policies folder of the Akana Policy Manager Organization.
To add an Open Banking Client Validation Policy
- Go to Workbench > Browse > Organization and select Policies > Operational Policies. The Policies Summary is displayed.
- Click Add Policy.
- Choose the policy type and click Next.
- Specify a name (required) and description (optional) and click Finish. At the Completion Summary, click Close. The Add Policy Wizard creates a draft policy instance that you can then configure on the Policy Details page.
For more information, see Add Policy.
Configuring the Open Banking Client Validation Policy
Once you've defined the basic policy information, you can configure the technical details that determine how the policy works when it's attached to a service.
To configure an Open Banking Client Validation Policy
- Go to Workbench > Browse > Organization and select the Policies > Operational Policies folder. The Policies Summary is displayed.
- Find the policy on the list and double-click to go to the Details page for the policy.
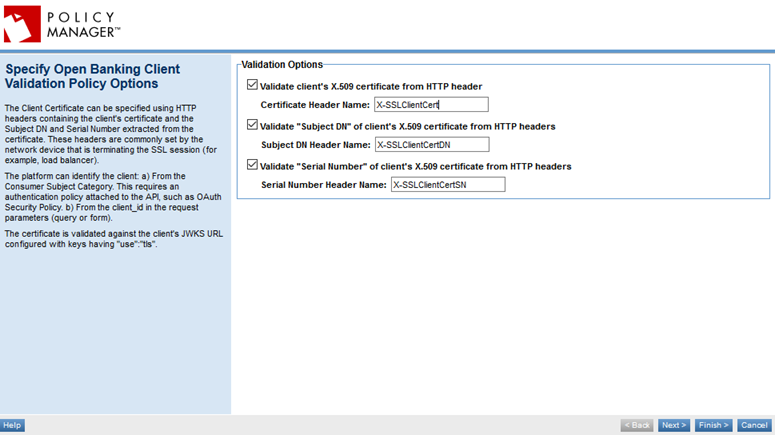
- In the second panel, click Modify to access the Specify Open Banking Client Validation Policy Options page.
- Choose one or more validation options. For each option you choose, specify the name of the custom header containing the information to be validated by the policy. For details, see Open Banking Client Validation Policy options below.
Note: To conform with the UK Open Banking standard, all three headers are required.
- Click Next to specify security audit options. See Configuring Security Audit Options below.
- Click Finish.
After you've configured your policy, you can activate it, then attach it to a web service, operation, or binding.
Open Banking Client Validation Policy options

On this page, you can configure the policy options:
- Validate client's X.509 certificate from HTTP header
- If you check this box, specify the Certificate Header Name—the name of the custom header that will contain the client's X.509 certificate. Example: X-SSLClientCert.
- Validate "Subject DN" of client's X.509 certificate from HTTP headers
- If you check this box, specify the Subject DN Header Name—the name of the custom header that will contain the Subject DN from the client's X.509 certificate. Example: X-SSLClientCertDN.
- Validate "Serial Number" of client's X.509 certificate from HTTP headers
- If you check this box, specify the Serial Number Header Name—the name of the custom header that will contain the Serial Number value from the client's X.509 certificate. Example: X-SSLClientCertSN.
Configuring Security Audit Options
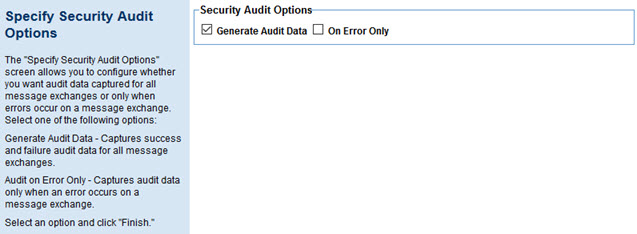
Once you've configured the settings for the specific type or types of HTTP Security policy that you chose, the next step is the Specify Security Audit Options page, as shown below.

Choose from the available options controlling the audit data that's captured:
- Generate Audit Data
- Captures all message data, whether success or failure, for all message exchanges.
- On Error Only
- If you choose to generate audit data, you can specify that audit data is captured only when an error occurs on a message exchange.
That completes the policy configuration. Click Finish to close the wizard. You can now assign the policy to a service.
Activating a policy
When you create and configure a policy, the policy is in Draft state. When the policy configuration is complete, activate the policy: click Activate Policy and then confirm. See Activate a Policy.
A policy in Draft state is not available for general use. Once you activate the policy, it is in Active state and is available for use.
Attaching a policy
To use the Open Banking Client Validation Policy, go to the Policies folder in the respective organization and attach the policy to a web service, binding, or binding operation.