Using the WS-Security Message Policy
Learn about the WS-Security Message Policy and policy configuration options.
For information about using policies in the context of the Community Manager developer portal, see Business Policies.
Table of Contents
- About the WS-Security Message policy
- Creating a WS-Security Message policy
- Configuring a WS-Security Message policy
- Modify WS-Security Message Policy Signature Options
- Modify WS-Security Message Policy Encryption Options
- Modify WS-Security Message Policy Required Content Options
- View WS-Security Message Policy Details
- Activating a policy
- Attaching a policy
About the WS-Security Message policy
The WS-Security Message Policy is used to configure message-level Confidentiality Assertions (EncryptParts and EncryptElements).
For more information about the function aspects of this policy, refer to the Protection Assertions > Confidentiality Assertions section of the applicable version of the WS-Security specification:
Creating a WS-Security Message policy
The first step in creating a policy is to define the basic policy information.
To add an operational policy
- Go to Workbench > Browse > Organization, and select Policies > Operational Policies. The Policies Summary is displayed.
- Click Add Policy.
- Choose the policy type and click Next.
- Specify a name (required) and description (optional) and click Finish. At the Completion Summary, click Close. The Add Policy Wizard creates a draft policy instance that you can then configure on the Policy Details page.
For more information, see Add Policy.
Configuring a WS-Security Message policy
To configure a WS-Security Message policy
- Go to Workbench > Browse > Organization and select the Policies > Operational Policies folder. The Policies Summary is displayed.
- Find the policy on the list and double-click to go to the Details page for the policy.
- In the second panel, click Modify to access the Modify WS-Security Message Policy wizard.
- In the Modify WS-Security Message Policy Options page, choose the version of the WS-Security Message specification that the policy will use (1.1 or 1.2), as shown below, and then click Next.

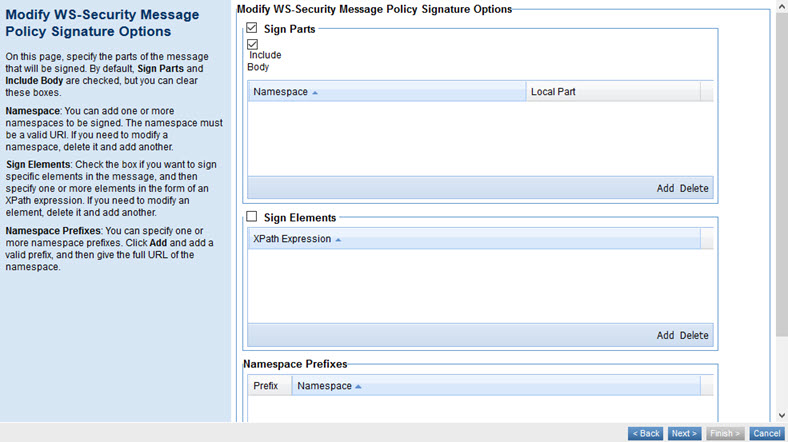
- In the Modify WS-Security Message Policy Signature Options page, specify signature settings and then click Next. For details about the options available, see Modify WS-Security Message Policy Signature Options below.
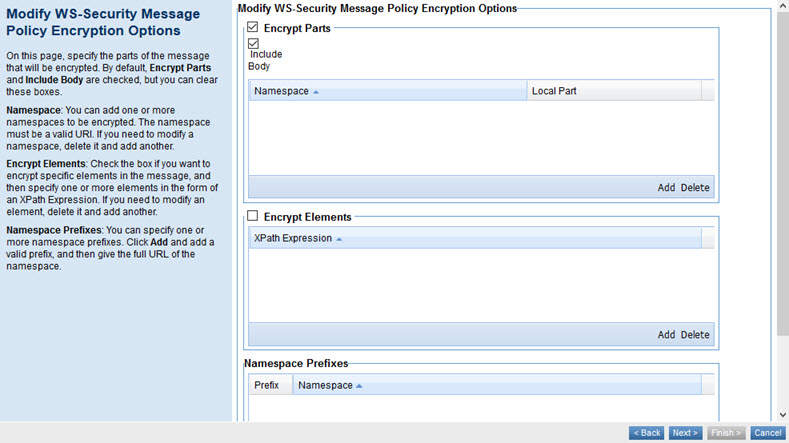
- In the Modify WS-Security Message Policy Encryption Options page, specify signature settings and then click Next. For details about the options available, see Modify WS-Security Message Policy Encryption Options below.
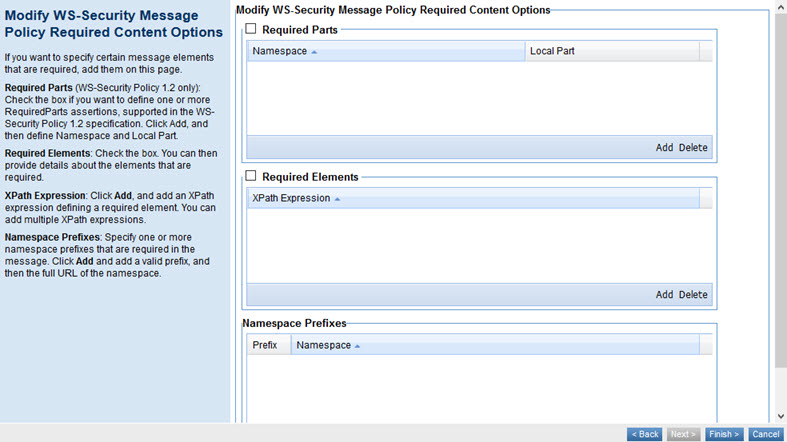
- In the Modify WS-Security Message Policy Required Content Options page, specify required elements and namespace prefixes. For details about the options available, see Modify WS-Security Message Policy Required Content Options below.
- Click Finish and then click Close.
Modify WS-Security Message Policy Signature Options

The Modify WS-Security Message Policy Signature Options page allows you to identify parts and/or elements of the message that should be signed.
- Sign Parts
- Indicates that there are specific parts of the message, outside of the security headers, that should be signed. Checked by default. For details, refer to the SignedParts Assertion section of the WS-Security specification (link is v1.2).
- Include Body
- Indicates whether the body of the message should be signed. Default: checked. You can also add or delete line items (Namespace and Local Part). The namespace must be a valid URI.
- Sign Elements
- Check the box if you want to define specific elements in the message that should be signed, and then specify one or more elements in the form of an XPath expression. If you need to modify an element, delete it and add another. For details, refer to the SignedElements Assertion section of the WS-Security specification (link is v1.2).
- Namespace Prefixes
- Check the box if you want to define specific namespace prefixes. Content from these namespaces will be signed. Click Add, and add a valid prefix, and then the full URL of the namespace. You can add or delete multiple namespace prefixes.
Modify WS-Security Message Policy Encryption Options

The Modify WS-Security Message Policy Encryption Options page includes the options listed below.
- Encrypt Parts
- Indicates that there are specific parts that should be encrypted. Checked by default. For details, refer to the EncryptedParts Assertion section of the WS-Security specification (link is v1.2).
- Include Body
- Indicates whether the body of the message should be encrypted. Default: checked. You can also add or delete line items (Namespace and Local Part).
- Encrypt Elements
- A table that lists elements in the message that should be encrypted. Each value on the list is an XPath expression identifying message elements. Check the box if elements should be encrypted. You can add or delete one or more XPath expressions. For details, refer to the EncryptedElements Assertion section of the WS-Security specification (link is v1.2).
- Namespace Prefixes
- A list of elements in the message that should be encrypted. Each value on the list is an XPath expression identifying message elements. You can add or delete multiple namespace prefixes. Each line item includes two values, Prefix and Namespace.
Modify WS-Security Message Policy Required Content Options

The Modify WS-Security Message Policy wizard, Modify WS-Security Message Policy Required Content Options page, includes the options listed below.
- Required Parts (WS-Security Policy 1.2 only)
- Check the box if you prefer to define one or more RequiredParts assertions, an alternative to the RequiredElements assertion based on QNames rather than XPath, to define header elements that are required to be present in the message. Click Add, and then define Namespace and Local Part. For more information, refer to the RequiredParts Assertion section of the WS-Security 1.2 specification.
- Required Elements
- Add information about elements in the message that are required. Each value on the list is an XPath expression identifying required content. You can add or delete one or more XPath expressions. For details, refer to the RequiredElements Assertion section of the WS-Security specification version 1.0 (section 4.3.1, page 23).
- Namespace Prefixes
- A list of elements in the message that should include the required content. Each value on the list is an XPath expression. You can add or delete multiple namespace prefixes. Each line item includes two values, Prefix and Namespace.
View WS-Security Message Policy Details
To view the WS-Security Service policy details
- Go to Workbench > Browse > Organization, and select Policies > Operational Policies. The Policies Summary is displayed.
- Find the policy on the list and double-click to go to the Details page for the policy.
Activating a policy
When you create and configure a policy, the policy is in Draft state. When the policy configuration is complete, activate the policy: click Activate Policy and then confirm. See Activate a Policy.
A policy in Draft state is not available for general use. Once you activate the policy, it is in Active state and is available for use.
Attaching a policy
To use the policy, go to the Policies folder in the respective organization and attach the policy to a web service, binding, or binding operation.