Use Case: Upgrade with Minimum Downtime
This use case outlines a scenario for achieving a minimum-downtime upgrade in an implementation of the Akana API Platform spanning multiple data centers.
This example includes two data centers, but the approach would work in exactly the same way for any number of data centers. The principle is the same between any two major versions.
Note that in this example, the term minimum-downtime is used to mean that the API Gateway has zero or minimal downtime. It's possible that during the upgrade process either Policy Manager or Community Manager, or both, might experience some downtime. This might be necessary if the upgrade includes database schema changes.
Essentially, you are removing a specific container from normal traffic, upgrading it, and then adding it back into the cluster.
Note: This use case provides an approach for manual upgrade across multiple data centers. However, the best, and recommended, approach for upgrade in a production environment is via automation, which is available as a service from the Akana Professional Services department. For details about automation options, contact your Akana representative.
Some points to bear in mind when considering a minimum-downtime upgrade:
- The Network Director uses caching, which is very important during any upgrade.
- If authorizations for policies have been approved within the last four hours, these will be used during the upgrade of the Policy Manager containers.
- Analytics are cached during the small time that Policy Manager containers are being upgraded. This is only important if writes are being done remotely via Policy Manager.
- The approach of taking data centers offline and upgrading them one at a time, or doing the same with nodes in a cluster, makes it possible to complete an upgrade with zero or minimum downtime.
- A previous-version Network Director container can communicate with an upgraded Policy Manager container. For example, Version 2025.1.x Network Director containers can communicate with upgraded version 2025.1.x Policy Manager containers.
- In the approach taken in this use case, the first Policy Manager upgrade is responsible for upgrading the database. While Policy Manager is down for this upgrade, the Network Director instances are using cache for any runtime calls.
On this page:
Multiple data center scenario
This approach upgrades data centers one by one. While one data center is being upgraded, the remaining data centers (one or more) service all traffic.
Key point relating to this use case:
Only Policy Manager and Community Manager have direct access to the MongoDB database. This assumes that the Network Director is pushing all its writes to MongoDB via the Policy Manager server.
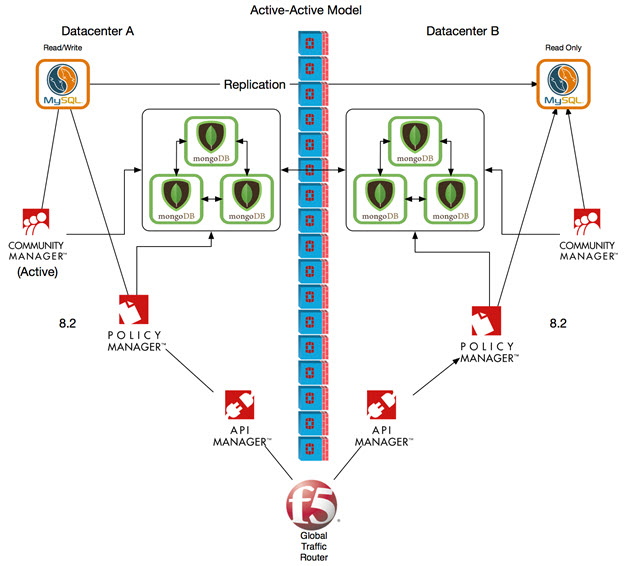
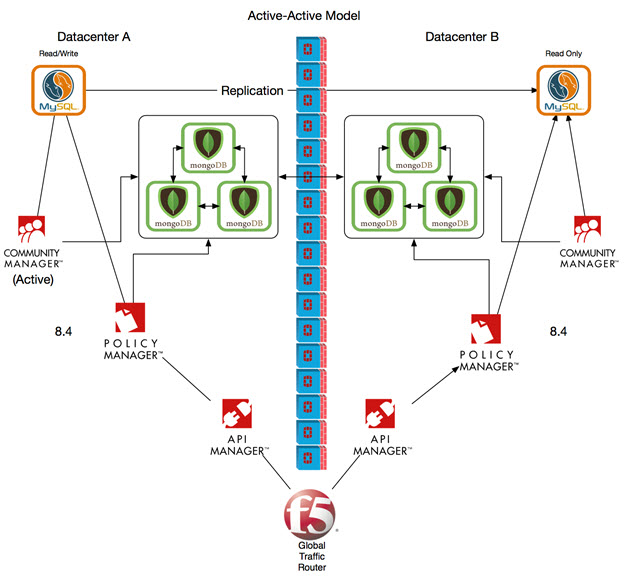
Initial (Pre-Upgrade) State
The diagram below shows the environment before upgrade. Active-Active MongoDB infrastructure has been implemented.
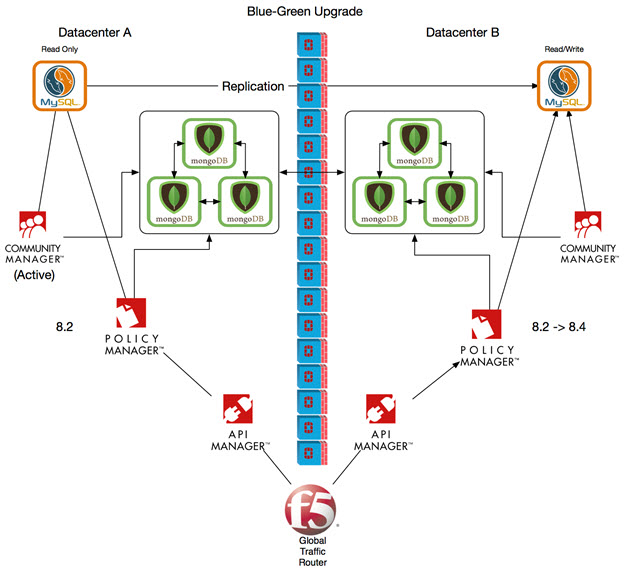
Step 1: Upgrade Data Center B
In this step, we first move all traffic to data center A, so that traffic is uninterrupted while data center B is being upgraded. We then perform the upgrade.
High-level summary of steps
For this scenario, you'll need to complete these steps:
Change the databases: define the writable database and change the direction of the replication.
We flip the databases and make data center B the writable database, and change the direction of the replication. This allows you to move the Primary data center back and forth. If you prefer a different sequence, you can start with upgrading data center A, and its database will always stay active.
Update the scheduled jobs.
Changing the Primary/writable data center also requires an update to the scheduled jobs. When building the new Primary Policy Manager, the scheduled jobs must be running from this container. To do this, set the property org.quartz.scheduler.enabled to true. For all other containers that have scheduled jobs installed, set the property to false. For instructions, see Turning the scheduled jobs off. Remember to restore the setting afterwards.
Upgrade the data center B environment.
Upgrading the data center B environment
The order of execution for upgrading data center B is:
Upgrade a Policy Manager container first. As part of the upgrade process for this Policy Manager container, the database is upgraded with any required schema changes.
After upgrade of the initial Policy Manager container is complete, upgrade all other containers. Order doesn't matter; you could even upgrade additional containers concurrently.
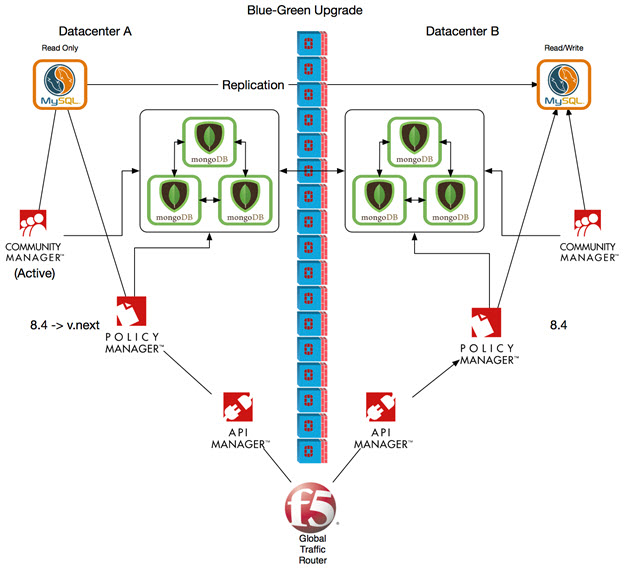
The diagram below shows the upgrade from 8.2 to 8.4 being done for data center B. Traffic is processed via data center A.
Step 2: Upgrade Data Center A
Once you're sure everything is working perfectly with data center B, it's time to upgrade data center A.
To do this, first direct all traffic from the global router to data center B. The Primary Policy Manager is now the Policy Manager, or bank of Policy Managers, that are running in data center B.
After upgrading each container, you'll need to register it in the Primary Policy Manager. Depending on your scenario:
If the Primary Policy Manager has access to the new containers that are being created or upgraded: Add the container directly to the Policy Manager Workbench.
If the Primary Policy Manager doesn't have access to the new containers: Export the XML in the /metadata call. You can then add a container in the Policy Manager Workbench, and at the Add Container step, upload the metadata.xml file.
The diagram below shows the upgrade being done for data center A. Traffic is processed via data center B.
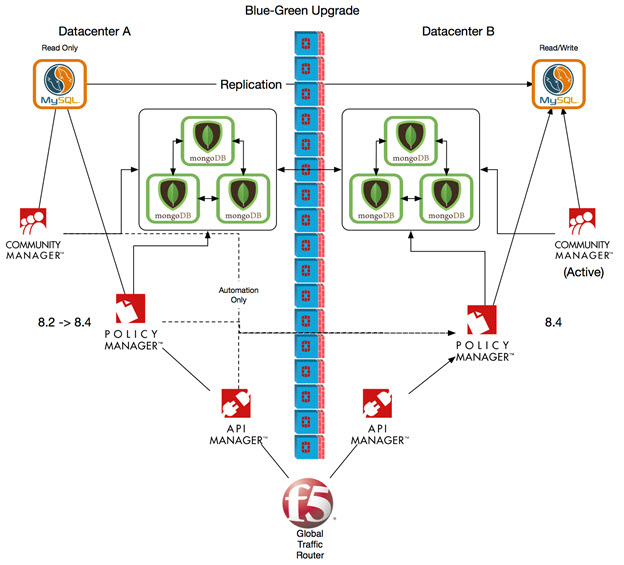
Final state after upgrade
The final state would be back to both data centers upgraded, active, and accepting traffic, as shown below.
Now, when it's time to do the next upgrade setup, follow the same steps, but change the sequence of the data centers. In the diagram above, notice that the writable database goes back to data center A. Also, remember that the Primary Policy Manager always follows the writable database.
The diagram below shows the upgrade being done for data center B. Traffic is processed via data center A.
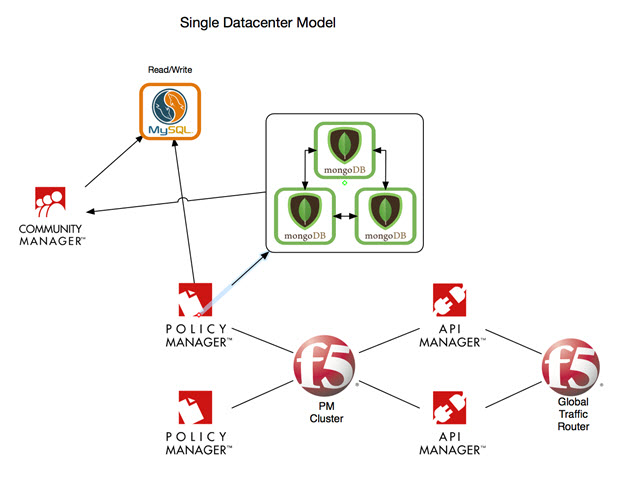
Single data center scenario
Even if you only have a single data center, you can still achieve a minimum-downtime deployment. The approach is very similar to the approach for multiple data centers; the only difference is that rather than a single data center remaining active, one side of the node remains active.
The database is never moved; you will always have a single database instance that is always the active database.
You don't have to worry about using a Primary Policy Manager instance, since there will never be a read-only database in the model.
The connections that are important in this model are the links into the Policy Manager cluster first. The steps are:
- First, remove 1 and direct all traffic to a single Policy Manager.
- Upgrade the Policy Manager that is out of the cluster.
- Once you've upgraded that Policy Manager, add it back into the cluster.
- Now upgrade the other node.
- Follow the same steps for upgrading one or more Network Director containers, one at a time.
Note that this is only viable for data centers that have multiple nodes deployed; at minimum, the gateways must have multiple nodes. Minimum-downtime upgrades can still be achieved with single Policy Manager node clusters.
The diagram below shows minimum-downtime upgrade for a single data center.