Interfaces
Learn about Interfaces, which define the behavior of a service based on a set of defined operations that the interface implements.
The Interfaces section of Policy Manager provides functionality that allows you to manage the baseline of interfaces that are available for use when modeling a service.
To view the Interfaces Summary page in Policy Manager, go to Configure > Registry and then click the Interfaces tab.
On this page:
- View Interface Details
- Perform Interface Search
- Add Interface
- Interface Identifiers
- Interface Categories
- View or Export WSDL for Interfaces
- View Service References for Interfaces
- Delete Interface
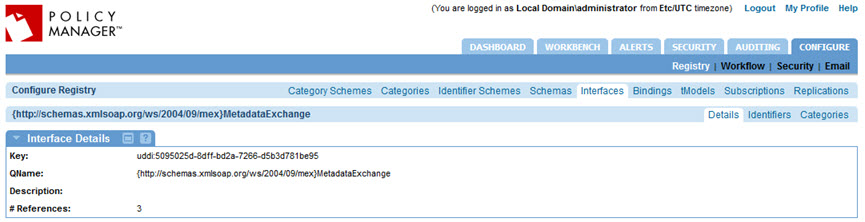
View Interface Details
View the elements that comprise the Interface definition. Information presented includes:
- Key
- QName
- Type
- Description
- Number of References
To view interface details
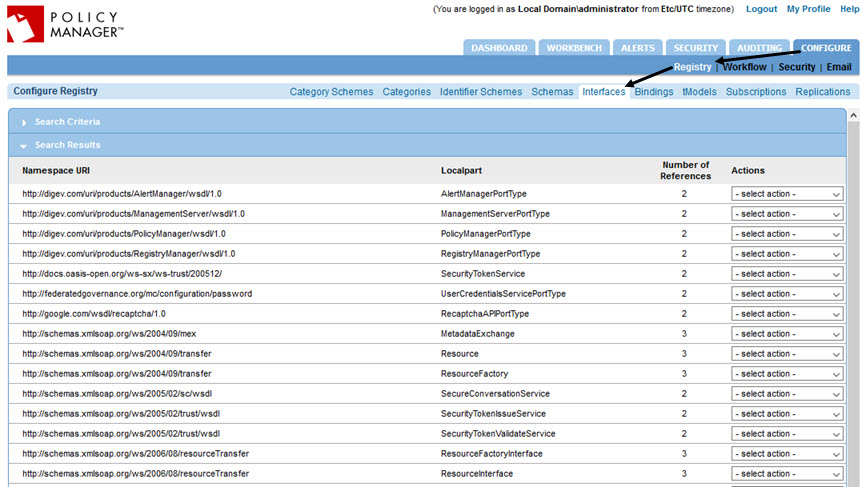
- Go to Configure > Registry.
- Click the Interfaces tab. The Interfaces Summary page is displayed, as shown below.
- Choose the interface you want to review and then, from the Actions drop-down list, select View Interface Details. The Interface Details page is displayed, as shown below.
Perform Interface Search
You can query Policy Manager to find interfaces. For example, you might need to search for specific interfaces to view interface details, view references (services that are implementing a specific interface), or perform impact analysis. You can search by any part of the Interface Namespace URI/Localpart of the Service QName.
To perform an interface search
- Go to Configure > Registry.
- Click the Interfaces tab. The Interfaces Summary page is displayed.
- Define your Search Criteria. You can enter any portion of an Interface Namespace URI/Localpart of the Service QName.
- Click Search. A list of interfaces that match your defined search criteria is displayed.
- (Optional) Apply Interface Actions to each search result via the Actions drop-down list box.
Add Interface
Define an Interface, which defines the behavior of a service based on a set of defined operations that it implements. Notes:
- Adding an Interface to the Policy Manager data repository involves defining an Interface QName which is composed of a Namespace URI and Localpart, and selecting the Interface elements and associated Operations you want to include in the Interface definition.
-
There are three ways to add an interface:
- Import from WSDL—Import interfaces from a WSDL file into the Policy Manager data repository. These interfaces can then be reused in full or in part to model webservices.
- Model Using Existing Schemas—Model a new interface by using schemas and associated operations that are already registered in Policy Manager.
- Model Using Existing Interface—Model a new interface by using interfaces and associated operations that are already registered in Policy Manager.
The following three initial steps are applicable to all the ways of adding an interface.
- In Policy Manager, go to Configure > Registry.
- Click the Interfaces tab. The Interfaces Summary page is displayed.
- Click Add Interface. The Select Interface Creation Option page is displayed.
Import Interface from WSDL
- On the Select Interface Creation Option page, select Import from WSDL.
- Click Next. The Select WSDL Import Option page is displayed.
- Click the button next to the WSDL Import Option you want to use, and then perform the appropriate action to complete the entry:
- WSDL URL—Provide a valid URL.
- WSDL Path—Click Browse to navigate to the directory location of the WSDL file, and then select it.
- Zip Archive Path—Click Browse to navigate to the directory location of the ZIP file, and then select it.
- Click Next. The system accesses the file specified in step #3 and presents the following options (depending on selection):
- For WSDL URL & WSDL Path—The system processes the WSDL file data and presents a list of WSDL service elements. If the WSDL file includes multiple service elements, each service element is represented using a Service QName that includes a namespace URI and a Localpart. Click the button next to the Service QName that represents the WSDL service element you want to add to the current service definition.
- For Zip Archive Path—The system reads the ZIP archive file and presents the file list on the Select File from Zip Archive page. Click the button next to the name of the ZIP file that contains the WSDL you want to add to the current service.
- Click Next. The system reads the selected file and the Select WSDL Service Element page is displayed.
- Select the appropriate Service Element.
- Click Next. The Select Interface page is displayed, showing a list of Interface QNames that exist in the file.
- Select Interfaces:
- To select All interfaces—Click the Interface QName checkbox.
- To select Specific Interfaces—Click the checkbox next to each interface you want to import. The Status column shows whether the interface is already stored in the Policy Manager data repository, or is new.
- Click Finish. The import process is initiated. When the process is done, the interfaces you imported appear on the Interfaces Summary page.
Model Interface Using Existing Schemas
You can model a new interface by using schemas and associated operations that are already registered in Policy Manager.
- From the Select Interface Creation Option, select Model using existing schemas.
- Click Next. The Specify Interface Details page is displayed. Here, you can define a new interface that can be used when modeling a service.
- Specify Interface Details:
- Namespace URI
- Local Part
- Key
- Description
- Click Add Operation.
- Define the Name and Description of the operations for the current interface.
Input, Output, and Fault messages for each operation will be populated on the Specify Operation Details page.
- Click Next. The Specify Operation Details page is displayed, where you populate messages for operations defined on the Specify Interface Details page with schema elements and types. A new instance of this page is presented for each operation defined.
- Under Schema Elements and Type, assign schema elements or types to Input, Output, and Fault Messages listed in the Operation Messages Section by selecting the operation message type from a drop-down list.
- Select a button, either Element or Type, to filter.
- Navigate the Element/Type Name list and select Input, Output, or Fault from the Add To column drop-down list box to populate the operation messages.
The Operation Messages populate with the Namespace, Local Part, and Element or Type (based on the selected filter).
- Click Next. If the current operation is the last in the sequence, the Finish button is displayed.
- Click Finish. The Completion Summary page is displayed.
- Review the summary information, and then click Close.
Model Interface Using Existing Interface
You can model a new interface by using interfaces and associated operations that are already registered in Policy Manager.
- From the Select Interface Creation Option, select Model using existing interfaces.
- Click Next. The Specify Interface Details page is displayed, where you can define a new interface that can be used when modeling a service.
- Enter the Interface QName:
- Namespace URI
- Localpart
- Description (Optional). If you enter a description, it will be displayed as hover text when you drag the mouse over the Namespace URI on the Interfaces Summary page.
- Click Next. The Select Interfaces page is displayed.
The web service interface models how the service performs its processing. It defines the types of messages and message exchange patterns that are involved in interacting with the service, together with any conditions implied by those messages.
Here, you will model your interface by selecting from a list of interfaces that are currently stored in the Policy Manager data repository.
- (Optional) Perform a search for Interfaces:
- Enter custom search criteria into the Interface QName field display.
- Click Search. The Results area provides a listing of interfaces that match your search criteria.
- (Optional) Assign individual interfaces to the current interface definition:
- Select the checkbox next to each Interface QName.
- Click the arrow to move a specific interface to the Interfaces Assigned section.
- (Optional) Assign all interfaces to the current interface definition:
- Click the main Interface QName checkbox in the header of the Results section.
- Click the arrow to assign an interface.
- Click Next. The Select Operations page shows a list of operations that are included in the Interface definitions selected in the previous step. You can assign these operations to the current Interface definition.
- (Optional) To replicate the current interface definition, click the checkbox next to each operation you would like added to the current Interface definition.
- (Optional) To rename an operation, enter the new Operation Name below the Interface QName.
- Click Finish. The new interface is displayed on the Interfaces Summary.
Interface Identifiers
View Interface Identifiers
- Go to Configure > Registry.
- Click the Interfaces tab. The Interfaces Summary page is displayed.
- From the Actions drop-down list box, select View Interface Details. The Interface Details page is displayed.
- Click the Identifiers tab. The Interface Identifiers Summary page is displayed.
Assign Interface Identifiers
Assign an Identifier Scheme, Key Name, and Key Value that represent lookup elements that will be invoked during a search.
- Follow steps 1 through 4 as outlined directly above under View Interface Identifiers.
- Click Assign Identifier. The Assign Identifier page is displayed.
- Select the desired Identifier Scheme from the drop-down list box.
- Enter the Key Name [physical name] to associate with the selected Identifier Scheme.
- Enter the internal Key Value being referenced in the selected Identifier Scheme.
- Click Apply to save the changes and return to the Interface Identifier Summary.
Unassign Interface Identifiers
Remove the identifier association from the current Interface definition. Removing an identifier could become necessary if, for example, the established association with the selected identifier scheme is no longer valid, or the Interface definition changed requiring a new identifier association.
- Follow steps #1 through #4 as outlined earlier in this section, under View Interface Identifiers.
- Click the line item for the Identifier Scheme you want to unassign.
- Click Unassign Identifier.
- At the confirmation message, click OK. The identifier definition is removed and is no longer listed on the Interfaces Identifier Summary.
Interface Categories
View Interface Categories
The following initial steps are applicable to all the ways you can add an interface category.
- Go to Configure > Registry.
- Click the Interfaces tab. The Interfaces Summary page is displayed.
- Click the line item for the interface you want to assign a category to.
- From the Actions drop-down list, select View Interface Details. The Interface Details page is displayed.
- Click the Categories tab. The Interface Categories Summary page is displayed, showing all categories that are defined for the current interface.
Assign Interface Categories
- Follow steps #1 through #5 in View Interface Categories above.
- From the Interface Categories Summary page, click Assign Category.
The Select Categories page is displayed.
- Select a Category Scheme.
- Navigate the tiers of the Category Scheme and select a Category Value to apply to the current interface definition.
- Click Finish. The system assigns the selected category value to the current organization definition and you are returned to the Add Categories Summary.
- Click Close to return to the Interface Categories Summary.
Unassign Interface Categories
Remove the category association from the current Interface definition.
Removing a category could become necessary if, for example, the established association with a selected category scheme is no longer valid, or an Interface definition changes requiring a new category association.
- Follow steps #1 through #5 in View Interface Categories above.
- From the Interface Categories Summary page, click Unassign Category.
- At the confirmation message, click OK to unassign the category.
The category is removed and you are returned to the Interface Categories Summary.
Assign Interface Category Groups
Category Groups allow you to categorize service relationships with a higher level of granularity, and contain a list of business categories that describe specific business aspects of the Organizations, Services, tModels, Schemas, Interfaces, or Bindings.
Examples of category groups are:
- Industry
- Product category
- Geographic region
Each Organization, Service, tModel, Schema, Interface, or Binding can be assigned one or more Category Groups.
To assign interface category groups
- Follow steps #1 through #5 in View Interface Categories above.
- From the Interface Categories Summary page, click Assign Category Group.
The Assign Category Group Wizard launches and Select Category Group page is displayed, listing the Category Groups that exist for the current interface.
- Click the button next to the category group that you want to assign a new category to.
- Click Next. The Select Categories page is displayed.
- Select a Category Scheme.
- Navigate the tiers of the Category Scheme and select a Category Value to apply to the current interface definition.
- Click Finish. The system assigns the selected category value to the current organization definition and you are returned to the Add Category Group Summary.
- Click Close to save and exit.
Unassign Interface Category Groups
Remove the category group association from the current Interface.
Removing a category group could become necessary if, for example, the established association with a selected category group is no longer valid, or an Interface definition changed requiring a new category.
- Follow steps #1 through #5 in View Interface Categories above.
- From the Interface Categories Summary page, click Unassign Category Group.
- At the confirmation message, click OK to unassign the category group.
The category is removed, and you are returned to the Interface Categories Summary.
View or Export WSDL for Interfaces
The View WSDL action launches a browser window showing the WSDL metadata associated with the current interface. When the service is registered using the Create Physical Service Wizard, WSDL metadata is copied to the Policy Manager Registry.
- Go to Configure > Registry.
- Click the Interfaces tab. The Interfaces Summary page is displayed.
- Click the line item for the Interface you want to view a WSDL for.
- From the Actions drop-down list, select View WSDL. The View WSDL page is displayed.
- (Optional) To export the WSDL, click Save. A File Download pop-up is displayed. Do the following:
- Click Save.
- Specify the filename for the WSDL.
- Navigate to the directory where you want to save the WSDL.
- Click Save. The WSDL file is saved to the specified location.
View Service References for Interfaces
The Interfaces Summary page includes a column titled Number of References that indicates the number of services that are currently implementing a specific interface.
Note: The number of references column shows both references from bindings and services.
- Go to Configure > Registry.
- Click the Interfaces tab. The Interfaces Summary page is displayed.
- Click the line item for the Interface you want to view service references for.
- From the Actions drop-down list, select View Service References. The Workbench > Search page is displayed, showing the references associated with the selected interface.
Delete Interface
Note: Only interfaces that contain zero references display the delete function.
- Go to Configure > Registry.
- Click the Interfaces tab.
The Interfaces Summary page is displayed.
- Click the line item for the Interface you want to delete.
- Click Delete Interface.
- At the confirmation message, click OK.