Using the API Consumer Application Security Policy
Learn how to configure authentication methods used to identify an application that is attempting to consume an API.
On this page:
- Introduction
- Creating an API Consumer Application Security policy
- Configuring the API Consumer Application Security policy
- Configuring API Consumer Application Security Policy options
- Activating a policy
- Attaching a policy
- Attaching a policy in the Community Manager developer portal
Introduction
The "API Consumer Application Security Policy" is used to identify (authenticate) an application that is attempting to consume an API to determine if it is authorized or not. This policy type supports multiple mechanisms for the App to present its identity. See Configuration Options (below) for a list of supported authentication methods.
Note: Use of this policy is reserved for API Administrators of the Community Manager application.
Creating an API Consumer Application Security policy
The first step in creating a policy is to define the basic policy information.
To add an operational policy
- Go to Workbench > Browse > Organization, and select Policies > Operational Policies. The Policies Summary is displayed.
- Click Add Policy.
- Choose the policy type and click Next.
- Specify a name (required) and description (optional) and click Finish. At the Completion Summary, click Close. The Add Policy Wizard creates a draft policy instance that you can then configure on the Policy Details page.
For more information, see Add Policy.
Configuring the API Consumer Application Security Policy
Once you've defined the basic policy information, you can configure the technical details that determine how the policy works when it's attached to a service.
To configure an API Consumer Application Security Policy
- Go to Workbench > Browse > Organization and select the Policies > Operational Policies folder. The Policies Summary is displayed.
- Find the policy on the list and double-click to go to the Details page for the policy.
- In the second panel, click Modify to access the Modify API Consumer Application Security Policy page.
- Either choose No Signature, or specify which security option will apply. For details on field values, see Configuring API Consumer Application Security Policy options below.
- If applicable, specify additional configuration values for your policy:
- Authorization header scheme
- Authorization header parameters prefix
- Cookie Name
- Clock Skew
- Character set for Decoding
For details on field values, see Configuring API Consumer Application Security Policy options below.
- When you're done, click Apply. The policy configuration is saved.
After you've configured your policy, you can activate it, then attach it to a web service, operation, or binding.
Configuring API Consumer Application Security Policy options
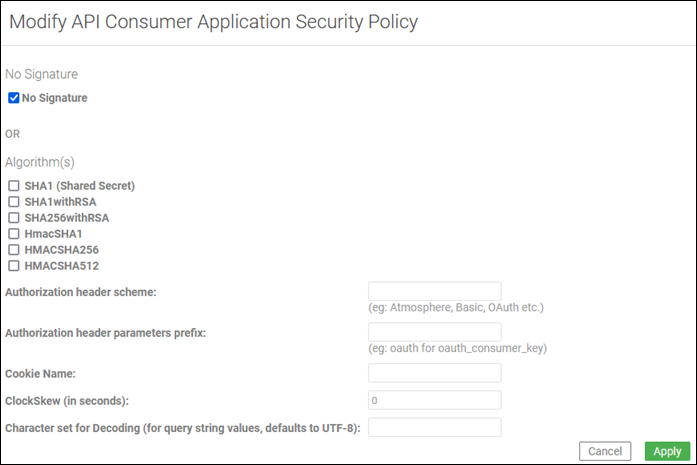
When you choose to modify the API Consumer Application Security Policy, you'll see that the No Signature option is enabled by default, as shown below. This option provides a simple header security default policy; for example, ApplicationSecurityUnsigned.
Another common simple header security policy for apps in the Community Manager developer portal provides SHA1-Shared Secret support; for example, ApplicationSecuritySigned. Just check the SHA1 (Shared Secret) box.
You can get started using the default policy configurations, as shown below, and then expand your configuration based on your requirements.
Note: The image below is from the Community Manager developer portal. When viewed in Policy Manager, the page look and feel is different but the functionality is the same.

On the Modify API Consumer Application Security Policy page, you can customize the policy as needed. Refer to the details below.
- No Signature
- You can choose to perform authentication with no signature. If you choose this option, configuration is complete; you cannot specify any algorithm options.
- Algorithm(s)
- If No Signature is disabled, configure one or more authentication algorithms based on your requirements. Configure one or more authentication methods based on the protocols supported by your API.
- Note: If your API supports OAuth, the API Consumer Security Policy is not required. Instead, use the applicable policy. Refer to Using the OAuth Security Policy or Using the OAuth 1.0a Security Policy.
- SHA1 (Shared Secret)—SHA1 hash function.
- SHA1 with RSA—RSA encryption algorithms with SHA1 hash function.
- SHA256 with RSA—RSA encryption algorithms with SHA-256 hash function (32-bit words).
- HMAC SHA1—Keyed-hash message authentication code with SHA1 hash function (32-bit words).
- HMAC SHA256—Keyed-hash message authentication code with SHA-256 hash function.
- Valid in version: 2020.2.8 and later, 2022.1.0 and later: HMAC SHA512—Keyed-hash message authentication code with SHA-512 hash function.
- Authorization Header Scheme
- The name of the authorization header scheme; For example, Atmosphere, Basic, OAuth.
- Authorization Header Parameters Prefix
- The authorization header parameters prefix; for example, oauth for oauth_consumer_key.
- Cookie Name
- Name of the API authentication cookie.
- ClockSkew (in seconds)
- Specify the clock skew (in seconds) that will be used to synchronize timestamps across hosts.
- Character set for decoding (for query string values, defaults to UTF-8)
- Valid in version: 2019.1.16.
- If messages will contain special characters not supported by UTF-8, such as certain Scandinavian characters, use this field to specify the character set you want the policy to use. Examples: ISO8859_1 or Cp1252.
Activating a policy
When you create and configure a policy, the policy is in Draft state. When the policy configuration is complete, activate the policy: click Activate Policy and then confirm. See Activate a Policy.
A policy in Draft state is not available for general use. Once you activate the policy, it is in Active state and is available for use.
Attaching a policy
To use the policy, go to the Policies folder in the respective organization and attach the policy to a web service, binding, or binding operation.
Attaching a policy in the Community Manager developer portal
After you configure the policy, you can assign the policy to an API implementation, in the Community Manager developer portal.
For instructions, see How do I assign policies to my API implementation?