Process Reference
Learn to create a process and use process activities.
On this page:
- About Processes
- Process Editor
- Fault Sequence Editor
- Variable and Faults Editor
- Receive Activity
- Reply Activity
- Invoke Activity
- Script Activity
- Branch Activity
- Split Activity
- Join Activity
- Transformation Activity
- Audit Activity
- Insert Content Activity
- Process Activity
- Throw Activity
About Processes
A process is an ordered graph of activities that can be performed by a container that supports the virtualization capability, such as the Network Director. The logic performed in a virtual service operation is defined as a process. When the container receives a message, it first identifies the virtual service operation and then executes the process. As dictated by the activities in the process, down-stream services may be invoked. As a result of process execution, a response to the original message is generated.
An example of a process is the default process of a virtual service operation. In that process, a message is received using a Receive Activity, an Invoke Activity is executed that calls the virtualized service operation, and a Reply Activity responds with the response from the Invoke Activity.
Processes can get much more complex to perform functions such as transformation and content-based routing. The author of the process can assemble activities to achieve the desired results.
The Akana API Platform allows you to manage the process for an operation from the Implementation page for a specific implementation: API > Implementations > specific implementation > at bottom, specific operation, Actions drop-down, click Edit Process.
Akana Policy Manager allows you to create processes within these contexts:
- As the implementation of a virtual service operation (Services > Operation > Process or Services > Operation > Fault section)
- As a standalone process (Processes Folder) that can be invoked by another process to achieve reusability.
In all contexts, a graphical editor is provided to construct the process.
Process Editor
The Process Editor allows you to create a process in a graphical drag-and-drop environment. The process begins by receiving a message (see the Receive Activity), and the process ends when a message is returned to the caller (see the Reply Activity).
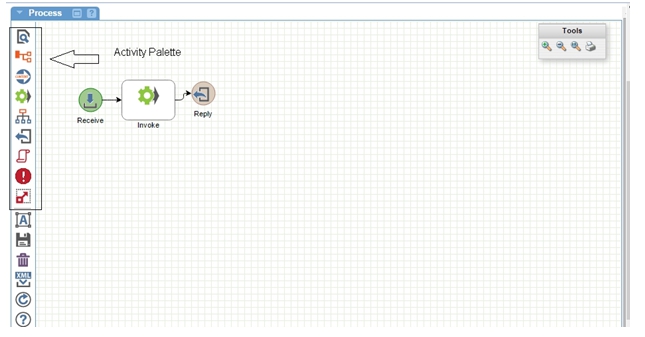
Activities
The activities available to be called from within a process are available on the Activity Palette, located on the upper left-hand side of the Process Editor workspace. You can select an activity icon in the palette and drag it on to the workspace. Activities are called in order and are linked together by directional connectors.
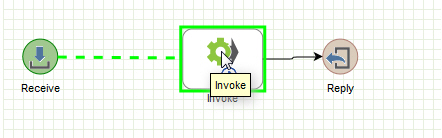
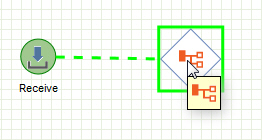
To link two activities, select the middle of the activity that will be executed first, as shown below.
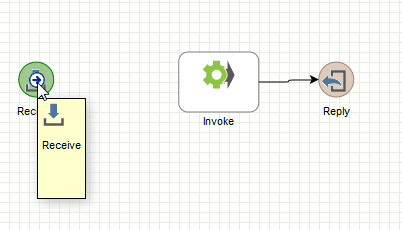
Drag your mouse to the center of the activity to be executed next, and then release. A directional connector is drawn, linking the two activities, as shown below.
Sequence
A series of activities linked together is called a Sequence. A sequence is terminated by either a Branch Activity (see below) or a Reply Activity (see below). A set of linked activities from the Receive Activity to a Reply Activity may contain several sequences separated by Branch Activities. In this scenario, the entire set of linked activities is called a Flow.
General Functions
Functions that can be performed on the entire process are available on a toolbar located on the bottom part of the Process Editor palette, as shown below.
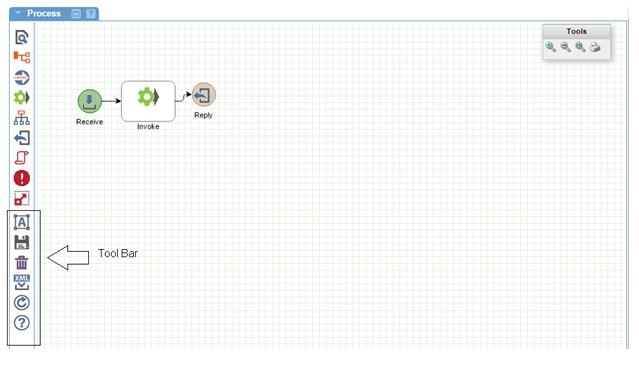
The toolbar includes functions such as saving the process, editing the variables used in the process (see Variable Editor), refreshing the page, or undoing the last action.
Fault Sequence Editor
Next to the Process Editor tab is a tab labeled Fault. On this tab, you define a sequence of activities to execute if a fault is encountered at any point of your main process. In the main process, once a fault is encountered, the process execution immediately stops and the activity sequence in the Fault tab is executed.
The Process Editor supports a flow for each named fault, as identified in the Variables and Faults Editor.
A pull-down of fault names, as defined in the Variables and Faults Editor, is displayed on the Fault tab. When you select a fault name from the pull-down list, the fault flow for the named fault is displayed on the workspace. By default, each fault flow has a single Reply activity. The default fault flow is displayed in the pull-down with the Unnamed label.
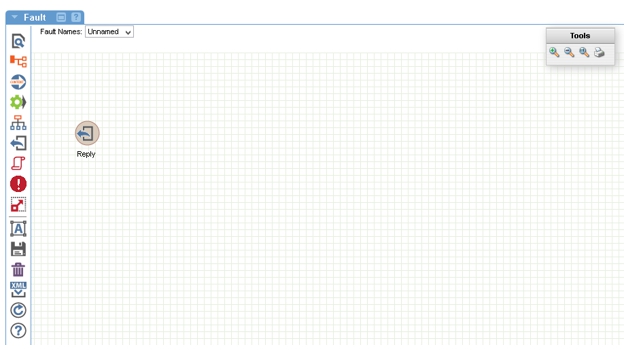
The Fault Sequence Editor works in exactly the same way as the main Process Editor, except that the sequence does not need to begin with a Receive Activity. The Receive from the external client has already been executed in the main process. At this point, we are just executing activities within the same process context.
When the fault sequence is executed, the reserved variable name fault contains the fault message that triggers the sequence. Activities that reference variables can use this fault variable.
A fault sequence is not required. If there is no fault sequence, the system simply returns the fault back to the client. If you define a fault sequence, at minimum you must include a Reply Activity at the end. You can use any of the activities in the Activity Palette in the fault sequence, including Branch activities. However, each branch must end with a Reply Activity.
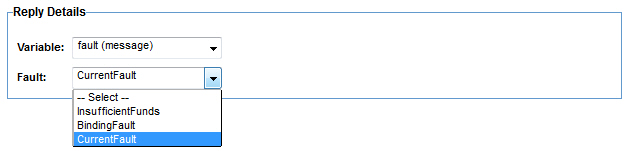
You can configure the Reply Activity to return a fault message or a regular message, as controlled by the Fault field in the Reply Activity Editor (see the Reply Activity section below). The reserved fault name CurrentFault, listed in the fault name pull-down, indicates that the fault name for the content of the fault variable will be used as-is. You can change the name to any of the operation faults or to a Binding Fault. This allows you to perform fault mediation.
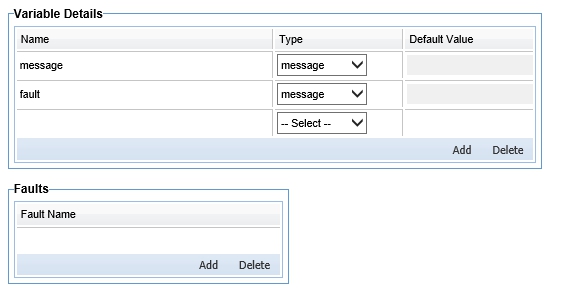
 Variables and Faults Editor
In the Variables and Faults Editor, you can define variables that can be used in the process and faults that are handled within the process.
You can use variables in different activities to:
- Dictate behavior, such as using a variable to identify the endpoint of a service to invoke.
- Store the output from web service invocations.
- Provide input to web service invocations.
Variables
A variable is identified by a name and defined by a data type, or syntax. The types recognized by the system are:
- message (used for input or output of a web service invocation, request, or Reply Activity)
- string
- int
- long
- Boolean
- float
- any (can hold any content)
Activities that support the use of variables in their configurations often restrict the use of variables based on type. You can also define a default value for a variable. If a default value has been defined, the default value is assigned to the variable at the beginning of process execution.
Faults
Faults can be thrown as a result of an activity. If a fault is unhandled, the default fault flow is invoked. Optionally, you can also define fault flows for each named fault thrown within the process. To do this, define the fault flows in the Faults Editor, as shown below.
 Receive Activity
The Receive Activity provides the entry point into the process. The caller invokes the process by providing it with a message. That message is stored in the variable selected in the activity's configuration screen. Only variables of type message can be used. There can only be one Receive activity in a process.

Reply Activity
The Reply Activity provides the exit point from a process. Every flow through the process must have one and only one Reply Activity. If there are multiple branches created from a Branch Activity, each branch must be terminated with a Reply Activity. The Reply Activity can return a message to the caller. It is not required for one-way operation processes. Only variables of type message can be used.

Application and Binding Faults
In addition to specifying the variable holding the message to return, you can also indicate that the message is a fault by providing a Fault Name. Faults fall into two main categories:
- Application faults
An application fault is caused by a problem in the business process of the operation. For example, if the operation is to withdraw funds, there might be an application fault to identify that there are insufficient funds. An application fault is defined in the WSDL document for the operation. You can attach one or more policies to an application fault.
- Binding faults
A binding fault is not specific to the business function of the operation; it is a problem at the protocol layer itself. Binding faults are general to all operations. Some examples: security failures, communication failures, or message parsing errors. A binding fault is typically not referenced anywhere.
In the Reply Activity Editor, the Fault Name pull-down contains the application faults found in the WSDL document for the operation, as well as a reserved fault name of BindingFault. You can choose what the message being returned represents.
There is one other option, available only in the Fault Sequence Editor; CurrentFault. This option requires that the reserved fault variable is filled with a message, and the fault name must be already known and in use.
Fault reply details are shown below.
 Invoke Activity
The Invoke Activity invokes an operation of a service registered in the system. It sends a message invoking the operation. The message includes a single input variable or multiple input parameters. The response from the operation invocation is stored in an output variable. You can configure these variables on the Manage Input/Output Parameters screen.
You can specify the operation that will be invoked, in two ways:
- Statically
- Dynamically through the use of variables.
To statically identify the operation to invoke, first start by searching for the service that includes the operation.
The search is performed using QNames. When you type a value in the Service QName field and click Search, the system searches for any service with a QName that contains that value. If you leave the field empty and click Search, all services are returned.

You can use variables to specify the service, interface, and/or operation. The variable must have a data type of string.
You can also choose to select a specific WSDL Access Point by name; check the Invoke Access Point Directly box and put in the access point (wsdl:port element in the WSDL).

To set up auditing of the message as it is sent over the wire to the access point, select the Audit check box.
Note: In order for the downstream message to be audited, there must be an auditing policy attached to the virtual service operation invocation that is executing the process.
Manage Input/Output Parameters
An invocation activity must define where inputs to the invocation will come from and where the output to the invocation is held within the process.
An operation can have 0 or more parameters, and can have message parts that must be provided as input values. Depending on the protocol used, these parameters can be encoded differently.
- Single Input Message: By default, you can use a single message as input, using the Single Input Message option. The runtime engine constructs protocol messages using a default mapping of parameters from the single input message according to protocol-specific rules.
- Multiple Input Parameters: In cases where there are multiple input parameters that cannot be constructed using the default mapping, you can directly specify values for each parameter with the Multiple Input Parameters option.
When choosing the Multiple Input Parameters option, you can identify variables in the process as the inputs to the parameters/parts defined for the operation. Each parameter of the operation is listed in the Parameters table. You can select a variable from the drop-down list in the same row to populate the parameter. If a variable is not assigned to a parameter, the runtime engine will attempt to perform its own mapping for that parameter.
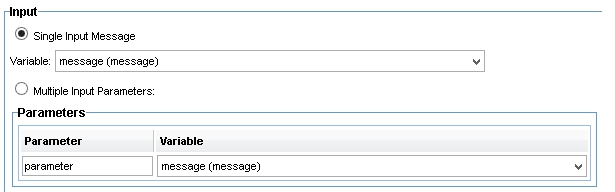
A single output message is returned from an invocation. A variable can be selected to hold that output for later use within the process.

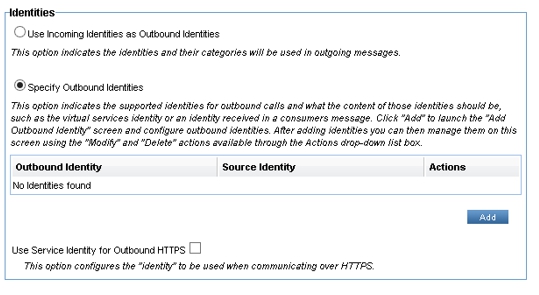
Manage Outbound Identities
You can configure whether you want to use incoming identities as outbound identities (the default), or specify custom identities to be used for all outbound messages to the downstream service on the Manage Outbound Identities screen.
When securing outbound calls from a virtual service, identities are typically required to be specified in request messages. Those identities can be categorized as different actors in a message exchange.
The Use Incoming Identities as Outbound Identities option is selected by default. This means that identities used when invoking the operation are dictated by the outbound identity configuration of the virtual service.
You can also define identities for outgoing messages in the Specify Outbound Identities section.
Identities that you add are stored in an Identity Table, which you can update as needed, modifying or deleting identities.
Assign Parameter Values from Script
You can also specify parameters, or parts, using the following methods:
- getPart (String)—Returns the message part (parameter) with the given name.
- addPart (String, Object part)—Adds a value for a part (parameter) with the given name.
- removePart (String)—Removes the value for the part (parameter) with the given name.
- getPartNames()—Returns the names of all parts (parameters) that have been assigned a value.
For details, refer to the Policy Manager Scripting API documentation.
 Script Activity
The Script Activity provides the ability to execute a script at the point in the process at which the activity is connected. The script can be written in JavaScript, Jython, or BeanShell.
The Script Details Editor is organized into two separate areas, Imports and Source. The Source area has:
- A pull-down list where you can select the script language.
- A large source code editor text area.
Script Activity, Source area:
If you have functions that might be common to more than one script, you can save those as Script objects using the Add Script function in the Scripts section of each Organization in the Policy Manager Workbench. To make use of those common functions from the Script Activity, you must import the script objects defining those functions. The Imports area is where those scripts are identified for import. The available scripts are listed in the Available Scripts tree. You can move any number of scripts in that tree to the Imported Scripts list box. Only scripts that match the language type are available for selection in the tree. The script does not return a value.
Script Activity, Imports area:
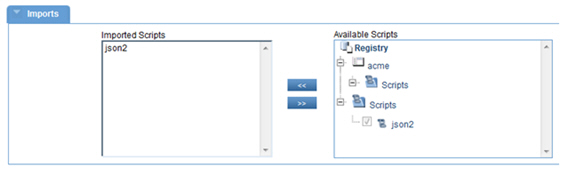
In the example above, the json2 script from the Registry > Scripts folder is imported. Any functions defined in json2 can be used within the Script Activity source code.
The following pre-defined variables are provided. For more information, refer to the Policy Manager Scripting API located in the docs\scriptDocs folder of the Policy Manager release folder, or on the Akana docs site: Policy Manager Scripting API documentation.
Click the main index HTML file to launch the documentation:
- processContext—Provides functions for retrieving and changing information about the currently running process, such as the variables defined in the process and the authenticated subjects of the process.
- systemLog—Provides logging functions to the container’s log. The statements logged with this interface are mixed with the other system log statements.
- auditLog—Provides logging functions to the process audit log. If auditing is enabled for the virtual service operation that is invoking the process, statements logged using this variable log information is inserted into the audited message log for the operation’s execution. This can be found on the service’s Monitoring tab in the Logs sub-tab.
- alerter—Provides an interface for generating alerts that are displayed in on the Policy Manager alert pages.
- recorder—Provides an interface for recording content in the Policy Manager usage log pages.
- msgFactory—Providers functions for create message variables. A message variable cannot simply be assigned content such as a simple string or int variable. It must be initialized using one of the functions in the msgFactory.
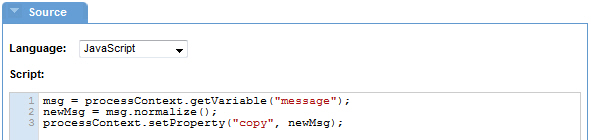
Normalized Copy Example
The following is a script that creates a normalized copy of a message and saves it as a variable.

- Line 1: The processContext is used to get the message variable named message.
- Line 2: A normalized copy is made of the message.
- Line 3: The processContext is used to save the normalized copy as a variable named copy that can be used in other activities that execute after this one in the process.
Normalized Message Creation Example
The next script illustrates the use of the msgFactory to create a normalized message. A normalized message contains the XML element referenced in the wsdl:Message element in a WSDL document.

- Line 3: The msgFactory is used to create a normalized message named temp.
- Line 4: The content from line 1 is set as the temp message content.
- Line 5: The processContext is used to save the new message as a variable named temp.
Protocol Message Creation Example
Message creation is not limited to normalized messages. Protocol-specific messages of any Content-Type can be constructed using the msgFactory. The following example shows the creation of a JSON message.

Note that on line 2 the call on the msgFactory to create the message is different, both in function name and the need for specifying the content-type of the message. In this case, the content-type is application/json.
Processing Message with UTF-8 Characters
If an incoming request includes UTF-8 characters then the Content-Type of the incoming request must be set to "application/json;charset=utf-8". The request will not be processed correctly if the Content-Type is not set appropriately.
For example, to support UTF-8 character encoding to use Swedish characters, include the following headers in the request.
Accept: application/json;charset=utf-8
Content-Type: application/json;charset=utf-8
Alternatively, the Content-Type of a message object can be modified inside Process Editor Script Activity by using setContentType("application/json;charset=utf-8") for an incoming message object or msgFactory.create() can be used to create a new message object.
 Branch Activity
The Branch Activity provides a mechanism to have alternate process flows, or branches, based on Boolean conditions.
To add a Branch Activity:
- Place the Branch Activity on the Process page.
- Connect the last activity to be executed before the branch to the Branch Activity.
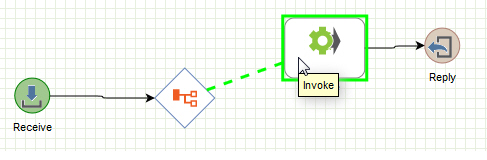
The example below shows adding a branch activity.
In the Branch Activity itself, there is very little to configure. It is the branch conditions themselves that have most of the information. If you double-click the Branch Activity, you can see a list of the conditions, and can establish what expression language each branch condition will use. All branch conditions must use the same language. Supported languages are:
- XPath
- JavaScript
- Jython
- BeanShell
- Simple Expressions
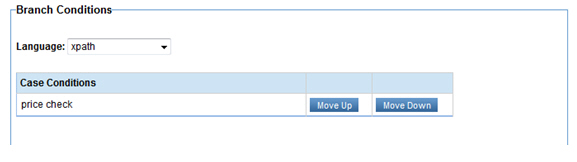
Branch Activity Editor: Branch Conditions
To create a branch:
- Add the next activity in the process.
- Select the Branch Activity and connect it to the next activity.
Branch Activity Editor: Creating a Branch
A Branch Activity is similar to a Java switch statement. It can support multiple branches; only one branch is followed. The branches have Boolean conditions defined by either an XPath expression or a script. Each branch is evaluated in order. The first to evaluate to true is selected, and the sequence of activities associated with the branch is then performed.
Branch conditions are defined separately from the main Branch Activity in the Condition Details Editor.
To add a branch condition:
- Add a new activity to the sequence (for example, a Script Activity or Invoke Activity).
- Drag a connector from the main Branch Activity to the target activity.
There must always be a default branch that can be selected if no other branch conditions evaluate to true. This default branch condition is named Otherwise. You must add and set the default branch for each Branch Activity configuration.
A branch condition can be written in any of the languages in the drop-down list. The language is set in the Branch Details Editor and can only be changed there. The language selected applies to all conditions within the branch.
Note: If you define branch conditions and then change the language, all the current source content is deleted. If you want to change the language, it's best to make a copy of your source content first.
After you select the language for case conditions, save and exit your Branch Activity and add your connections.
The result of the condition must be either true or false. If there are multiple conditions for a branch, you can change the order in which they are executed by moving conditions up or down in the Case Conditions table.
Note: The Otherwise condition does not display in the Case Conditions table, but you must still define it.
In most cases, the first branch created becomes the Otherwise branch, although you can change the sequence.
To change a branch’s condition:
- Double-click the connector between the Branch Activity and the next activity in the branch sequence.
Notes:
- The branch condition can be written in XPath, JavaScript, Jython, or BeanShell.
- The result of the condition must be either true or false.
Branch Condition Editor:
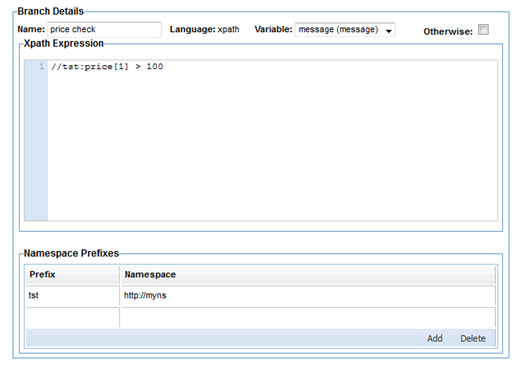
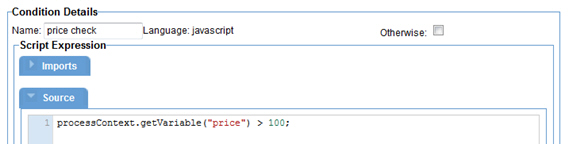
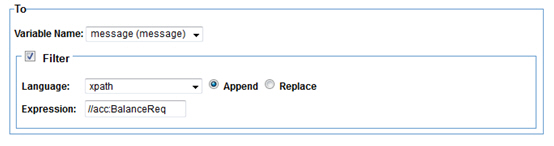
In the example above, the condition is configured to use XPath as the language for the Boolean expression. The expression first checks for the first price element found in the content of the message named message. If the value of this element is greater than 100, this condition is met. Note that the namespace prefix is defined at the bottom of the page.
If you are using XPath as the expression language, you'll see a field for selecting a message variable to use as the context of the expression. The expression is evaluated against that variable's content. The variable's content must be XML; if it isn't, an error is generated at runtime.
If you are using a script language, the script is evaluated, and the last line of execution is expected to result in a Boolean true or false. The context of the script is provided with a subset of the variables described in the Script Activity above:
- processContext—Provides functions for retrieving and changing information about the currently running process, such as the variables defined in the process and one or more authenticated subjects of the process.
- systemLog—Provides logging functions to the container’s log. The statements logged with this interface are mixed with the other system log statements.
- auditLog—Provides logging functions to the process audit log. If auditing is enabled for the virtual service operation that is invoking the process, statements logged using this variable are inserted into the audited message log for the operation’s execution. This can be found on the service’s Monitoring tab, Logs sub-tab.
In the example below, of a JavaScript branch condition, the condition is triggered when the value of the price variable is greater than 100.
 Split Activity
The Split Activity provides a mechanism to split the process into multiple concurrent flows, or branches.
To add a Split Activity:
- Drop the Split Activity on the Process page.
- Connect the last activity to be executed before the split, to the Split Activity.

When the activity that connects to the Split activity completes, the process engine executes all flows originating from the Split activity in parallel, each with its own thread.
Tips:
- Each flow can have any of the activities from the palette, except those that would prematurely end the flow of execution before a required Join activity, such as a Reply activity.
- It's best not to re-use the same process variable in different flows, because this can lead to unpredictable results.
- All flows that originate from the Split activity must be terminated by the same Join activity.
- All flows execute concurrently.
- When a flow is complete, it waits until all are complete. At that point, execution is resumed after the Join activity.
 Join Activity
The Join Activity terminates multiple concurrent flows, or branches. Drop the Join Activity on the Process page and then connect the last activity in each of the concurrent flows, originating from a Split activity, to the Join activity.

Tips:
- All flows originating from a Split activity must be terminated by the same Join activity.
- The activity after the Join activity is executed in the same thread as the originating Split activity, but it will not execute until all the flows complete their execution.
The Split-Join activity works for both REST and SOAP services, but using the Split-Join activity for SOAP services requires authentication with the authentication scheme. This activity will not work with an anonymous user.
 Transformation Activity
The Transformation Activity provides a mechanism for transforming XML message or string content. The transformation can be based on either of the following:
- XSLT (see examples below).
- FreeMarker (see Using FreeMarker in the Process Editor).
The input to the activity can be a message or string variable. At the completion of the activity, the transformed content replaces the input variable content.
Transformation Activity: XSLT Example
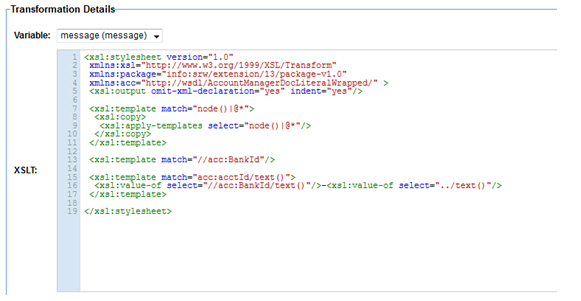
In the example above, the XSL stylesheet will remove the BankId element and prefix the AcctId of each account with the BankId.
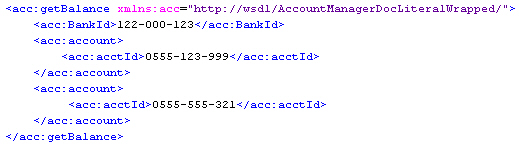
The example below shows an example of the transformation for a specific content example.
A: Before Transformation
Message variable content before the transformation:
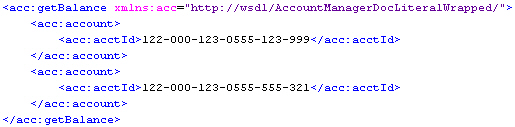
B: After Transformation
Message variable content after executing the Transformation Activity:
 Audit Activity
The Audit Activity provides a mechanism for auditing a message. The audited message content is recorded and displayed as audited message content from an Auditing Policy. This information displays on the Monitoring pages of a service (Services > Monitoring). The input to the activity can be a message variable.
Drag and drop to the workspace, and then double-click to access the Auditing Details Editor.
There are several options for defining which part of the message variable content will be audited. In the Capture Details section, shown below, you can choose to capture the complete message or a portion of the message.
Auditing the complete message
If the Capture complete message option is selected, as shown below, it's only necessary to specify a record name or label.

Auditing a portion of the message
If the Capture message at the following expressions option is selected, you can enter a list of expressions, as shown below.

Each expression can use a different language. The supported languages are:
- XPath: used when the input content is XML.
- JSONPath: used when the input content is JSON
- Regular Expression: used for all other types of content.
Each expression has its own Record Name, or label.
In case there is content that should not be viewable by others in the audit log, there is an option for masking content. In the Masked Elements section, shown below, you specify a mask (for example, password or account number) and a list of expressions that identify the content to be masked.
Masking message elements:
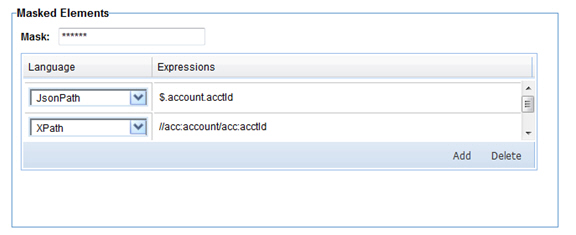
The expressions in the Masked Elements section are similar to those in the Capture Details section. The same languages are supported for masking, and the same mapping of message content type to expression language. The results of the expressions are replaced by the mask string.
If you look at the entire activity definition, you can see that auditing is applied to the account elements/properties of XML and JSON messages, but the account IDs are shown with a mask of *******.
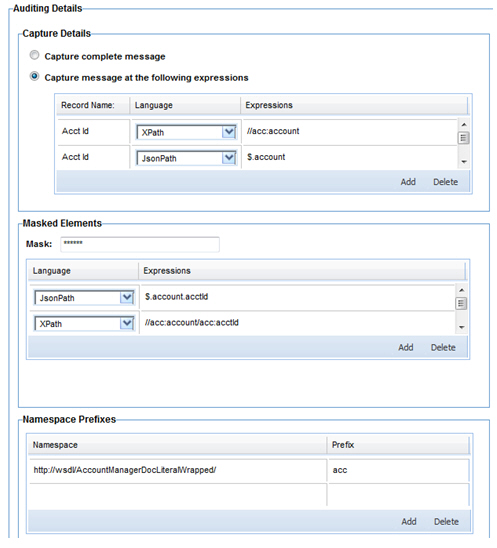
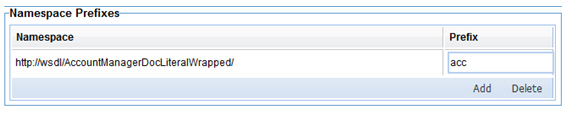
Note: The XPath expressions require the namespace prefix definitions that are specified at the bottom of the Process Editor.
 Insert Content Activity
You can use the Insert Content Activity to fill the content of a String or Message variable. The source of the content can be either of these:
- Statically defined content
- An existing variable
The From section of the activity editor identifies the source of the content.
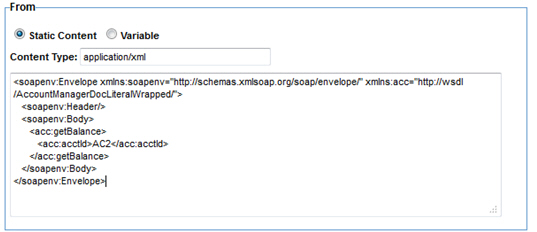
To specify static content to be inserted:
- Select the Static Content radio button. A text area is displayed.
- Enter content of any type, such as XML, JSON, or text.
- In the applicable text field, enter the content type of the static content you entered in the text area (for example, application/xml or application/json).
Example: inserting static content
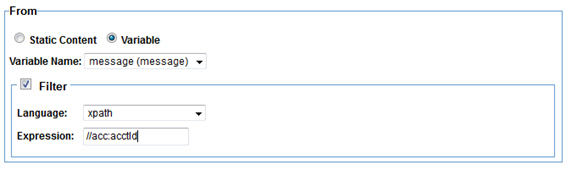
To use content from a variable as input, select the Variable radio button. The Filter section is displayed. To insert only a specific portion of the variable's content, select the Filter check box. To insert the entire content of the variable, leave the check box cleared.
A filter is defined using a filter expression written in a selected language.
Supported languages:
- XPath (for XML content)
- JSONPath (for JSON content)
- Regular Expression (for any content)
The result of the filter expression applied to the input variable is inserted. It is possible that the filter expression results in multiple elements or properties being used as input.
Inserting filtered variable content:
Namespace Prefixes
When defining XPath filter expressions, you must include the namespaces of specified elements by including a namespace prefix in the expression. All namespace prefixes must be mapped to a namespace in the Namespace Prefixes table at the bottom of the activity page, shown below.
The To section of the activity identifies the target of the content specified in the From section. The target of the inserted content must be a variable. You can choose to:
- Use the content of the From section to initialize or replace the content of the variable in the To section.
- Insert the content of the From section into the existing content of the target variable.
If you're replacing the entire content of a variable, if the variable hasn't yet been initialized it is initialized as a result of the activity.
To insert into existing content, you must identify the target location using a filter similar to the one described in the To section. Based on the filter expression, it is possible that there might be multiple target locations.
Once you've identified the target location, you can specify one of the following:
- The source content is inserted/added at the specified location (click Append button).
- The source content replaces any existing content at the specified location (click Replace button).
Note: If you are using a regular expression, only the Replace option is available.
The following figure illustrates the use of the Insert Content activity to initialize a message with static XML content.
Example: Initializing a message with static content
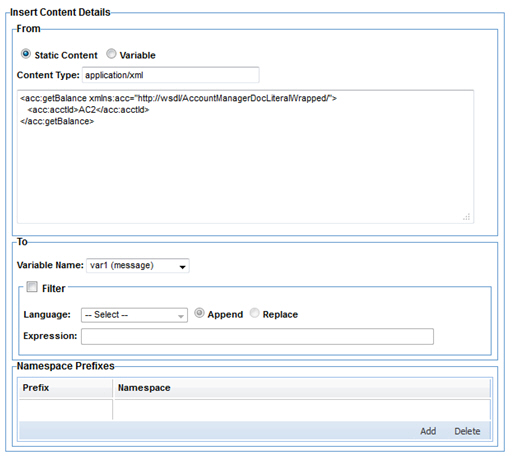
In this example, since no filter is defined in the To section, the static XML content will replace the content of var1, but if var1 has not yet been initialized in the process the static XML content is used to initialize var1.
Example: Appending message content
The example below illustrates using the Insert Content Activity to extract a portion of a source variable and append it to a target variable in a specified location.
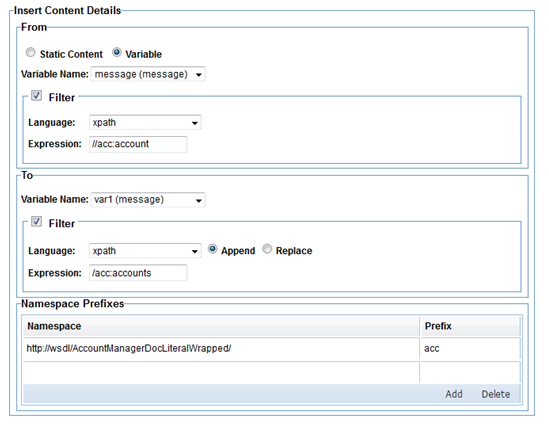
In this example, all account elements in the message variable are appended to the accounts element in var1. If no accounts element is found at the root of var1, an error is generated. To see how this activity would perform at runtime, take the following content for the message variable:
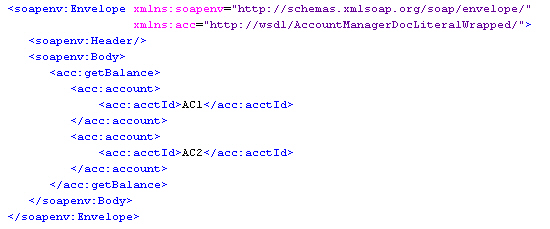
And take the following content for the var1 variable:

As a result of the activity, var1 will have the following content:

 Process Activity
The Process Activity allows you to call one process from another, so that you can create processes with common activities and then call those processes at an appropriate point during another process.
Processes with common activities are reusable. Reusable processes can themselves include Process activities so that they can call other reusable processes.
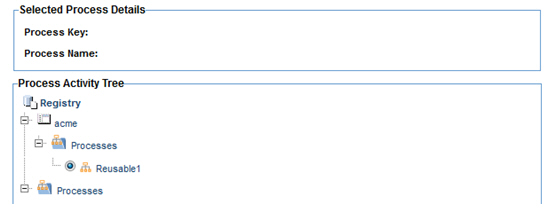
The configuration of a Process Activity is simple. The Process Editor presents a tree of reusable processes in the Processes folder of each Organization in the Policy Manager Workbench, as shown below. You simply select one.
When a process is called from another process, the calling process's context is passed to the called process. All the variables and their values from the calling process are passed through.
Note: If the called process defines variables with the same names as variables in the calling process, the variables defined for the calling process are used.
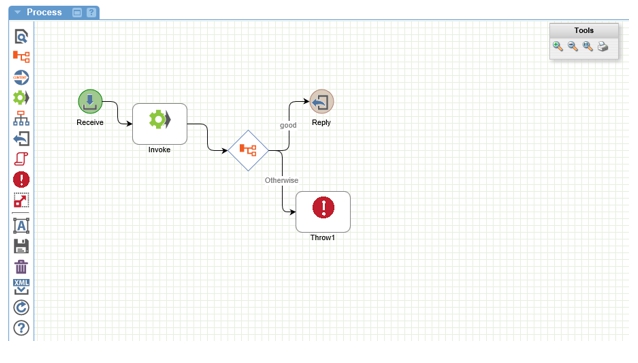
 Throw Activity
The Throw Activity exits the current flow of activities and enters the fault flow. You can add a Throw Activity at any point in the process (not in the fault flow). At the conclusion of the Throw Activity, the current flow is terminated and one of two things occurs:
- If a specific fault flow is defined for the fault that was thrown, the specific fault flow is executed.
- If there is no fault flow defined for the fault that was thrown, the default fault flow is executed.
The Throw Details Editor allows you to configure the Throw Activity. Here, you can define the fault name and a message variable for the throw message, as shown below.

Example: Adding a Throw Activity
The Throw Activity is defined by the fault it throws and, optionally, a message containing information about the fault.
If there is a fault flow constructed for the fault with the given name, that flow is executed. If a matching fault flow is not defined, the default, or unnamed fault flow is executed. The variable identifies a message variable in the process that holds the contents of the fault. It is assigned to the standard fault variable that is used in the default Reply activity of fault flows.