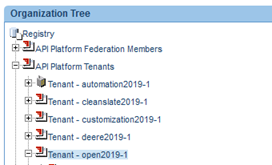
Tutorial: OAuth Setup for JWT Support
A step-by-step example to demonstrate setting up an OAuth domain to support JWT tokens. This example uses an LDAP domain for authentication.
On this page:
- Prerequisite steps in Policy Manager
- Set up the Akana OAuth/OIDC Provider domain
- Set up the External OAuth Provider domain
- Set up the app
- Set up the API
- Create the contract
- Test in Test Client
- Optional: decode the JWT token
Prerequisite steps in Policy Manager
There are some prerequisite steps that need to be done in the underlying infrastructure, Policy Manager. You can ask the Administrator to do these steps for you:
- Create an LDAP domain
- Create a JWT user
- Set up the JWT user as an organization identity for your Community Manager developer portal
Create an LDAP domain
- In the Policy Manager Management Console: Configure > Security > Identity Systems > Add Identity System.
- Follow the steps of the Add Identity System wizard. For documentation, see Identity Systems Overview.
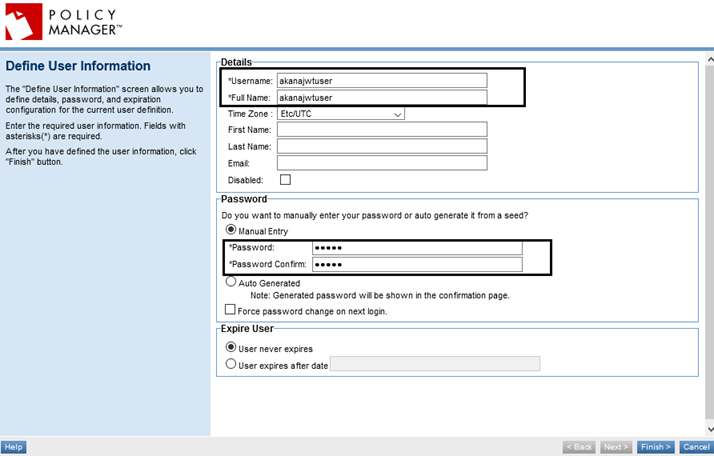
Create a JWT user
- In the Policy Manager Management Console: Security > Users > Add User. This example uses akanajwtuser as shown below.
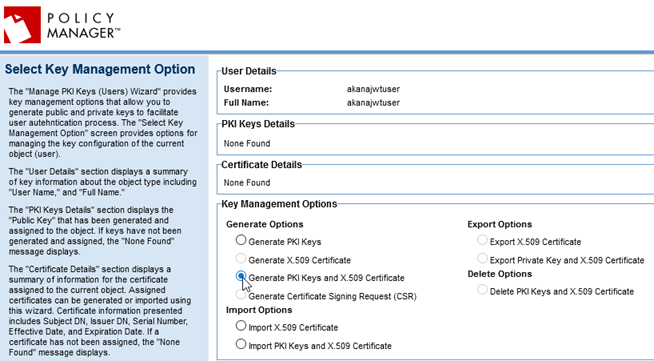
- Click Finish and then, at the Summary, click Manage PKI Keys.
- In the Select Key Management Option page for the user, generate the PKI keys for the user. This example uses the Generate PKI Keys and X.509 Certificate option, as shown below. Click Next.
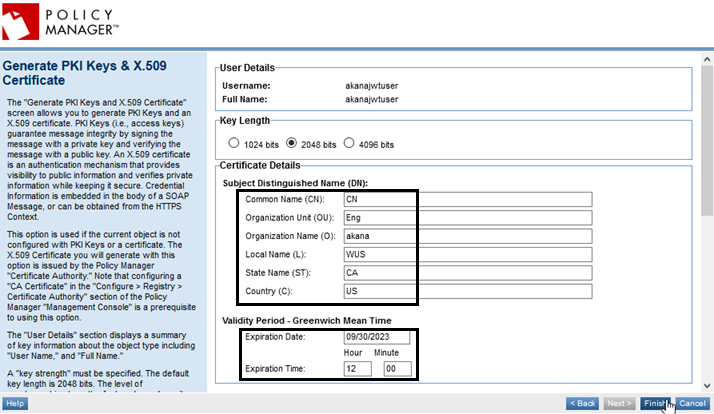
- In the Generate PKI Keys & X.509 Certificate page, enter values for the certificate. An example is shown below. Click Finish and then click Close.
Set up the JWT user as an organization identity for your Community Manager developer portal
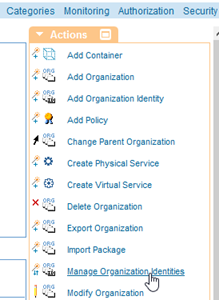
- In the Policy Manager Management Console: Go to Workbench and, on the left, choose your organization. If there are multiple organizations, be sure to choose the correct organization where you will create your OAuth domain. On the right, under Actions, choose Manage Organization Identities, as shown below.
- Use the Search tools to find the akanajwtuser user and add it to your organization, as shown below.
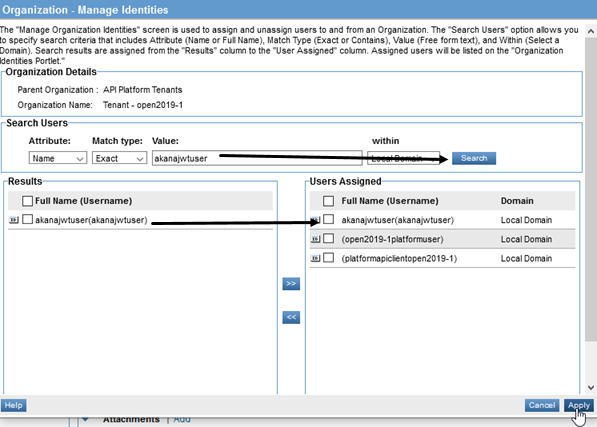
- Click Apply.
That completes the Prerequisite steps in Policy Manager. All other steps in this use case are performed in the Community Manager developer portal.
Set up the Akana OAuth/OIDC Provider domain
In this step, you will set up the OAuth Provider domain in the Community Manager developer portal, and configure it to use JWT.
To set up an Akana OAuth/OIDC Provider domain
- Log in to the Community Manager developer portal as a Business Admin.
- Go to More > Admin > Domains.
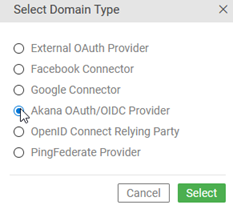
- Click Add Domain, and choose Akana OAuth/OIDC Provider, as shown below.
- In Tab 1, Details, provide a name for the domain. In this example: Akana JWT Provider.
- In Tab 2, Grant Types, choose all four grant types. In the Resource Owner Authentication Domain field, choose the LDAP domain that you set up. An example is shown below.

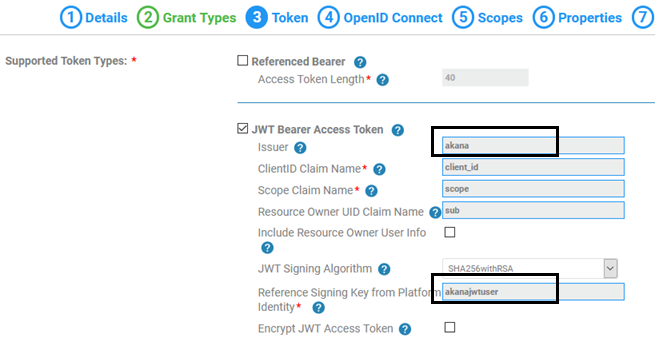
- In Tab 3, Token, click JWT Bearer Access Token. Specify the following values, as shown in the example:
- Issuer: akana
- Reference Signing Key from Platform: akanajwtuser.
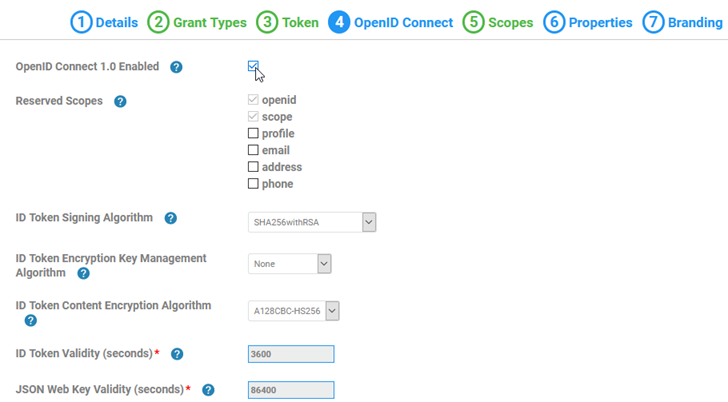
- In Tab 4, OpenID Connect, check the box to enable OpenID Connect, as shown below:
- In Tab 5, Scopes, no changes are needed. Make sure User Authorization required is checked. It is the default.
- In Tab 6, Properties, no changes are needed.
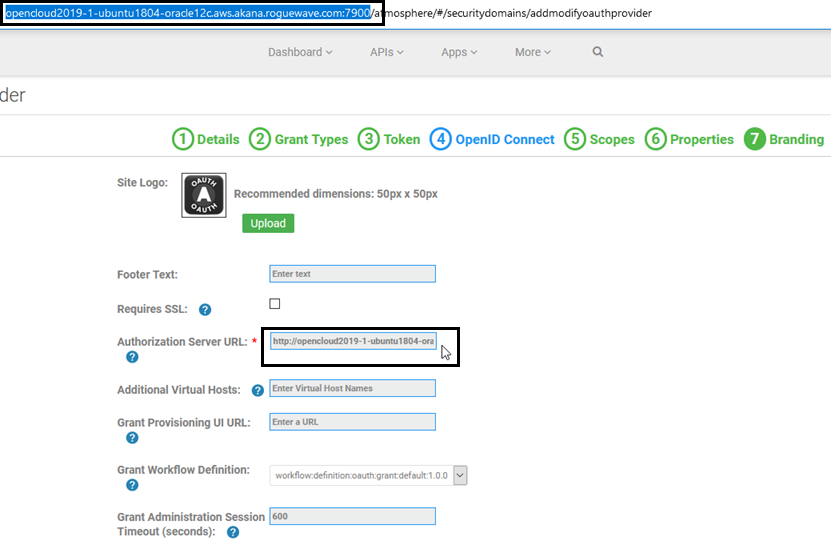
- In Tab 7, Branding, type in the full Authorization Server URL, including the port number, as shown below. In this example: http://opencloud2019-1-ubuntu1804-oracle12c.aws.akana.roguewave.com:7900.
- Click Save.
The next step is to add an External OAuth Provider domain.
Set up the External OAuth Provider domain
In this step, you will set up the OAuth Domain in the Community Manager developer portal, and configure it to use JWT.
To set up an External OAuth Provider domain
- Log in to the Community Manager developer portal as a Business Admin.
- Go to More > Admin > Domains.
- Click Add Domain, and choose External OAuth Provider.
- In Tab 1, Details, provide a name for the domain. In this example: Akana External.
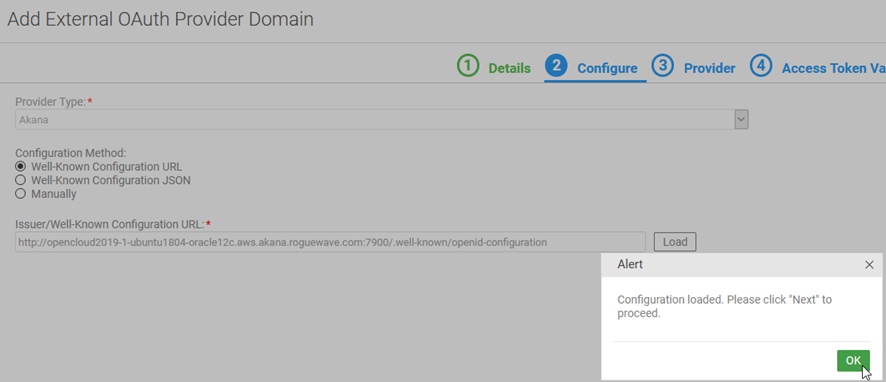
- In Tab 2, Configure:
- In the Provider Type field, choose Akana.
- Specify the well-known configuration URL for your provider, in the format {hostname:port}/.well-known/openid-configuration, and click Load. In this example: http://opencloud2019-1-ubuntu1804-oracle12c.aws.akana.roguewave.com:7900/.well-known/openid-configuration, as shown below:
- In Tab 3, Provider:
- In the top section, the values should be loaded from the OAuth Provider well-known configuration URL. If they are not, you can specify the issuer and the endpoints. The example below shows the values loaded from the well-known configuration URL above. In this example, Client Registration Endpoint is not needed. Text values, with placeholder hostname, are also included below.
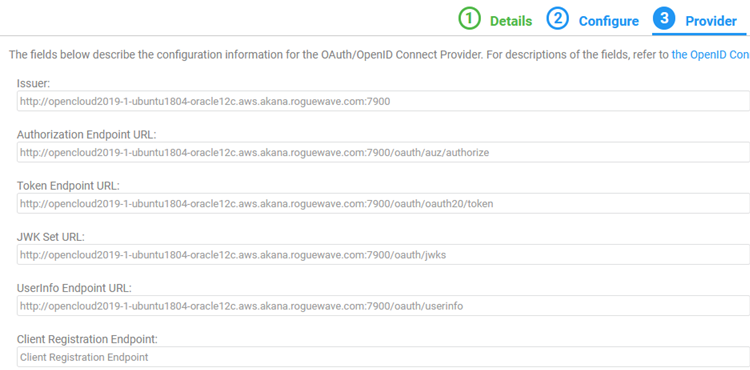
Issuer: Auth Server IP:Port
Authorization Server URL: Auth Server IP:Port/oauth/auz/authorize
Token Endpoint URL: Auth Server IP:Port/oauth/oauth20/token
JWK Set URL: Auth Server IP:Port/oauth/jwks
Userinfo Endpoint URL: Auth Server IP:Port/oauth/userinfo
- In the bottom section, if you are setting values manually, choose the features that you want. Again, these values should be read from the OAuth Provider's well-known configuration URL. You cannot choose to support options that the provider does not support.
- In the top section, the values should be loaded from the OAuth Provider well-known configuration URL. If they are not, you can specify the issuer and the endpoints. The example below shows the values loaded from the well-known configuration URL above. In this example, Client Registration Endpoint is not needed. Text values, with placeholder hostname, are also included below.
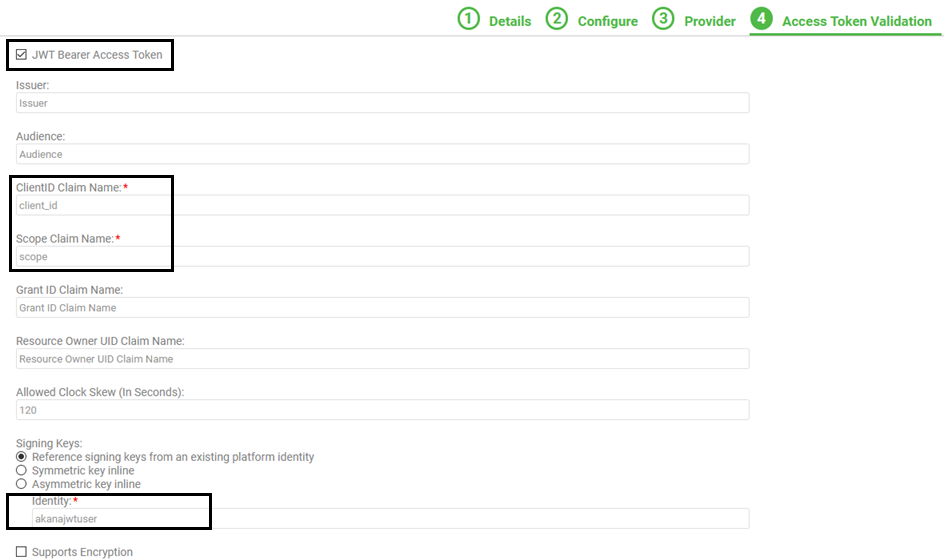
- In Tab 4, Access Token Validation:
- Check the JWT Bearer Access Token box.
- For ClientID Claim Name, enter client_id.
- For Scope Claim Name, enter scope.
- Make sure Reference signing keys from an existing platform identity is selected.
- In the Identity field below it, specify the platform identity that you created in Policy Manager. In this example: akanajwtuser.
- In Tab 5, Extensions, no changes are needed.
- Click Finish.
Now that you have the two domains set up, you are ready to create the app and API and test.
Set up the app
Create the app and then configure the App OAuth Profile.
To create an app
- Log in to the Community Manager developer portal.
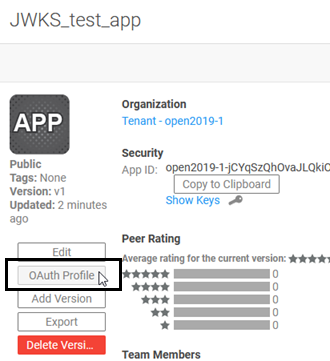
- Create an app. In this example, JWKS_test_app.
- Apps > Add App.
- Provide a version number, and save.
For detailed instructions, see How do I add an app?
- To configure the app to work with OAuth, go to the App Details page and click OAuth Profile:
- In the App OAuth Profile page:
- Provide some value in the Description and Legal Disclaimer fields, since these fields are required.
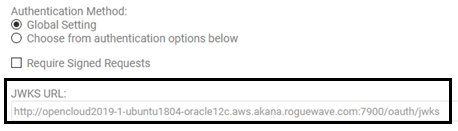
- Under JWKS URL, add your JWKS endpoint. This is the JWKS Set URL from the External OAuth Provider domain, Tab 3, Provider. In this example it is http://opencloud2019-1-ubuntu1804-oracle12c.aws.akana.roguewave.com:7900/oauth/jwks:
- Save.
Now, create the API.
Set up the API
There are a few settings you have to choose to get the API ready to use OAuth. Follow the steps below.
To create an API
- Log in to the Community Manager developer portal.
- Create an API:
- APIs > Add API.
- For detailed instructions, see How do I add an API? This examples uploads a version of the Swagger Petstore JSON file.
- For this example, after uploading the Swagger JSON, we have renamed the API to Swagger_Petstore_JWKS_Test.
- Modify the API implementation to use the OAuth Security Policy:
- Implementations > choose implementation > on Policies section, click Edit and add the policy.
- Implementations > choose implementation > on Policies section, click Edit and add the policy.
- Set up the API OAuth Details to use the OAuth Provider domain you set up:
- From the API's Details page, from the drop-down on the right, choose OAuth Details:
- In the API OAuth Settings wizard, Tab 1, Provider, choose the OAuth Provider created earlier, and then click Add Provider. In this example: Akana JWT Provider:

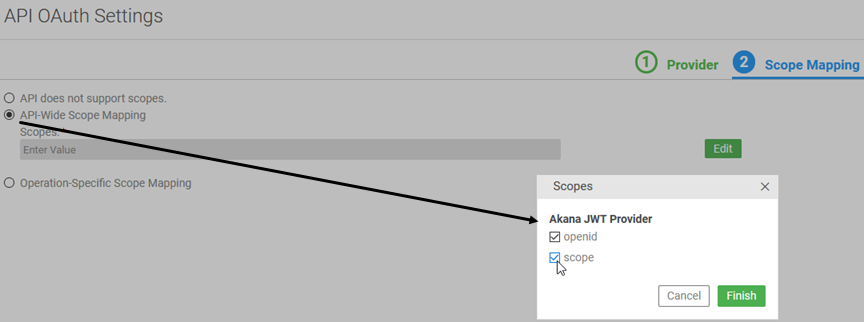
- In Tab 2, Scope Mapping, choose API-Wide Scope Mapping, then click Edit and choose both openid and scope:
- From the API's Details page, from the drop-down on the right, choose OAuth Details:
- Click Finish.
Create the contract
There must be a contract between the app and the API so that you can see OAuth and JWKS in action. The app developer requests a contract with the API, and the API developer approves it.
To create the contract
- In the Community Manager developer portal, go to APIs > My APIs > choose API > Overview.
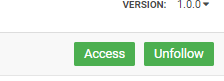
- At the top right, click Access:
- In Tab 1, Select App, specify the app/app version. In this example, Swagger_Petstore_JWKS_Test.
- Click Next.
- In Tab 2, Endpoint, choose the endpoint. Since you just created the API, there is only one endpoint.
- Click Save.
- As the API Admin, go to your Action Dashboard and activate the access request via the Dashboard notification.
Test in Test Client
Once everything is set up, you can test in Test Client, get the OAuth token, and get the API response.
To test in Test Client
- In the Community Manager developer portal, go to Apps > My Apps, choose the app (in this example, JWKS_test_app), and then go to Test Client.
- Make sure the correct API is selected. In this example, it is the only API that the app is connected to.
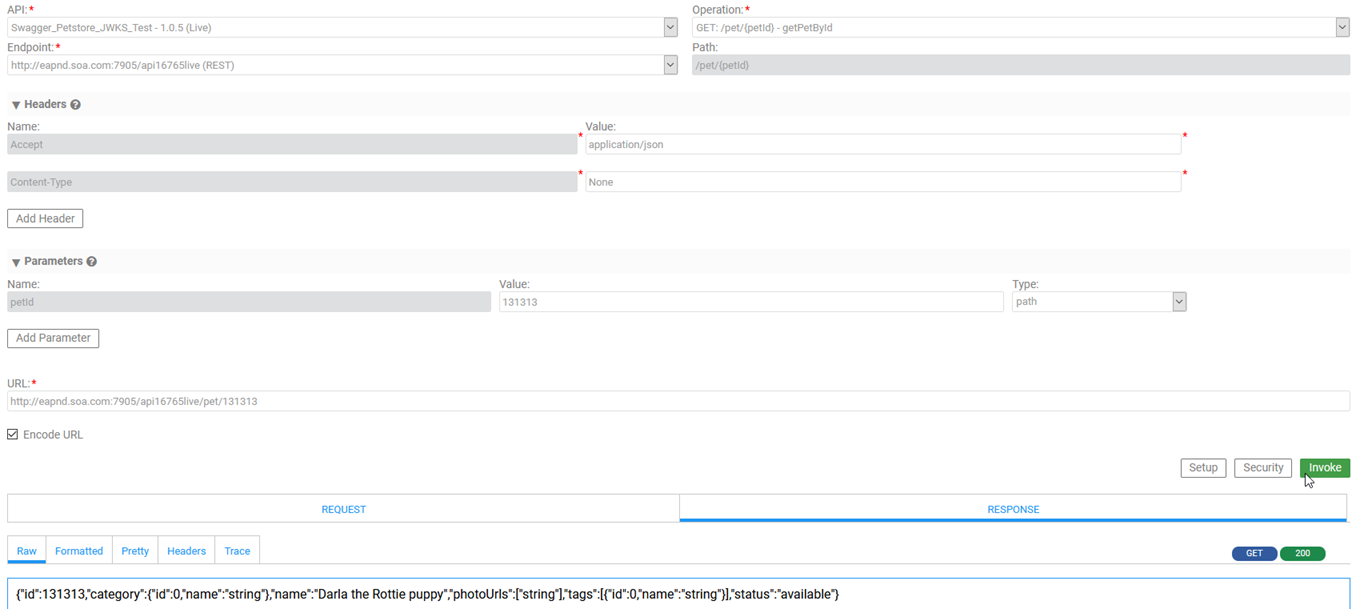
- Choose the operation. This example uses the getPetById operation (GET: /pet/{petid}) in the Swagger Petstore API.
Note: to follow along with this example, you will need to add a pet at https://petstore.swagger.io/#/pet/addPet, so that you have a valid Pet ID for testing.
- Click the Security button. You'll see the OAuth Security Policy page.
- Click Get Token. You will see the Authorization page:

- Put in the username and password for the LDAP user, and click Authorize, and the token is generated:
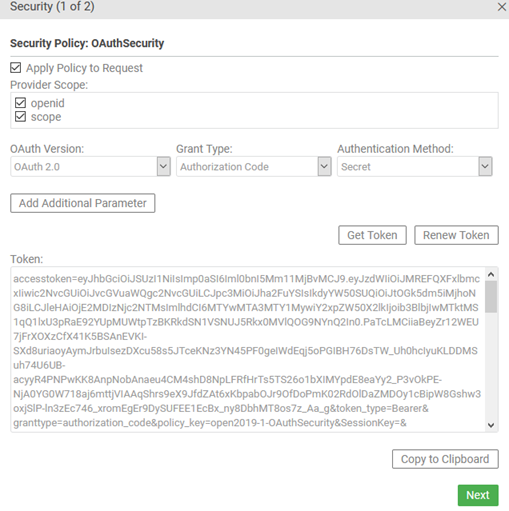
- Click Next, and then, at the SameOriginPolicy page, click Finish.
- For the Swagger Petstore API, put the valid PetID in the Value field, and then click Invoke to call the API.
For general documentation about using Test Client, see API Testing with Test Client.
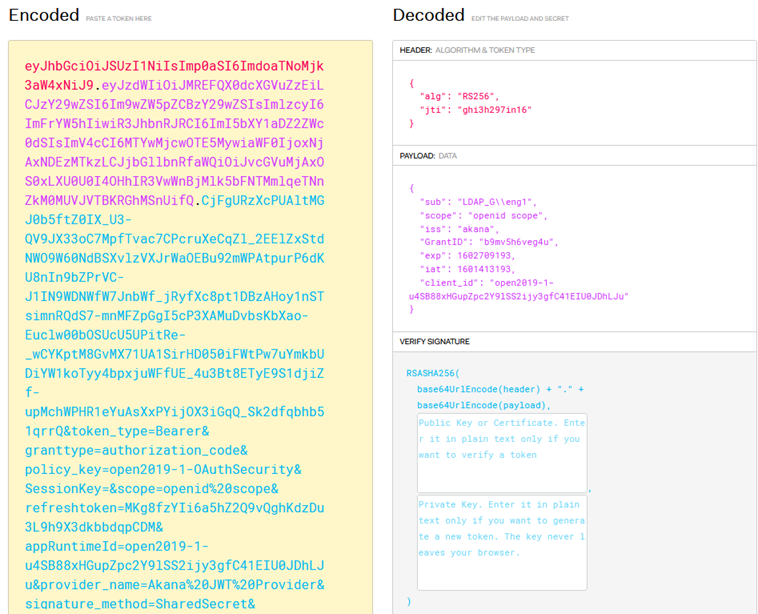
Optional: decode the JWT token
When you get the token in Test Client, you can also copy it to the clipboard and then parse the token on https://jwt.io/ to see the details. The token from the example above is shown below.
Note: If you copy the token using the Copy to Clipboard option, you'll need to remove the accesstoken= at the beginning. Just use the token value, as shown below.