API Testing with Test Client
Test your API in Test Client.
To invoke APIs from the Test Client, network directors or cluster hosts must be added to the forward proxy allowed list. For more information, see Prevent forward proxying.
Video content:
- Learn how to use Akana to test APIs and REST APIs to ensure they are functional, reliable, and secure.
- Learn how to use Akana to create an app, call an API, and request access to test API security.
On this page:
- What is Test Client?
- How do I access Test Client?
- How do I test my API in Test Client?
- How do I test my API with different apps in Test Client?
- What policies are supported in Test Client?
- How do the policies I choose affect the user experience in Test Client?
- Test Client security settings: AtmosphereApplicationSecurityPolicy
- Test Client security settings: Jose Security Policy v2
- Test Client security settings: Jose Security Policy v2 with content-type application/jose+json
- Test Client security settings: OAuth Policy
- Test Client security settings: OAuth Policy: Additional Parameters for authorization and token endpoints
- Test Client security settings: OAuth Policy: Multiple OAuth Providers (2019.1.0 and later)
- Test Client security settings: SameOriginPolicy
- Test Client security settings: HTTP Security Policy
- Test Client security settings: Aggregate Policy (2019.1.0 and later)
- How can I configure the additional parameters for authorization and token endpoints for the Akana OAuth Provider Domain? (2022.1.x and later)
- Does Test Client support policies assigned at the operation level? (2020.2.0 and later)
- How does Test Client support APIs that don't allow cross-origin API calls (don't support CORS)?
- How can I use the API Supports CORS check box for testing?
- My API uses the HTTP Security policy. Can people still test it in Test Client?
- Why does Test Client send an HTTP OPTIONS request before the call to the API endpoint?
- Troubleshooting in Test Client
What is Test Client?
The platform includes an API testing interface, Test Client, that acts as an easy-to-use testing tool for any API that is set up in the Community Manager developer portal. This test tool allows developers to thoroughly test all capabilities of the API.
It can be used for prototyping, testing, and troubleshooting apps against an API. It includes OAuth support for retrieving the OAuth token in order to process the message.
As an API admin, it's a good idea to try your API out in Test Client before you publish, so you can see what experience app developers will have when trying out your API.
How do I access Test Client?
Test Client is available in the context of either an app or an API:
- For app developers: From the app's Details page, on the left menu bar, choose Test Client.
- For API Admins: From the API's Details page, on the left menu bar, choose Test Client.
For Simple Dev theme, you'll need to construct the URL.
To construct the Simple Developer URL for an API Test Client
Note: Simple Dev theme is deprecated in version 2020.2.0, and will be removed in a future release.
- Take your Simple Developer platform URL, up to and including the #! in the URL, but delete everything after that.
- Get your APIID and APIVersionID. If necessary, you can get these from Hermosa Theme by going to the API's Details page (APIID is shown in the URL) and clicking Edit (APIVersionID is added to the URL).
- Construct the URL by adding the following after the portion of the URL that you already have:
apis/{APIID}/versions/{APIVersionID}/testclient
For example, the URL might be:
http://{hostname}/#!apis/9add5c43-d9c8-443c-b13f-5388eaf95df8.acmepaymentscorp/versions/f9c0846f-c4b5-4a42-b759-2f92de62aaa4.acmepaymentscorp/testclient
- Paste the URL in the address bar and click Enter to go to the Test Client page for your API in Simple Developer theme. You can now put in sample values to test your API.
The Test Client is accessible to the users after logging in.
How do I test my API in Test Client?
To test your API in Test Client, you can access it as an app developer or as an API admin. For instructions, see How do I access Test Client?
As an API admin, it's a good idea to test:
- With a few different operations
- With different parameters and headers
- With each of the security mechanisms your API supports
- With each OAuth version, and grant type, your API supports
- With each token type your API support.
For general info on the settings available, and where different values are set up, refer to the app developer help, reference section: What are the options in Test Client?
Operations List: for additional information about the list of operations displayed in Test Client, see Note: Operations List in Test Client.
CORS policy: The Site Admin can configure the platform to enable or disable the CORS policy for the purposes of testing APIs against apps in the Test Client testing tool. If you need this, ask the Site Admin. More information about this option is available in the Site Admin documentation: Can Test Client use CORS to send the requests to the API endpoint directly without using the Forward Proxy?
How do I test my API with different apps in Test Client?
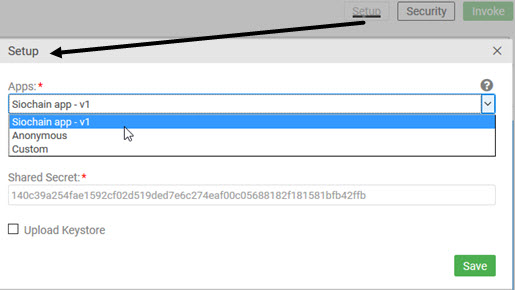
When you're testing you API in Test Client, you can test it in these contexts:
- Specific app—In the context of any app that you have visibility of. This includes any apps you might have set up yourself, and any apps that have an existing contract with your API.
- Anonymous—without specifying any app
- Custom—by defining values yourself
Below is an example of how this might look:
Note: To use all the features of Test Client, you'll need to enable popups on your browser.
Note: Display of the shared secret is governed by the platform's settings for apps. If the shared secret is encrypted, it is not displayed. For more information on how to use Test Client when the shared secret is encrypted, see The app's shared secret is not displayed, or is encrypted. How do I use Test Client?
For general information about viewing the shared secret, see How do I view a shared secret?
To test your app against a specific API, or in an anonymous or custom context
- From the app's Details page, on the left menu bar, choose Test Client.
- Choose the environment, operation, and any other available settings you want to test (available choices depend on the API setup).
- Click the Setup button. The top field, Apps, is a drop-down list and includes all available choices: all the apps you have access to, and also the Anonymous and Custom options (see above). For more information about the fields in this dialog, see Test Client: Setup (Authentication Settings) (app developer help).
- Click the Security button, choose options for the policies associated with the API, and save. For more information about the fields in this dialog, see Test Client: Security Settings (app developer help).
- Click Invoke.
What policies are supported in Test Client?
Key popular policies are supported in Test Client, but not the whole set.
Test Client supports:
- AtmosphereApplicationSecurityPolicy
- JOSE Security Policy v2
- OAuth Policy
- Same Origin Policy
- HTTP Security Policy
- Aggregate Policy (with any of the above policies)
For illustrations and usage examples, see How do the policies I choose for my API affect the user experience in Test Client? below.
How do the policies I choose for my API affect the user experience in Test Client?
The policies you choose for your API, on the API Implementation page, affect the options available to developers when using the Test Client tool to try out your API.
The policies you'll need/want to implement will depend on your specific needs; however, it's a good idea to test out the user experience and make sure everything looks good in Test Client for your users.
Note: The specific list of policies available to you for selection is determined by the System Administrator in Policy Manager. If you have questions or concerns about the policies available, or the options within those policies, contact the Site Admin or System Administrator.
Below are example of policies you might choose and the security options that will be available to your users in Test Client:
- Test Client security settings: AtmosphereApplicationSecurityPolicy
- Test Client security settings: Jose Security Policy v2
- Test Client security settings: Jose Security Policy v2 with content-type application/jose+json(2019.1.14 and later)
- Test Client security settings: OAuth Policy
- Test Client security settings: OAuth Policy: Additional Parameters for authorization and token endpoints
- Test Client security settings: OAuth Policy: Multiple OAuth Providers (2019.1.0 and later)
- Test Client security settings: SameOriginPolicy
- Test Client security settings: HTTP Security Policy
- Test Client security settings: Aggregate Policy (2019.1.0 and later)
Test Client security settings: AtmosphereApplicationSecurityPolicy
The AtmosphereApplicationSecurityPolicy is the basic policy for authentication; most APIs use it. If this policy is assigned, Test Client users have access to some or all of the security options shown below (via the Security button).
The token algorithms appearing on the list below are determined by the policy definition in Policy Manager. If token algorithms are not supported, users see only the Token Location drop-down.
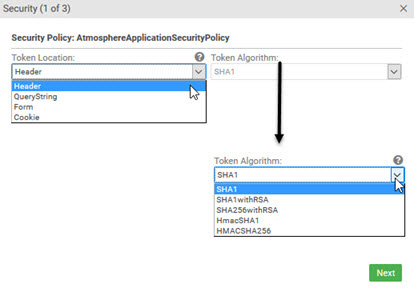
For more information about this policy, see Policy List.
For more information about the policy settings, if you are an authorized Site Admin, see What are the AtmosphereApplicationSecurityPolicy settings and how do they affect Test Client?
Test Client security settings: Jose Security Policy v2
Note: If the API requires JOSE policy, you can only use Test Client to test POST or PUT operations.
In Test Client, if the API uses JOSE policy, when you click Setup you must click Upload Keystore and upload the keystore; see Test Client: Setup (Authentication Settings).
Note: Test Client requires the private key, included in the P12 or JKS file. Of course, in a production scenario you would not upload the private key. Make sure that you are using a temporary keystore that you will not use in your production implementation.
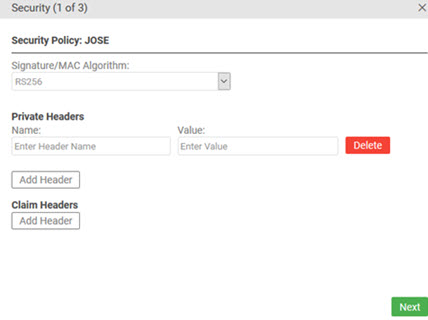
Then, click Security Settings. On the Security Policy page for the JOSE policy:
- Choose a signature/MAC algorithm.
- As needed, specify one or more private headers.
- As needed, specify one or more claim headers.
The illustrations below show the empty page on the left, and an example with headers added on the right.
Note: The headers shown in this example are private/critical headers specified by the UK Open Banking standard.
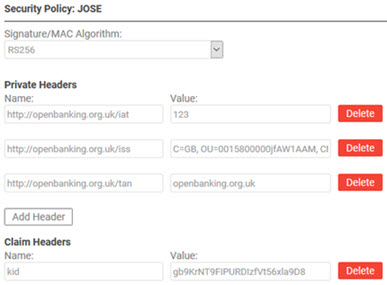
The table below shows the configuration values in the Security window if the JOSE Security v2 policy is applied to the API.
| Field... | Values... |
|---|---|
| Signature/MAC Algorithm | Choose from the list of supported algorithms; for example, RS256. |
| Private Headers |
A private header is any header other than the registered headers defined by the specification; see Private Header Parameter Names section of RFC 7515. You can specify one or more private headers; check the box and specify the header name and value. You can also add or delete existing private headers as needed. |
| Claim Headers |
You can specify one or more additional headers for the claim. |
Test Client security settings: Jose Security Policy v2 with content-type application/jose+json
Valid in Version: 2019.1.14 and later
If you choose an operation that has a content-type of application/jose+json, and the JOSE Security policy configuration settings on the API are set to use JSON serialization rather than compact serialization, you must add the following claim header:
- Name: cty
- Value: application/json
An example is shown below.
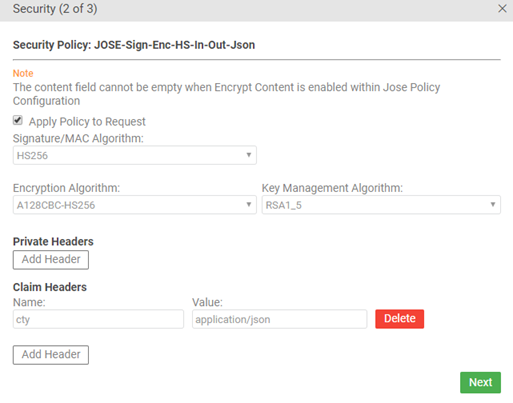
Note: If you're not sure whether this header is needed, refer to the documentation for the API. The API documentation should include this information.
Test Client security settings: OAuth Policy
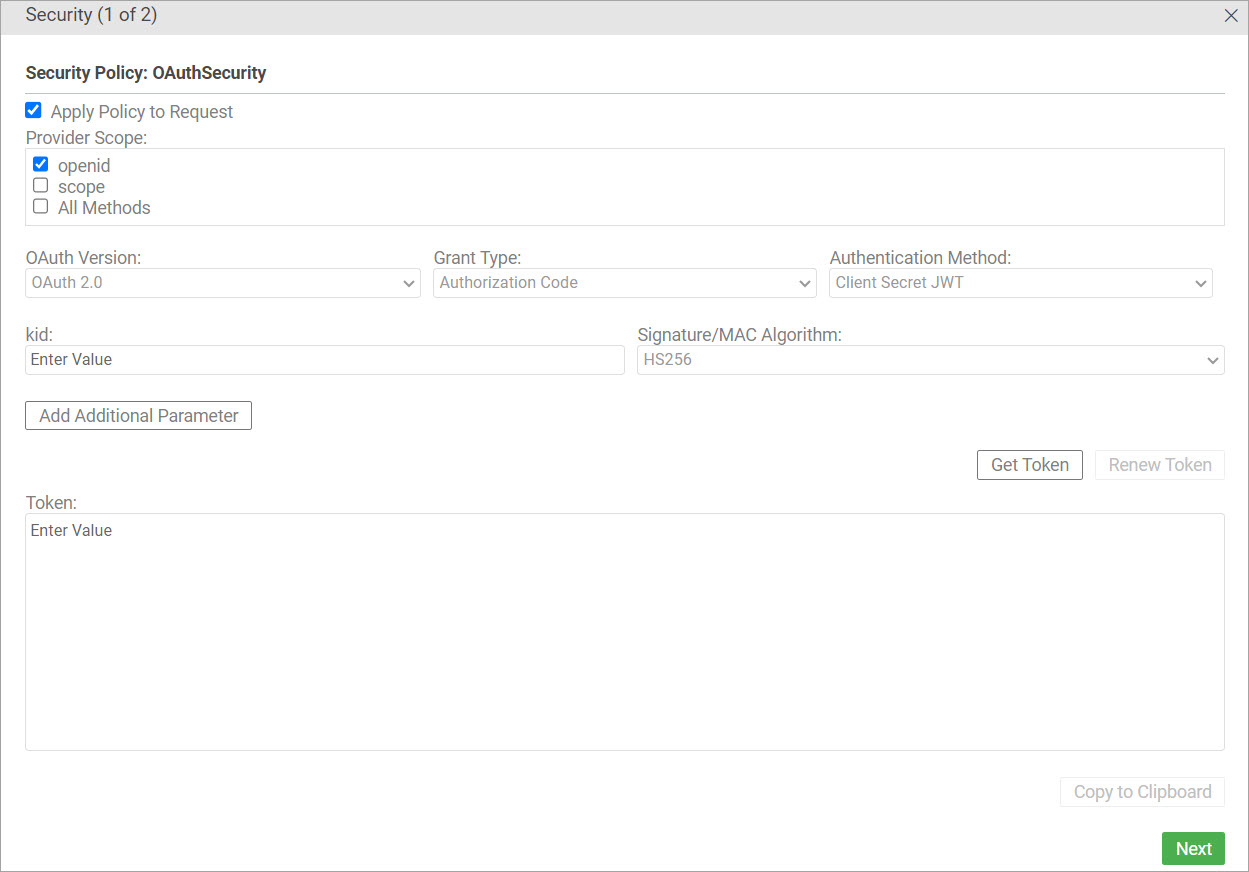
OAuth Policy: Field Values
The following table shows the configuration values in the Security window if the OAuth Policy is applied to the API.
| Field... | Values... |
|---|---|
| Apply Policy to Request | By default, the Apply Policy to Request checkbox is checked. If you change the setting, it doesn't change the behavior of the API that you are sending a test message to. It only changes the way that the Test Client composes the request. |
|
Provider Name / Provider Scope(2019.1.0 and later) |
Choose the OAuth provider you want to test against. Scopes supported by the selected provider and supported by the API/current operation being tested, are checked by default. For details and an example, see Test Client security settings: OAuth Policy: Multiple OAuth Providers. |
| OAuth Version | Choose from OAuth versions supported by the API. |
| Grant Type |
OAuth 2.0 defines four grant types (security scenarios, or use cases). The supported grant types are Authorization Code, Implicit, Resource Owner Credentials, and Client Crendentials. For more information, refer to the spec: http://oauth.net/2/. |
| Authentication Method |
Choose from authentication methods supported by the API. The full selection list of authentication methods, if all are supported by the API:
|
|
kid Signature/MAC Algorithm |
If you choose Client Secret JWT or Private Key JWT, specify these additional values:
|
| Additional Parameter / Add Additional Parameter |
If additional parameters are needed, provide the parameter names and values. For details, see Test Client security settings: OAuth Policy: Additional Parameters for authorization and token endpoints. |
| Get Token | Click to get an access token from the API's identity provider, so your app can access the API. Test Client will add the access token to each request. You might need to log in to the identity provider. |
| Renew Token | If the token has expired, click to get a renew token from the API's identity provider, so your app can access the API. You might need to log in to the identity provider. |
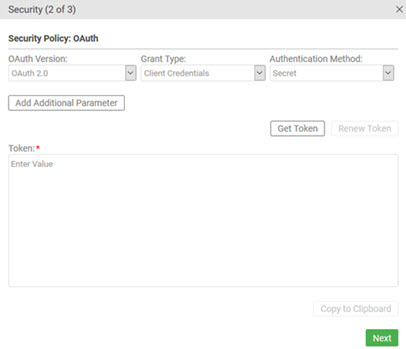
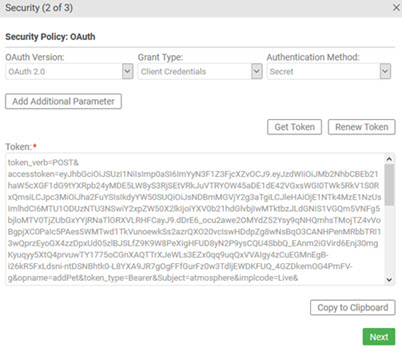
The example below show the OAuth Security page. In the first example, the Client Credentials grant type is selected; in the second, the user has clicked Get Token and the token is returned.
Test Client security settings: OAuth Policy: Additional Parameters for authorization and token endpoints
If your OAuth Provider requires additional parameters, you can get the parameter name and value from the configuration values in your OAuth Provider account. If additional parameters are needed, provide the parameter name and value for authorization and token endpoints, and then click Get Token.
In the following example, using the Implicit grant type, an additional parameter is required, of name resource, and a value, beginning with 00000002 in Test Client for adding the parameter name and value.
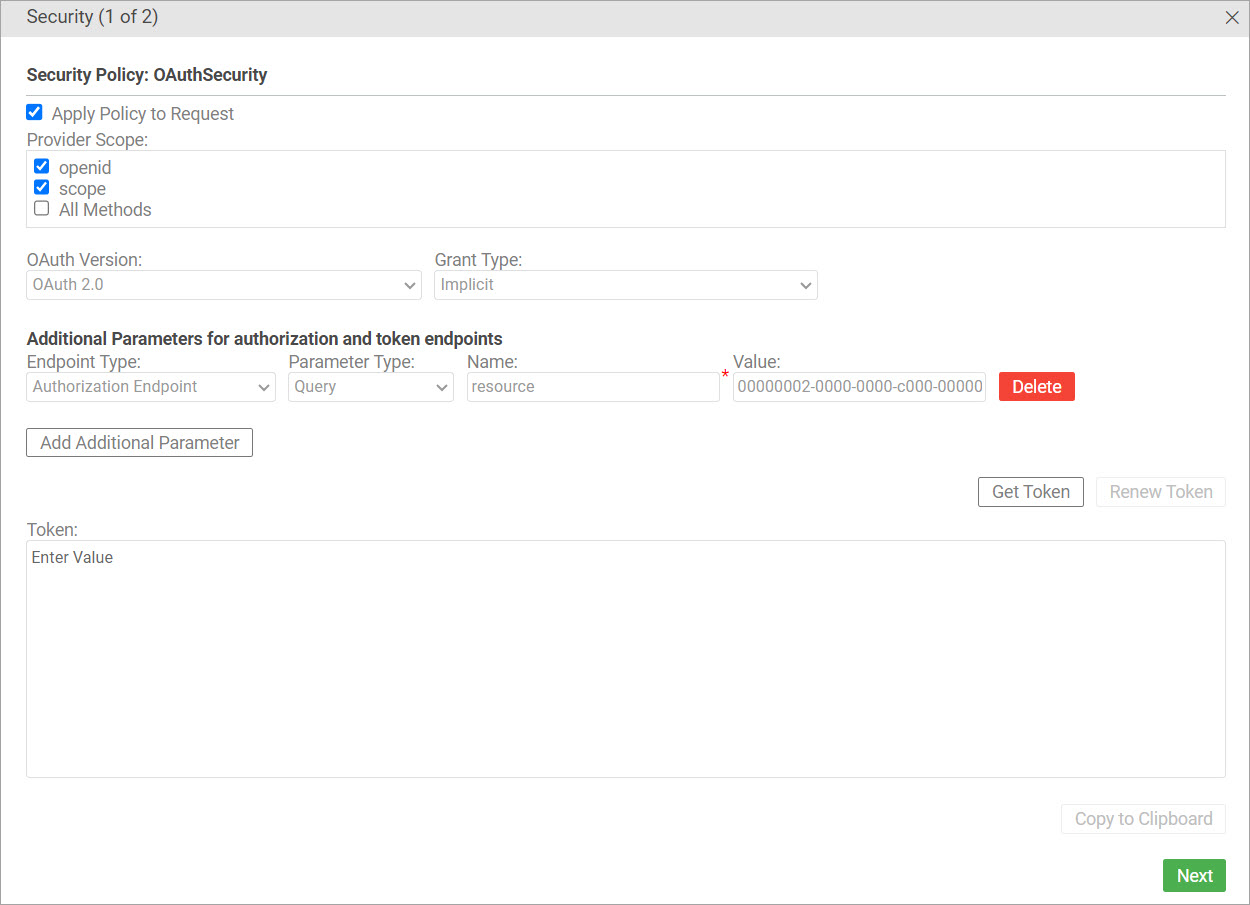
The following table shows the configuration values required for OAuth.
| Field... | Description... |
|---|---|
| Endpoint Type |
The endpoint type. The supported endpoints are the authorization and token endpoints. Based on the Grant Type, the following endpoint types are supported:
|
|
Parameter Type |
The type of a parameter for the endpoint. The supported types are header, query, and URL-encoded form.
|
| Name | Specify the name of the parameter. |
| Value | Specify the value to be used for the parameter. |
If you are using Okta as the OAuth Provider or any other third-party OAuth provider, the parameter type of the provider must exactly match the parameter type that needs to be sent. For example, the token endpoint parameter type can be either form or header, sent as form or header only. Refer to the OAuth provider documentation for details.
For more information about the policy, see Policy List.
For more information about the policy settings, if you are an authorized Site Admin, see What are the AtmosphereApplicationSecurityPolicy settings and how do they affect Test Client?
For information about the other fields on this popup, see OAuth Policy: Field Values.
Test Client security settings: OAuth Policy: Multiple OAuth Providers
Valid in Version: 2019.1.0 and later
If the API supports multiple OAuth providers, you can choose the provider you want to test against. When you choose a different provider from the drop-down list, Test Client updates the list of scopes to show the scopes the provider supports. The scopes that the current API uses, and that are valid for the current operation being tested, are selected by default.
If the API scope configuration includes operation-specific scopes, Test Client matches the scopes displayed to the current use case scenario. For example, if the API has separate scopes for GET, POST, and PUT operations, as in the example below, and you select a GET operation and then click the Security button, the scopes for the POST and PUT operations are not displayed.
In the example below, the selected provider supports five scopes displayed with check boxes. Of those, the current API/current operation supports one, selected by default. The other scopes are available for negative testing scenarios.
Choose the provider, specify the other values such as OAuth version and grant type, and then click Get Token.
For information about the other fields on this page, see OAuth Policy: Field Values above.
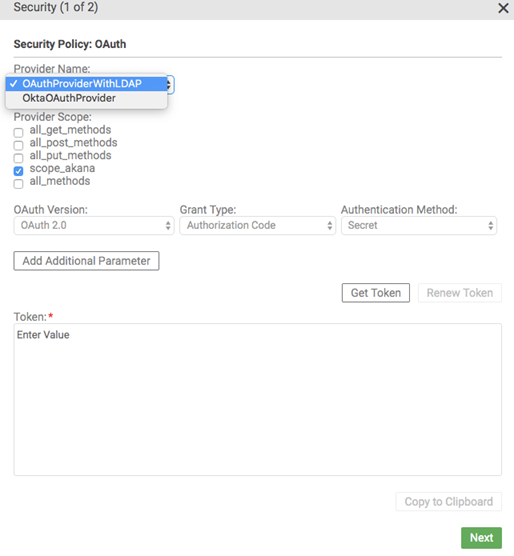
Note: If the API supports only one OAuth provider, the scopes are still displayed as above.
Test Client security settings: SameOriginPolicy
If the endpoint URL is on a host that is not the user interface host, same-origin policy prevents the browser from accepting the response unless the API can send the CORS headers.
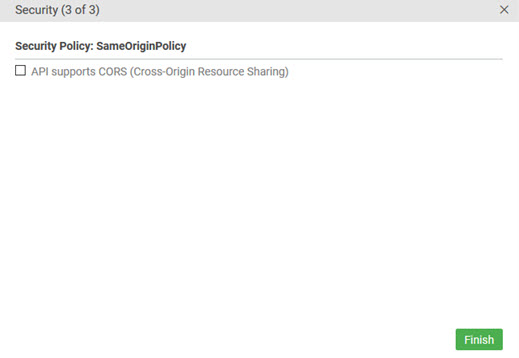
Test Client includes the SameOriginPolicy option by default, because Test Client is capable of supporting cross-origin resource sharing (CORS) as well as sending the message via the platform's forward proxy server. The page for this policy is the last page of the Security wizard. Depending on the API setup, it might be the only page.
If the API supports CORS, check the box. Otherwise, leave it cleared, or the request will fail.
In Test Client, when you click Invoke, the request is sent directly from the browser to the API endpoint. If the endpoint supports receiving requests from a different domain, the API supports CORS. If it does not, the call will not be successful, and there will be an error, since the API call is sent from the Community Manager developer portal to the API endpoint.
If you want your API to support CORS, add the CorsAllowAll policy to the proxy API implementation (API > Details > Edit > CorsAllowAll policy).
Note: In some cases, the Site Admin might have modified the Community Manager developer portal setup so that the SameOriginPolicy option is set in the background, either enabled or disabled, and doesn't display to users. If you don't see this page, and have questions about CORS support, contact the Site Admin.
Test Client security settings: HTTP Security Policy
If the API has the HTTP Security Policy attached, the Test Client user must upload a certificate, in the Authentication Settings, in order to test the API. For details and instructions, see Test Client: Setup (Authentication Settings) (app developer help).
Test Client security settings: Aggregate Policy
Valid in Version: 2019.1.0 and later
The Aggregate Policy offers a lot of flexibility. Adding an Aggregate Policy to an API allows the API Admin to set up a scenario where multiple policies are combined into one, with either of the following conditions specified:
- AND: messages must meet the requirements of all the policies defined in the Aggregate Policy
- OR: messages must meet the requirements of at least one of the policies defined in the Aggregate Policy
For example, the API Admin might set up a scenario where an Aggregate Policy includes the AtmosphereApplicationSecurityPolicy and also the OAuth Policy, with AND configured. In this scenario, adding only one policy to the API, the Aggregate Policy, provides the security features of both policies.
Test Client supports the Aggregate Policy for testing purposes if the API is configured with one or more of the following:
- AtmosphereApplicationSecurityPolicy
- HTTP Security Policy with Client Certificate option only (requires Authentication Policy, also supported)
- OAuth Security Policy
Note: The Community Manager developer portal itself supports many additional policies on APIs. However, Test Client supports only the policies listed in What policies are supported in Test Client?, and the Aggregate Policy can only include the policies listed above. If an API has policies attached that are not supported in Test Client, results might not be as expected. In this scenario, you'll see a message warning you that the policy is not supported and results might be unexpected.
In the example below, the API has an Aggregate Policy which includes the AtmosphereApplicationSecurityPolicy, with an enforcement requirement of AND. This means that the Aggregate Policy includes at least one other policy, and must enforce both of them (or all of them). In this scenario, the Apply Policy to Request check box is checked by default, because the Aggregate Policy is configured with an AND condition.
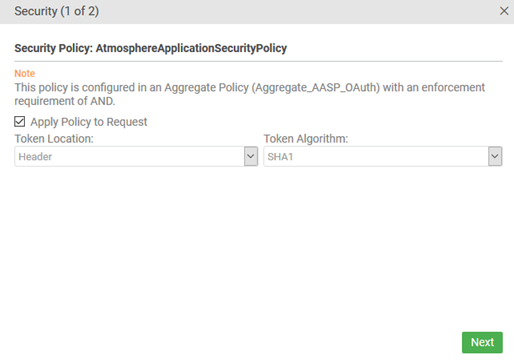
By default, this checkbox inherits the policy configuration, and Test Client enforces the conditions of the policy, or not, depending on the setting. If you change the setting, it doesn't change the behavior of the API that you're sending a test message to. It only changes the way that Test Client composes the request. For example, if there is an Aggregate Policy on the API, and it includes an OAuth Policy with an enforcement requirement of AND, Test Client sends an OAuth token with the request. If you clear the check box, the API still requires an OAuth token, but Test Client doesn't send it with the request. You can use this for test scenarios, including negative testing.
How can I configure the additional parameters for authorization and token endpoints for the Akana OAuth Provider Domain?
Valid in Version: 2022.1.x and later
If the Akana OAuth Provider Domain requires additional parameters, you can configure the authorization and token endpoint parameters using the Security Domain API or the user interface, see Test Client security settings: OAuth Policy. The POST/securitydomains API request creates a new domain along with the additional parameters required for authorization and token endpoints. To update an existing domain, use the PUT/securitydomains/{DomainID} API request to send the additional parameters for authorization and token endpoints by adding the following JSON for a domain:
\"AuthorizationEndpointParameters\":{\"Parameter\":[\"authorization_endpoint_parameters1\", \"authorization_endpoint_parameters2\"]},\"TokenEndpointParameters\":{\"Parameter\":[\"token_endpoint_parameters1\", \"token_endpoint_parameters2\"]}
For more information see, Test Client security settings: OAuth Policy: Additional Parameters for authorization and token endpoints.
Does Test Client support policies assigned at the operation level?
Valid in Version: 2020.2.0 and later
An API can have policies assigned to the entire version of the API in a specific implementation (Sandbox or Live). In Version 2020.2.0 and later, policies can also be assigned to one or more specific operations. So, for example, an API owner might add an extra security policy to POST, PUT, and DELETE operations, but not to the GET operations.
If the API has policies assigned at the operation level, and you're using Test Client and choose that operation, you'll see the series of operation-specific pages just as you would if the policy was assigned for the entire API. In terms of using Test Client, there is no difference to the user experience. Normally, Test Client determines which policies to present to the user based on the API that the user is testing. With operation-specific policies, it depends on the API and also the operation that the user is testing.
All policies supported by Test Client are supported at the operation level. For the list, see What policies are supported in Test Client?
How does Test Client support APIs that don't allow cross-origin API calls (don't support CORS)?
If an API doesn't support CORS, by default any calls to the API from Test Client, on the Community Manager developer portal's URL, would be refused.
As a workaround to support testing these APIs in Test Client, Test Client employs a proxy server, which sends the request to the Network Director, so that the domain is the same.
By default, when you're using Test Client, if the sending and receiving domains are different the browser sends a pre-flight request (see Why does Test Client send an HTTP OPTIONS request before the call to the API endpoint? below). Based on the results, if the API doesn't support CORS, Test Client sends the request, with special headers, to the proxy server set up for the purpose. The proxy server forwards the request to the underlying infrastructure (Network Director); the request is relayed to the API and the response returned to Test Client.
How can I use the API Supports CORS check box for testing?
Test Client includes a check box in the Security settings API Supports CORS, that you can use to check that your API's CORS support is working properly.
For information on how to access this setting, see Test Client security settings: SameOriginPolicy above.
By default, Test Client sends calls to the target API endpoint via a forward proxy, which then forwards the call to the underlying infrastructure, so that API calls from Test Client don't violate the API's CORS policy.
If you check the API Supports CORS check box, Test Client doesn't route calls via the forward proxy. Instead, API calls are routed directly to the underlying infrastructure.
You can use this to test your API; for example, in a scenario where there is an issue and you want to narrow down where the issue is occurring.
If your API does not support CORS, you could also use this check box to test that CORS limitations are working correctly. If you check the box, and the API does not support CORS, the API call from Test Client will fail.
My API uses the HTTP Security policy. Can people still test it in Test Client?
Yes. If an API has the HTTP Security Policy attached, Test Client sends an additional header in the request, the Atmo-Client-Token header, as shown below.
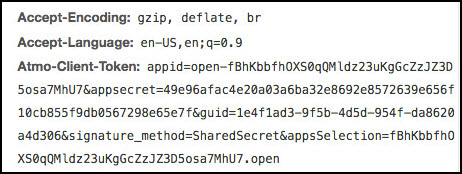
This allows app developers to test their apps with APIs that use the HTTP Security policy.
Why does Test Client send an HTTP OPTIONS request before the call to the API endpoint?
When you're sending an API call in Test Client, Test Client performs an extra step in the background in order to support testing of APIs even if the API doesn't support CORS (cross-origin resource sharing). Here's what happens:
- When the API request is initiated, Test Client sends a preflight request, using the HTTP OPTIONS method, to the proxy endpoint. This request essentially says: will you accept this request, with these headers? The specific headers for this type of message are: Access-Control-Request-Method and Access-Control-Request-Headers.
- If the response message indicates that the message will be accepted, Test Client then sends the message, via the browser.
For this reason, you'll sometimes see an HTTP OPTIONS request message in the Trace tab of Test Client.
For more information about how CORS support works, see http://www.w3.org/TR/access-control/#resource-preflight-requests (external link to applicable section of CORS specification).
If you want your API to support CORS, add the CorsAllowAll policy to the API implementation (API > Details > Edit > at bottom left of page, CorsAllowAll policy).
Troubleshooting in Test Client
This section provides information on some of the issues you might encounter when testing your API in Test Client.
Specific errors are listed in the table below. However, there are many variables associated with API setup and any of these variable factors might influence the way things work in Test Client. If you find that test calls aren't working when you think they should, here are some of the things you could check:
API setup:
- Make sure the target URL is correctly defined.
- Make sure the proxy endpoint is correctly defined.
- Make sure that if media types are specified they are correct.
- Check that access is set appropriately: public, private, or registered users; allow anonymous access yes or no for each endpoint you've defined.
- Make sure each operation is defined correctly.
- Make sure there are no spaces in the operation definitions, including trailing spaces.
- Make sure the correct policies are assigned to the API.
- Does the API have the same endpoint in both Sandbox and Live implementations? If so, Network Director cannot differentiate between the two endpoints with API calls, so you might get unexpected results. You can change the proxy endpoint so that there is a difference between the two environments; for example, append /prod and /sbox in the second field.
- Remember that if the API uses the out-of-box AtmosphereApplicationSecurityPolicy, security is disabled by default, so the Shared Secret value is not validated.
- Remember that if the API allows anonymous access, neither the App ID nor the Shared Secret is validated.
- The API might be set up so that anonymous access is allowed with some scopes, but that if the developer provides the App ID additional licenses become available. In this scenario, some capabilities are available with anonymous access, and additional capabilities are available by sending the App ID and Shared Secret.
OAuth setup:
- If the API uses OAuth, make sure the OAuth Policy is assigned (API setup, Tab 3, at the bottom).
- Make sure the OAuth options are correctly set up (API Details > OAuth Options).
App setup:
Make sure the app has a contract with the API in the environment you're testing.
Policy setup:
If you want to support different security options for OAuth, such as SHA1, SHA 256, or HMAC, you'll need to make sure the AtmosphereApplicationSecurityPolicy supports those options (in Policy Manager). By default, it does not. If needed, coordinate with an Administrator with regard to the settings for this policy.
| Error message or scenario | Possible reason |
|---|---|
| 400 Bad Request |
Any discrepancy between the actual API definition and the API definition in the platform or the values provided in Test Client might cause this error. For example:
You will also see this error if you didn't specify an app, or specified Anonymous, when the API doesn't support anonymous access. |
| Authorization Failed |
The app doesn't have a contract with your API, and the API is not available for anonymous users (therefore valid authorization is required which the app doesn't have). The API uses the OAuth Policy and you changed some of the values without generating a new token. |
| Binding failure | The media type specified for the Accept header isn't supported by the operation. For example, the operation returns application/json only, but the Accept header field specifies a media type of application/xml. |
| "Missing domain. The service may not have been assigned a provider." | The API definition includes the OAuthSecurity policy, but the API's OAuth setup was not complete (API > Details > from the drop-down on the right, OAuth Details). |
| TokenKey does not have Policy Type (OAuth 1.0a or OAuth 2.0) | The API definition includes the OAuthSecurity policy, but you didn't click the Security button, choose OAuth settings, and generate the token. |
| API definition allows anonymous access, but the API call fails if Anonymous is specified for the app. | The API has a security policy assigned: either the AtmosphereApplicationSecurityPolicy policy or the OAuthSecurity policy. Both these policies require credentials; so even if you specified that the API allows anonymous access, the security policies will reject anonymous calls to the API. |
| "1010714-Invalid consumer key. The value [APIRuntimeID] in the oauth_consumer_key field is invalid or missing." | An invalid value was provided for oauth_consumer_key. |
| OAuth token generation fails | The platform includes a security setting, Limit forward proxy feature to allow only these hosts (Site Admin help). If only specific hosts are listed, OAuth requests to a host that is not on the trusted list will fail. |
| Security button does not appear in Test Client | The implementation for the API is not correctly set up with a valid Deployment Zone enabled. See Managing API Implementations. |
| Operations do not appear for the API | The implementation for the API is not correctly set up with a valid Deployment Zone enabled. See Managing API Implementations. |
| "Error encountered executing {service/operation}. Cause: Cannot establish connection to {API_endpoint} because it cannot be trusted." | The OAuth token is missing or invalid. In Test Client, be sure to click the Security button, and then click the Setup button. On the page for the OAuth Security policy, make sure the values are correct, and click Get Token. The token is required for a successful call to the API endpoint. |
|
"This security policy is not supported by Test Client. On "Invoke" you might see errors." |
There is a policy included in an Aggregate Policy attached to the API, which is valid at runtime, but not supported for testing as part of an Aggregate Policy in Test Client. The platform includes a large number of policies, and a popular subset is supported in Test Client. An example of this error is shown below.
For information about which policies are supported for testing purposes, see What policies are supported in Test Client? |
|
With Okta as the OAuth Provider: on clicking Get Token, this error: { "HttpStatus": 403, "ErrorCode": "access_denied", "ErrorDescr": "Policy evaluation failed for this request, please check the policy configurations."} |
A default policy is not set up for the Okta Authorization Server. See Setting up the authorization server in Okta (use case for API testing in Test Client with Okta). |
