API Administration: Overview
Overview of API management in the Akana API platform.
On this page:
- How do I add an API?
- How do I get started?
- What API management capabilities are available to the API Admin in the platform?
- What are the differences between the API Admin and Business Admin roles?
- How do I manage my API?
- What information is available on the API Overview page?
- What's the difference between the Overview page and the Details page?
- What are API properties?
How do I add an API?
There are three approaches to adding an API in the platform.
Review the options in the table below to decide which is best for you. Then click through to the process overview and instructions.
| Use this option... | If... |
|---|---|
| Add a new API > Design from Scratch |
The API is not already set up as a service in the API Gateway, and you want to define it by hand rather than using an API description document. |
| Add a new API > OAS3/Swagger/RAML/WSDL/WADL/GraphQL document |
The API is not already set up as a service in the API Gateway, and you want to define it using an API description document. |
| Publish an existing service as an API |
The API is already set up as a service in the API Gateway.
Note: This option might not be there, depending on platform settings as determined by the Site Administrator. See Publish an existing service as an API. |
How do I get started?
The API development process steps you through the stages shown below: Add, Design, Implement, and Test.
To get started, from the top navigation, go to APIs > Add API.
You can define your API from scratch, or you can import an API description document. Either way, you'll need to have your full API definition ready.
For more information about adding an API, see Add an API.
Once you've added the API, take a moment to review API management capabilities (What API management capabilities are available to the API Admin in the platform?) and how you get around in the user interface to complete these tasks (How do I manage my API?).
For some tutorial videos to help you get started, see Tutorial Videos.
What API management capabilities are available to the API Admin in the platform?
When a user creates an API, that user automatically becomes the first Admin for the API. All API Admins have the same rights. They can:
- Invite additional users to the API Admin group, or remove existing members from the team.
- Add and manage API implementations.
- Upload, modify, and delete API documentation.
- Upload legal agreements for the API.
- Manage an API Scope Group, including creating the group, inviting one or more members, changing a member's role, and modifying or deleting the group.
- Invite independent groups to connect with the API.
- Manage API access requests including granting an app's request for API access and suspending/resuming or cancelling API access.
- Make changes to the API including modifying the API, adding, modifying, or deleting API versions, or deleting the API.
- View analytics for API performance, including monitoring volume and looking at detailed information about the messages being processed, such as headers.
- Change policies that are applied to the API.
- Modify the API, including changing the endpoint, operations, and other details associated with the API.
- Moderate user-generated content associated with the API, such as discussions, reviews, and comments. See Forum Moderation.
- Manage tickets associated with the API, including opening, modifying, closing, and deleting tickets and changing ticket status.
- Export API information.
For details and links, see How do I manage my API?
Note: If a Business Admin assigns a user the API Administrator role in the context of a business organization (see What are the default roles for the API platform: API Administrator), that role has full rights to view, add, modify, or delete an API, but does not have permission to view or modify the API Admin group. Only when a user creates the API, or is invited to the API Admin group, does the user have full rights both to the API and to the API Admin group.
What are the differences between the API Admin and Business Admin roles?
In a tenant scenario, a user who is a Business Admin for the tenant has full permission to all resources within the tenant business, including all apps and APIs.
The Business Admin has the same rights for all APIs as API Admins have for each API, plus additional rights and responsibilities.
How do I manage my API?
Once you've added your API, there are many steps you'll need to take to manage your API on a day to day basis, including such activities as adding other API Admins, testing the API, monitoring API analytics, and more.
For a summary of activities, see What API management capabilities are available to the API Admin in the platform?
From the point that you've successfully added the API, take a moment to look at the user interface and see the various pages where you can manage activities associated with your API. A sample API Overview page is shown below (Hermosa Theme). For more information about this page, see What information is available on the API Overview page? below.
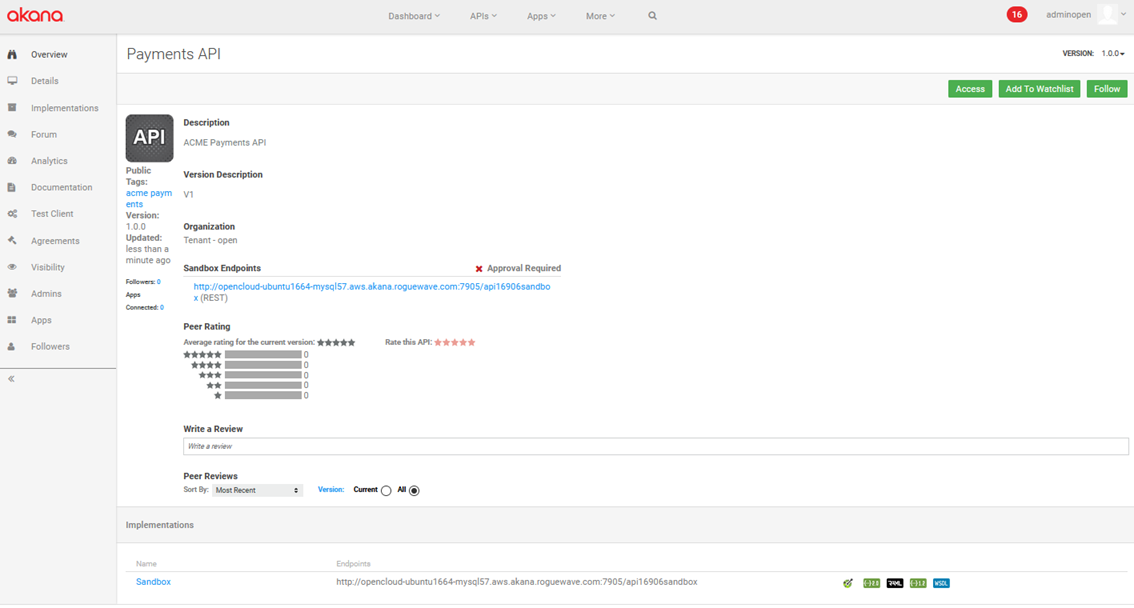
On the left menu bar, the following options allow you to perform activities associated with the API:
- Overview:
- Details:
- Displays details about the current API design, including API design (Path, HTTP Verb, and Name for all operations) and Implementations (Name and Endpoints).
- Offers access to additional API setup steps such as setting up OAuth details and auto-connect settings, adding a version, and exporting the API information.
- Provides edit access to modify the API definition.
- Possibly, includes a Properties section. See What are API properties?
- Assign policies to the API or remove policies.
- Implementations:
- Displays a summary of any existing implementations.
- Provides Add capability to define a new implementation.
- Provides Edit capability to edit an existing implementation.
- Forum:
- Shows a summary of Discussions, Tickets and Alerts for the API, for you to view and manage.
- Allows app developers to follow the API.
- Analytics:
- Allows you to review metrics for the API, such as charts and logs.
- Allows you to export metric information.
- Documentation:
- Allows you to upload authored API documentation content and manage both generated and authored documentation.
- Displays generated API documentation for the API, if available.
- Displays authored API documentation for the API if it has been uploaded.
- Test Client:
- Allows you to test your API in the context of an app, or in an anonymous context (without any app) if the API supports anonymous access.
- Allows you to add headers and parameters, test with different OAuth versions, and view request and response information.
- Agreements:
- Upload legal agreements for the API. Users requesting access to the API must accept the legal agreement as part of the API access process.
- Manage legal agreements (activate, deactivate).
- View existing legal agreements.
- Visibility:
- Manage who can see the API (available only if the Licenses feature is enabled).
- Admins:
- Invite existing platform users, or new users, to be additional API Admins for the current API.
- Remove existing API Admins from the team.
- Followers:
- Displays a summary of users who are following the API.
What information is available on the API Overview page?
The API's Overview page, shown above, is the landing page for app developers viewing the API. It provides:
- An instant visual summary of the API.
- Ways for developers to engage with the API.
Visual Summary
The visual summary includes the following information about the API (if set up):
Left Panel:
- Avatar: An image for the API
- Tags: One or more keywords for the API
- Version
- Updated: Timestamp for last update
- Followers: Number of followers and avatars for each
Center Panel:
- API Description
- Version Description
- Organization: Name of the parent organization
- Live Endpoints
- Whether approval is required for API access
- Peer ratings (averaged over number of ratings)
- Reviews, if there are any
- Peer Reviews: Extra tools for viewing reviews. You can sort reviews or specify the version.
Implementations Section:
The bottom panel summarizes information about available implementations, including name, endpoints, and icons for available API description languages.
In the example below, the API was created from an OAS 3.0 document, but developers can view the API description in multiple description languages.

For information about the supported formats, see How can I view the API description document for an API?
In general, SOAP-based APIs, created from an uploaded WSDL file, are only available for viewing in WSDL format. See How do I add a SOAP-based API?
Access to Functions
The API Overview page includes buttons at the top left that allow app developers to:
- Choose version: In the Version drop-down at the top right defaults to the current version. If there are multiple versions, users can choose to view the Overview page for a different version.
- Access the API: request a contract to actually use the API. For more information, see API Access.
- Follow the API.
- View API description code: In the Implementations section at the bottom of the page, review the API description. For more information, see How can I view the API description document for an API?
What's the difference between the Overview page and the Details page?
The API Overview page is the API's homepage in the Community Manager developer portal; app developers can view this page to get information about the API and what it offers. See What information is available on the API Overview page? above.
The API Details page is visible only to API Admins. From the top-level API Details page the API Admin can manage information about your API such as:
- Top section:
- Edit: Edit the basic API metadata (name, description, and avatar)
- Delete: Delete the API version. If there's only one version, this action deletes the entire API.
- Auto-Connect: Set up auto-connect settings for the API.
- OAuth Details: Set up information needed for your API to support OAuth.
- Manage Licensing: Set up information needed for your API to offer different licenses; for example, a limited license for access to GET resources and a full license for access to all resources.
- Add Version: Add a new version for the API.
- Export: Export information about the API to a ZIP file that can be imported to another instance of the API platform.
- Summary information is displayed about the API:
- On the left: Avatar, Type, and Tags
- On the right: API Description, Version, Version Notes, and Organization. You can click through to the Organization page.
- Middle section:
- View the design of the API, and click Edit to modify.
- Bottom section:
- View a summary of the implementations for the API.
The API Details options menu is shown below.

What are API properties?
In some cases, depending on platform configuration, some resources in the Community Manager developer portal, such as apps and APIs, might include additional properties. If these exist, you'll see them when adding, editing, or viewing the resource.
For APIs, if this feature is in place, when you're adding the API you'll be asked for additional information, over and above what's covered in the standard help text. When you've created the API, you'll see a Properties section at the bottom of the API's Details page, displaying the values.
Properties may or may not be collected depending on how the Community Manager developer portal is configured. You can also edit the properties; for more information, see To edit properties for an app version.
An example is shown below.

If API properties are in place, they appear in these pages:
- Add API (add properties)
- Add API Version (add properties)
- The API's Details page (view properties)
- The API's Details page, Properties section > Edit button > Properties page (edit properties)