Use Case: API testing in Test Client with Okta
This use case provides step by step instructions, and illustrations, for testing your API in Test Client with OAuth. It includes instructions for configuring the app and the authentication server in Okta, configuring the Okta OAuth Provider domain in the Community Manager developer portal, and setting up the app and API, so that you can test your API in Test Client using Okta as the OAuth Provider.
On this page:
- Overview
- Setting up the application in Okta
- Setting up the authorization server in Okta
- Setting up the domain in the Community Manager developer portal
- Setting up the API in the Community Manager developer portal
- Adding the policies to the API
- Setting up the API OAuth Details
- Setting up the app in the Community Manager developer portal
- Creating the contract in the Community Manager developer portal
- Testing in Test Client
- Viewing the API metrics
- Troubleshooting
Overview
This use case provides end to end steps so that you can set up an application and an authorization server on Okta, set up a domain in the Community Manager developer portal, create and configure an app and API, request and activate a contract, and then use Test Client to test the API. You'll see the OAuth token, generated by the authorization server.
This use case assumes the following:
- You have an instance of the Community Manager developer portal, with Business Admin permissions so that you can add a domain, an API, and an app.
- You have an Okta account. You can create a free account, for testing purposes, at https://developer.okta.com/.
- The Okta certificate is trusted by the platform. If you're on the SaaS platform, Okta is trusted already. Otherwise, you'll need to get the Site Admin to upload the Okta certificate to the underlying infrastructure. See note in Setting up the domain in the Community Manager developer portal below.
Setting up the application in Okta
You must set up an application in Okta and set up an app in the Community Manager developer portal. Okta generates credentials for the application; you can then assign those to your app in the Community Manager developer portal. At runtime, Test Client sends the credentials to Okta to authenticate the app that is requesting access to the API. Okta authenticates and therefore trusts the app.
To set up the application in Okta
- Log in to your Okta account.
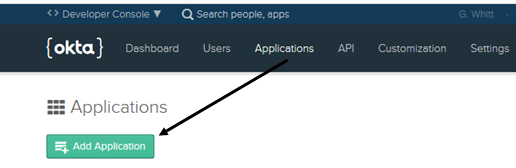
- From the top menu, choose Applications, and then click Add Application.
- Choose Web and then click Next.
- In Application Settings, set up the following values:
- A unique name for your application. Example: acmepaymentscorp_okta_app.
- Login redirect URI: The URL for the Community Manager developer portal instance, up to the .com, and then the following for the platform OAuth login redirect URI: /api/devconsole/oauth/redirect. In this example, https://rcoaless.apiportal.akana.com/api/devconsole/oauth/redirect.
- Grant Types Allowed: select them all.
- Click Done.
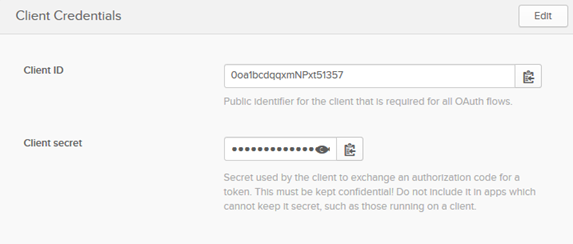
- In the Client Credentials section (below General Settings), shown below, copy the Client ID and client secret values to a safe place. You'll use those to set up the app in the Community Manager developer portal (see Setting up the app in the Community Manager developer portal below).
Setting up the authorization server in Okta
The next step is to set up an OAuth authorization server in Okta. When you set this up and then provide the resulting well-known configuration URL to your domain on the developer profile, APIs can use this domain to authenticate with the server and get a token. The Community Manager developer portal can then use the token to call the API.
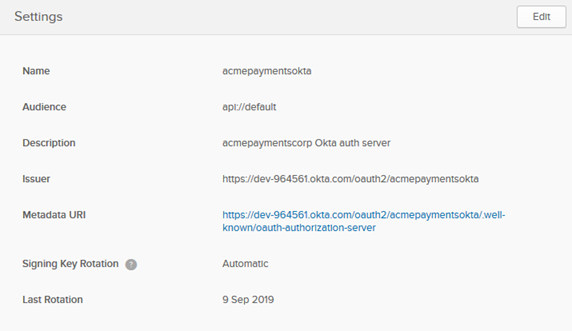
An example of authorization server settings in Okta is shown below.
To set up the authorization server in Okta
- Log in to your Okta account.
- From the top menu, choose API, and then choose Authorization Servers.
- Click Add Authorization Server.
- In the Add Authorization Server window, set up the following values:
- Name: A unique name for your authorization server. Example: acmepaymentsokta.
- Audience: api://default
- Description (optional): A short description. In this example: acmepaymentscorp Okta auth server.
- Click Save.
- Copy the metadata URI. You'll use this to set up the API OAuth Details in the Community Manager developer portal (see Setting up the API OAuth Details below).
- Click the Scopes tab.
- Click Add Scope to add a custom scope, and specify the following values:
- Name: all_get_methods
- Description: all GET operations
- Metadata: check the box.
An example is shown below.
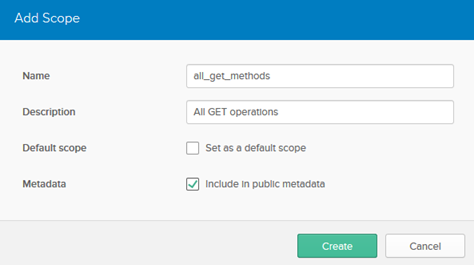
- Click Create.
- Click Add Scope to add a second custom scope, and specify the following values:
- Name: all_methods
- Description: all operations
- Metadata: check the box.
- Click Create.
- Conditional: If your Authorization Server is not the default for your Okta account—for example, if it's a second Authorization Server—you'll also need to add a policy. If you're using the default Authorization Server, the default policy is already there. Follow the steps below.
- Click Access Policies as shown below. The example below is the default Authorization Server.
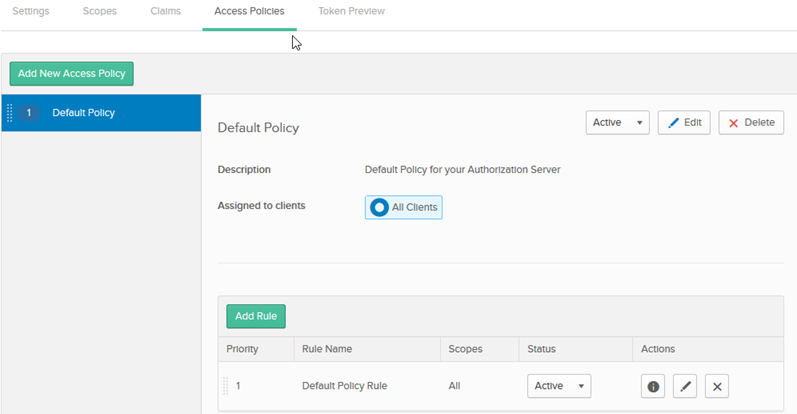
- Check that the default rule is present as shown above. If it isn't, click Add Policy as shown below.
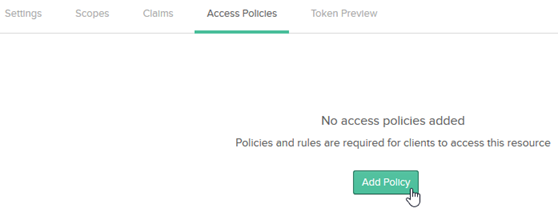
- In the Add Policy window, provide values for Name and Policy. In the Assign to field, make sure Assign to All Clients is selected, and then click Create Policy.
- Click Add Rule.
- Assign a name; in this example, Default Rule. The default values are fine. Click Create Rule.
- Click Access Policies as shown below. The example below is the default Authorization Server.
That completes the Okta setup. The next steps are in the Community Manager developer portal.
Setting up the domain in the Community Manager developer portal
Note: domain setup is a Business Admin task.
For full instructions on setting up an External OAuth Provider domain, see External OAuth Provider Domain.
Certificate Upload: This procedure requires that you upload information from the well-known configuration URL in Tab 3, Provider. The platform only allows upload if the URL is trusted. If you're working on the SaaS platform, the Okta URL is already trusted. If you're using an on-prem installation, the Okta certificate must be set up in the underlying infrastructure, Policy Manager. Ask your Site Admin to complete this step. For instructions, see Import Trusted CA Certificates from a keystore.
To set up the Okta domain
- Log into the Community Manager developer portal as the Business Admin.
- Go to More > Admin > Domains and click Add.
- Choose External OAuth Provider domain.
- On Tab 1, Details, specify a name. In this example: rcoaless_eoap_okta.
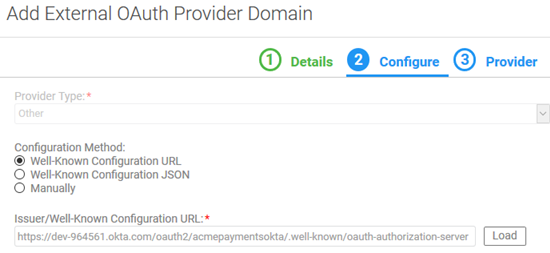
- On Tab 2, Configure:
- For Provider Type, choose Other.
- Put in the well-known configuration URL from the authorization server you configured in your Okta account, and click Load, as shown below. In this example: https://dev-964561.okta.com/oauth2/acmepaymentsokta/.well-known/oauth-authorization-server.
Note: If you see the error Loading Configuration Failed, first test the URL in the browser. If you see the well-known configuration values in the browser, the certificate must be uploaded before loading the configuration. See Certificate Upload above. If you don't see the configuration in the browser, there is an error in the URL.
- Click Next.
- On Tab 3, Provider, the values are pre-filled from the well-known configuration URL. In the Scopes Supported section, make sure that the custom scopes you set up in To set up the authorization server in Okta are there. An example is shown below.
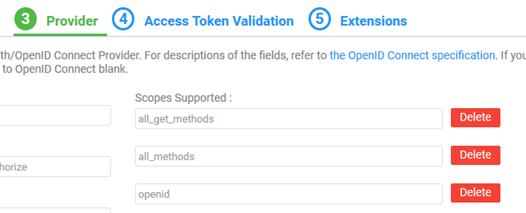
- Click Next.
- On Tab 4, Access Token Validation, check the JWT Bearer Access Token box.
- Provide the following values:
- Issuer: the value from your Okta account, Authorization Server settings, Issuer field. In this example: https://dev-964561.okta.com/oauth2/acmepaymentsokta.
- Audience: the value from your Okta account, Authorization Server settings, Audience field. In this example: api://default.
- ClientID Claim Name: cid
- Scope Claim Name: scp
- Resource Owner UID Claim Name: sub
- In the Signing Keys section, choose Asymmetric Key Inline and then choose JWK Set URL.
- Click Next, and then click Finish. For this provider, nothing is needed on the Extensions tab.
Setting up the API in the Community Manager developer portal
The next step is to create the API. You can then set up the API OAuth details, assign the policies, create a contract with an app, and test in Test Client.
For this use case, we're using the Swagger Petstore API, uploading the Swagger 2.0 API description document.
To create an API
- Log in to the Akana API Platform.
- Go to APIs > Add API. The Add API page opens.
Note: In 2019.1.0, go to APIs > Add API.
- Click I have a Swagger/RAML/WSDL/WADL document, click File, and then click Browse.
- Browse to the location of the Swagger file, upload it, and then click Save to create the API.
- This example uses the Petstore API Swagger 2.0 JSON. You can use the same JSON file or another.
- In the top section, click Edit and modify the API name from the default. In this example: Swagger_Petstore_Okta_test.
- Click Save.
For more information, see Adding an API.
Adding the policies to the API
Now that the API is created, it's time to add policies so that you can apply OAuth to the API. It's also a good idea, since this is a test scenario, to add detailed auditing so that you can view detailed transaction logs.
To add policies to the API
- In the Community Manager developer portal, go to APIs > My APIs > choose API > Implementations.
- Click through on the implementation (in this example, Live) and go to the Policies section.
- Click Edit.
- Add the following policies, as shown below:
- Detailed Auditing
- OAuth Security

- Click Save.
- Click Go Back to Implementations.
Setting up the API OAuth Details
Now that the API is created, and you have the policies assigned, you can set up the specific details so that this API can use OAuth.
To set up the API OAuth details
- In the Community Manager developer portal, go to APIs > My APIs > choose API > Details.
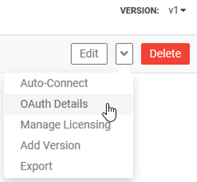
- From the drop-down at the top right, choose OAuth Details, as shown below.
- On Tab 1, Provider, choose the OAuth provider domain. In this example: rcoaless_eoap_okta.
- Click Next.
- On Tab 2, Scope Mapping, choose API-Wide Scope Mapping.
- Click Select, and choose the two custom scopes that you added in Okta (see Setting up the authorization server in Okta above). An example is shown below.
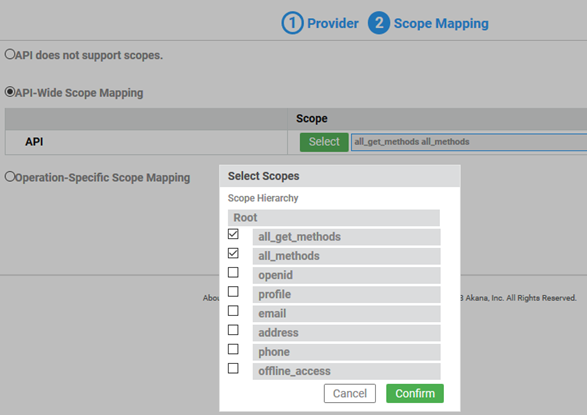
- Click Confirm and then click Save.
Setting up the app in the Community Manager developer portal
The next step is to create an app that you can use for testing the API in Test Client. You must assign the App ID and Shared Secret values that are assigned to your application in your Okta account, so that Okta can authenticate the app when you make the API call through Test Client.
To create an app
- From the Plus menu, choose Add App.
Note: In 2019.1.0, go to Apps > Add App.
- Provide the following minimum values:
- App Name: In this example, acmepaymentscorp_Okta_test
- Version ID: In this example, v1
- App ID: The Client ID from your Okta account. See Setting up the application in Okta Step 7.
- Shared Secret: The Client Secret from your Okta account. See Setting up the application in Okta Step 7.
- Click Finish.
For more information about adding an app, see Creating and Managing Apps.
Creating the contract in the Community Manager developer portal
The app developer requests a contract with the API, and the API developer approves it. In this use case, as the Business Admin, you can perform both actions.
To create the contract
- In the Community Manager developer portal, go to APIs > My APIs > choose API > Overview.
- At the top right, click Access.
- In Tab 1, Select App, specify the app/app version. In this example, acmepaymentscorp_Okta_test.
- Click Next.
- In Tab 2, Endpoint, choose the endpoint. In this example, Live is the only endpoint.
- Click Save.
To activate the contract
- In the Community Manager developer portal, go to APIs > My APIs > choose API > Apps.
- Find the app, and at the right, click the drop-down arrow to see the list of valid actions, as shown below.

- Choose Activate.
- Enter a comment (optional), and click Confirm.
Testing in Test Client
Once everything is set up, you can test in Test Client, get the OAuth token, and get the API response.
To test in Test Client
- In the Community Manager developer portal, go to APIs > My APIs > choose API > Test Client.
- At the top right, under Operation, choose this operation: GET:/pet/{petid} - getPetById.
- In the Headers section, for the Accept header, change the value to application/json (optional so that the response is in JSON format rather than XML).
- In the Parameters section, for the tags parameter, provide a value in the Value column.
Note: If you provide a valid value, you'll get an accurate response. If the API call is successful, but the ID is invalid, you'll get an HTTP 404 response. To get a valid response, you could set up a pet, with an ID, on the Swagger Petstore website: http://petstore.swagger.io/.
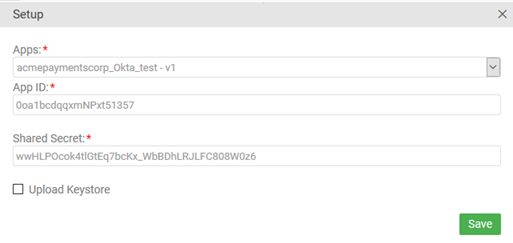
- Click the Setup button. You'll see the App ID and Shared Secret from your Okta account, that you set up on the Edit API page. An example is shown below.
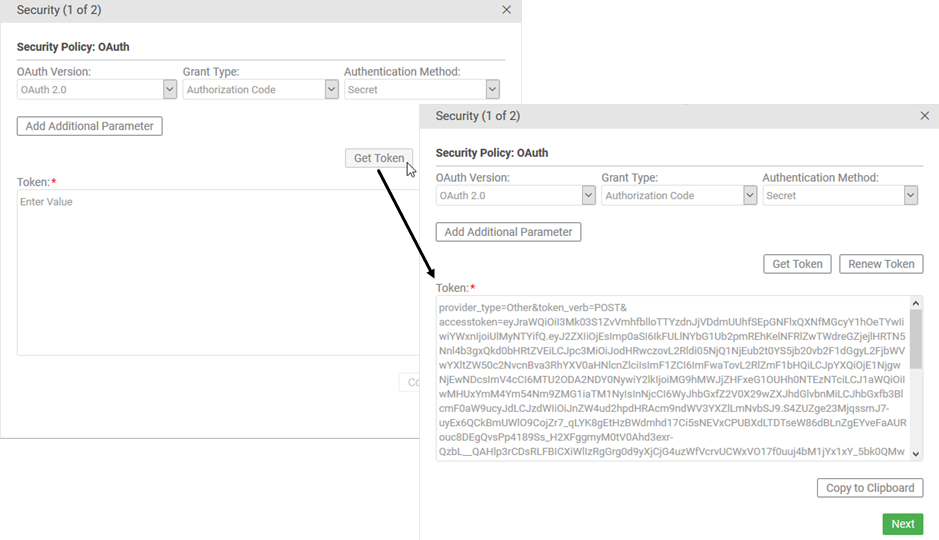
- Click the Security button. You'll see the OAuth Security Policy page. Click Get Token. The token is returned. An example is shown below.
- When you have the token, click Next and then, at the Same Origin Policy Page, click Finish.
- Click Invoke. The API response is returned. The example from this use case is shown below.
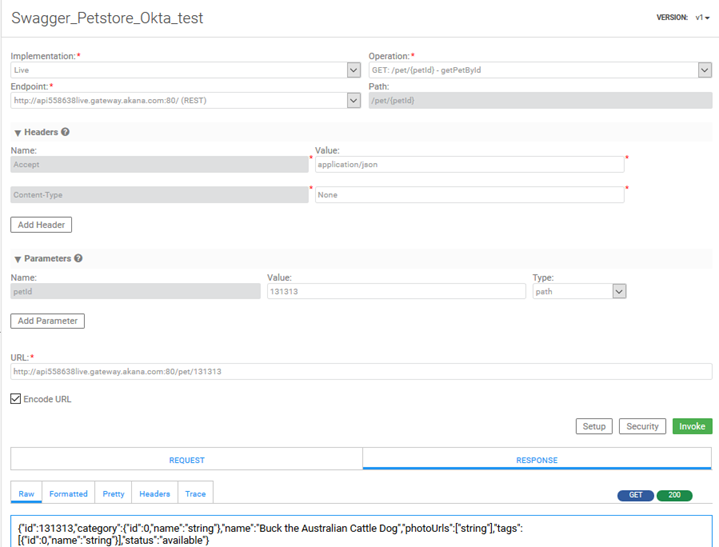
That's the end of the use case. OAuth was applied to the API call, and the Community Manager developer portal validated the app credentials, called the OAuth provider, got the OAuth token, and used the OAuth token to get the API response from the API endpoint.
You could invoke the API a few times and look at the resulting metrics; see Viewing the API metrics below. When testing your API with Test Client, it's a good idea to have the Detailed Auditing policy attached to the API, as in this example, so that you can look at the logs. In a live environment, in most cases, a Detailed Auditing policy would not be used.
For general documentation about using Test Client, see API Testing with Test Client.
Viewing the API metrics
If you attached an auditing policy to the API in Adding the policies to the API above (Step 4), you can view additional information about the messages.
If you run into errors, looking at the logs is one way to view more information about what's happening.
From the API left menu, choose Analytics > Logs. Find the transaction in the log, and click the arrow to the left to expand the information.
An example is shown below.
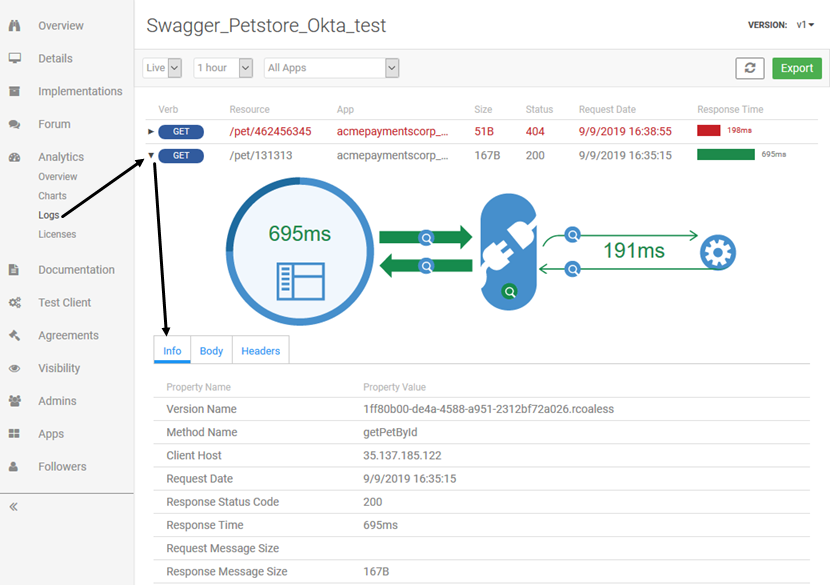
This example is a GET request, so there is no message body.
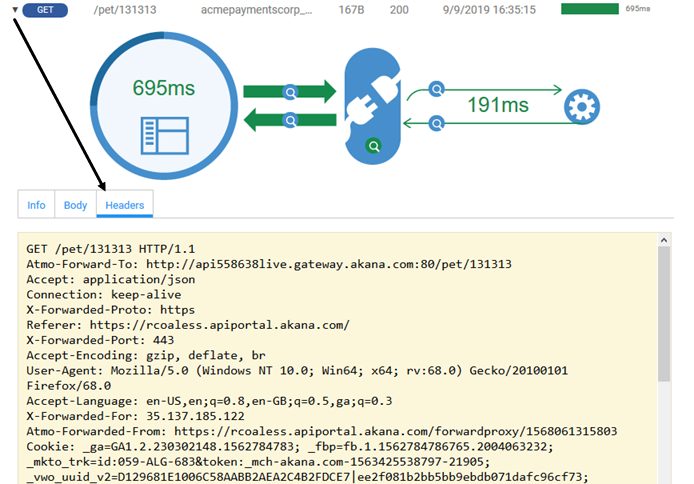
Click the Headers tab to view the message headers.
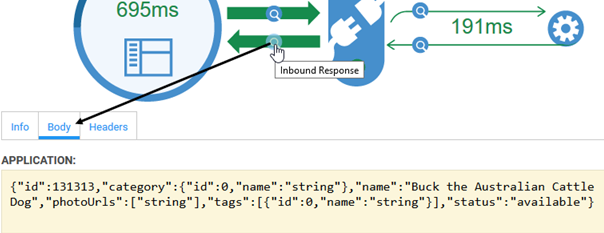
You can also click the magnifying glass on each part of the message image to view the outbound and inbound content. An example is shown below.
Troubleshooting
If you get errors, you can:
- Go carefully over the procedure, making sure you didn't miss any steps.
- Check the table below for specific errors.
- Review the Test Client troubleshooting section for help. See Troubleshooting in Test Client.
- Look at the logs in API > Analytics > Logs in case you can see the error there: see Viewing the API metrics above.
| Error message or scenario | Possible reason |
|---|---|
| Token is not returned |
Mismatch of scopes. Steps you can check:
|
|
On clicking Get Token, this error: { "HttpStatus": 403, "ErrorCode": "access_denied", "ErrorDescr": "Policy evaluation failed for this request, please check the policy configurations."} |
A default policy is not set up for the Okta Authorization Server. See Setting up the authorization server in Okta above, Step 12. |