OpenID Connect Support
Configure an OpenID Connect Relying Party domain that you can use for platform login or to support an Akana OAuth/OIDC Provider domain using OpenID Connect for authentication.
Note: For general information about platform domains, or specific information on a different domain, refer to Domains.
On this page:
- What is OpenID Connect?
- How is OpenID Connect different from OpenID?
- How is OpenID Connect different from SAML?
- What's the difference between OpenID Connect Relying Party and OpenID Connect Provider?
- What roles can the platform fulfil in relation to OpenID Connect?
- Can I configure multiple OpenID Connect Providers?
- How is an OpenID Connect provider different from an OAuth provider?
- How do I set up the platform to log in with an OpenID Connect Relying Party domain?
- What value should I use for the Redirection URI for my OpenID Connect Relying Party domain?
- I already have an Akana OAuth/OIDC Provider domain configured. How can I benefit from the platform's OpenID Connect support?
- Can I integrate some other OpenID Connect provider in the platform? If so, how? Which features of the platform can support an external OpenID Connect provider?
- What are the OpenID Connect OAuth URLs for the platform?
- What signature algorithms are supported by the platform's Akana OAuth/OIDC Provider?
- How often are JSON web keys rolled over?
- How do I configure an OpenID Connect Relying Party domain?
- How do I choose which response type to use?
- How do I send the scopes in the ID token instead of in the authorization request?
- Troubleshooting: Values not populated for a third-party user logging in for the first time
- Troubleshooting: "Loading configuration failed" message
What is OpenID Connect?
OpenID Connect is a popular protocol for user authentication; it is an identity layer on top of the OAuth 2.0 protocol that allows a client app to verify the identity of an end-user. It interoperates smoothly with OAuth to provide both authentication and authorization services. OpenID Connect was released in February 2014 and is gaining in popularity. For example, Google has moved from OpenID to OpenID Connect for products such as the Google+ API, used by the platform's Google login domain, and no longer supports OpenID. For more information, see Welcome to OpenID Connect (external site).
Although it can be used on its own for authentication, OpenID Connect is often used in combination with the OAuth 2.0 protocol to provide both authentication and authorization. An OpenID Connect provider performs the authentication, verifying the user's identity, and the OAuth provider performs the authorization, managing the process of the authenticated end-user giving permission to an application to access the user's resources. In this scenario, OpenID Connect allows the client application (Relying Party) to verify the identity of the end-user based on authentication by an OpenID Connect Identity Provider (IdP).
The IdP performs the authentication and sends back a token to the application; the application then sends the information, along with its own credentials, to the OAuth Authorization server.
Finally, the Authorization Server issues an access token, which the application sends to the Resource Server with its request for resources. The Resource Server responds with the resource access, and the application provides the requested service to the consumer.
OpenID Connect defines the following roles of users and applications:
- End-user—The user to be authenticated in order to then consume a service; the consumer.
- OpenID Connect Identity Provider—The entity responsible for verifying identity and issuing user identity information via the OpenID Connect protocol.
- Relying Party—The app or site that wants to verify the end-user identity. In the case of OpenID Connect used for login, the Relying Party is the Community Manager developer portal. This role is also called Service Provider, because the app or site is providing a service to the consumer (end-user).
- Server Agent—The server that verifies the end-user's OpenID Connect credentials. It is usually the same as the OpenID Connect Identity Provider.
- User Agent—The program used by the end-user to access the relying party / service provider; usually a browser.
- OAuth Authorization server—The server that issues an access token to the application (Relying Party) after authentication and authorization are complete.
How is OpenID Connect different from OpenID?
OpenID Connect has support for OAuth 2.0 built in, and is extensible. OpenID Connect is more API-friendly and is more flexible.
OpenID is now deprecated.
How is OpenID Connect different from SAML?
SAML and OpenID Connect are both very popular and mainstream standards that support single sign-on. OpenID Connect is essentially JSON-based, whereas SAML is an XML implementation.
There are two main reasons why you might choose SAML over OpenID Connect for your Policy Manager/developer platform implementation:
- An existing SAML implementation
- The need to support webservices, REST APIs, and user login with a common infrastructure
Reasons you might choose OpenID Connect rather than SAML for your implementation:
- An existing OpenID Connect Relying Party implementation.
- The OpenID Connect Provider returns tokens rather than SAML tokens. The token can then be exchanged to get an access token for API consumption and to get more details of the user.
What's the difference between OpenID Connect Relying Party and OpenID Connect Provider?
In OpenID Connect, the term Relying Party refers to the application that wants to offer its services to users and wants to allow users to log in via an external third party, relying on the external identity provider for user authentication. Users authenticate via the app, and the app “relies” on the identity provider to provide authentication via the OpenID Connect protocol.
The OpenID Connect provider is the identity server that authenticates the user and exposes user identities to the app (relying party) with the consent of the user.
In connection with logging in to the platform, the platform acts as the relying party. For example, let's say that on the platform you want to use OpenID Connect for login authentication, and you set up a Google domain for login. When the user logs in with Google, the platform is the relying party and Google is the OpenID Connect provider.
What roles can the platform fulfil in relation to OpenID Connect?
The platform supports OpenID Connect in the roles and scenarios listed below.
As OpenID Connect Relying Party
The platform can integrate with any OpenID Connect provider wherever SSO is needed. This includes the following scenarios:
- The Community Manager developer portal allows login with user accounts from any OpenID Connect provider.
- When the platform's OAuth/OpenID Connect provider is used, any OpenID Connect provider can be used as an SSO provider to authenticate end-users.
As OpenID Connect Identity Provider
As an identity provider, the platform can integrate with any OpenID Connect provider to support the following:
- The platform can act as an identity provider for any application/website wanting to offer SSO capabilities to the platform's user accounts.
- The platform's OAuth/OpenID Connect provider can be used by any app wanting to obtain an access token to consume an API. As the provider, the platform issues access tokens, validates access tokens, and manages user grants.
Can I configure multiple OpenID Connect providers?
Yes. The platform deployment supports multiple OpenID Connect providers. In addition, if multiple tenants are configured, each tenant can support multiple OAuth/OpenID Connect providers. The platform identifies the target of the OAuth/OpenID Connect for each request based on the hostname of the HTTP request.
How is an OpenID Connect provider different from an OAuth provider?
The OpenID Connect protocol is built on top of the OAuth 2.0 specification. Below are some of the additions and the specific ways OAuth is used in the OpenID Connect protocol:
- Discovery Configuration: OpenID Connect provider defines a well-known configuration URL that can be used for relying party applications to learn all the details about the OpenID Connect provider. This includes:
- URLs for Authorization Endpoint, Token Endpoint, JWKS Endpoint, and UserInfo Endpoint
- Supported scope names
- Other security-related configuration needed to interact with the OpenID Connect provider
- UserInfo Endpoint: OAuth 2.0 defines an Authorization Endpoint that is used for the resource owner (end user) to give consent to the app's request for access to the user's resources, and a Token Endpoint for the relying party (app) to obtain an access token for use when invoking APIs. This access token invokes the request with the security context of the end-user.
However, there was no standard way for the relying party app to collect information about the end user (resource owner). The OpenID Connect specification includes two ways for the app to learn information about the end user:
- The OpenID Connect Provider can issue an ID Token (token) from either the Authorization Endpoint or the Token Endpoint.
- The OpenID Connect Provider can publish a UserInfo endpoint. The relying party app can then use the UserInfo endpoint to learn information about the end-user (who gave consent to the relying party).
- JWKS Endpoint: tokens are signed, and optionally encrypted, using the JWK specification with rolling keys. The OpenID Connect provider publishes the JWKS endpoint with JSON Web Key Set for all valid tokens issued by the provider.
- Session Management: OpenID Connect supports logging the end user out from the OpenID Connect provider in two ways:
- By initiating logout from the Relying Party app
- Logging out from the Relying Party app by initiating logout from the OpenID Connect Provider
It also provides an option to include a Provider iFrame in a Relying Party web app that can help manage the end-user session with the relying party app if the OpenID Connect provider decides to end the end-user's session with the relying party.
Note: The Community Manager developer portal's OpenID Connect Provider does not support OpenID Connect's Session Management features.
- Dynamic Client Registration: OpenID Connect Provider supports an endpoint with standard interface to register Relying Party applications.
Note: The platform does not support the standard OpenID Connect Provider Dynamic Client Registration endpoint. Instead, the platform has the proprietary API to register relying party applications.
The following specific OAuth Provider features are from the OpenID Connect specification:
- The Relying Party must use one of the following OAuth grant types from the OAuth Provider to get the consent of the end-user for the relying party to use the end-user's security context:
- Authorization Grant
- Implicit Grant
- The OpenID Connect protocol does not use either of these two OAuth grant types:
- Client Credentials
- Resource Owner Password Credentials
- When using an Authorization Grant, OAuth issues an authorization code from the Authorization Endpoint. The Relying Party application should use the Token Endpoint to retrieve the access token. However, the OpenID Connect provider allows the relying party to obtain both the Authorization Code and the access token from the Authorization Endpoint.
- The OpenID Connect protocol extends the Authorization Endpoint to issue a Token (id_token) from the Authorization Endpoint to the Relying Party. In this case, the Relying Party does not use the Token Endpoint or the UserInfo Endpoint.
- When using OpenID Connect, the OAuth Provider should issue a Bearer token only. Issuing a MAC token from the Authorization/Token Endpoint will limit the Relying Party from using the UserInfo Endpoint.
- POST response from Authorization Endpoint: The OpenID Connect provider functionality supports a query parameter to the Authorization Endpoint that requires the Authorization Endpoint to return the response parameters to an HTTP POST request at the redirect URL, instead of using a HTTP GET.
Note: The platform's OpenID Connect provider does not support this option.
How do I set up the platform to log in with an OpenID Connect Relying Party domain?
The platform supports single sign-on with an OpenID Connect Provider, for developer login to the platform. This option can be used to leverage user identities already created/maintained in another system that offers an OpenID Connect Provider interface. The platform acts as a relying party to the OpenID Connect provider.
To offer OpenID Connect as an option to your users for platform login, you must complete the following basic steps:
- Create an account with an OpenID Connect provider.
- In the platform, set up an OpenID Connect Relying Party domain: see How do I configure an OpenID Connect Relying Party domain?
- In the platform, enable the domain for login on the More > Admin > Logins page. See How do I enable a domain for login?
Note: If an OpenID Connect Relying Party domain is enabled as a login domain, you cannot delete it. If you need to delete a domain, first make sure it isn't enabled for login.
What value should I use for the Redirection URI for my OpenID Connect Relying Party domain?
Depending on how you will be using the OpenID Connect Relying Party domain, there are two possible redirect URI values that you could use on your OpenID Connect provider site when registering your platform as an app with your provider. Choose the applicable value from the table below.
| Environment Scenario | Redirect URL |
|---|---|
| Akana API Platform Login | {CMConsoleAddress}/api/login/ssoLogin |
| OAuth Provider Resource Owner domain | {OAuthProviderAuthorizationServer}/oauth/auz/grants/provider/authcomplete |
I already have an Akana OAuth/OIDC Provider domain configured. How can I benefit from the platform's OpenID Connect support?
To enable the OpenID Connect Provider features from the OAuth Provider, use the Edit Akana OAuth/OIDC Provider Domain wizard ( More > Admin >Domains). Once this option is enabled, allow a few minutes for the settings to refresh, so that the OAuth Provider feature will be enabled on the containers it's installed on. After that, the supported OpenID Connect Provider features can be accessed from the OAuth Provider.
Can I integrate some other OpenID Connect provider in the platform? If so, how? Which features of the platform can support an external OpenID Connect provider?
Yes. You can integrate any OpenID Connect provider by setting up an OpenID Connect Relying Party domain: More > Admin >Domains > Add Domain > OpenID Connect Relying Party.
For instructions, see How do I configure an OpenID Connect Relying Party domain?
You can choose this domain if you want the platform's OAuth or OpenID Connect provider to use an external OpenID Connect Provider for resource owner authentication or for login.
You can dynamically reference the provider's discovery URL (well-known configuration URL), you can read the metadata from that URL as a starting point and then modify the values, or you can configure the domain manually.
What are the OpenID Connect OAuth URLs for the platform?
If you are using OpenID Connect for your Akana OAuth/OIDC Provider domain, you will need to configure the applicable URLs. The relative paths shown below provide the exact URL to be used for each endpoint. You can get all the URLs by accessing the Discovery Endpoint below.
URLs:
- Discovery Endpoint: {oauth-provider-url}/.well-known/openid-configuration
- Authorization Endpoint: {oauth-provider-url}/oauth/auz/authorize
- Token Endpoint: {oauth-provider-url}/oauth/oauth20/token
- UserInfo Endpoint: {oauth-provider-url}/oauth/userinfo
- JWKS Endpoint: {oauth-provider-url}/oauth/jwks
What signature algorithms are supported by the platform's Akana OAuth/OIDC Provider?
The Community Manager developer portal's OpenID Connect provider supports the following digital signature/MAC algorithms to sign ID tokens as defined in the IETF JSON Web Algorithms specification:
- Symmetric Signature Algorithms:
- Asymmetric Signature Algorithms:
- RS256: RSASSA-PKCS-v1_5 using SHA-256
- RS384: RSASSA-PKCS-v1_5 using SHA-384
- RS512: RSASSA-PKCS-v1_5 using SHA-512
- ES256: ECDSA using P-256 and SHA-256
- ES384: ECDSA using P-384 and SHA-384
- ES512: ECDSA using P-521 and SHA-512
- PS256: RSASSA-PSS using SHA-256 and MGF1 with SHA-256
- PS384: RSASSA-PSS using SHA-384 and MGF1 with SHA-384
- PS512: RSASSA-PSS using SHA-512 and MGF1 with SHA-512
The OpenID Connect Provider requires a default signature algorithm from the above list of algorithms to be used to sign ID tokens it issues to relying party applications.
In the platform, the default signature algorithm is set up in More > Admin >Domains > Add Domain > Akana OAuth/OIDC Provider, on the OpenID Connect page of the Add/Edit Akana OAuth/OIDC Provider wizard.
There are some limitations when HS256/HS384/HS512 algorithms are configured to sign ID tokens. The OpenID Connect specification recommends using relying party/application/client secrets when using symmetric signature algorithms (HS256/HS384/HS512) to sign ID tokens. For this reason, apps/clients must make sure that the app or client secret has sufficient entropy to be used as a cryptographic key with these algorithms.
When asymmetric signature algorithms are used to sign ID tokens, the public keys to verify the signature of the ID token are published at the JWKS endpoint. This is according to the JSON Web Key specification, page 10.
Note: The auto-generated application secrets are compatible for use with HS256 only, which requires a minimum of 32 characters. If you want to use HS384/HS512 algorithms, application secrets must have a minimum of 48/64 characters respectively.
How often are JSON Web Keys rolled over?
When asymmetric signature keys are used to sign ID tokens, the keys are rolled over by periodically adding new keys to the JWK Set.
By default, all the JSON Web Keys created by the platform's OpenID Connect provider are valid for 24 hours. You can configure this value in the Admin Console of each container that the OAuth Provider feature is installed in. Go to the com.soa.oauth category and set the value for the following property:
com.soa.oauth.provider.jwk.validityInSeconds
Every time the platform's OpenID Connect provider needs to sign an ID token, it checks if there is a JWK with the default signing algorithm.
If it finds one, it then checks whether the JWK expires within the validity period of the ID token. If yes, the platform deprecates the existing JWK, creates a new JWK using the default algorithm, and adds it to the JWK Set that is published at the JWKS endpoint.
When a JWK is deprecated, it is still retained in the JWK Set until all ID tokens that were issued using that key have expired. At that point, the JWK is decommissioned/discarded from the platform.
How do I configure an OpenID Connect Relying Party domain?
Once the OpenID Connect provider account is set up, the Business Admin can set up the domain in the Community Manager developer portal user interface. Follow the steps below.
To configure an OpenID Connect Relying Party domain
- Log in as a Business Admin.
- Go to More > Admin > Domains. The Domains Summary page displays.
- On the right, click Add Domain.
- Choose OpenID Connect Relying Party. The wizard opens at the first tab.
- Follow the instructions for each tab. The information you'll provide depends on your OpenID Connect Provider and on how you are using the domain. For details on specific fields and options, if needed, refer to the additional information in OpenID Connect Relying Party Domain: Configuration Values below. The wizard includes the following tabs:
- Tab 1: Details: the name and description you want to assign to the domain.
- Tab 2: Configuration Method: the approach you want to use for setting up your domain. You can dynamically reference the provider metadata, read in the provider metadata and then modify it as needed, or do a completely manual configuration.
- Tab 3: Provider: basic information about your OpenID Connect identity provider. The platform uses this to connect to the provider.
- Tab 4: Authentication: values associated with user authentication and how user information is returned to you.
- Tab 5: App: the two values, App ID and Shared Secret, that uniquely identify your app with your OpenID Connect identity provider.
- Tab 6: Token: If you want claims to be returned from the token endpoint, you must configure values relating to the token.
- Tab 7: User: If you want claims to be returned from the UserInfo endpoint, you must configure URI and HTTP method; if the claim names you're using are not the defaults, you can also set up the claim names on this page.
- Click Save.
OpenID Connect Relying Party Domain: Configuration Values
This topic provides reference information to help you configure your OpenID Connect Relying Party domain.
Tab 2: Configuration Method
On this tab, you specify how you want to provide the information that the platform needs for your OpenID Connect Relying Party domain. Use the information below to help determine your choices.
Select Configuration Method
| Option... | Meaning... |
|---|---|
| Discover Provider Metadata | Choose this option if you want the platform to read the configuration information dynamically from your provider's well-known configuration URL (discovery endpoint). Then provide the URL, and the platform populates the fields in the wizard. When you choose this option, the platform always references the configuration endpoint for the information; it is not stored locally. Values from the configuration file are displayed and cannot be changed. |
| Read Provider Metadata & Edit Configuration | Choose this option if you want the platform to read the configuration information from your provider's well-known configuration URL (discovery endpoint) and store it locally. Once the information is read in, you will be able to edit it. It is stored locally and is not updated from the configuration endpoint. Values from the configuration file are displayed, but can be changed. |
| Manual Configuration | Choose this option if you want to set up your domain by providing all the values yourself, without reference to any external configuration information. |
- Issuer/Well-Known Configuration URL
- If you are referencing provider metadata, or reading provider metadata and then editing, you'll need to provide the well-known configuration URL (discovery URL) so that the platform can access the provider metadata. If you are doing a manual configuration, this URL is not applicable.
- Note: If the well-known configuration URL is HTTPS, the issuer certificate of the server must be trusted by the platform. For instructions, see To set up the PingFederate server certificate in Policy Manager. The instructions are for PingFederate, but the steps are the same.
- You can specify the external well-known configuration URLs by adding them to the allowed host list. For more information, see Prevent forward proxying.
Tab 3: Provider
On this tab, you specify basic information about your OpenID Connect identity provider. Use the information below to help determine your choices.
If you chose to reference provider metadata, some of the information is read in from the metadata file.
- Issuer
- Enter the Issuer ID of your OpenID Connect provider.
- If you provided a well-known configuration URL, the value is read from the provider's configuration file and displayed.
- JWK Set URI
- If your OpenID Connect provider will send an ID token signed with a private key, provide the URI for the JSON web key set where the corresponding public key can be read and used for ID token signature validation.
- If you provided a well-known configuration URL, the value is read from the provider's configuration file and displayed.
End-User Claims Available in
| Option... | Meaning... |
|---|---|
| ID Token from Authorization Endpoint |
Choose this option if you want claims to be returned in the ID Token from the authorization endpoint. This is the most efficient option, but can be more complex because of the need to secure the ID token. If you choose this option, you only need to complete the first five tabs of the wizard. Tabs 6 and 7 are not necessary. Note: With this option, the application communicates directly to the authorization endpoint via the user-agent; this means that the user can see the ID token. Because of this, TLS security cannot be used. |
| ID Token from Token Endpoint |
Choose this option if you want claims to be returned in the ID Token from the token endpoint. This option is a compromise between efficiency and security; it introduces a second step, but allows you to use transport-level security for securing the ID token. If you choose this option, you only need to complete the first six tabs of the wizard. Tab 7 is not necessary. Note: With this option, the application communicates directly with the token endpoint. The user and user-agent do not have access to the information that's shared, which is an added security. |
| UserInfo from UserInfo Endpoint |
Choose this option if you want claims to be returned in the UserInfo response from the UserInfo endpoint, and/or for backwards compatibility with an earlier version of the Community Manager developer portal. This option introduces a third step. An ID token is not involved; plain text JSON is used for claims. This option is the least efficient and least secure. It is the only option supported in earlier versions of the platform. If you choose this option, you must complete all seven tabs of the wizard. |
Additional parameters for provider
If the OAuth endpoint for the provider requires customized parameters, choose the Additional parameters for provider option to enter parameters. Specify:
- Name
- Specify the name of the parameter.
- Value
- Specify the value to be used for the parameter.
- Type
- Specify the type of parameter for the endpoint. The supported types are header, query, and URL-encoded form.
- Endpoint
- Specify the endpoint for the provider. The supported endpoints are authorization, token, userinfo, and JWKS.
-
Endpoint... Description... Authorization Endpoint The authorization endpoint accepts the additional parameter in a query or a URL-encoded form.
-
The GET/authorize endpoint accepts the additional parameter in a query.
-
The POST/authorize endpoint accepts the additional parameter in a URL-encoded form.
Token Endpoint The token endpoint accepts the additional parameter in a header.
UserInfo Endpoint The user info endpoint accepts the additional parameter in a header.
JWKS Endpoint The JWKS endpoint is a read-only endpoint set to use the UserInfo Endpoint to get the access token. The JWKS endpoint makes a request to the UserInfo Endpoint using an access token to return the user information.
-
Tab 4: Authentication
On this tab, you specify values associated with user authentication and how user info is returned to you. Use the information below to help determine your choices.
- Authorization Endpoint URL
- Your OpenID Connect Provider’s authorization endpoint URL. This is where your provider authenticates the user and requests the user’s consent to allow access to their resources.
- If you provided a well-known configuration URL, the value is read from the provider's configuration file and displayed.
- HTTP Method
- The HTTP method to be used for the request to the authorization endpoint. POST is more secure, and is recommended. Use POST if your provider supports it.
- Note: In general, every server that relays the message will log query parameters, but not form parameters. For this reason, it is more secure to send information as form parameters in a POST request rather than as query parameters in a GET request.
- Response Type
- Indicates the type of response that the identity provider should send to the client. Choose from available values. Choices might be limited by what your provider supports. If you are doing a manual configuration, make sure you choose a response type that your provider supports. For more information, see How do I choose which response type to use? below.
- Response Mode
- Indicates how the OpenID Connect Identity Provider should return/encode the response parameters in the Authorization response: as query parameters, as a fragment, or as HTML form parameters via HTTP POST.
- Scopes
- Enter one or more scopes that the relying party is requesting access to, separated by spaces. The Community Manager developer portal relays the list of scopes to the authorization endpoint. If you are using OAuth and want the platform to relay a list of scopes from the inbound request, to ask the OpenID Connect provider for these scopes, use the {inbound_request_scope} placeholder. For example: name email {inbound_request_scope}. If the inbound request to the OAuth provider contains the scope email profile phone, when the relying party makes an authorization request the scope will contain the following value: openid name email profile phone. The relying party always sends the openid scope even if it is not part of the configured scope.
- Use Inbound Request Client ID
- Check this box if the domain will be used from the Akana OAuth/OIDC Provider and you want to use the app ID of the application that is requesting the token, from the inbound request. The app ID of this domain will also be sent in the authorization request via this parameter: X_proxy_azp_client_id.
- Transfer Inbound OAuth Client Redirect URI
- Check this box if the domain will be used from the Akana OAuth/OIDC Provider and you want to relay the Redirection URI of the application that is requesting the token, from the inbound request. The Redirection URI of this domain will also be sent in the authorization request via this parameter: X_proxy_redirect_uri.
- Transfer OAuth Grant ID
- Check this box if the domain will be used from the Akana OAuth/OIDC Provider and you want to relay the Grant ID corresponding to the inbound authorization request. The Grant ID will be sent in the authorization request via this parameter: GrantID.
- Use Identity Token Claims as Scopes
- Extension property: check this box only if you want to send the claims not in the access token, as is normal, but in the ID Token. Then, in the Scopes Claim text box, specify the claim name; for example, roles. For more information, see How do I send the scopes in the ID token instead of in the authorization request?
Prompt
Specify what prompt, if any, the Authorization Server should offer to the user. For additional information, refer to the table below.
| Option... | Meaning... |
|---|---|
| None | The authentication server must not display any authentication or consent pages to the user. The user must already be authenticated. |
| Login | The Authorization Server must prompt the user to log in and authenticate. |
| Consent | The Authorization Server must prompt the user to give explicit consent for access. |
| Select_account | The Authorization Server will prompt the user to select an account (for scenarios where users might have multiple accounts). |
| Delegate | The domain will be used from the Akana OAuth/OIDC Provider and the prompt value received in the inbound request, from the application that is requesting the token, will be relayed. |
Tab 5: App
On this tab, you specify the two values, App ID and Shared Secret, that uniquely identify your app with your OpenID Connect identity provider.
Is Platform Identity: Check this box if the credentials for the application are associated with an identity in Policy Manager. For symmetric encryption, storing credentials in a platform identity is recommended; for asymmetric encryption, it is required, since the UI collects only the app Shared Secret value. For more information, see Should I set up a platform identity, or provide the credentials in the domain configuration?
If you are configuring your domain by dynamically referencing the provider URL, this completes the domain setup, and you can save and close the wizard.
Tab 6: Token
If in the Provider tab you chose ID Token from Token Endpoint as the way end-user claims would be returned to your app, you must provide values for receiving the token.
You only need to provide information on this tab if you are manually configuring your information, either completely or by starting with the information at the well-known configuration URL. If your domain setup dynamically references the well-known configuration URL, Tab 5 completes the setup.
- Token Endpoint URL
- Your OpenID Connect Provider’s token endpoint URL. The token endpoint authenticates the relying party’s request for access. Once authentication is complete, it returns an access token.
- If you provided a well-known configuration URL, the value is read from the provider's configuration file and displayed.
- Client Authentication Method
- The method that the token endpoint uses to authenticate the relying party (app). Make sure the option you choose is supported by your OpenID Connect provider. Values supported by the platform are:
- - client_secret_basic
- - client_secret_post
- - client_secret_
- If you provided a well-known configuration URL, only choices supported by your provider are displayed.
- ID Token: Is symmetric key Base64 encoded?
- If you have an OpenID Connect provider that uses the URL-safe Base64-decoded shared secret as the symmetric key for signing the ID token, such as Auth0, check this box.
- When a symmetric signature algorithm such as HS256 is used, some OpenID Connect providers may Base64-decode the client's shared secret to come up with the secret key to sign the ID token. Certain OpenID Connect providers, such as Auth0, assume by default that the client secret is Base64-encoded. In this case, if the OpenID Connect provider is configured to sign the ID tokens using the symmetric signature algorithm, it will use Base64 URL-decoded bytes of the client secret as the symmetric signing key.
- When this box is checked, the platform decodes the client secret first and then uses the symmetric key to verify the id_token signature. Note that in Base64 decoding, + (plus sign) and - (minus sign) both decode to 62; in addition, / (forward slash) and _ (underscore) both decode to 63. Invalid Base64 characters in the shared secret are skipped when decoding the client's secret. If the client's secret contains one or more padding = (equals) signs, the Base64 decoder skips any characters after the first = sign including the padding character itself.
Tab 7: User
On this tab, you specify information relating to the UserInfo endpoint.
In each of the Claim fields in this tab, the default value is the standard claim name. If you use custom claim names, you can use these fields to specify the names you're using. For more information on claims, refer to the OpenID Connect specification, Standard Claims list.
Note: If the information coming from the OpenID Connect provider includes additional custom claims not listed on this page, they are passed through by the Community Manager developer portal in the response message to the GET /api/users/{UserID} operation when the user logs in to the Community Manager developer portal.
- UserInfo Endpoint URI
- Your OpenID Connect Provider's UserInfo Endpoint URL. If you chose to have claims returned from the UserInfo endpoint, the client sends the access token to this endpoint, with information about the claims for which the user granted access permission, and the UserInfo Endpoint returns the user information in the form of a JSON object.
- If you provided a well-known configuration URL, the value is read from the provider's configuration file and displayed.
- HTTP method
- The HTTP method to be used for the message to the UserInfo endpoint. POST is more secure, and is recommended. Use POST if your provider supports it.
- Subject Claim
- Optionally, you can specify the claim name that refers to the subject identifier in /UserInfo claims. Default claim name: sub.
- First Name Claim
- Optionally, you can specify the claim name that refers to the first name of the user in /UserInfo claims. Default claim name: given_name.
- Last Name Claim
- Optionally, you can specify the claim name that refers to the last name of the user in /UserInfo claims. Default claim name: family_name.
- Email Claim
- Optionally, you can specify the claim name that refers to the user's email address in /UserInfo claims. Default claim name: email.
- Phone Claim
- Optionally, you can specify the claim name that refers to the user's telephone number in /UserInfo claims. Default claim name: phone_number.
How do I choose which response type to use?
When you're configuring your OpenID Connect Relying Party domain, you'll need to choose a Response Type in Tab 4, Authentication. See How do I configure an OpenID Connect Relying Party domain? above.
When you make choices earlier in the wizard, including manually providing values from your OpenID Connect Provider or reading in information from a Well-Known Configuration URL, the platform dynamically modifies the list so that you are only offered valid choices. However, there might be several options. The full set of possible options is shown below.
- ID Token from Authorization Endpoint (platform required id_token):
- id_token
- id_token token
- code id_token
- code id_token token
- ID Token from Token Endpoint (platform requires code):
- code
- code id_token
- code token
- code id_token token
- UserInfo from UserInfo Endpoint (platform requires either code or token):
- code
- id_token token
- code id_token
- code token
- code id_token token
The response type determines what gets returned in the response. From the perspective of the platform as an OpenID Connect Relying Party, any available option is valid. The platform’s minimum requirements for each of the choices are as follows:
- ID Token from Authorization Endpoint: The ID token (JWK token) is all that the platform requires, so the minimum requirement is id_token. The platform doesn't require code or token in the response_type. However, you might choose to include either or both of these values if your Identity Provider uses them.
- ID Token from Token Endpoint: The platform gets the JWK token from the Token Endpoint. In order to send the response from the token endpoint, the OpenID Connect provider requires an authorization code as proof that the user has authorized the client to obtain the user profile. A response_type value of code returns the authorization code, which the app can then provide to the Token Endpoint to obtain the ID token. The Token Endpoint response also includes access_token; this can be ignored, since the id_token value includes the user profile information.
In this case, the platform's minimum requirement for the response_type parameter is code. The token and id_token are not required. However, you might choose to include either or both of these values if your Identity Provider uses them.
- UserInfo from UserInfo Endpoint: The platform gets the userinfo from the UserInfo Endpoint. To do that, the platform needs to get the access token, either from the Authorization Endpoint or from the Token Endpoint. To get the access token from the Authorization Endpoint, it must get the token. To get the access token from the token endpoint, it needs the code. So either code or token should be there in the response type.
If you select code, there are three steps to the process flow: go to the Authorization Endpoint, then the Token Endpoint, and then the UserInfo Endpoint.
If you select token, there are two steps to the process flow: go to the Authorization Endpoint and then the UserInfo Endpoint. In this scenario, it’s not necessary to go to the Token Endpoint, because the platform gets the access token directly from the Authorization Endpoint.
However, there are also security implications to these choices. The token is delivered via the browser, which is not as secure because it could potentially be captured by another application. Anything exchanged directly between the client and the Token Endpoint is much more secure. So, code is more secure, but token gives better performance.
As well as the platform’s minimum requirements, your OpenID Connect provider might have requirements, or might offer a different behavior based on your choice. If you’re not sure which option to choose, consult with your OpenID Connect provider to determine what’s best for your use case.
How do I send the scopes in the ID token instead of in the authorization request?
In a rare case, the scopes might not be available at the point in the OAuth process when the user is redirected to the authentication provider. For example, if you have a single-page application (SPA) and want to secure your API with user roles, you might not be able to determine which roles to allow until you've authenticated the user.
To support this scenario, the platform's OpenID Connect Domain includes a set of two extension properties that allow you to:
- Choose to send the scopes, not in the initial request for the Authentication Token, which is the usual process, but instead, in the ID Token.
- Specify the scopes claim name to be used in the ID Token; for example, roles. For an illustration, see Example: Decoded JWT token with custom claim below.
Here's how it works in terms of the OAuth authentication and authorization process:
- In the usual case: information about the scopes being requested is sent in the request to the Authorization Endpoint, in the scope parameter. The user is asked to authenticate and then, after authentication, is asked to grant access to the requested scopes.
- In this modified case: Information about the scopes being requested is not sent in the request to the Authorization Endpoint. The other values that identify the end-user and the client are included in the normal way. The user is asked to authenticate. Once the user authenticates, the Authentication Provider specified the scopes and returns this information in the ID token. The user is then asked to grant access to the requested scopes.
A Single-Page Application (SPA) might have some limitations sending scopes in the initial /authorize call in the OAuth 2.0 flow. This modified configuration approach has been designed to overcome that limitation.
This difference in the OAuth process flow is seamless to the user, but enables you to use OAuth in a scenario where the scope information isn't available until after authentication is complete.
In the user interface, the additional properties are set up in the OpenID Connect Domain wizard, Tab 4, Authentication. The fields are Use Identity Token Claims as Scopes and Scopes Claim. For information about setting up these fields, see Tab 4: Authentication. For the overall process, see How do I configure an OpenID Connect Relying Party domain?
Example: Decoded JWT token with custom claim
The example below shows a JWT token, decoded. The three parts are indicated in different colors for the purposes of illustration. The custom roles claim is indicated in yellow highlight, and holds the actual values. In the Community Manager developer portal, Use Identity Token Claims as Scopes is checked, and roles is specified as the scopes claim.

Troubleshooting: Values not populated for a third-party user logging in for the first time
If the OpenID Connect Relying Party domain is set up correctly, and a user is logging in to the Community Manager developer portal via a third-party provider such as Google, Okta, or Facebook, the values supported by the third-party provider are sent in the API response from the third-party provider to the Community Manager developer portal over as part of the registration process. However, if the scopes are not set up correctly in the domain setup, the values are not returned. If this happens, the user will need to provide the values, in the Activation page (see How do I sign up using a social media account?).
If you find that users logging in with a third-party provider have to provide these values, check your domain setup and make sure the scopes are set up correctly.
The examples below show how the scope setup affects the user experience. This is a Google example. The behavior might be a little different with a different identity provider, but the same principles apply.
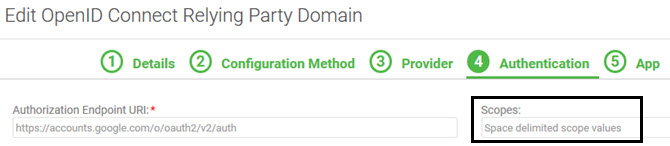
Example #1: Scopes not set up
Domain setup:
In this example, no scopes are set up. The default user input helper text is displayed in the Scopes field.
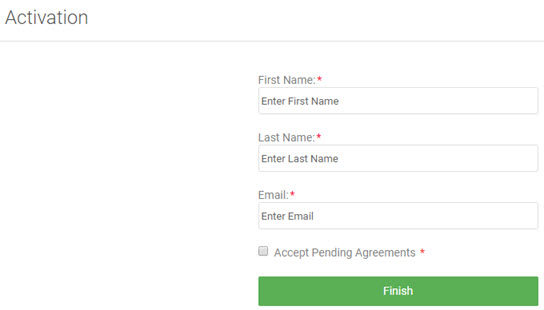
User experience:
When the user logs in for the first time with Google, the fields are not populated. The user has to enter the exact values to complete the login, including the email address that the user just signed in on. This is not the best user experience.
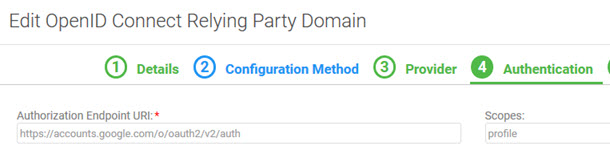
Example #2: Scopes partially set up
Domain setup:
In this example, only the profile scope is set up.
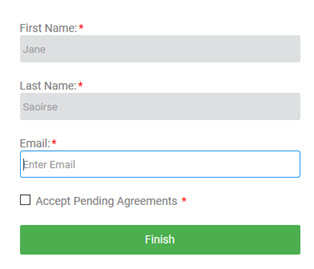
User experience:
Because the profile scope is set up, the First Name and Last Name are pre-populated. However, the user still has to enter the email address, even after authenticating with Google.
Example #3: Scopes set up correctly
Domain setup:
In this example, email and profile scopes are set up.
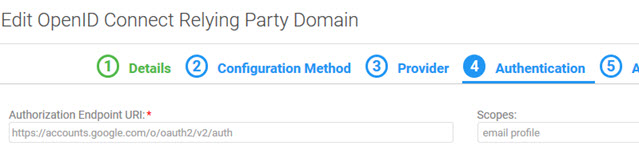
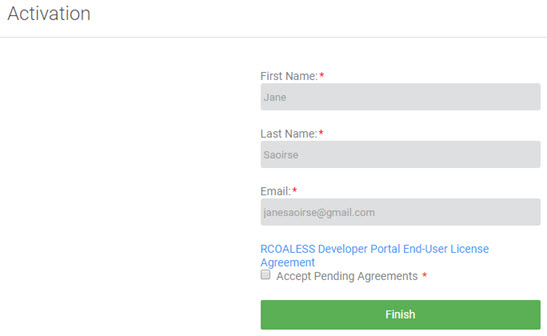
User experience:
In this example, when the user logs in via Google, the First Name, Last Name, and Email fields are pre-filled and are display-only. The user only needs to accept pending agreements and click Finish. This is the ideal user experience.
Troubleshooting: "Loading configuration failed" message
In some cases, you might get the following error when loading the well-known configuration file for the provider metadata:
Loading configuration failed.
The example below is for the Google well-known configuration URL.
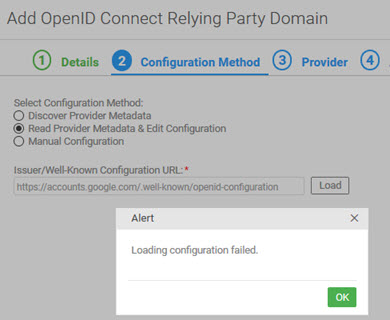
If this happens, it means that the third-party URL is not trusted by the platform.
Before you can set up this provider, you must get the System Administrator for the underlying infrastructure (Policy Manager) to load the certificate for the provider into the trust store. Instructions for this activity are in the Policy Manager help: Add Trusted CA Certificates.
Once the certificate is known and trusted, you'll be able to load the configuration file and finish setting up the domain.