Export/Import
Export and import platform information.
On this page:
- What organization information can I export?
- How do I export organization information?
- What export options should I choose?
- How do I export a license?
- How do I export a scope?
- What are the contents of the organization export file?
- How do I import site, app, or API information from an export file?
- What is the import properties file and when do I need it?
- Can I export/import between different versions?
What organization information can I export?
You can export organization information to an external file. You can then import that file to another instance of the platform. One use of this feature is to move the entire set of resources associated with an organization from one environment to another, such as from a development environment to a testing environment.
Note: If you export a subset of platform data, you'll need to consider interdependencies between different resources. For recommendations about export options and information about dependencies, see What export options should I choose?
You can choose whether or not to include the following information:
- API:
- Private Key + Certificate
- Resources / Documentation
- API Contracts
- Export API Administrators
Note: The relationship of the user as an API admin is exported, but the user is not exported. The user must exist in the target environment. If the user does not exist when the information is imported, the API is created without that admin. From there, either a) the user can sign up and be invited to be an admin, b) the user can sign up and the API data can be reimported, c) another individual can be designated as an API admin.
- Export API Implementation Services
Note: If the API was created using an existing service, this option allows you to choose whether or not to export the API implementation services, as set up in Policy Manager. If the API was created as a new service, implementation services are always exported along with API.
- Policy:
- Operational Policies
- QoS Policies
- Compliance Policies
- Scopes
- Licenses
- Apps:
- Certificate / Shared Secret
- Export App Team Members
Note: The relationship of the user as an app team member is exported, but the user is not exported. The user must exist in the target environment. If the user does not exist when the information is imported, the app is created without that team member. From there, either a) the user can sign up and be invited to be an app team member, b) the user can sign up and the app data can be reimported, c) another individual can be designated as an app team member.
- Site Configuration:
- Site Settings
- Workflow Definitions
- Custom Styles (managed by the Site Admin)
- Security Domains
- Login Domains (managed by the Site Admin)
- Notification Templates (Email and Action Dashboard)
For instructions, see How do I export organization information?
You can also export an individual license, scope, or API. For instructions, see:
If you choose to import APIs that are using the licenses, scopes, policy, and apps, then you must first import apps, scopes, licenses, and policy in the target environment.
How do I export organization information?
You can export organization information to an external file. You can then import that file to another instance of the platform to replicate the entire set of information. You can use this feature to move the entire set of resources associated with an organization from one environment to another, such as from a development environment to a testing environment.
There are many configuration options, so you can determine exactly what you want to include in the export file.
To export organization information
- Log in as a Business Admin and click the Organizations icon.
- Choose your organization.
- Click Actions.
- Click Export.
- On the Export page, choose the information you want to include in the export file. For information about the options, see What organization information can I export? above. For information about dependencies between different types of platform data, see What export options should I choose?
- Choose to save or open the export file.
What export options should I choose?
If you choose to export a subset of platform data, it's important to consider interdependencies between different resources, such as apps and APIs. The specific relationships between resources might vary depending on the instance of the platform that you're exporting from; for example, if no APIs use licenses, exporting APIs without exporting licenses is not an issue. Examples of possible interdependencies:
- If there are contracts between apps and APIs, and you export contracts and apps, but not APIs, or export contracts and APIs, but not apps, the import data will not work correctly unless the missing resources already exist in the platform version you're importing to. A contract is between an app and an API, so both resources must be available for the import data to be valid.
- If you export one or more APIs that are using the Licenses feature, but don't export licenses and scopes, the same licenses and scopes would need to be available in the platform version you're importing to, otherwise the APIs will not work as expected.
In general, it's best to preserve interdependencies when you're exporting data. For example, you could choose all export options, or at least choose API, Policy, Scopes, Licenses, and Apps.
How do I export a license?
You can export information about a specific license to an external file. You can then import that file to another instance of the platform. One use of this feature is to move data from one environment to another, such as from a development environment to a testing environment.
You can also choose to export additional data associated with the license.
To export a license
- Log in as a Business Admin and go to the Admin section.
- Click Licenses.
- On the list of licenses, find the license you want to export and click the license name.
- Click Export.
- On the Export page, choose whether to include the following data associated with the license:
- QoS Policies
- Scopes
- Click Export.
- Choose to save or open the license-export.zip export file.
How do I export a scope?
You can export information about a specific scope to an external file. You can then import that file to another instance of the platform. One use of this feature is to move data from one environment to another, such as from a development environment to a testing environment.
You can also choose to export additional data associated with the scope.
To export a scope
- Log in as a Business Admin and go to the Admin section.
- Click Scopes.
- On the list of scopes, find the scope you want to export and click the scope name. The details are displayed to the right.
- Click Export.
- At the prompt, click Export again.
- Choose to save or open the resourse-export.zip export file.
What are the contents of the organization export file?
The organization export file includes all the core information about the organization, as well as any of the optional additional information you specified.
The file has a very specific structure. It will look something like the image below:
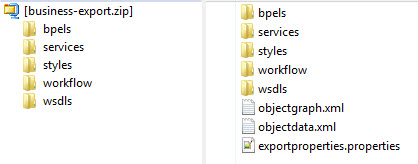
The export file will generally include the following:
- Files at root level:
- objectgraph.xml: An XML file that shows the relationships between resources.
- objectdata.xml: An XML-based summary of all the data in the export file.
- exportproperties.properties: a properties file showing which options were included in the export file.
- bpels: a folder containing XML organization process files (bpel files); one for each operation, for each environment. So, for example, if the API has five operations, and runs in Sandbox and Live implementations, there are 10 bpel files.
- services: a folder containing a subfolder for each environment, each subfolder containing a bpel.xml file for the applicable service/environment.
- styles: a folder containing the custom.less file with the organization-specific styles (only present if custom styles were uploaded).
- workflow: custom workflow information specific to the organization (only present if custom workflows were uploaded).
- wsdls: a folder containing WSDL files for the service.
How do I import site, app, or API information from an export file?
You can export site, app, or API information to an external file. You can then import that file to another instance of the platform to replicate the entire set of information. You can use this feature to move the entire set of resources and associations from one environment to another, such as from a development environment to a testing environment.
The export and import platform versions must be compatible. See, Can I export/import between different versions?
The import file must be a valid package file previously exported from a platform instance, and the FedmemberID must be the same. For example, if the TenantID for the exported information is acmepaymentscorp, the TenantID for the installation the file is being imported to must be the same.
Note: If you export from one tenant and import to another tenant in the same installation, services that exist in both instances are cloned. This is because two APIs cannot share the same service, and two tenants cannot share the same API.
Only a Business Admin can import.
To import site, app, or API information
- Log in as a Business Admin and click the Organizations icon.
- Choose your organization.
- Click Actions.
- Click Import.
- Browse to the location of the export package file (ZIP file) and choose it.
- Optional: browse to the location of the configuration migration properties file and choose it. For more information, see What is the import properties file and when do I need it?
- Click Import.
What is the import properties file and when do I need it?
When you import a file, you can also provide an optional configuration migration properties file.
Migration properties allow for URL mapping of physical service endpoints between the source environment that the information was exported from and the target environment you're importing it to.
If the URL mapping is not specified, physical service endpoint URLs are migrated without any change. It is possible that the source environment URLs might not apply to the target environment, and in this case the migration properties file is needed.
URL mapping is done by URL prefix. The backslash character (\) is used to escape any special characters in the properties file, such as a colon in the URL.
If you import the package file without a properties file, APIs included in the package that are Managed Services in the source environment become Unmanaged Services in the target environment, unless the target environment contains Akana container instances with the same container key as in the source environment.
The migration properties file is used to handle the differences between the source environment and the target environment by transforming the contents of the export package to be suitable for the target environment.
Here are some examples of instances in which the migration properties file can be used:
- The target API endpoint is not the same in the source and target environments: see Different source and target endpoints.
- Proxy API is hosted in an Akana container: see Proxy API hosted in an Akana container: different container keys.
- Import package has virtual service and also corresponding physical service, changes have been made, and you want to make sure there are no conflicts: see Import package has both virtual service and physical service.
Different source and target endpoints
Instances where the target API endpoint is not the same in the source environment and target environment include:
- Different hostname—It is likely that the path portion of the URL might be the same, but with a different hostname.
- Multiple source environment endpoints—The migration properties file allows one or more source environment URL prefixes to match to one or more target environment URL prefixes. You can use this to map one endpoint of the target API to multiple endpoints for the same API in the target environment.
- Multiple target environment endpoints—Conversely, you can use the migration properties file to map multiple endpoints of the API in the source environment to a single endpoint of the API in the target environment.
The sample file below illustrates this scenario.
#With the properties below, all target APIs with an endpoint address of
#http://apihost-source-env:8900 will be imported with a URL of
#http://apihost-target-env:8900, keeping the path portion the same
#in both environments.
migration.url.source.http\://apihost-source-env\:8900=DiscussionAPI
migration.url.target.http\://apihost-target-env\:8900=DiscussionAPI
Proxy API hosted in an Akana container: different container keys
Proxy APIs are hosted in Akana containers. It is possible that the container key in the source environment might be different from the container key in the target environment.
It is also possible that the proxy API might be hosted in a different number of ND containers in the source environment versus the target environment. However, this is rare, because most users want to host the Proxy API in an ND cluster rather than hosting in multiple NDs.
The migration properties file allows the user to map a set of ND container keys in the source environment to an alias to which multiple target environment ND containers are also mapped. This scenario allows the proxy APIs that are exported/imported to be imported into the appropriate ND containers in the target environment.
The sample file below illustrates this scenario.
#With the properties below, source-env-container-key in the source environment
#is mapped to target-env-container-key in the target environment. All proxy
#services that were hosted in source-env-container-key in the export file
#will be hosted in target-env-container-key in the target environment.
migration.container.source.source-env-container-key=acmebroker
migration.container.target.target-env-container-key=acmebroker
Import package has both virtual service and physical service
If an import package includes both virtual services and their corresponding physical services, and changes to the existing virtual service have been made in the target environment, there could be conflicts in some scenarios between data in the resulting physical service and virtual service. To make sure this doesn't happen, you can add the following property to the migration file:
migration.delete.virtualized.operations=true
Additional Migration Properties: QName Matching
You can use an additional property to allow service QName matching in the migration properties file.
This property is used in cases where the databases used for package import and export include services, interfaces, and bindings with the same QName but different keys. It allows update of the existing objects based on matching QNames.
For example, if you create a physical service in both the exporting and importing databases using the same WSDL, the QNames will match, but the service keys will be different. Then, if you try to import the service from one database to another with QName matching disabled, the import process will attempt to create a new service, and will fail because duplicate QNames are not allowed.
With QName matching enabled, the import process will update the existing service, behaving exactly the same as if service keys were matching.
The sample file below illustrates use of this property in the migration properties file.
#Sets QName matching for the import environment.
migration.service.qname.matching=true
Creating the properties file
You can use any text editor to create the properties file for import.
Can I export/import between different versions?
If you are exporting and importing data, it's best to make sure that both environments are on the same version of the platform. However, there may be instances where one needs to export and then import into different versions. In general, this is not recommended and was never supported.
However, from version 2022.1.3, to support customers during their upgrade of Akana environments we recognize that the lower environment could be at a higher version than the environment that is being promoted into depending on the upgrade methodology. To support this scenario we do test between immediately adjacent versions.
We still recommend testing this thoroughly after upgrading the lowest environment to ensure there are no issues within your specific environment. Please notify Akana Support immediately with any issues encountered as part of this testing.