Akana Platform Hardening Guide
This document summarizes ways to harden the platform for secure deployments.
On this page:
- Introduction
- Deployment Architecture
- Install Network Director on a separate container
- Install Internet-facing and administration applications on separate containers
- Configure all listeners, internal and external as HTTPS only
- Configure the Akana Administration Console (/admin) on a separate port
- Disable the Akana Administration Console domain as a login domain
- Secure self-hosted Akana over public Cloud VMs
- Configuration settings in the Akana Administration Console for the container
- Add the unlimited strength policy to the JDK
- Configure the product to ignore downstream cookies
- Configure secure cookies
- Mitigate the session fixation attack
- Disable SSL renegotiation
- Cipher suite support in Java 17 (Version 2025.1.0 and later)
- Restrict the cipher suites used
- Enforce TLS 1.2 and TLS 1.3
- Disable SSL protocols
- Limit outbound SSL/TLS/Cipher support
- Configure TLS protocol versions and Cipher suites
- Limit the scripting language allowed
- Prevent forward proxying
- Header propagation in Network Director
- Tune the API Security Credential Cache
- Configure the Anti-Virus policy to scan for uploaded files
- Enable CSRF protection
- Add XSS exclusions
- Configure X-FRAME-OPTIONS header
- Configure Server Header
- Securing the metadata service
- Configuration setting to limit XSLT transformation
- Configuration property so that the Community Manager developer portal uses the mime.types file
- Configuration settings in the Community Manager developer portal user interface
- Enforcing challenge questions and answers
- Configuring constraints on security challenge questions and answers
- Configuring account login rules
- Configuring password complexity rules
- Turning off user account enumeration
- Disallowing user profile modification
- Limiting file types allowed for upload
- Enforcing an allowlist for cross-site scripting prevention (2019.1.11 and later)
- Adding the Malicious Pattern Detection policy to Community Manager developer portal APIs that support file upload
- Skipping external entity references from API specification for XXE prevention
- Enforce signature validation for SAML Web Browser SSO login domain
- Update JavaScript references for a default landing page: Automation script
Introduction
Akana is a recognized leader in API Management and SOA Governance Automation solutions. Our platform-independent solution set includes the API Gateway, which is further broken down into Policy Manager, the centralized administration console, and Network Director, an intermediary that integrates with Policy Manager to provide high-performance, scalable API security and management capabilities. The solution also includes Community Manager, which provides a branded Community Manager developer portal for the consumption of API by the developer.
This document describes the best practices and configuration settings to harden Akana's API Gateway and Community Manager products. For an example of a deployment in a clustered environment, see Sample Deployment Scenario.
Deployment Architecture
There are several best practices that cover the deployment of the product in a hardened environment.
An external HSM keystore can be used in place of the out of the box Policy Manager keystore (database).
Install Network Director on a Separate Container
API traffic processing should be handled separately from Web traffic and Admin traffic. To this end, the Network Director should not be installed on the same container as Community Manager, or Policy Manager features:

Install Internet-facing and Administration Applications on Separate Containers
There are two components to this:
- The Community Manager should not be installed on the same container as Policy Manager Console
- The Community Manager User Interface and APIs provide both consumer-facing and administrative functions. If needed by your security constraints, the administrative functions can be disabled in Community Manager. This will allow you to install different instances of Community Manager on different containers – and disable the administration functionality in the Internet-facing instance.
To disable the administrative functionality in the Community Manager:
In the Akana Administration Console, configure the following:
com.soa.atmosphere ->
atmosphere.config.denyUserRoles=SiteAdmin,BusinessAdmin,ApiAdmin,System Administrator,Security Administrator,Site Administrator
Configure all listeners, internal and external as HTTPS only
This is accomplished in two places in the product: Firstly, the listeners for the applications in the container are configured from within Policy Manager at Containers > {container_name} > Details > Inbound Listeners. Options for configuring port and PKI are available. Settings for two-way SSL mutual authentication are also available. It is best to choose either Accept client certificates or Require client certificates, based on customer security requirements.
Scope: All Containers
#Config for pm
#Thu Jul 10 23:47:51 PDT 2014
product.home=file\:/Users/example/soa/sm80/
org.eclipse.jetty.server.Request.maxFormContentSize=500000
felix.cm.dir=${felix.cache.rootdir}/cm
org.osgi.service.http.port.secure=9900
com.soa.provision.file.dir=${felix.cache.rootdir}/deploy
product.home.dir=/Users/janemead/soa/b962/sm80
com.soa.snapshot.directory=${felix.cache.rootdir}/snapshot
com.soa.provision.noInitialDelay=true
com.soa.http.host=127.0.0.1
com.soa.http.bind.all=false
com.soa.provision.bundles.start=true
com.soa.provision.poll=2000
org.eclipse.jetty.servlet.SessionCookie=JSESSIONID_pm
felix.shutdown.hook=false
container.name={container_name}
Note above the *.secure syntax used for the settings.
Secondly, the listeners for the applications in the container are configured from within Policy Manager at Containers > {container_name} > Details > Inbound Listeners. Options for configuring port and PKI are available.
Configure the Akana Administration Console (/admin) on a separate port
As shown above, this is configurable in the system.properties file for each container. The Akana Administration Console (/admin) and the other features installed in the container should ideally be configured on different ports. This will allow you to isolate the Akana Administration Console from the Internet.
Scope: All Containers
To do this, there are four steps.
To configure the Akana Administration Console on a separate port
- Update the /instances/{container_name}/system.properties file by setting the com.soa.http.host value to the hostname for your Akana Administration Console.
Sample file:
#Config for pm
#Thu Jul 10 23:47:51 PDT 2016
product.home=file\:/Users/example/soa/sm80/
org.eclipse.jetty.server.Request.maxFormContentSize=500000
felix.cm.dir=${felix.cache.rootdir}/cm
org.osgi.service.http.port.secure=14443
com.soa.provision.file.dir=${felix.cache.rootdir}/deploy
product.home.dir=/Users/janemead/soa/b962/sm80
com.soa.snapshot.directory=${felix.cache.rootdir}/snapshot
com.soa.provision.noInitialDelay=true
com.soa.http.host=10.1.1.2
com.soa.http.bind.all.secure=false
com.soa.provision.bundles.start=true
com.soa.provision.poll=2000
org.eclipse.jetty.servlet.SessionCookie=JSESSIONID_pm
felix.shutdown.hook=false
container.name={container_name}
Modified value for hostname:
com.soa.http.host={localhost} - In the same file, set the org.osgi.service.http.port.secure value to a different port, not the one that the application is running on.
Modified value for port:
org.osgi.service.http.port.secure=23312
- Go into the Akana Administration Console. Click Configuration, then find the com.soa.admin.console category. Find the admin.console.localhost.only value and set it to true.
- Restart the container.
Disable the Akana Administration Console domain as a login domain
For additional security, you can disable the Admin Console domain as a login domain. This prevents users from logging in via the default domain.
Before disabling the Admin Console domain, make sure you've correctly set up and enabled a valid login domain that users can use, such as an LDAP domain.
For instructions for configuring a security identity provider via the Policy Manager console, refer to: About Identity System Configuration.
The Administrator for the Akana Administration Console can then assign the System Administrator role for the registry organization to users from the security identity provider, in the console. For instructions, see To grant System Administrator permission.
To disable the Akana Administration Console domain as a login domain:
- Log in to the Akana Administration Console.
- Click the Configuration tab.
- On the left, under Configuration Categories, scroll down to find the com.soa.admin.console category.
- Set the admin.console.domain.enabled property to false.
- Click Apply Changes.
Secure self-hosted Akana over public Cloud VMs
If you are hosting Akana on a cloud platform, then secure the VMs by following cloud security best practices including but not limited to the following:
- Block access to all internal IP ranges. For example, block IP address 169.254.169.254 for AWS cloud from the Community Manager developer portal servers exposed to the public internet. For more information, see Prevent forward proxying.
- Configure network groups to accept only trusted IP addresses.
- If you are hosting Akana on Amazon Web Services (AWS) EC2 instances, avoid enabling IMDSv1 to prevent accidental disclosure of credentials.
Configuration settings in the Akana Administration Console for the container
This section covers settings and tuning parameters relating to hardening, that you can configure in the Admin Console for the container, or at the command line for the container. It includes:
Add the unlimited strength policy to the JDK
To support long passwords when importing PKI from a Java keystore, you will need to install the Java Cryptography Extension (JCE) Unlimited Strength Jurisdiction Policy Files. This is dependent on the JRE version being used and is available from Oracle. To install, copy the US_export_policy.jar and local_policy.jar files to the /lib/security directory for the JRE.
Scope: All Containers
Configure the product to ignore downstream cookies
This prevents the product from automatically storing and forwarding any cookies retrieved from the downstream APIs and Services.
Scope: All Containers
In the Akana Administration Console, configure the following:
com.soa.http.client.core ->
http.client.params.cookiePolicy=ignoreCookies
Configure secure cookies
This sets the product to only use secure cookies.
Scope: All Containers
In the Akana Administration Console, configure the following:
com.soa.platform.jetty ->
session.manager.factory.secureCookies=true
Mitigate the session fixation attack
To mitigate the risk of a session fixation attack, which can allow unauthorized access to sensitive information post-authentication, it is essential to configure session cookie attributes for improved security. The session.manager.factory.sameSite property can be set to one of the following values to control the cookie behavior and help reduce the risk of session hijacking or fixation. The possible values are:
- BROWSER_DEFAULT: The same site attribute is not set, the browser applies its default behavior.
- LAX: The same site attribute is set to Lax for the session cookie.
- STRICT: The same site attribute is set to Strict for the session cookie.
- NONE: The same site attribute is set to None for the session cookie, but this is only applied when the connection is secured with HTTPS.
Scope: All Containers
In the Akana Administration Console, configure the following:
com.soa.platform.jetty ->
session.manager.factory.sameSite=LAX
Changing the session.manager.factory.sameSite property value requires a container restart.
Disable SSL renegotiation
There are no common reasons for supporting client-initiated SSL renegotiation, so wherever possible it's more secure to disable this setting so that it isn't supported.
Scope: All Containers
In the Akana Administration Console, configure the following:
com.soa.platform.jetty ->
http.incoming.transport.config.allowRenegotiate=false
Cipher suite support in Java 17
Akana Platform supports cipher suites compatible with Java 17. For a complete list of cipher suites, refer to Java Cipher Suite Names.
Restrict the cipher suites used
Use only stronger cipher suites for SSL
Scope: All Containers
In the Akana Administration Console, configure the following:
com.soa.platform.jetty ->
http.incoming.transport.config.cipherSuites=TLS_ECDHE_ECDSA_WITH_AES_256_CBC_SHA384,TLS_ECDHE_RSA_WITH_AES_256_CBC_SHA384,TLS_ECDHE_ECDSA_WITH_AES_128_CBC_SHA256,TLS_ECDHE_RSA_WITH_AES_128_CBC_SHA256,TLS_ECDHE_RSA_WITH_AES_256_GCM_SHA384,TLS_DHE_DSS_WITH_AES_256_GCM_SHA384,TLS_ECDHE_RSA_WITH_AES_128_GCM_SHA256,TLS_DHE_DSS_WITH_AES_128_GCM_SHA256,TLS_DHE_DSS_WITH_AES_256_CBC_SHA256,TLS_DHE_RSA_WITH_AES_128_CBC_SHA,TLS_ECDHE_RSA_WITH_3DES_EDE_CBC_SHA,TLS_ECDHE_RSA_WITH_AES_128_CBC_SHA,TLS_ECDHE_RSA_WITH_AES_256_CBC_SHA,TLS_RSA_WITH_AES_128_CBC_SHA256,TLS_RSA_WITH_AES_256_CBC_SHA256,TLS_RSA_WITH_AES_128_CBC_SHA,TLS_RSA_WITH_AES_256_CBC_SHA
The TLS v1.3 supports the following cipher suites:
com.soa.platform.jetty ->
http.incoming.transport.config.cipherSuites=TLS_AES_256_GCM_SHA384, TLS_AES_128_GCM_SHA256
To specify which cipher suites to exclude for TLS, use the property http.incoming.transport.config.excludeCipherSuites.
Note: Cipher suites that use AES_256 require installation of the JCE Unlimited Strength Jurisdiction Policy Files. See Java Cryptography Architecture Oracle Providers Documentation for Java Platform Standard Edition 8. This must be added to the JRE.
Enforce TLS 1.2 and TLS 1.3
TLS 1.0 and 1.1 protocols are deprecated and disabled by default since Java 1.8.0_292 build due to associated security risks. If you want to continue using these protocols by taking into consideration all the risks, those can be enabled from <container-path>\jre\lib\security\java.security settings by removing the TLS 1.0 and TLS 1.1 protocol from jdk.tls.disabledAlgorithms property.
Note: When TLS 1.0/1.1 are disabled and TLS 1.2 is enforced, openssl s_client -connect <host>:<port> -tls1 fails with alert protocol version (SSL alert number 70). This indicates the server rejected the TLS 1.0 handshake because TLS 1.0 is not supported. If consumers still appear to connect with TLS 1.0/1.1, verify where TLS is negotiated. If SSL/TLS terminates outside Akana (for example, at a load balancer or proxy), older protocols can still be accepted there. Also verify the operating system crypto policy: run update-crypto-policies --show (values FUTURE or FIPS disable TLS 1.0/1.1; DEFAULT can allow them).
Depending on the level of security required, you may way to restrict the protocol to TLS 1.2 and TLS 1.3. Note - This will limit the accessibility of the platform to certain clients.
The above examples show two options:
Enabling TLS v1.2 and TLS v1.3
In the following example, you can enable either TLS v1.2 or TLS v1.3, or enable both at the same time for inbound connections. Note that this option is only applicable if you don't have load balancing.
Scope: All Containers
Enable TLS v1.2 only, with no load balancing:
com.soa.platform.jetty ->
http.incoming.transport.config.enabledProtocols=TLSv1.2
Enable TLS v1.3:
com.soa.platform.jetty ->
http.incoming.transport.config.enabledProtocols=TLSv1.3
Note: Cipher suites that use AES_256 require installation of the JCE Unlimited Strength Jurisdiction Policy Files. See Java Cryptography Architecture Oracle Providers Documentation for Java Platform Standard Edition 8. This must be added to the JRE.
Enforcing TLS v1.2, TLS v1.3 behind a secure load balancer
In the example below, protocols are limited to TLS v1.2, TLS v1.3, and one additional protocol needed by the load balancer.
Scope: All Containers
Enable TLS v1.2, TLS v1.3 with load balancing in place. Some secure load balancers require the SSLv2Hello protocol, so that needs to be included.
As long as SSL is not enabled, the SSLv2Hello is only used during the initial handshake, and the protocol is not downgraded or renegotiated to use SSLv2 or SSLv3.
com.soa.platform.jetty ->
http.incoming.transport.config.enabledProtocols=SSLv2Hello,TLSv1.2,TLSv1.3
Note: Cipher suites that use AES_256 require installation of the JCE Unlimited Strength Jurisdiction Policy Files. See Java Cryptography Architecture Oracle Providers Documentation for Java Platform Standard Edition 8. This must be added to the JRE.
Disable SSL protocols
The example below configures the product to disable SSL v3. Specific TLS protocols are enabled. In this example, SSLv2HELLO is still enabled, for the load balancer.
Scope: All Containers
In the Akana Administration Console, configure the following:
com.soa.platform.jetty ->
http.incoming.transport.config.enabledProtocols=SSLv2HELLO,TLSv1,TLSv1.1,TLSv1.2
Limit outbound SSL/TLS/Cipher support
You may also want to limit the protocols and ciphers the product will use for outbound connections.
Scope: All Containers
Configure the available protocols for outbound connections:
com.soa.http.client.core ->
https.socket.factory.enabledProtocols=TLSv1.2,TLSv1.3
Configure the available cipher suites for outbound connections:
com.soa.http.client.core ->
https.socket.factory.cipherSuites=TLS_RSA_WITH_AES_256_CBC_SHA256, TLS_RSA_WITH_AES_256_GCM_SHA384, TLS_ECDHE_RSA_WITH_AES_128_CBC_SHA256, TLS_AES_256_GCM_SHA384, TLS_AES_128_GCM_SHA256
For TLS v1.3, the supported cipher suites are TLS_AES_256_GCM_SHA384 and TLS_AES_128_GCM_SHA256.
Note: Cipher suites that use AES_256 require installation of the JCE Unlimited Strength Jurisdiction Policy Files. See Java Cryptography Architecture Oracle Providers Documentation for Java Platform Standard Edition 8. This must be added to the JRE.
Configure TLS protocol versions and Cipher suites
Akana does not provide a single, consolidated view of the active TLS protocol versions and cipher suites for Network Director and Policy Manager. Instead, TLS behavior is defined by a combination of Akana configuration properties and the default settings of the underlying Java Runtime Environment (JRE).
TLS and cipher configuration are applied at the application level through the Akana Administration Console. These settings override inherited Java defaults, but do not appear in the java.security file or other native Java runtime configuration files.
If you do not explicitly configure TLS protocol versions or cipher suites, Akana uses the defaults provided by the embedded server and the JRE.
Step 1: Review or configure inbound TLS protocols (incoming/server-side)
- Log in to the Akana Administration Console.
- Go to the Configuration tab.
- Configure the following property:
com.soa.platform.jetty > http.incoming.transport.config.enabledProtocols
Step 2: Review or configure outbound TLS protocols (outgoing/client-side)
- Log in to the Akana Administration Console.
- Go to the Configuration tab.
- Configure the following property:
com.soa.http.client.core > https.socket.factory.enabledProtocols
Step 3: Review or configure inbound cipher suites (incoming/server-side)
- Log in to the Akana Administration Console.
- Go to the Configuration tab.
- Under com.soa.platform.jetty, configure the following properties:
- Allowed cipher suites
http.incoming.transport.config.cipherSuites
- Exclude cipher suites
http.incoming.transport.config.excludeCipherSuites
- Allowed cipher suites
Step 4: Review or configure outbound cipher suites (outgoing/client-side)
- Log in to the Akana Administration Console.
- Go to the Configuration tab.
- Under com.soa.http.client.core, configure the following properties:
- TLS protocols
https.socket.factory.enabledProtocols
- Cipher suites
https.socket.factory.cipherSuites
- TLS protocols
Step 5: Disable TLS 1.0 and TLS 1.1 at the Java level when inherited defaults allow them
If TLS 1.0 or TLS 1.1 are enabled due to Java security configuration, you must disable them at the JRE level.
Update the java.security file and add the protocols to the jdk.tls.disabledAlgorithms, to include TLSv1 and TLSv1.1. For example:
jdk.tls.disabledAlgorithms=SSLv3, TLSv1, TLSv1.1, RC4, DES, MD5withRSA, DH keySize < 1024, EC keySize < 224, 3DES_EDE_CBC, anon, NULL
Step 6: Validate which protocol the server accepts
You can validate which TLS protocols the server accepts by running the following command:
openssl s_client -connect <server>:<port>
To test a specific protocol, such as TLS 1.1, run the following command:
openssl s_client -connect localhost:<port> -tls1_1
Limit the scripting language allowed
In the Akana Administration Console, the Administrator can limit the scripting languages supported by the API platform. For example, you could choose not to support Jython. Limiting the supported scripting languages helps close the door on possible malignant efforts to hack the system using those scripting languages.
For maximum security, limit this setting to js only.
The setting is in the Akana Administration Console: Configuration > com.soa.script.framework, as shown below.

By default, all scripting languages supported by the platform are shown, as comma-separated values. To update, remove one or more values and click Apply Changes.
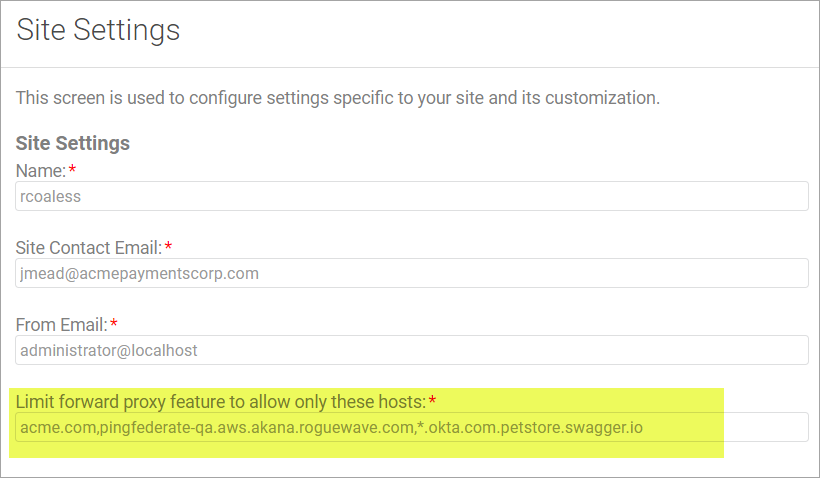
Prevent forward proxying
Prevent users from initiating arbitrary connections from the Community Manager developer portal.
Scope: Community Manager Containers
You can prevent forward proxying by specifying a list of allowed and denied hosts.
-
Allowed Hosts: Configure the list of hosts for external URLs that the Community Manager developer portal can invoke. This setting will restrict access to the external URLs getting invoked for the following features in Community Manager.
-
Invoke APIs hosted on the Network Director from Test Client or API Documentation.
-
Create an OAuth/OIDC domain by accessing a well-known configuration from an external URL.
-
Create a new API by fetching the API specifications hosted on an external URL.
-
Configure JWKS URL in App > OAuth profile.
To use external URLs, configure corresponding hosts in the allowed list. As a security best practice, consider not to set * in the allowed host list for Community Manager deployments available on the public internet. Akana allows you to configure the exact hosts or IP addresses with the exact names. The host names can also be configured using a wild card character * at the beginning.
-
-
Denied Hosts: Configure a list of network hosts or IP addresses that must always be denied access by Community Manager. The denied host list will always take precedence over the allowed host list. The host names can also be configured using a wild card character * at the beginning.
You can set the allowed and denied hosts list in two ways.
- On the Community Manager developer portal user interface: Admin > Site > Limit forward proxy feature to allow only these hosts. Changing this setting in the user interface affects all containers for the installation.
- In the Akana Administration Console for each Community Manager container. Configure the following setting:
The configuration setting for Allowed Hosts:
com.soa.atmosphere.forwardproxy ->
forward.proxy.allowedHosts=<Network Director Host(s) and/or Load Balancer Host and any other external hosts used for 4 scenarios mentioned above>
The configuration setting for Denied Hosts:
com.soa.atmosphere.forwardproxy ->
forward.proxy.deniedHosts=<Set of Host(s), IPv4 Addresses, IPv4 Ranges, Domains, and Sub-Domains of a specific domain>
Values are comma separated. For more information, see Atmosphere Forward Proxy.
Header propagation in Network Director
Configure a translation of the X-Forwarded-Host header.
Scope: Network Director Containers
In the Akana Administration Console, configure the following:
com.soa.http.client.core ->
header.formatter.interceptor.templates=replace=X-Forwarded-Host:{host}
Tune the API Security Credential Cache
You can configure the expiration period and refresh time for the security cache for API calls.
Scope: Network Director Containers
In the Akana Administration Console, optionally configure the following:
com.soa.api.security ->
com.soa.api.security.cache.expirationPeriod=3600000
com.soa.api.security.cache.refreshTime=300000
Configure the Anti-Virus policy to scan for uploaded files
The Anti-Virus policy scans for files that are uploaded from the Community Manager developer portal.
Scope: All Community Manager Containers
In the Policy Manager Console, create an Anti-Virus Operational Policy and configure the policy.

In the Policy Manager Console organization tree, attach this policy to the Community Manager services listed below, in the Akana Policy Manager > Akana API Platform > Services node, and to the one Policy Manager service listed below, in the Akana Policy Manager > Services node. An example is shown below.

You can also assign the Anti-Virus policy at the operation level. For example, in the Workflow Service, you could assign the policy to one operation, addWorkloadDefinitionConfiguration. Go to the Akana Policy Manager > Akana API Platform > Services node, locate the WorkflowAPI Service. On the right, click Operations, and locate the operation on the list. Click to go into the operation details, and then assign the policy to the operation, as shown below.

The tables below show the services and operations that should have the Anti-Virus policy attached:
- Community Manager services/operations that include file upload
- Policy Manager services/operations that include file upload
Community Manager services/operations that include file upload
The table below shows the Community Manager services that include file upload and should therefore have the anti-virus policy attached.
| Service | Operation Name |
|---|---|
| ApplicationAPI Service | saveKeyInfo |
| BoardAPI Service | addArtifact |
| addCommentArtifact | |
| addFirstArtifact | |
| addFirstCommentArtifact | |
| ClientServicesAPI Service | assignClientIdentity |
| loadAliasesForKeystore | |
| ConsoleResourceAPI Service | upload |
| uploadRoot | |
| ContentAPI Service | add |
| upload | |
| DropboxApi Service | addPicture |
| readFileDetails | |
| readUrl | |
| readWsdl | |
| readWsdlZip | |
| readZipFileDetails | |
| ModelAPI Service | readFileDetails |
| updateImage | |
| OAuthClientApi Service | createSessionKey |
| TenantAdministrationAPI Service | importPackage |
| Workflow Service | addWorkloadDefinitionConfiguration |
Policy Manager services/operations that include file upload
The table below shows the Policy Manager services that include file upload and should therefore have the anti-virus policy attached.
| Service | Operation Name |
|---|---|
| Container Management Service | addContainerMultipart |
| modifyContainerCertificateMultipart | |
| modifyContainerMetadataMultipart | |
| modifyContainerMultipart | |
| uploadContainerListenerPKI |
Enable CSRF protection
You can enable and disable CSRF protection in the Policy Manager and Community Manager User Interfaces.
Scope: All Community Manager and Policy Manager Containers
Due to the fact that Policy Manager is not Internet-facing, this setting is disabled by default. You can enable CSRF protection for Policy Manager in the Akana Administration Console for the Policy Manager container:
com.soa.console.csrf ->
org.owasp.csrfguard.Enabled=true
In the Community Manager developer portal, this setting is configured by the Site Admin. Choose:
- Administration > Settings > Security > CSRF Support for Read Requests
- Administration > Settings > Security > CSRF Support for Write Requests
For an illustration, see Enforcing an allowlist for cross-site scripting prevention below.
Add XSS exclusions
Cross-site-scripting (XSS) is a way to inject client-side script into Web pages viewed by other users.
Scope: All Community Manager and Policy Manager Containers
To configure any exceptions to the exclusion policy:
com.soa.console.xss ->
exceptionURLs=[COMMA DELIMITED LIST]
To configure any new keywords that should be excluded:
com.soa.console.xss ->
keywords=[COMMA DELIMITED LIST]
To turn XSS validation on/off:
com.soa.console.xss ->
validate=[true|false]
Configure X-FRAME-OPTIONS header
The X-FRAME-OPTIONS header plays a role in determining if and how the user interface can be embedded within an iFrame in a third-party site.
Scope: All Community Manager and Policy Manager Containers
To configure Community Manager:
com.soa.atmosphere.console ->
atmosphere.console.config.xFrameOptions=[DESIRED HEADER]
To configure Policy Manager:
com.soa.console.xss ->
xFrameOptions=[DESIRED HEADER]
Changes to the X‑FRAME‑OPTIONS configuration take effect without requiring a container restart. If the updated setting does not apply as expected, restart only the Community Manager and Policy Manager containers.
Configure Server Header
You might want to prevent the Server header from being returned in responses.
Scope: All Community Manager and Policy Manager Containers.
In the Akana Administration Console for each container, configure the following:
com.soa.platform.jetty -> jetty.server.sendServerVersion = false
Note: this property does not exist by default, so you will probably need to add it.
Secure the metadata service
The Metadata API includes details about the container, such as public keys, internal IP addresses and file locations, which you probably don't want to share broadly. This information could potentially aid an attacker in fingerprinting and enumerating the Policy Manager application or discovering how some of the Java servlets are configured.
For additional security, we recommend that you secure this API for all containers. Follow the steps below.
To secure the metadata service (must be done separately for each container):
- Log in to the Akana Administration Console.
- Click the Configuration tab.
- On the left, under Configuration Categories, scroll down to find the com.soa.container.metadata.service category.
- Add a new property:
- Property name: metadata.basic.auth.filter.enabled
- Property value: true
- Click Apply Changes.
Configuration setting to limit XSLT transformation
A configuration setting prevents XSLT transformation, by default. This helps protect against malicious attacks.
Scope: All Containers
The configuration setting to prevent XSLT transformation:
com.soa.framework.xsl.transform ->
java.extension.enabled=false
In the Akana Administration Console:

By default, this is set to false, to disallow XSLT transformation.
Configuration property so that the Community Manager developer portal uses the mime.types file
Valid in Version: 2020.2.12 and later
For additional security, you can add a configuration setting to the Akana Administration Console, com.soa.atmosphere category, to configure the platform to reference the mime.types file, a file that maps Internet media types to unique file extensions. For example, this file maps the file extensions htm and html to the MIME type text/html.
If this file is in use, the platform performs the following checks against the file, for security purposes:
- The platform checks the file extension and uses the mime.types file to determine the MIME type. If the MIME type is not on the list of file types allowed for upload, in the Community Manager developer portal security settings (see How do I configure settings for business security?, Limit file types allowed for upload setting), the file is rejected.
- For more information on the developer portal setting, see Limiting file types allowed for upload below.
- If the file matches a valid MIME type that is allowed in the security settings. the platform checks the content of the file to ensure that the file is actually the declared file type. If it is not, the file is rejected. For example, if a file is named index.htm but is not a valid HTML file, it is rejected. This helps prevent malicious file content being passed as a supported file type.
For instructions to use the mime-types file, see How do I add the configuration property so that the Community Manager developer portal uses the mime.types file?
Configuration settings in the Community Manager developer portal user interface
This section covers settings and tuning parameters relating to hardening, that you can configure in the Community Manager developer portal (Community Manager). It includes:
- Enforcing challenge questions and answers
- Configuring constraints on security challenge questions and answers
- Configuring account login rules
- Configuring password complexity rules
- Turning off user account enumeration
- Disallowing user profile modification
- Limiting file types allowed for upload
- Enforcing an allowlist for cross-site scripting prevention (2019.1.11 and later)
- Adding the Malicious Pattern Detection policy to Community Manager developer portal APIs that support file upload
- Skipping external entity references from API specification for XXE prevention
- Enforce signature validation for SAML Web Browser SSO login domain
- Update JavaScript references for a default landing page: Automation script
Enforcing challenge questions and answers
Challenge Questions/Answers are often required to increase security around password reset. When signing up to the platform, the user must provide the answer to one or more security questions, if the platform is set up to require them. The user's answers are stored in the database, and the user must answer one or more security questions on demand to perform certain functions such as resetting a password or changing the user profile.
In Community Manager, choose Admin > Settings > Users > Enforce Challenge Questions on Login:
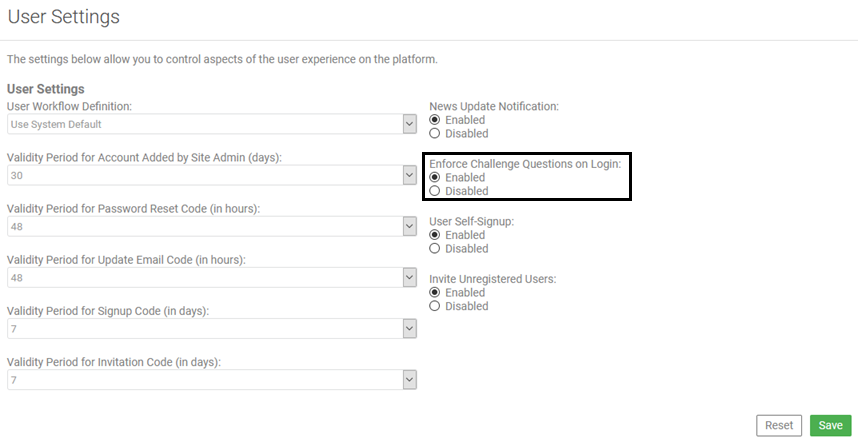
Set Enforce Challenge Questions on Login to Enabled.
Additional settings can be found under Admin > Settings > Security:
- Encrypt Challenge Answers (enabled/disabled)
- Challenge Count
For an illustration, see Enforcing an allowlist for cross-site scripting prevention below.
For more information, see How do I configure settings for business security? (Community Manager developer portal help)
Configuring constraints on security challenge questions and answers
For each security question set up in the Community Manager developer portal, as well as specifying the actual question, the Site Admin can configure constraints such as minimum and maximum number of letters, numbers, and special characters allowed or required in the answers, whether answers are case-sensitive, and whether spaces are allowed.
The Site Admin can delete questions; however, if any users have already set up answers to questions that are then deleted, those questions and answers are still available for account verification purposes.
Security question settings can be found under Administration > Settings > Challenges:
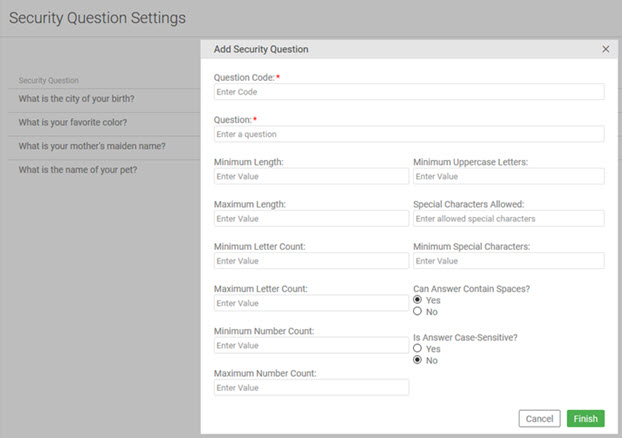
Note: In the Community Manager developer portal, the security challenge feature doesn't allow users to give the same answer twice. This is a precaution against users being lazy and using a default value, which is less secure, rather than setting up authentic answers to the questions.
For more information about configurable settings in the Community Manager developer portal, see Site Resource Settings (Site Admin help).
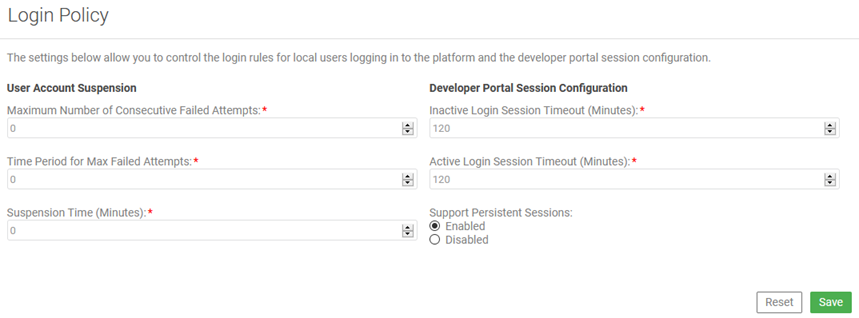
Configuring account login rules
The account login rules may include many options regarding failure attempts allowed, including account suspension times, and other settings.
Scope: Community Manager
Login policies can be set:
- Via the Community Manager developer portal user interface: Admin > Settings > Login, as shown below.
- Via an API call into the system.
Configuring password complexity rules
Password requirements (rules) may include many options such as length, characters allowed/required, and password change period.
Scope: Community Manager
Password rules can be set:
- Via the Community Manager developer portal user interface: Admin > Settings > Password, as shown below.
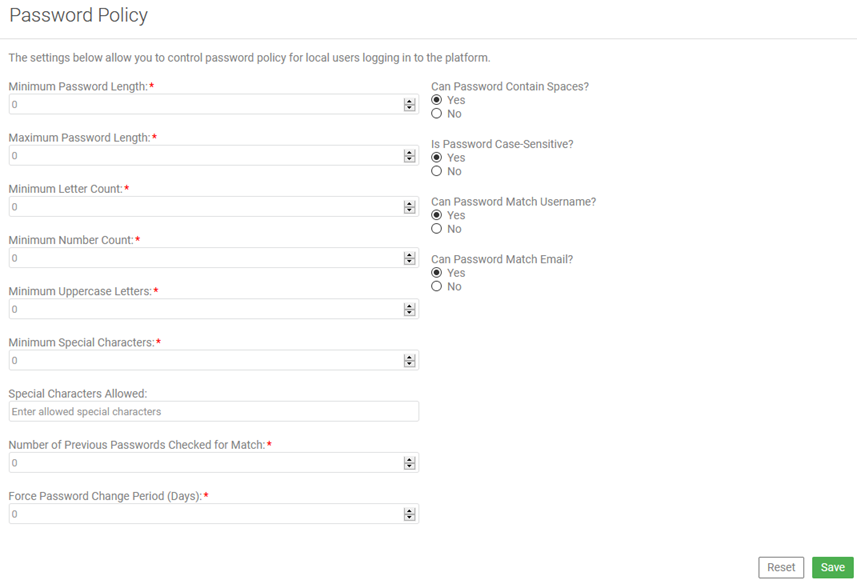
- Via an API call into the system.
Turning off user account enumeration
User Account Enumeration occurs when the Community Manager user interface provides direct feedback to a user during the signup and registration processes to the effect that a user account already exists or is already registered. If this is turned off, no useful feedback is provided to the user, minimizing the security risk, but decreasing usability.
Scope: All Community Manager Containers
In Community Manager, choose Admin > Settings > Security > Allow User Enum.
For an illustration, see Enforcing an allowlist for cross-site scripting prevention below.
For more information, see How do I configure settings for business security? (Community Manager developer portal help)
Disallowing user profile modification
User Profile Modification permits a user access to their own profile for modification. In some circumstances, you may wish to prevent this (e.g. when user accounts are pre-provisioned).
Scope: All Community Manager Containers
In Community Manager, User Profile Modification configuration can be found under Admin > Settings > Security: Allow users to modify their own profiles (enabled/disabled).
For an illustration, see Enforcing an allowlist for cross-site scripting prevention below.
For more information, see How do I configure settings for business security? (Community Manager developer portal help)
Limiting file types allowed for upload
Valid in Version: 2019.1.0 and later
In the Community Manager developer portal, you can restrict the media types allowed for uploading to comments, discussions, tickets, alerts, or reviews. The default allows any media type.
This setting is configured by the Site Admin. Choose More > Admin > Settings > Security > Limit file types allowed for upload.
For an illustration, see Enforcing an allowlist for cross-site scripting prevention below.
For more information, see How do I configure settings for business security? (Community Manager developer portal help)
Enforcing an allowlist for cross-site scripting prevention
Valid in Version: 2019.1.11 and later
In the Community Manager developer portal, you can enforce an allowlist for cross-site scripting prevention.
When you enable this feature, only the characters specified in the allowlist are allowed, other than defaults such as characters, numbers, and common punctuation.
This setting is configured by the Site Admin. Choose More > Admin > Settings > Security > Enforce allowlist for cross-site scripting prevention.

For more information, see How do I configure settings for business security? (Community Manager developer portal help)
Adding the Malicious Pattern Detection policy to Community Manager developer portal APIs that support file upload
It's a good idea to attach the HTTP Malicious Pattern Detection Policy to all Community Manager developer portal APIs that support upload. This provides a layer of protection against upload of malicious content.
The following services in the Akana API Platform API include operations that support upload:
- ApplicationAPI (Apps service) (certificate upload)
- ApiRESTApi (APIs service)
- BoardAPI (Boards service) (image and file upload)
- BusinessAPI (Businesses service) (certificate upload)
- ClientServicesAPI (Client Services service) (keystore upload from Test Client)
- ConsoleResourceAPI (Console Resources service) (file upload)
- OAuthClientApi (keystore upload from Test Client)
- ContentAPI (Content service) (file upload, API docs and UI customization files)
- GroupAPI (Groups service)
- WorkflowAPI (Workflow service)
- DropboxApi (Dropbox service) (image and file upload)
- UserAPI (Users service)
- TenantAdministrationAPI (Tenant Administration service)
Links to details about the above services are available in either or both of the following locations:
- Authored API documentation: On the Akana API Platform API home page
- Landing page for generated API documentation: https://help.akana.com/content/current/ag/apidoc_restApiDocs.htm
To attach the policy to a service
- Define the policy. For information about this policy, see Using the HTTP Malicious Pattern Detection Policy.
- In Policy Manager, in the Organization Tree, locate your Akana API Platform services. An example is shown below.

- Click through to the applicable service. In the Policy Attachments, Operational section, click Manage.
- Add the policy and save your changes.
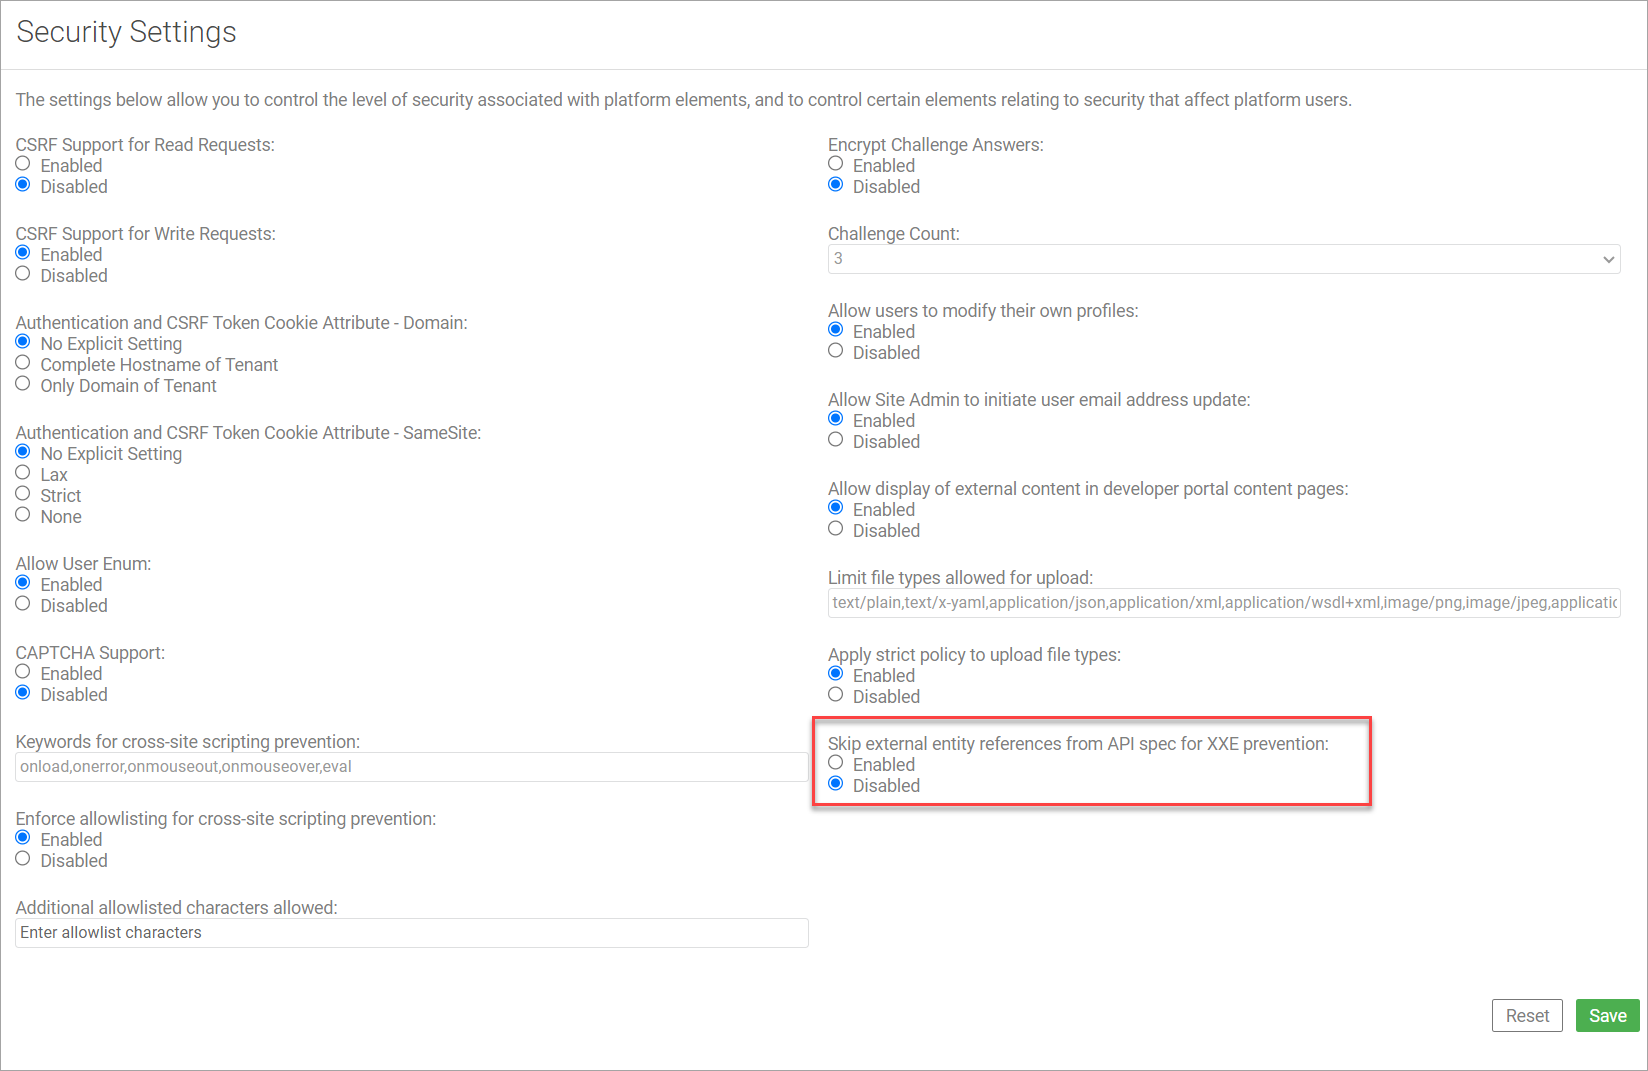
Skipping external entity references from API specification for XXE prevention
Valid in Version: 2022.1.2.11 and later
In the Community Manager developer portal, you can skip external entity references from API specification for XXE prevention.
When you enable this feature, the API specification parser will not process the external references found in the specification, such as ENTITY, DTD, or XSD.
This setting is configured by the Site Admin. To enable or disable this setting, go to More > Admin > Settings > Security > Skip external entity references from API spec for XXE prevention.
For more information, see How do I configure settings for business security?
Enforce signature validation for SAML Web Browser SSO login domain
Valid in Version: 2022.1.3.2 and later
The validation of SAML response and assertion can prevent tampering attacks and confirm message authenticity within SAML assertions, enforcing the trust relationship between the Identity Provider and Service Provider.
The SAML Signature Policy can be configured for SAML Web Browser SSO to validate the signature on SAML Response and/or SAML Assertion. The system administrator can now enforce the Sign-on Response and Sign-on Assertion based on the identity system configuration. If the SAML Signature Policy is enabled, SAML signature validation will be effective for both SP-initiated and IdP-initiated authentication requests.
To set up signature validation in the Policy Manager Console
- Go to Configure > Security > Identity Systems > Add Identity System > SAML Identity Provider Configuration page to configure SAML signature validation for sign-on response and/or assertion.
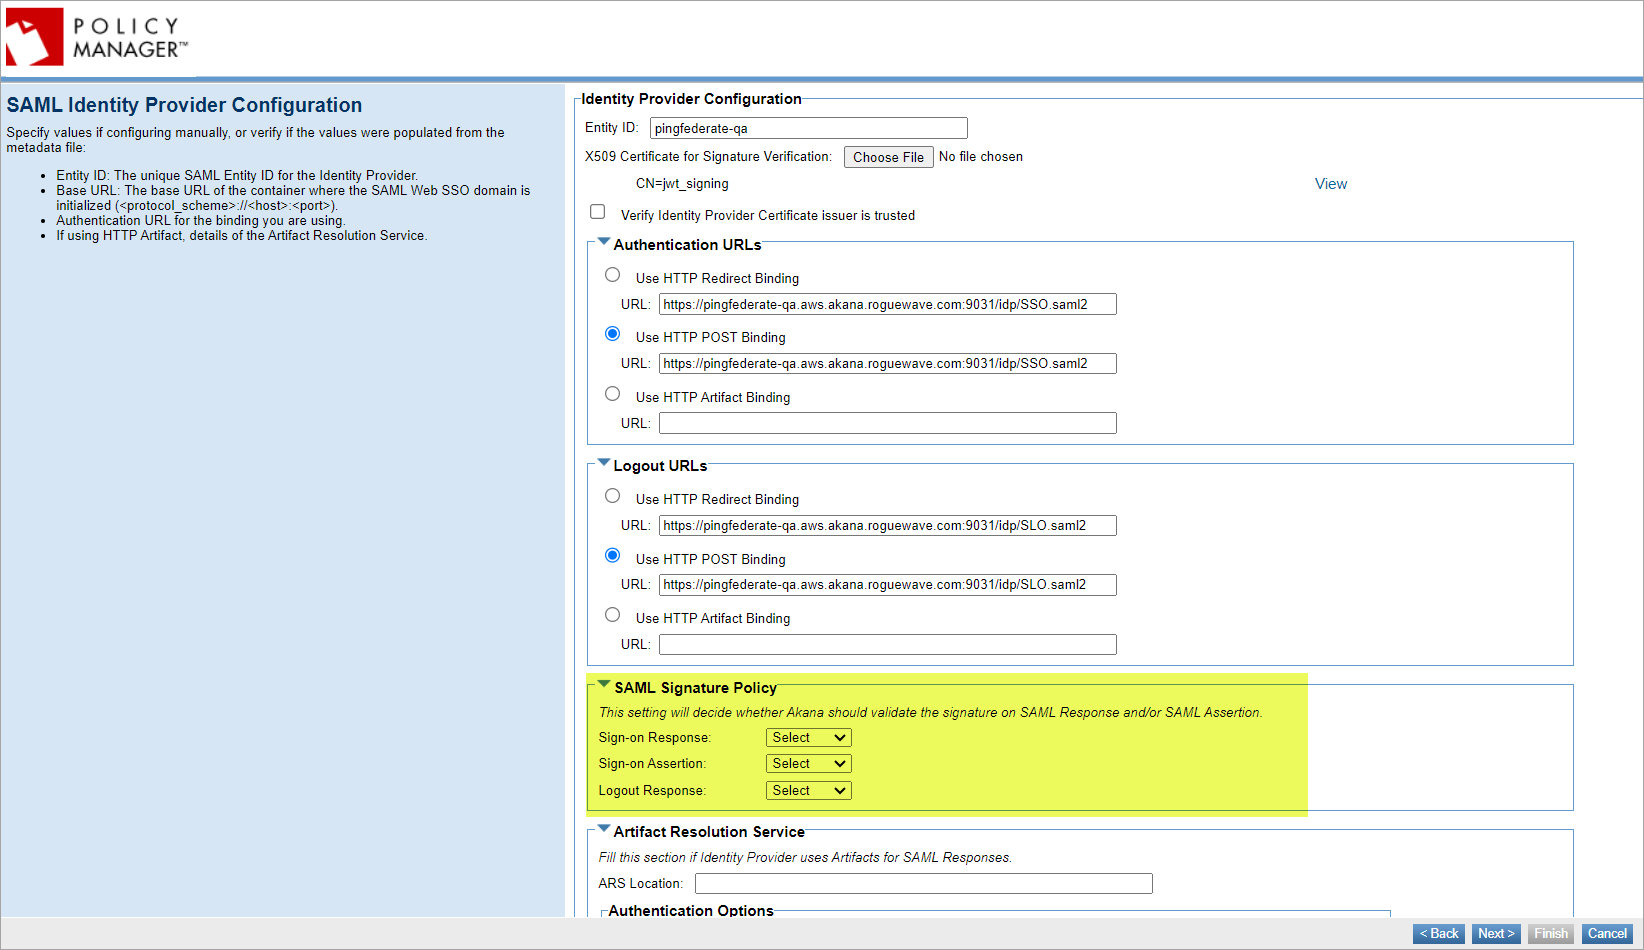
- In the SAML Signature Policy field:
- If you choose the Sign-on Response, Sign-on Assertion, or Logout Response option to signed, this ensures that the signature is present and validates the response and assertion signature using the public keys or X.509 certificates issued by the identity provider.
- If you choose the Sign-on Response, Sign-on Assertion, or Logout Response option to unsigned, this will skip the validation of the response and assertion signatures.
- If you choose the Sign-on Response, Sign-on Assertion, or Logout Response option to select, this will validate the signature if present and skip the signature validation if not present.
For more information, see Setting up the SAML Web Browser SSO.
Update JavaScript references for a default landing page: Automation script
If you are using the default landing page or any out-of-the-box pages in the Community Manager developer portal, it is essential to update the JavaScript references by running an automation script. For example, the necessary updates are included in the com.soa.atmosphere.content-2025.1.0-userdocs.zip file; however, this file is not automatically deployed during the upgrade process. You must execute the script to ensure the JavaScript references are updated.
To remove security vulnerabilities associated with Bootstrap 3.1.1 and jQuery 1.11.0, run the content.py script. When you run the script, it will prompt you to provide the tenant admin credentials, which can be found in the pm-cm-all.properties file.
Example:
The following is the command to run from the /akana/bin folder:
./jython.sh ../scripts/Lib/soa/atmosphere/content.py -u -v --url https:{hostname}:{port}
--file ../tenant/content/com.soa.atmosphere.content-2025.1.0-userdocs.zip
--keyloc /path/to/your/.jks
--keypswd password
where:
- --url
Specify your tenant’s host URL.
- --file
Path to the content ZIP file to be uploaded.
- --keyloc
Path to the keystore file (.jks) containing trusted SSL certificates.
- --keypswd
Password to access the keystore file.
To verify the landing pages, go to More > Admin > File Manager within the Content section of the Community Manager developer portal.
You must run this script across all relevant tenants to ensure that all required files are updated.
Troubleshooting: File type restrictions
If you encounter the error message "File media type is not permitted for security reasons," you may need to adjust the allowed file types for uploads. In the Community Manager developer portal, go to More > Admin > Settings > Security > Limit file types allowed for upload and specify the acceptable file types, which include:
- text/css
- text/html
- application/javascript
- image/png
- image/svg+xml
- application/pdf
- application/xhtml+xml