Sign Up
Sign up for a platform account and learn about account privileges.
On this page:
- Do I need an account?
- How do I sign up for a new account?
- How do I sign up using a social media account?
- What are my account privileges?
- How do I log in?
- The Site Admin invited me. How do I log in?
- How do I log in if the platform Terms and Conditions change?
- How does the verification code work?
- Why does my login time out?
Do I need an account?
There is no need to sign up for an account to view public APIs. There is also much public content such as discussion boards. You can even view trouble tickets posted by members of our community. However, you must create an account on the platform in order to access APIs. With an account, you can establish a project, invite others to collaborate with you, test your app using the Test Client tool, and receive permission to commercially publish an app integrated with platform APIs.
How do I sign up for a new account?
In many cases, all you need to provide is name, email address, and password. In some cases, additional information is required, depending on platform configuration.
Additional login domains might be available; for example, you might be able to sign up using Facebook or Google. See How do I sign up using a social media account?
To sign up for a new account
- At the top of the Community Manager developer portal home page, click Log In, and then click Create Account.
- On the Sign Up page, provide your user information:
- First Name, Last Name, Email, Password, and Confirm Password are required fields.
Note: The portal creates your Profile Name from your First Name and Last Name. For example, if your first name is Adam and your last name is Smith, the default Profile Name is AdamSmith. After you create your account and sign in, the Profile Name is displayed at the top right of the page. If needed, you can change it later: see How do I edit my user profile?
- Your password must be different from your Profile Name (First Name / Last Name), and it must contain 8 to 20 characters, can contain alphanumeric characters, must include at least one letter and number, may include the following characters (%,&, _, ?, #, =, -), cannot contain spaces, and is not case sensitive. To ensure account integrity, it's best to use a strong password, with a mix of letters, numbers, and special characters.
- Depending on platform settings, you might also need to provide a full telephone number, with country code.
- Depending on platform settings, you might need to provide answers to one or more security challenge questions.
- Depending on platform settings, you might need to accept a platform legal agreement (Terms and Conditions). Click the link to review the agreement, and then click the check box to accept.
- First Name, Last Name, Email, Password, and Confirm Password are required fields.
- Click Create Account.
- The Check Your Email page displays indicating that a registration email has been sent to the specified email address.
- The email contains a link that is used to activate your account.
- Load the email and click the link to activate your account. The Finish page displays.
Note: The activation email expires 7 days after being issued. If you activate an expired email, the Expired Registration Email page displays with a notice that a new email has been sent. Load the new email and continue with the activation process.
- Confirm the First Name, Last Name, and Email entries, enter your password, and then click Finish. The User Details page is displayed. Here you can verify your account information and, optionally, add an avatar.
- Click Edit. The Edit User Details page is displayed.
- Verify First Name and Last Name entries.
- Update your User Name as needed. The User Name is used to display the author of posts and tickets on the App Forum, API Forum, or Action Dashboard.
- You can upload a profile avatar (image) via the Profile > Details page. You can upload a profile image or reference a file from Gravatar. For file requirements, see What are the file requirements for avatar images?
- To upload a new user profile pic (direct file upload):
- Access the Edit User Details page (Profile > Details > Edit). The current profile pic displays in the Avatar section.
- Click Upload. The Upload File pop-up displays.
- Click Browse to target and select your profile pic image. Click Upload. The image loads into the Upload File pop-up with the upper left corner of the file selected. This represents the default crop setting for your image (75px x 75px). Select the cropped area and drag the highlight to the area of the image you would like to display as your profile pic. You can resize the cropped area as desired (but cannot exceed the default crop setting).
- After you have defined the area of your image you would like cropped, click Save. After saving your user settings, your profile pic will be updated and will display in the Logged In User area, and with App Forum, API Forum, and Action Dashboard posts.
- To upload a new user profile pic (Product / Gravatar upload):
- Access the Edit User Details page (Profile > Details > Edit). The current profile pic displays in the Avatar section.
- If you would like to use the default product icon, select the Use Avatar option that displays the product name.
- If would like to use an icon you have registered with https://en.gravatar.com/, select the Use Avatar from Gravatar icon. The avatar changes to the Gravatar icon.
- After saving your user settings, your profile pic will be updated and will display in the Logged In User area, and with App Forum, API Forum, and Action Dashboard posts.
- Click Save. Click Settings in the left navigation. The User Settings page displays. Here you can update your Email and Password information and configure Email Notifications.
- Click Edit. The Edit User Settings page displays. Perform the following tasks:
- Verify and update the Email address as needed.
- If you would like to receive news updates, click the Receive Email Updates check box.
- You can configure your account to receive notifications via email when certain activities occur. Click the check box for each activity you would like to receive notifications for. For details of notification settings, see How do I enable or disable email notifications?
- Click Save to commit changes, and Finish to complete the signup process.
For more information, see How do I edit my user profile?
How do I sign up using a social media account?
You can sign up by using an existing social media account, such as Facebook, Google, or Okta.
To sign up using a social media account
- In the top navigation, click Log In. The login page is displayed.
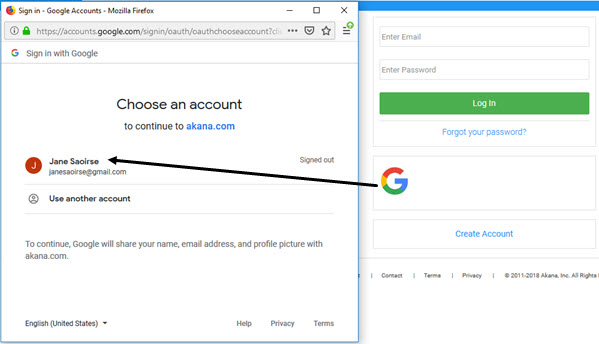
- In the section below the Forgot your password? link, click one of the available social media icons (for example, Facebook or Google).
Note: Availability depends on the implementation you're using. If an icon isn't displayed, that platform is not available for login. In the example below, only Google is available.
- At the sign in page for your social media provider, log in using your credentials for the account (generally username/password or email/password). The example below shows logging in to a Google account.
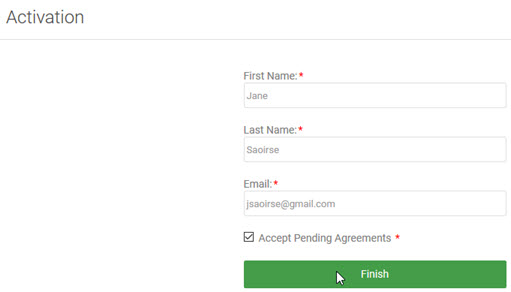
- After your login credentials have been accepted, you are redirected to the Activation page, shown below. Confirm the First Name, Last Name, and Email entries, accept pending agreements if needed, and then click Finish.
This completes the login, and you're taken to the main landing page, show below.
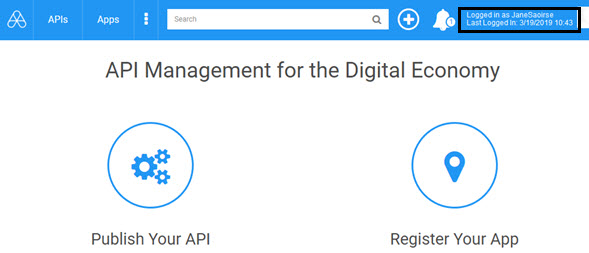
You're now ready to get started on the platform. For example, you can:
- Modify your user profile to add an avatar or other details. See How do I edit my user profile?
- Add an app. See How do I add an app?
- Add an API. See How do I add an API?
- Create a group. See How do I add a group?
What are my account privileges?
If you signed up for an account you have privileges to create an application and utilize the full spectrum of development, application management, and collaboration features.
- For the application projects you develop, you also are the sole administrator for the project.
- As an administrator, you can invite developers who are account holders to join your application team.
- Team members also have administrator rights for the app.
How do I log in?
The top navigation includes a Log in link.
To log in using your credentials
- Click the Log in link at the top right.
- On the login page, specify your Email and Password, and click Log In.
When login is complete, you are taken to your Action Dashboard page.
Note: In some cases, the Community Manager developer portal might be customized to take you to a different page. In addition, from certain pages, such as a specific app or API page, if you log in from that page you are redirected back to the same page after login, for your convenience.
To log in using your third-party provider ID
Note: once you set up a platform account with an email that's authenticated via a third-party provider such as Facebook or Google, you cannot create a platform account using that email address, and you can only reset your password via the same third-party provider.
- Click the Log in link at the top right to go to the Login page.
- In the section below the Forgot your password? link, click one of the available social media icons (for example, Facebook or Google).
- Specify your login credentials. After your login credentials have been accepted, you are redirected back to the main landing page for the Community Manager developer portal.
The Site Admin invited me. How do I log in?
In some cases, a Site Admin might add you as a Community Manager developer portal user rather than asking you to sign up yourself.
In this scenario, the Site Admin will add basic information about you; generally, your first name, last name, and email address.
The Site Admin might specify a custom password, or the password might be generated by the platform.
The Site Admin will give you the information you need to log in to the portal for the first time, including the URL and the password. Usually, when you log in for the first time, you'll be required to change the password. You can also review the basic profile information added by the Site Admin, and adjust it if needed; see How do I edit my user profile?
It's important to log in to complete the account registration process. Your account isn't activated until you log in successfully for the first time. Until this time, you won't be able to perform certain basic user functions such as getting a password reset link if you forget your password.
How do I log in if the platform Terms and Conditions change?
If the platform Terms and Conditions you reviewed and agreed to when you initially signed up to the platform change between logins, you will be required to review and agree to the new copy when you log in.
To log in using your credentials
- Click the Log in link at the top right to go to the Login page.
- In the Login area, specify your Email and Password, and click Login.
- If the Terms and Conditions have changed, you'll see a Pending Signup Agreement popup. Use the vertical scroll bar to navigate through the Signup Agreement and review the text. An example is shown below.
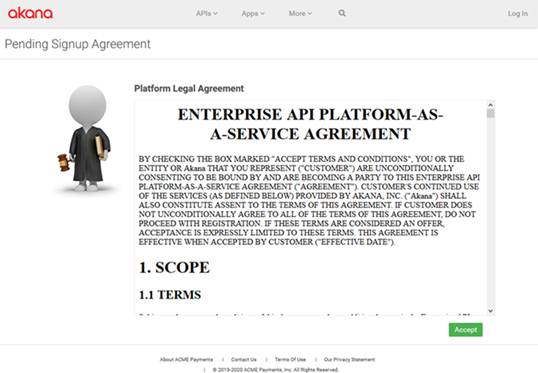
- Click Accept to accept the Terms and Conditions.
When login is complete, you are taken to your Action Dashboard page.
Note: In some cases, the Community Manager developer portal might be customized to take you to a different page. In addition, from certain pages, such as a specific app or API page, if you log in from that page you are redirected back to the same page after login, for your convenience.
To log in using your social media provider ID
- Click the Log in link at the top right to go to the Login page.
- In the bottom section, click the login icon, such as Google, and then specify your login credentials. After your login credentials have been accepted, you'll be redirected back to the Community Manager developer portal.
- If the Terms and Conditions have changed, you'll see a Pending Signup Agreement popup. Use the vertical scroll bar to navigate through the Signup Agreement and review the text, and then click Accept.
How does the login verification code work?
Some versions of the platform include an extra layer of login security. If that is the case, you'll be sent a special verification code by phone or email. The details depend on how the platform version you're using is set up; but basically you'll need to log in, providing your credentials in the usual way, and then provide the code.
Generally the code has quite a short life; for example, five minutes. If you don't manage to log in before the code expires, you can request a new one.
This extra layer of security helps protect you and your account, as well as the platform, from unauthorized users.
If you have any questions about the verification code, or the process, contact your Site Admin.
Why does my login time out?
For security reasons, the Community Manager developer portal might be set to time out. There are two timeout settings:
- Timeout after a period of inactivity.
- Timeout even if a user is still active but has been using the portal for an extended period of time.
The amount of session time that's allowed before the timeout occurs is controlled by the Site Admin.
If your session is active and reaches the maximum session time, you'll see a notification message prompting you to save your work. Save any change immediately so that you don't lose any work. There is no restriction on logging in again; you'll be able to log back in immediately after the timeout, or when you see the message you can simply log out and log back in again immediately.