Account Management
Manage your platform user account, configure notifications, and get password support.
On this page:
Account Information
- How do I set up a user account?
- I received an email inviting me to join the platform. What do I do now?
- What are the security questions and how are they used?
- How do I edit my user profile?
- How do I change my user name?
- How do I change my email address?
- What are the file requirements for avatar images?
- How do I update my user profile picture?
- How do I add a Gravatar image to my account?
- How do I upload and crop icons?
- How do I remove an avatar image?
- How do I log out?
- Does the Community Manager developer portal use cookies?
Password Management and Security
- How do I change my password?
- What do I do if I forget my password?
- My account is locked. What do I do?
- Why doesn't the browser remember my password?
- How do I change my security questions?
Preferences and Notification Settings
- What user preferences can I set?
- How do notifications work?
- How do I enable or disable email notifications?
- How do I respond to notifications?
- How do I delete notifications?
Roles
Account Information
How do I set up a user account?
It's easy to set up a new account on the platform. From the homepage, click Log In.
The login page shows you what signup options you have. This might vary according to how the platform version you're using is configured:
- Create Platform Account: In most cases, you can create a platform account. Click Create Account and then, at the Sign Up page, fill in the information requested. A signup email is sent to the email address you provide; you can then click the link in the email and complete the signup process.
Note: In some cases, signup for new users might be disabled. If this is the case, you can only sign up at the invitation of a Site Admin.
- Use Third-Party Authentication: In many cases, you might have one or more options to sign in by using a third-party identity provider such as Facebook, Google, or CA SiteMinder. If any of these options are available on your version of the platform, you'll see buttons with applicable logos on the login page. Just click the button you choose and then authenticate with the third-party provider. You'll need to complete your user profile by providing first and last name and accepting the platform Terms and Conditions.
For more information on setting up user accounts, see Sign Up.
On the platform's signup page, you might need to answer a CAPTCHA test. Whether or not CAPTCHA is required is determined by the platform's configuration settings.
Once you've created your account and logged in, you can fine-tune your user profile. See below.
I received an email inviting me to join the platform. What do I do now?
You might be invited to join the platform, and receive an email notification with instructions. There are two main scenarios:
- Someone who is already a platform member invites you to join the platform.
In this scenario, the invitation email will include a link with an invitation code. Click the link and then follow the instructions to complete signup. The invitation code is only valid for the email address the invitation was sent to.
- The Site Admin adds you as a user.
In this scenario, the Site Admin will contact you with the password, which you will need to complete the registration process. When you have the password, click the link in the email and follow the instructions. Depending on the platform setup, you might need to choose a new password, accept a legal agreement, and/or provide answers to security challenge questions.
On the platform's signup page, you might need to answer a CAPTCHA test. Whether or not CAPTCHA is required is determined by the platform's configuration settings.
Once you've created your account and logged in, you can fine-tune your user profile. See below.
What are the security questions and how are they used?
When you create an account on the platform, you might be asked to answer one or more security questions.
Answering the security questions provides an extra layer of protection for your account. Make sure you choose questions that you can easily answer, and would always answer in the same way. Later, if you perform certain operations such as changing or resetting your password, you'll be prompted to answer one or more of these questions. Your answer is checked against the answer you originally provided, and must match.
Whether the security questions are in place, how many are required, and the exact questions used, might vary according to the version of the platform that you're using.
Constraints on the answers might also vary; for example, some answers might require a maximum or minimum number of letters, numbers, or characters, and might not allow spaces or certain special characters. If there are constraints, you'll see messaging to let you know what the guidelines are.
In all cases, if you're asked to answer one or more security questions when creating an account, your responses are stored securely and are used only to protect your account.
If by any chance you don't recall the answer you provided for a security question, and fail to answer the question correctly, you'll see a second security question, and then, if you fail again, a third question. After three unsuccessful tries, the account is locked for a period of time, generally 30 minutes. If needed, contact the Site Admin who can reset your password.
Note: It might happen that, over time, the set of security challenge questions used on the Community Manager developer portal is changed. If you choose a question and set up an answer to it, and the question is later removed, you can still use that question/answer to restore your access to the Community Manager developer portal. However, if this happens, and you go in to look at your security questions, you won't see the question you previously selected. If this happens, it's best to choose a new question, set up the answer, and save your updates. For information about how to check the questions/answers you've set up, see How do I change my security questions?
How do I edit my user profile?
After you create a new account, your profile is created. The top navigation includes a Profile link where you can view and edit your account information.
Note: In some cases, the platform might be set up so that you cannot modify your account information. If you need to change a value, but it is read-only, contact your Site Administrator.
The left navigation includes the following options:
- Details page: First Name, Last Name, Profile Name (username on the platform), Email, Phone Number (possibly, depending on configuration) and Avatar. See To edit user details.
- Forum page: The user forum aggregates forum entries for all apps, APIs, and groups the user is associated with. See Forums.
- Password page: Change password. See To change your password.
- Preferences page (Version: 2020.1.0 and later): See What user preferences can I set?
- Security page: Set up, or change, security questions and answers. The number of security questions you must answer, if any, is determined by platform settings. See To set or change answers to security challenge questions.
- Settings page: Manage notifications settings. See To edit user settings.
To edit user details
- In the top navigation, to the right of your avatar, click the down arrow and then click Profile.
- In the left navigation menu, click Details. The Details page appears, as shown below.
- Update the account information as needed. Here you can change any of the following:
- First name
- Last name
- Profile name
- Phone number (including country code) if the platform is configured to collect phone numbers. Depends on platform settings.
- Avatar
- Click Save.
If needed, you can use the Reset button at any point before saving, to remove changes you just made.
- Use the top navigation to navigate to another page.
To change your password
- In the top navigation, click Profile.
- In the left navigation menu, click Password.
- Provide the current password.
- Choose the new password.
- Type the new password again.
- Click Save.
If needed, you can use the Reset button at any point before saving, to remove changes you just made.
- Use the top navigation to navigate to another page.
To set or change answers to security challenge questions
- In the top navigation, click Profile.
- In the left navigation menu, click Security.
If you previously provided answers to security questions, the questions that you chose, and the answers you provided, are not displayed. To change the questions and/or answers, all you need to do is choose the question, provide the answer, and save. Your choices are never displayed, but they are stored securely in the database.
- For each entry, choose a question from the drop-down list and then provide an answer.
If you previously set up security challenge questions, and are now modifying the information, you'll need to set up a complete new set of questions/answers. The prior information isn't displayed, and the new information replaces it. You can't change just one and keep the others.
- Click Save.
If needed, you can use the Reset button at any point before saving, to remove changes you just made.
- Use the top navigation to navigate to another page.
Once you navigate away, if you go back to the page you won't see your choices. However, as long as you saved, the information is stored in the database and is available if needed; for example, if you forget your password.
To edit user settings
- In the top navigation, click Profile.
- In the left navigation menu, click Settings.
- Clear check boxes as needed to modify your notifications settings.
- Click Save.
If needed, you can use the Reset button at any point before saving, to remove changes you just made.
- Use the top navigation to navigate to another page.
How do I change my user name?
Your user name displays on posts, tickets, and notifications. When you initially sign up, you specify a user name on the Personal Info page. If you want to change it, you can do so on the user Details page.
To change your user name
- Go to your user details page (Profile > Details).
- Update the Profile Name field.
- Click Save.
For additional information on changing your user profile, see How do I edit my user profile?
How do I change my email address?
The platform uses your email address for authentication when you log in, and also for sending email notifications to inform you about certain events such as app team changes.
You can change the email address associated with your account, on the User Settings page.
Note: If you log in to the Community Manager developer portal using an account you've set up with a third-party provider such as Google, Okta, or Facebook, the email address set up in the Community Manager developer portal must match the address in the provider account. If you change your email address on the User Settings page, make the same change in your third-party provider account. When you make the change, a notification is sent to the old and new accounts to keep you informed.
Confirmation of the new email is required before the change is finalized. When you change your email address:
- A notification is sent to the new email address, with a code. You must enter the code in the Community Manager developer portal user interface to confirm the change.
- A courtesy notification is sent to the old email address, as a standard security measure.
In some cases, the Site Admin might initiate a change of email address for a specific user. If this happens, you'll receive a notification to the new email address, with a reset password link, as well as a courtesy notification to the old email address. In this scenario, you must reset your password to confirm the change of email address.
In some cases, the option to change your email address might be disabled. If you need to change the email address on your account and the field is disabled, contact your Site Admin for assistance.
To change your email address
- Go to your user details page (Profile > Details).
- Next to the Email field, click Change to access the Change Email Address dialog box.
- Enter your new email address and click Next.
- In the Confirm Email box, enter the confirmation code that was sent to your new email address, and click Finish.
- On the user details page, click Save.
For additional information on changing your user profile, see How do I edit my user profile?
What are the file requirements for avatar images?
The Community Manager developer portal supports upload of avatar images for user profiles, APIs, apps, groups, and business organization.
The file requirements for avatar images uploaded to the platform are:
- File format: jpeg, gif, bmp, or png
- Maximum preview size: 75px x 75px
- Maximum file size: 4MB
How do I update my user profile picture?
The user profile avatar (picture) displays with the user name in the Logged In User area, and with App Forum, API Forum, and Action Dashboard posts.
You can set up an avatar for yourself via the Profile > Details page. You have two choices:
- Upload a profile picture. For file requirements, see What are the file requirements for avatar images? above.
- Reference an avatar you've already set up for yourself on Gravatar. See How do I add a Gravatar image to my account?
To upload a new user profile picture
- Go to your user details page (Profile > Details).
- In the Avatar section on the right, click Upload.
- Click Browse and then navigate to the location of your file.
- Click Upload. The image loads into the Upload File pop-up with the upper left corner of the file selected. This represents the default crop setting for your image (75px x 75px). Select the cropped area and drag the highlight to the area of the image you would like to display as your profile picture. You can resize the cropped area, but cannot exceed the default crop setting.
- Click Save.
For additional information on changing your user profile, see How do I edit my user profile?
How do I add a Gravatar image to my account?
If you have a Gravatar account that uses the same email address as the one for your platform account, you can use the avatar you've set up on Gravatar as your avatar on the Community Manager developer portal.
To set it up, you'll need to be logged in to your Gravatar account so that the platform can retrieve the image. Follow the instructions below.
To reference an image on Gravatar for a user profile picture
Note: to use this feature, you must first create an account at https://en.gravatar.com and upload an avatar.
- Go to your user details page (Profile > Details).
- Click Edit).
- In the Avatar section on the right, click Use Avatar from Gravatar. The avatar changes to your Gravatar icon.
- Click Save.
For additional information on changing your user profile, see How do I edit my user profile?
How do I upload and crop icons?
You can upload an icon for a specific resource such as an API, app, or group. This action can be performed in the Icon section when adding or editing the resource.
For file requirements, see What are the file requirements for avatar images? above.
To upload and crop an icon
- In the Icon section for the resource, click Upload to launch the Upload File pop-up.
- Click Browse and then navigate to the location of your file.
- Click Upload. The image loads into the Upload File pop-up with the upper left corner of the file selected. This represents the default crop setting for your image (75px x 75px). Select the cropped area and drag the highlight to the area of the image you would like to display as the avatar for the resource. You can resize the cropped area, but cannot exceed the default crop setting.
- Click Save.
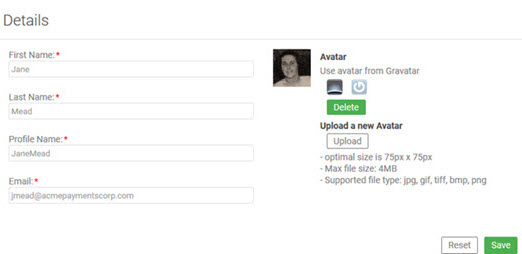
How do I remove an avatar image?
If you've assigned an avatar to your user profile, or to a resource such as an app, API, or group, you can remove it by clicking the Delete button below the avatar. The example below shows the user Details page when an avatar was uploaded and saved for the user:
![]()
Just click Delete and then save the change.
How do I log out?
You can log out using the Logout link on the top navigation.
To log out
- Access the top navigation.
- Click Logout.
Note: In some cases, the Site Admin might set up the platform so that it times out automatically after a period of inactivity. If this setting is in place, the specific time period is determined by the Site Admin.
Does the Community Manager developer portal use cookies?
The Community Manager developer portal uses a temporary cookie, called a session cookie, to facilitate your user experience. The cookie contains information about your roles and permissions and thus enables you to take full advantage of the features offered by the portal. The cookie is established when you log in, and is removed when you log out.
The portal also uses a browser storage field to store the active session timeout value. This allows you to use more than one browser tab, and the timeout is coordinated between tabs.
Password Management and Security
How do I change my password?
Your password is used along with your email address to sign in. You can change your user account password on the User Settings page.
If needed, you could also ask the Site Admin to change your password.
To change your password
- Go to your Password page (Profile > Password).
- Type to current password.
- Provide the new password and type it again in the Confirm Password field.
Note: to help ensure account integrity, use a "strong" password that includes a mix of uppercase and lowercase with at least one or two numbers and/or special characters.
- Click Save.
What do I do if I forget my password?
If you forget your password, you can request a password reset.
If needed, you could also ask the Site Admin to reset your password.
Notes:
- Password reset on the platform only works if you have an account set up on the platform (as a registered user). If you log in via a social media provider, such as Facebook or Google, you'll need to change your password with the provider.
- If you're added as a user by a Site Admin, rather than signing up yourself, you must sign in successfully at least once to activate your account before you can change your password using the "Forgot Password" process described here. If a Site Admin added you and you've forgotten your password, ask the Site Admin to change the password for you.
To reset your password
- On the homepage, click Login / Sign-up.
- On the Login page, click the Forgot Password? link.
- Type your email address and click Continue.
- Go to your email account, find the password reset email, and click the link (or paste the link in the browser).
- Conditional: answer the CAPTCHA, if applicable.
- Conditional: answer the security question, if applicable.
- Choose a new password and confirm.
My account is locked. What do I do?
Under certain conditions, your account might be locked for security reasons; for example, if there are several failed login attempts (usually three) close together, or if the Site Admin thinks your account might have been compromised.
If your account is locked, you can do either of the following:
- Ask the Site Admin to unlock the account.
- Reset your password. Changing the password automatically unlocks the account. You can only change the password if you've logged in successfully in the past (that is, your account has been active, it's not a completely new account that you're trying to access for the first time). If the platform version you're using is set up to require security challenge questions, you'll also have to correctly answer the security challenge before you could change your password. For instructions on password reset, see To reset your password above.
Why doesn't the browser remember my password?
Many browsers allow the saving of passwords, and will sometimes offer a prompt asking if you want to save the password.
Although saving passwords is convenient, it's a potential security risk. For this reason, the platform has been modified so that even if the browser gives the save password prompt, the password is not actually saved. In addition, the auto-complete function is turned off on certain sensitive fields such as the email address at login. These changes have been made to enhance the security of our users.
We recommend that you never allow the browser to save your passwords.
How do I change my security questions?
As part of signing up for the platform, you might be required to provide answers to one or more security questions. These are for the security of your account. For more information about security questions, see What are the security questions and how are they used?
You might want to change one or more of the security questions, or change your answer. Once you are logged in, you can do this at any time.
Note: The platform might be set up so that the answers to security questions are encrypted. If this is the case, you'll see a message to that effect. Although your answers to the security questions are not shown except when you add them, your existing answers are stored. You don't need to do anything with questions and answers you don't want to change. Just provide new answers to any changed questions, or if you want to change your answer.
To change your security questions and/or answers
- Log in to the platform.
- In the top navigation, click Profile.
- In the left navigation menu, click Security.
- Do either or both of the following:
- To change a question, choose a new question from the drop-down list, and then type your answer.
- To change the answer to an existing question, just type the new answer.
Click Save.
Note: It might happen that, over time, the set of security challenge questions used on the Community Manager developer portal is changed. If this happens, the answers you previously set up will still work for you; However, when you go in to look at your security questions, you won't see the question you previously selected. In this case, it's best to choose a new question, set up the answer, and save your updates.
Preferences and Notification Settings
What user preferences can I set?
In your user profile, you can customize the types of items that are displayed by default on your Action Dashboard.
Note: If you change your user preferences to customize the initial display, you can still access all item types when viewing the Action Dashboard. This setting just changes the initial view.
For more information on the Action Dashboard, see Action Dashboard.
To customize your Action Dashboard initial view
- Go to Profile > Preferences.
- In the Filter Setting on Action Dashboard field, choose one of the item types for your initial view. Choices:
- Alerts
- Requests
- Tickets
- Click Save.
How do notifications work?
The platform offers two types of notifications:
- Notifications, displayed on the Notifications page in the platform user interface and often also in the Action Dashboard.
- Email notifications, sent to you
Action Dashboard notifications
When you log in, you are automatically taken to your Action Dashboard, where you might see one or more notifications to keep you informed of activity relating to your apps, APIs, and groups. In some scenarios, such as accepting an invitation to a group, you can take action directly from the Action Dashboard notification.
In addition, after you've navigated to a different page, you can always view a summary of your notifications.
To view your notifications
- In the top navigation bar, click the number indicator. You'll see a short summary of your notifications.
- To see all notifications from this view, click the See All link at the bottom of the drop-down notifications list, as shown below.

- On the Notifications page, manage your notifications. See:
For more information on the Action Dashboard, see Action Dashboard.
Email notifications
Email notification messages are generated in response to certain events, such as changes relating to your apps, APIs, or groups.
For some events, such as password change, you'll always receive an email notification. For other types of events, you can turn off the email notification option in your user settings. Even though the emails are not generated, you will still get notifications on the Action Dashboard and Notifications page for these events.
To turn off your email notifications: see How do I enable or disable email notifications?
How do I enable or disable email notifications?
By default, the platform sends you email notifications when certain activities occur; for example, when a new member joins your app team or group. You can update your notifications settings on the User Settings page to turn email notifications off or on for certain events.
To change your notification settings
- Go to your Settings page (Profile > Details).
- If you want to change your setting for receiving news updates, check or clear the Email me news updates check box, if it is available.
- If you want to enable or disable email notifications, check or clear the applicable categories. Options include:
- An app connects to my API
- My apps receive alerts
- There are major changes to my app's lifecycle
- Posts are created for my apps
- There are changes to my app's team
- There are changes to my app's access to APIs
- Email me news updates
- Someone comments on my post
- There are changes to my API Scope Group
- Tickets relating to my APIs or apps are created or updated
- When you're satisfied with your settings, click Save.
How do I respond to notifications?
Some notifications are action items, such as an invitation to be an API Admin, to join a team, or to approve a request to connect to your API.
You can respond to notifications in the Notifications page or Action Dashboard, or in the Forum for the resource, such as app notifications.
The Notifications page displays 20 at a time, and the page uses infinite scrolling rather than paging. This means that when you have a lot of notifications, and go to the Notifications page, you'll see the first 20. If you scroll down the list, another 20 are added to the list. If you have a large number of notifications, you can continue scrolling down the list, and more notifications will be added, until all your notifications are displayed.
For a list of response options to posts or tickets, see Post/Ticket Management.
How do I delete notifications?
On the Notifications page, after you've viewed your notifications, you can delete them individually or in multiples.
To delete notifications individually: Check one or more boxes to the right of individual notifications and then click Delete Checked.
To delete all notifications on the page: choose Check All on Page and then click Delete Checked.
If you have a large number of notifications, only the first 20 are displayed on the Notifications page. To view additional notifications, just scroll down. As you scroll, additional notifications are displayed. To delete all notifications at once, for a large number, you'd have to scroll until all your notifications are displayed, then choose Check All on Page and click Delete Checked.
Roles
How do roles work?
There are some functions in the Community Manager developer portal that don't even require login; without signing up, you can look at apps and APIs and get a feel for how it all works.
When you sign up as a platform user, new capabilities become available to you. For example, probably you can add apps or create a group. The specific functions that a general platform user can perform are governed by platform roles, which are assigned by the Administrator. For example, one user might have a role that allows adding and editing of APIs, whereas another might have a different role that only allows viewing.
If you have questions about the specific roles that are assigned to you, or the functions you can perform in the Akana API Platform, contact an Administrator.
A platform function is not available to me. What do I do?
Certain aspects of platform functionality are controlled by the Site Admin via configurable settings. For example, you might read in the online help about how to add an API, but then find that this capability isn't available in the user interface.
Other capabilities are determined by the specific roles assigned to you (see How do roles work? above). Roles are assigned by the Business Admin.
If you find that specific capabilities aren't available to you, and you feel they should be, contact an Administrator and ask for assistance/clarification.