Groups
Create and manage groups in the Community Manager developer portal.
On this page:
About Groups:
- What is a group?
- What are the different types of groups on the platform?
- What are the group membership roles?
- What can a group Member do?
- What can a group Leader do?
- What can a group Admin do?
- How do I make someone a group Leader?
- How do I make someone a group Admin?
- How does group visibility work?
Managing Groups:
- How do I add a group?
- What are the components of the Group Details page?
- How do I access a group?
- How do I invite someone to a group?
- Can I invite non-members to a group?
- How do I accept an invitation to a group?
- How do I edit group information?
- How do I remove a group member?
- How do I re-send a group member invitation?
- How do I delete a group?
- Why can't I add a group?
API Scope Groups:
- What is an API Scope Group?
- How do I add an API Scope Group?
- What are the components of the API > Visibility > Groups page?
- How do I access an API Scope Group?
- How do I delete an API Scope Group?
Group Ratings and Reviews:
- Where can I find rating and review information for each group?
- How do I rate a group?
- How do I review a group?
- How do I edit a group review?
- How do I delete a group review?
About Groups:
What is a group?
On the platform, you can create a special-interest group of any time, and invite people to it. Creating a group enables collaboration between group members.
Groups have three levels of membership:
- Admin
- Leader
- Member
The person who creates the group becomes the first Admin, and can invite additional members to the group, as well as changing the role of an existing member. Groups can also be invited to have visibility of APIs; in this scenario, every member of the group has visibility, without having to request a contract with the API.
When a user is first invited to the group, on accepting the invitation, the user becomes a Member. From there, the member can be promoted to a Leader or Admin role.
All group members can:
- Collaborate on the group Forum. Depending on the visibility setting, the Forum is visible only to group members or to all platform users.
- See summary information about the group, on the Group Details page. See What are the components of the Group Details page?
- Provide feedback on the group by providing a review or rating. See Group Ratings and Reviews.
- Have visibility of any APIs that the group has been invited to have visibility of.
What are the different types of groups on the platform?
There are three variations of the standard platform group with the three-tier membership (Admin, Leader, and Member):
- Standalone (independent) group, created from the top menu bar: see How do I add a group?
- API Scope Group: a group that's created in the context of a specific API, if the develop portal is configured to support this feature. There are two types of API Scope Group:
- Independently Managed: the group can exist separately from the API; if the API is deleted, the group is not deleted.
- Not Independently Managed: the group exists solely in the context of the API; if the API is deleted, the group is automatically deleted also.
For more information, see API Scope Groups.
The platform also supports different types of group with a specific role, such as developers for a specific app, API Admins for a specific API, Business Admins, and Site Admins. These groups only have one membership level.
What are the group membership roles?
Groups have three levels of membership:
- Member (third level; general group membership). See What can a group Member do?
- Leader (second level; some additional permissions to group members). See What can a group Leader do?
- Admin (top level; full permission to manage the group). See What can a group Admin do?
What can a group Member do?
When a user accepts a group membership invitation, the user initially has the status of Member.
Group Member capabilities
Users with Member status and above have access to the following functions:
- Details (see What are the components of the Group Details page?)
- View information about the group.
- Give the group a rating.
- Write a review of the group.
- Follow the group.
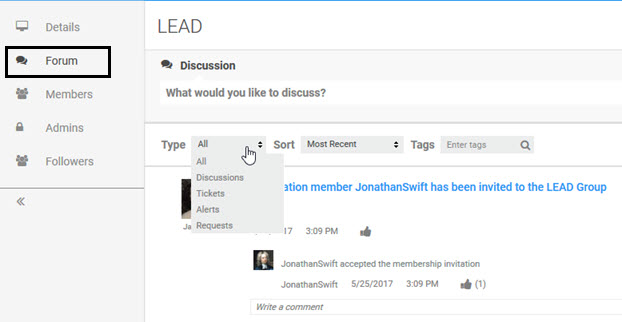
- Forum:
- Add or view forum entries, including Discussions, Tickets, Alerts, or Requests.
- Vote on forum entries.
- Comment on forum entries.
- Vote on forum entry comments.
- Follow or unfollow the forum.
- Members: View a list of members and leaders, and their status
- Admins: View a list of Admins, and their status
- Followers: View a list of users who are following the group.
What can a group Leader do?
Once a user accepts the group membership invitation, a group Leader or Admin can make that member a Leader. The Leader has all the same capabilities as a group Member, as well as some additional functions, as shown below.
Group Leader capabilities
Users with Leader status have the following additional capabilities:
- Members:
- Invite new members. See How do I invite someone to a group?
- Change someone's membership status from Member to Leader
- Change someone's membership status from Leader to Member
What can a group Admin do?
When a user creates a group, that user becomes the first Admin, and has visibility of various functions associated with the group.
The Group Admin can perform all functions relating to the group.
Group Admin capabilities
Users with Admin status can perform all the functions of Members and Leaders, and have the following additional permissions:
- Details:
- Edit information about the group. See How do I edit group information?
- Delete the group. See How do I delete a group?
- Forum: Delete forum entries.
- Members: Change membership status:
- Make another Member into a Leader or Admin. See How do I make someone a group Leader?
- Make another Leader into a Member or Admin. See How do I make someone a group Admin?
- Admins: Make another Admin into a Member or Leader
How do I make someone a group Leader?
A group Leader can perform more functions than a general member, including inviting members. For details, see What can a Group Leader do?
To assign or unassign the Leader role
To complete these steps, you must be an Admin or Leader for the group.
- Go to the Groups page. See How do I access a group?
- Click the name of the group. The Group Details page displays.
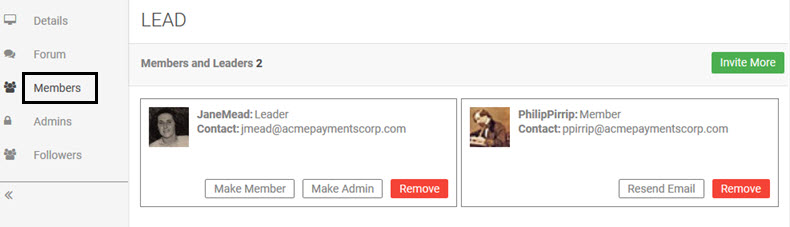
- In the left navigation bar, click Members. The Members page displays a list of group members with the Member or Leader role. In the example below, one person is a Leader and one has been invited but has yet accepted the invitation.
- Click the button to assign the new role:
- A Leader can click Make Leader.
- An Admin can also choose Make Admin, as shown above.
- At the Change Role confirmation message, click OK.
How do I make someone a group Admin?
A group Admin has full rights to perform all functions for the group. For details, see Group Admin Capabilities.
To assign or unassign the Group Admin role
To complete these steps, you must be an Admin for the group.
- Go to the Groups page. See How do I access a group?
- Click the name of the group. The Group Details page displays.
- In the left navigation bar, click Members.
- Find the user on the list, and click Make Admin.
- At the Change Role confirmation message, click OK.
To unassign the Group Admin role
- Go to the Groups page. See How do I access a group?
- Click the name of the group. The Group Details page displays.
- In the left navigation bar, click Admins.
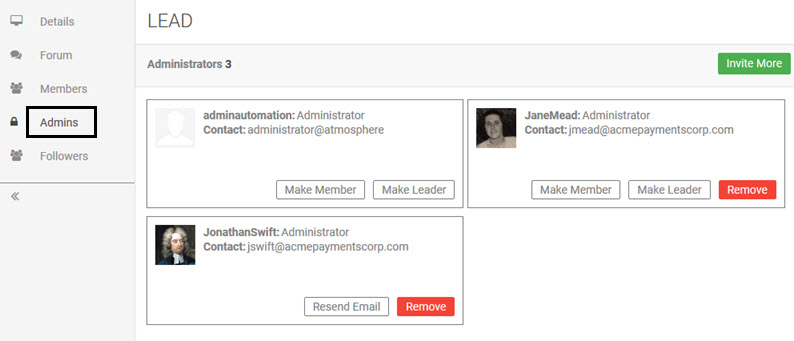
- Find the user on the list, and click Make Member or Make Leader. An example is shown below.
- At the Change Role confirmation message, click OK.
How does group visibility work?
When you create a group, you can control who will be able to see the group in the platform, via the Visibility setting.
In the Add a New Group or Edit Group Info page, there are three visibility options:
- Public: Visible to all users, even users who are not logged in.
- Private: Visible only to group members.
- Registered Users: Visible to all users who are logged in to the platform, even when they are not group members.
Managing Groups:
How do I add a group?
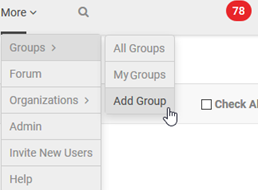
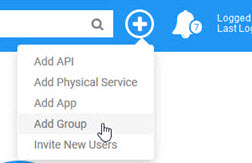
You can add a group from the top menu bar, as shown below.
| Hermosa Theme, 2019.1.0 and later: | Hermosa Theme, versions up to 2019.1.0: |
|---|---|
|
|
Note: In some cases, depending on platform configuration, the option to add a new group might not be available. For more information, see Why can't I add a group?
To add a group
- In the top navigation bar, choose More > Groups > Add Group.
- In the Add Group page, enter information about the group:
- Group Name: A brief descriptive name.
- Group Description: Short descriptive summary about the group.
- Tags: one or more key words that people can use to search for the group.
- Visibility: Determines who can see the group. For details, see How does group visibility work?
- In the Group Icon section, you can upload an icon for your group. See How do I upload and crop icons?
- Click Save.
What are the components of the Group Details page?
The Group Details page shows summary information about the group.
To access: follow the instructions in How do I access a group? below.
An example is shown below.

It includes information such as:
- Group name, description, tags, and avatar
- Creation date
- The group's privacy setting
- Number of Members and Admins
- Information about ratings and reviews
From here you can:
- Follow a group (button top right)
- View the group Forum. An example is shown below.
- View and manage group Members and Leaders. An example is shown below.
- View and manage group Admins. An example is shown below.
- View and manage group Followers.
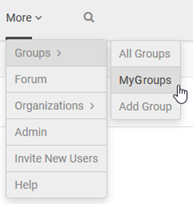
How do I access a group?
You can access your groups from the top navigation bar, as shown below.
| Hermosa Theme, 2019.1.0 and later: | Hermosa Theme, versions up to 2019.1.0: |
|---|---|
|
Click More > Groups > My Groups.
|
|
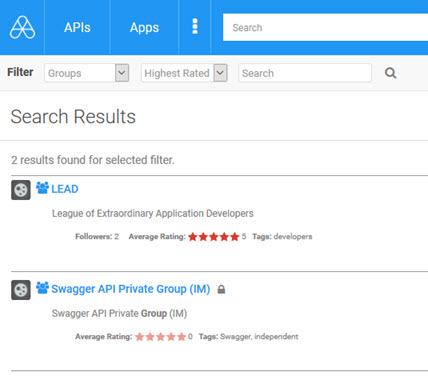
The Groups list page appears, showing the groups you're a member of. Find the group you want, and click the title to go to the Details page for the group. An example is shown below.
How do I invite someone to a group?
If you have the group Leader role, you can invite others to the group. If you want to invite others but you're not a Leader, you can request a role change by submitting a ticket to the Admin via the group Forum.
Note: If you invite someone who hasn't yet signed up for the Community Manager developer portal, they'll have to sign up before accepting your invitation to the group. They'll receive instructions in the invitation email.
To invite someone to a group
- Go to the Groups page. See How do I access a group?
- Click the name of the group. The Group Details page displays.
- Choose the applicable left menu option:
- To invite someone to be a member, click Members.
- To invite someone to be an admin, click Admins.
- Click Invite More.
- In the Invite Group Members or Invite Administrators box, enter one or more email addresses. Use a comma separator between multiple email addresses.
- Add a brief message. Your message will be included in the invitation email.
- Click Invite.
An invitation email is sent out to each invitee, with a link to accept the group invitation. Invitees must log in to the Community Manager developer portal to accept the invitation.
Once an invitee has accepted the group invitation, you can change the group member role to Admin or Leader, if you're an Admin or Leader yourself. See To assign or unassign the Leader role and To assign or unassign the Admin role.
Can I invite non-members to a group?
You can invite individuals who are not platform members to a group, but non-members must sign up before accepting the group request via their personal Action Dashboard page.
How do I accept an invitation to a group?
You can accept an invitation to join a group by approving the notification in your Action Dashboard.
To accept an invitation to a group
- Log in to the platform (you can click the link in the invitation email) and go to your Action Dashboard page.
- Find the group invitation notification.
- Click Accept. Enter a comment if you want to, and then click Confirm.
Note: Be sure to click Confirm. If you only click Accept, but not Confirm, you haven't yet accepted the invitation.
How do I edit group information?
To edit group information
To complete these steps, you must be an Admin for the group.
- Go to the Groups page. See How do I access a group?
- Click the name of the group. The Group Details page displays.
- Click Edit.
- In the Edit Group Info page, update information about the group, as needed:
- Group Name: A brief descriptive name.
- Group Description: Short descriptive summary about the group.
- Tags: one or more key words that people can use to search for the group.
- Visibility: Determines who can see the group. For details, see How does group visibility work?
- In the Group Icon section, you can upload an icon for your group. See How do I upload and crop icons?
- Click Save.
How do I remove a group member?
An API Admin can remove a group member or leader. A leader can remove a group member.
To remove a group member
- Go to the Groups page. See How do I access a group?
- Click the name of the group. The Group Details page displays.
- Click Members. The Members page displays.
- Find the member's name on the list, and click Remove.
- At the confirmation prompt, enter a comment if you want to, and then click Confirm. The group member is removed.
How do I re-send a group member invitation?
You might need to re-send an invitation to a user to join a group. When you re-send an invitation, a new notification is sent to the invited user.
To re-send an invitation for group membership
- Go to the Groups page. See How do I access a group?
- Click the name of the group. The Group Details page displays.
- Click Members. The Members page displays.
- Find the member on the list, and click Resend Email.
- At the confirmation popup, enter a message that will be included in the notification to the user, and then click Invite.
How do I delete a group?
Only a group Admin can delete a group.
To delete a group
- Go to the Groups page. See How do I access a group?
- Click the name of the group. The Group Details page displays.
- Click Delete. At the confirmation message, click OK. The group is deleted.
Why can't I add a group?
In some cases, depending on the specific configuration settings of the Community Manager developer portal you're using, you might find that you can't add a group.
Platform settings are controlled by the Site Admin.
Depending on the group type:
- If you want to be able to add a platform group, and the Add Group option isn't available from the More > Groups menu, ask the Site Admin. For more information, see General Group Settings (Site Admin help).
- If you want to be able to add an API Scope Group, and the Add Group option isn't available in the Visibility > Groups page, ask the Site Admin. For more information, see General API Settings (Site Admin help).
API Scope Groups:
What is an API Scope Group?
An API Scope Group is a group that's created in the context of a specific API. There are two types of API Scope Group:
- Independently Managed: the group can exist separately from the API; if the API is deleted, the group is not deleted.
- Not Independently Managed: the group exists solely in the context of the API; if the API is deleted, the group is automatically deleted also.
Both types of API Scope Group work the same as other groups in the Community Manager developer portal. The differences are:
- An API Scope Group is created in the context of an API and is accessed in the user interface from the left menu for the API.
- If an API Scope Group is created as Not Independently Managed, and the API is deleted, the group is deleted also.
Note: In some cases, depending on platform configuration, you might not be able to add an API Scope Group. For more information, see Why can't I add a group?
How do I add an API Scope Group?
An API Admin can create an API Scope Group in the context of the specific API, if this feature is enabled in the platform settings.
In the example shown below, the API has one group.
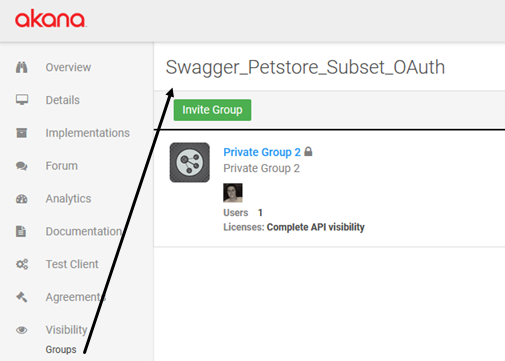
In the API > Visibility > Groups page the API Admin can:
- Add a new group: see To create an API Scope Group below.
- Invite an existing group to have visibility of the API: click Invite Group, find the group on the Groups List, and click OK.
Notes:
- You can only add an API Scope Group if you are an Admin for the API.
- In some cases, depending on platform configuration, you might not be able to add an API Scope Group. For more information, see Why can't I add a group?
To create an API Scope Group
- Log in as an API Admin and go to the My APIs page.
- Choose the API and then, from the left menu bar, click Visibility > Groups.
- Click Create Group.
- In the Add Group page, enter information about the group:
- Group Name: A brief descriptive name.
- Group Description: Short descriptive summary about the group.
- Tags: one or more key words that people can use to search for the group.
- Visibility: Determines who can see the group. For details, see How does group visibility work?
- In the Group Icon section, you can upload an icon for your group. See How do I upload and crop icons?
- Click Save.
What are the components of the API > Visibility > Groups page?
The APIs section includes a Visibility > Groups page that allows API Admins to manage API Scope Groups. An example is shown below (Hermosa Theme).
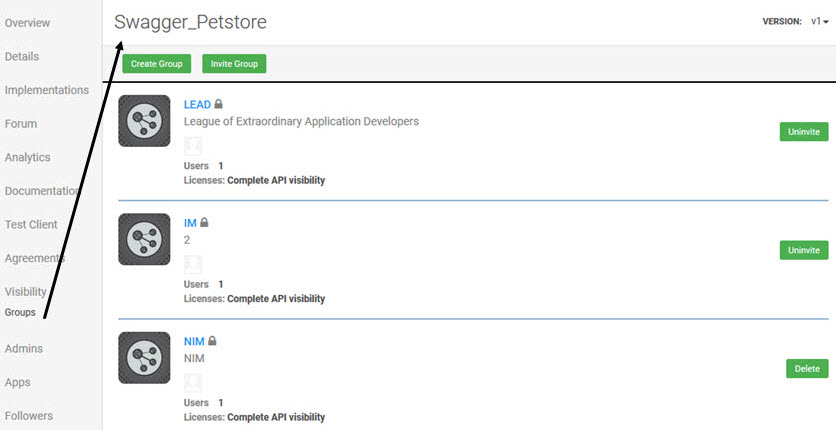
From here, the API Admin can:
- Create a new API Scope Group: click Create Group. See To create an API Scope Group.
- Invite an existing group to have visibility of the API: click Invite Group, find the group on the list, and then click Invite Group to the right of the line.
- Withdraw an existing invitation: click Uninvite and then, at the confirmation message, click OK.
- Delete an API Scope Group that was created as Not Independently Managed: click Delete and then, at the confirmation message, click OK.
Note: In some cases, depending on platform configuration, you might not be able to add an API Scope Group. For more information, see Why can't I add a group?
How do I access an API Scope Group?
To access an API Scope Group
- Click My APIs > API Name > Visibility > Groups. The Group Summary page displays.
- Find the group you want, and click the title to go to the Details page for the group.
How do I delete an API Scope Group?
To complete these steps, you must be an Admin for the group.
To delete an API Scope Group
- Go to APIs > Visibility > Groups. The Group Summary page displays.
- Find the group you want, and click the title to go to the Details page for the group.
- Click Delete.
- At the confirmation message, click OK. The group is deleted.
Group Ratings and Reviews:
Where can I find rating and review information for each group?
Each group can include rating and review information submitted by platform community members. The information is available on the Group Details page as follows:
- Peer Rating—This section uses a star rating system to record positive feedback. A rating counter displays feedback for each rating number (1–5 stars, with 5 being the best rating), and displays an average rating.
- Peer Review—This section has a list of written reviews submitted by the platform community for the current group. You can browse the reviews and filter information by Most Recent, Most Popular, Current or All versions, or enter a search tag.
- Thumbs-Up—You can also give a thumbs-up vote to reviews as well as to Forum entries such as comments.
How do I rate a group?
You can rate a group on the Group Details page. Follow the instructions below.
To rate a group
- Go to the Groups page. See How do I access a group?
- Click the name of the group. The Group Details page displays.
- In the Peer Rating section, go to Rate this Group and click the star that represents the level of positive feedback you want to submit for the current group. The rating counter increments by one next to the star rating you selected and the star rating turns red.
How do I review a group?
You can review a group on the Group Details page. Follow the instructions below.
To write a review for a group
- Go to the Groups page. See How do I access a group?
- Click the name of the group. The Group Details page displays.
- Go to the Write a Review section.
- In the Title text box, enter a title for the review.
- In the Review text box, enter the review contents. If Markdown is supported for reviews on the platform, you'll see the Markdown icons above the review comment box. For more information, see How do I use Markdown in my discussions, tickets, alerts, reviews, or comments?
- After writing your review, click Save. The review is posted. Community members can now read your review and rate whether it was helpful.
Note: In some scenarios, an approval process might be in place for reviews. If that's the case, you'll see that your review is in a Pending state. At that point, others will not see your review until it's approved. An Admin is notified that the review is pending approval, and will approve (or reject) your review as soon as possible.
How do I edit a group review?
If you've added a group review and want to change the content, you can edit the review on the Group Details page as follows.
Note: You can only change the content of your own review.
To edit a group review
- Go to the Groups page. See How do I access a group?
- Click the name of the group. The Group Details page displays.
- In the Your Review section, you'll see the review. Click Edit.
- Edit the review title and/or content, and then click Save.
How do I delete a group review?
You can delete a group review on the Group Details page.
To delete a group review
- Go to the Groups page. See How do I access a group?
- Click the name of the group. The Group Details page displays.
- In the Your Review section, you'll see the review. Click Delete.
- At the confirmation message, click OK. The review is deleted.