Basic Site Settings
Configure site settings such as site URL, contact email address, and themes.
Note: This section contains information about the configuration settings defined within the Akana API Platform, which apply to the entire Community Manager developer portal.
For information about the configuration settings defined in the Akana Administration Console, which apply only to the specific container, refer to Admin Console Settings.
On this page:
- How do I configure site settings?
- What is a platform theme?
- What themes are available?
- How do I add a theme?
- How do I extend a platform theme?
- How do I edit a theme?
- How do I delete a theme?
- How do I configure values for a theme?
- How do I manage security for a Community Manager developer portal theme?
- How do I add security to a theme?
- How do I get my security certificate added to the platform's trust store?
- What are the valid file types for the security certificate for a theme?
- How do I view the security certificate for a theme?
- How do I update the security for a theme?
- How do I download an existing certificate already assigned to a theme?
- How do I delete the certificate assigned to a theme?
- Lifecycle Manager: special instructions for running with MS SQL Server
How do I configure site settings?
Key values relating to your implementation of the Community Manager developer portal, such as the contact email address used in emails and notifications sent out by the system, are generally set up as part of the Jython script that's run as part of installation. However, you might want to change one or more of these values later.
Some of these settings, you can configure in the Site Settings page.
You can also add or modify platform themes on this page.
| This setting... | Controls this feature... |
|---|---|
| Name |
A friendly name for the tenant (can be more than one word), used in emails and notifications that are sent out by the system. It should reflect the name of your site. Corresponds to the tenantName element in the installation Jython script. |
| Site Contact Email |
The email address used in any "contact us" context for the Community Manager developer portal, including certain emails and notifications that include contact information. Corresponds to the contactEmailAddress element in the installation Jython script. |
| From Email |
The email address displayed in the "From" field for email notifications sent out by the platform. Corresponds to the fromEmailAddress element in the installation Jython script. |
| Limit forward proxy feature to allow only these hosts |
Optional security feature for platform services such as Test Client messages and/or OAuth requests, and file upload such as API descriptions or platform content (via the Dropbox API):
You can use any of the following formats, or a combination:
Note: There is a setting in the Akana Administration Console relating to forward proxy hosts, and that field takes precedence over this one. It must be set to the default, * (allow all) in order for values specified in the Community Manager developer portal site settings to apply. For information on the Akana Administration Console setting, see com.soa.atmosphere.forwardproxy. |
| Default Console Address |
The full URL that will be used in the browser when accessing the Community Manager developer portal user interface. The browser then redirects to the default login page. Corresponds to the consoleAddress element in the installation Jython script. |
| Google Analytics Account ID | To add Google Analytics automatically to your site pages, provide your Account ID. |
| Extended Properties and Workflow | If enabled, properties defined for assets in the Community Manager developer portal, such as apps and APIs, can be extended by modifying templates in an integrated Lifecycle Manager. For more information, see Using Custom Metadata in the Community Manager developer portal. For information about special steps to take if you're using Lifecycle Manager with a SQL Server database, see Lifecycle Manager: special instructions for running with MS SQL. |
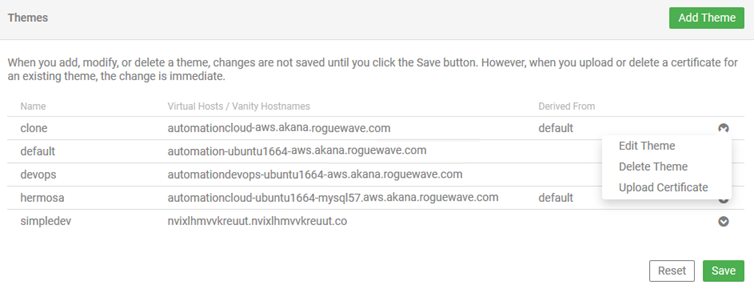
| Themes |
Current themes for the tenant are displayed. For each theme, you can see details about the theme and a drop-down list with actions you can take. In this section you can:
|
To configure site settings
- Log in as a Site Admin and go to the Admin section.
- Go to Site.
- Change the settings as needed. For explanations of your choices, refer to the table above.
- When done, click Save.
If needed, you can use the Reset button at any point before saving, to remove changes you just made.
What is a platform theme?
One theme is one instance of the Community Manager developer portal, with a unique URL and a specific look and feel. As part of site configuration, the Site Admin has the option to configure more than one theme for the implementation. There are several themes available: see What themes are available?
You can define a separate instance for each theme; in addition, you can extend a theme, to create one or more custom themes that are based on the same standard theme. Each custom theme can then be modified independently of the others, so that there can be multiple instances of the same theme with different sets of customization applied to each.
When creating the tenant, it's best to choose one theme, such as Hermosa, as a starting point. The Site Admin can create additional themes later, in the Community Manager developer portal: More > Admin >Site > Add Theme.
For more information, see How do I add a theme? and How do I extend a platform theme?
You can customize a theme. See Detailed Customization Document.
What themes are available?
Available themes are displayed in More > Admin >Site > Add Theme, in the Theme Name drop-down list:
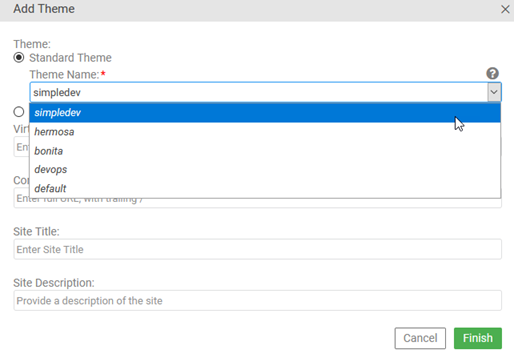
The following themes are available:
- Simple Dev—A simplified, streamlined user interface for developers, without Site Admin or Business Admin functionality.
Note: Simple Dev theme is deprecated in version 2020.2.0, and will be removed in a future release.
- Hermosa—Offers access to all features, including Site Admin and Business Admin functionality. In most cases, this help documentation shows dialog boxes and navigation from Hermosa Theme.
- Bonita (new in Version: 2020.1.0)—A simplified, streamlined user interface, based on Simple Dev theme and very similar to it, but with added functionality relating to APIs. See Bonita Theme.
- DevOps—Used with the Lifecycle Coordinator product. See How do I set up Lifecycle Coordinator?
How do I add a theme?
You can add one or more themes in the Site Settings page.
To add a theme
- Log in as a Site Admin.
- Go to More > Admin >Site.
- At the bottom, in the Themes section, click Add Theme.
- Specify settings (for help with field values, see How do I configure values for a theme? below):
- Choose Standard Theme (for options, see What themes are available?), or Custom Theme (specify a custom theme name, and then specify the standard theme that it's based on).
Note: If you're setting up DevOps theme, see How do I set up Lifecycle Coordinator?
- Specify one or more comma-delimited virtual hosts for the theme.
- Specify the full console address for the theme, including trailing backslash.
- Specify the site title. This is important for SEO rankings.
- Specify the site meta description.
- Choose Standard Theme (for options, see What themes are available?), or Custom Theme (specify a custom theme name, and then specify the standard theme that it's based on).
- Click Finish.
- On the Site Settings page, click Save to confirm.
How do I extend a platform theme?
The Community Manager developer portal includes several out-of-the-box standard themes. For a full list, see What themes are available?
You can extend a standard theme by defining one or more custom themes based on the same standard theme. By doing this, you can have two or more instances of the same platform theme, each with its own URL and potentially each with a different set of user-defined customizations. Each instance uses the same database.
You can use this to define multiple access points into the platform, each with its own set of customizations applied.
Sample scenario illustrating multiple customizations of look and feel:
Tenant ACMEPayments Corp has 10 partners; each partner has a different API on the platform, and each has an API admin who accesses the platform and exports metric information for the API.
When installing, the Site Admin defines ten custom themes, each based on Hermosa theme, each named for one of the 10 partners, and each with a different URL that includes the tenant name and partner name.
After defining one or more custom themes, the Site Admin applies the customization by uploading a custom.less file for each partner with the partner's company colors and logo.
When each API Admin logs in via the URL for his company, he sees the colors and logo for his company.
Notes:
- For instructions, see How do I add a theme? In Step 4, choose Custom Theme.
- You'll need to have a unique URL for each theme.
- Each instance with a separate theme value can be customized later with a custom.less file. See I want to customize platform styles. What do I do?
How do I edit a theme?
You can edit a theme in the Site Settings page.
To edit a theme
- Log in as a Site Admin and go to the Admin section.
- Go to Site.
- At the bottom, in the Themes section, find the theme.
- To the right of the line, click the Actions icon and choose Edit Theme.
- In the Edit Theme overlay, modify settings as needed. For help with field values, see How do I configure values for a theme? below.
- Click Finish.
- On the Site Settings page, click Save to confirm the change.
How do I delete a theme?
You can delete a theme in the Site Settings page.
To delete a theme
- Log in as a Site Admin and go to the Admin section.
- Go to Site.
- At the bottom, in the Themes section, find the theme.
- To the right of the line, click the Actions icon and choose Delete Theme.
- From the Site Settings page, click Save to confirm the deletion.
How do I configure values for a theme?
In Site Settings, you can add, edit, or delete a theme.
The values in the Add/Edit Theme overlay are explained below.
Add/Edit Theme Settings
| Field | Description |
|---|---|
| Theme: Standard | Standard themes are out-of-the-box themes that ship with the product; however, they must be specifically installed. |
| Theme Name |
If you choose Standard Theme, choose a name out of the list of out-of-the-box themes available: simpledev, bonita, or hermosa. Note: If the theme you want is not available for selection, ask the System Administrator to install it. |
| Theme: Custom |
Naming a custom theme allows you to define a new theme, based on an out-of-the box theme. You can then apply customization to the custom theme without affecting the out-of-the-box theme itself. Choose a simple theme name without spaces or special characters. |
| Theme Name |
Custom themes allow you to have a different branding on a different virtual host for the same theme. The custom theme name is used in the path of the uploaded resources for the theme. If you choose Custom Theme, specify the out-of-the-box theme it will be based on. For information about the themes, see What themes are available? |
| Virtual Hosts / Vanity Hostnames | A comma-delimited list of all hostnames that will be used to access the site (for example, vanity.example.com,other.example.com). The system uses these hostnames to determine which theme to present. In your DNS system, make sure there is an A record or CNAME record for each virtual hostname, and that it points to your system. |
| Console Address | The full URL for the site. As well as browser access, the console address is used in links to the site in various emails and notifications. Must be a full URL, including scheme, hostname, context path, and trailing forward slash; for example, https://vanity.example.com/site/. |
| Site Title | The page title for the site. This is the most important on-page SEO element, and typically appears in the browser tab and search engine results. Place relevant keywords first in the title, with branded information at the end. Keywords earlier in the title are given greater importance and will positively impact your organic rankings and traffic. Page titles should ideally be no more than 60 characters long to ensure they're not truncated on desktop, mobile, and tablet searches. |
| Site Meta Description | The meta description for the site. This is used by search engines. The description should lead with an explanation of what the site is about, followed by a call to action. It should be no more than 155 characters so that it isn't truncated in search results. |
How do I manage security for a Community Manager developer portal theme?
The platform uses TLS (Transport Layer Security) for secure communications. It also supports SNI (Server Name Indication), an extension to TLS. You can use the platform's SNI support to add your own certificate to a theme.
By default, each tenant on the platform is protected by the platform's security certificate. However, by adding SNI support for your own tenant, you can use your own certificate. When customers access your theme in the browser, they'll see your own certificate rather than the default Akana platform certificate.
When SNI is in place, your consumers can use your own certificate rather than the default platform certificate for SSL termination.
To implement SNI for your tenant, upload and assign a PKCS12 security certificate and assign it to your Community Manager developer portal theme.
You can:
- Upload a security certificate and assign it to a specific theme: see How do I add security to a theme?
Note: The cert CN (Common Name) must match the site virtual host.
- View the security certificate that's assigned to a theme: see How do I view the security certificate for a theme?
- Edit a certificate that's assigned to a theme (essentially, replace it with a new one): see How do I update the security for a theme?
- Download an existing certificate: see How do I download an existing certificate already assigned to a theme?
- Delete the certificate assigned to a theme: see How do I delete the certificate assigned to a theme?
Note: The cert must be a trusted certificate; therefore, its certification path must be in the platform's trust store. See How do I get my security certificate added to the platform's trust store?
For on-premise implementations only: If you get the below error message, you'll need to first set up an HTTPS listener in Policy Manager, the underlying infrastructure:
No available HTTPS listeners.
To set up the listener, see Adding a Listener (Policy Manager help).
How do I add security to a theme?
Once you've added a site theme, you can upload a certificate to add security to the theme. In the case of CloudHSM, uploading the certificate for a theme will fail unless you are using JCEKS as an external keystore. However, you can download the certificate for a theme on both CloudHSM and using JCEKS as an external keystore. For more information, see Using the HSM as an External Keystore and Using the JCEKS as an External Keystore.
Note: The certificate must be a trusted certificate; therefore, its certification path must be in the platform's trust store. See, How do I get my security certificate added to the platform's trust store?
In general, changes that you make to a theme aren't saved until you click Save; however, certificates are an exception. When you upload the security certificate, it's attached to the theme immediately.
To add a certificate to a theme
- Log in as a Site Admin and go to the Admin section.
- Go to Site.
- At the bottom, in the Themes section, find the theme.
- To the right of the line, click the Actions icon and choose Upload Certificate. The Import Private Key + X.509 Certificate from Keystore overlay appears.
- Import the key/certificate file that you want presented (by SNI) to your tenant:
- Browse to the keystore file and upload it.
- If the keystore file is password protected, enter the password when prompted.
- Enter the key alias.
- Enter the key password.
- Click Finish. The key/certificate information is added to the theme immediately, and the Site Settings page is updated to display the security icon for the theme, as shown below.
- In the Site Settings page, click Save.
How do I get my security certificate added to the platform's trust store?
If you're adding or updating a certificate for your theme, you'll need to make sure that the certification path is in the platform's trust store. This is required so that the certificate is a trusted certificate.
To get the certificate added to the platform's trust store:
- If you're using the SaaS (Software as a Service) Cloud platform, write a Support ticket to get your certificate added.
- If you have an on-prem installation, you must define it in Policy Manager so that trust is established. For instructions, see Import CA Certificate (Policy Manager help).
What are the valid file types for the security certificate for a theme?
The security certificate for a site theme must be one of these file types:
Note: The certificate file alone is not enough; you must upload the keystore file. Also note that the certificate must be a trusted certificate; therefore, its certification path must be in the platform's trust store. See How do I get my security certificate added to the platform's trust store?
How do I view the security certificate for a theme?
You can quickly review the plain-text details of the security certificate for a specific theme, in the Site Settings page.
To view the security certificate for a theme
- Log in as a Site Admin and go to the Admin section.
- Go to Site.
- At the bottom, in the Themes section, find the theme.
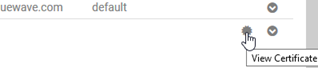
- To the right of the line, find the security icon for the theme, as shown below, and click it.
- Review the certificate. An example is shown below.
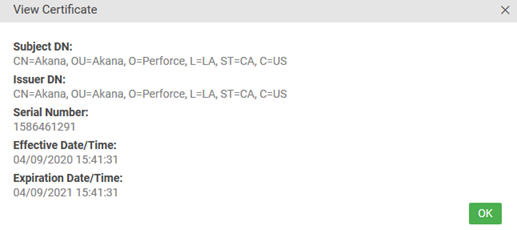
- When done, click OK to close the View Certificate page.
How do I update the security for a theme?
Once you've uploaded the security certificate for a theme, you can edit the certificate (upload a different one), download it, or delete it.
Note: If you're updating the certificate, the new certificate must be a trusted certificate; therefore, its certification path must be in the platform's trust store. See How do I get my security certificate added to the platform's trust store?
To update the certificate for a theme
- Log in as a Site Admin and go to the Admin section.
- Go to Site.
- At the bottom, in the Themes section, find the theme.
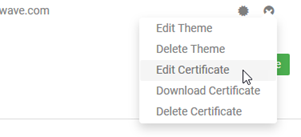
- To the right of the line, click the Actions icon and choose Edit Certificate, as shown below.
- In the Import Private Key + X.509 Certificate from Keystore overlay, import the new key/certificate file:
- Browse to the keystore file and upload it.
- If the keystore file is passworded, enter the password.
- Enter the key alias.
- Enter the key password.
- Click Finish. The key/certificate information is updated immediately.
- In the Site Settings page, click Save.
How do I download an existing certificate already assigned to a theme?
You might need to download the certificate that's been assigned to a theme; for example, for backup. Follow the steps below.
To download the certificate for a theme
- Log in as a Site Admin and go to the Admin section.
- Go to Site.
- At the bottom, in the Themes section, find the theme.
- To the right of the line, click the Actions icon and choose Download Certificate.
- Choose whether to open or save the file, and specify application (for Open) or location (for Save). The default filename is certificate.cer.
How do I delete the certificate assigned to a theme?
Most values associated with a site theme are updated only when you click Save on the Site Settings page. However, when you make changes to security keys/certificates, the changes are effective immediately. Deleting the security certificate for a site theme removes a layer of security; be sure that you want to perform this action. If you're planning to add a new certificate, you could leave the existing certificate in place and then just upload the new one, to ensure there is no lapse in site security; see How do I update the security for a theme?
To delete the certificate for a theme
- Log in as a Site Admin and go to the Admin section.
- Go to Site.
- At the bottom, in the Themes section, find the theme.
- To the right of the line, click the Actions icon and choose Delete Certificate.
- At the confirmation message, click OK. The certificate is no longer associated with the theme.
- In the Site Settings page, click Save.
Lifecycle Manager: special instructions for running with MS SQL
When the API Platform is using a Microsoft SQL Server database, when you initially enable the option in the Site Settings (see Extended Properties and Workflow), this action fails to create the backing Lifecycle Manager library for the tenant.
To address this issue, you'll need to enable a setting in the Akana Administration Console for the container, before enabling the Extended Properties and Workflow site setting. Follow the steps below.
To enable synchronization of Lifecycle Manager data in the Akana Administration Console
- In the Akana Administration Console, on the Configuration tab, under Configuration Actions, choose Synchronize Lifecycle Manager Data. The wizard opens.
- Enter the name of a specific tenant, or leave empty for all tenants, and run the configuration action.
- When done, click Finish.
For more information on running this configuration action, see Synchronize Lifecycle Manager Data (Admin Console documentation).