File Manager
Learn how to use File Manager to manage Community Manager developer portal content files, such as help content and customized resources.
Note: As well as working with content files, The Site Admin uses File Manager for uploading platform resource files, such as the site logo, custom styles, and any customized site pages. For information on these actions, see Customization and Branding. It is also used by the API Admin for uploading authored API documentation. See API Documentation Maintenance.
On this page:
- What is a Resource?
- What's the difference between Resources and Content?
- What is the folder structure for content in Hermosa Theme?
- How do I download content or resource files?
- How do I upload content to the Community Manager developer portal?
- In File Manager, why is content upload not allowed for some file types?
- What is the Resource Version Key and how do I find it?
- How do I set up platform content to include a piece of shared content that's referenced across multiple files?
Managing Content in Simple Dev Theme:
- What is the folder structure for content in Simple Developer Theme?
- How do I develop content for Simple Developer theme?
- How do I upload content for Simple Developer theme?
What is a Resource?
In the context of the More > Admin > File Manager section available to the Site Admin, a Resource is any type of publishing artifact used in the construction of the platform UI presentation. This includes:
- css style sheets
- Images
- Sprite files
- Site copy
- The site legal agreement
- API documentation, legal agreements, and downloadable files
- Online help documentation
What's the difference between Resources and Content?
When you log in as the Site Admin and go to the More > Admin > File Manager section, you'll see two buttons to access File Manager:
- Resources
The Resources button takes you to the /resources folder for your implementation. From here, you can upload files and create folders. Use this location for assets that do not require indexing, such as images and sprite files.
Note: For site styles, go to More > Admin > Customization; see I want to customize platform styles. What do I do?
- Content
The Content button takes you to the /content folder for your implementation. Here, you can upload customized content files for the platform help and the platform legal agreement. You can also upload API documentation and API legal agreements, for any APIs already created on the platform. If you're uploading API documentation, you'll need to know the APIID so that you choose the correct folder.
Files uploaded to this location are indexed periodically, automatically, so that content is available for your site users when they use the Search feature to look for content.
For more information on the file and folder structure for your implementation, as it relates to files you might want to upload or customize, see What is the folder structure for content in Hermosa Theme? and What is the folder structure for content in Simple Developer Theme? below.
What is the folder structure for content in Hermosa Theme?
If you're uploading content to the platform, via More > Admin >File Manager > Content, you'll need to make sure you place files in the correct folders.
Clicking the Content button takes you to File Manager where you can create folders, navigate up and down the folder structure, and upload single files or ZIP files. When you're uploading files, it's important to make sure you're in the right folder. You cannot move files.
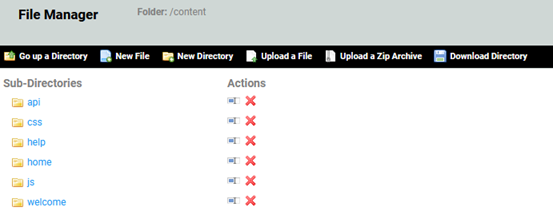
The Content button takes you to the top level of the folder structure, the /content folder. From there, the folder structure is as follows:
- /api: top folder for any API documentation. When an API is added on the platform, a documentation folder is created. Click through to a specific API to upload API documentation.
- /home: top folder for site content. From here there are additional subfolders:
- /landing for the site landing page and legal agreement (ideally HTML and PDF, but only one agreement)
- /learnmore where the site content files are located.
- /signup/confirm for the signup page.
- /support for the support page.
For example, let's say you want to customize the Support page. The URL for the page is: {hostname}/#/home/support. You would go to More > Admin > File Manager > Content, to access the Content folder, navigate down to the home/support folder, and upload the new file. See To customize the Support page for the Community Manager developer portal.
If needed, you can save out the existing HTML; choose to view the file in the browser, click View Source, and then copy the HTML. Or you can export the file set, which will include referenced assets.
How do I download content or resource files?
In File Manager, you can download a ZIP file of the current directory including all files in the directory and all subfolders and their contents. You can download a ZIP of any content or resources that you are authorized to view and edit. Follow the instructions below.
To download content or resource files
- Log in as a Site Admin and go to the Admin section.
- Go to More > Admin > File Manager.
- Under either Resources or Content, click the File Manager button.
- Go to the directory you want to download (or stay in the current directory).
- Click Download Directory.
- Choose to open or save the file.
How do I upload content to the Community Manager developer portal?
Platform content typically consists of HTML files, images that are referenced in the content, any custom styles sheets that support the content, and reference material, such as PDF files or diagrams, that are linked in the content.
Note: If you're trying to upload file content such as HTML, you might see a message that you cannot upload an HTML file. You might choose to adjust the allowed file types in the platform security settings (see How do I configure settings for business security?), or just use a different file format such as PDF or plain text.
Content that you can add or customize includes:
- API Documentation Content—The /content/api directory includes a folder for each API that is added to the platform. When you initially add your API using the Add a New API function this folder is automatically generated and an id name is automatically assigned as the folder name; for example, api100.cm. API content is uploaded to this folder.
- Online Help Content—You can use the /content/home/learnmore directory for any html and supporting graphic files you might want to add or modify for the platform Online Help.
- Landing Page Content—The /content/home/landing directory includes HTML and supporting files that comprise the platform home page, including images, content, css styles sheets, and JavaScript files.
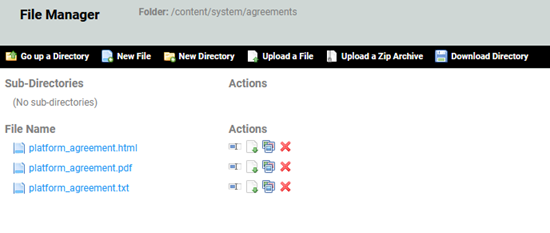
- Developer Agreement—Upload the platform developer legal agreement to the /content/system/agreements directory, as shown below. You might have to create the path.
- Support—The /content/home/support directory includes the default Support page, index.html. Use this folder for any html and supporting graphic files that comprise the Support section of the platform.
To upload a content file to the Community Manager developer portal
- Log in as a Site Admin and go to the Admin section.
- Go to More > Admin > File Manager.
- In the Content section, click File Manager.
- Select the directory for the content area you would like to update.
- Click Upload. The File Upload dialog box displays. Go to the file you want to upload and click Open.
- To upload the file to the selected directory, click Upload.
In File Manager, why is content upload not allowed for some file types?
In some cases, you might find that upload of certain file types is restricted. This is a security feature of the platform and is controlled by the Site Admin.
If you're trying to upload content in File Manager, and encounter error messages, you'll need to upload a different content type. Alternatively, the list of allowed file types can be adjusted by a Site Admin.
Allowed file types are configured in the Community Manager developer portal security settings: Limit file types allowed for upload. For more information, and instructions for changing the setting, see How do I configure settings for business security?
For example, a user uploading an HTML file might see this message:
File media type is not permitted for security reasons [[text/html]].
The Site Admin can add that value to the Limit file types allowed for upload field to allow this file type.
If you're uploading your content in a ZIP file, you might see this message:
File media type is not permitted for security reasons [[application/xhtml+xml]].
The Site Admin can add that value to allow ZIP file upload.
Note: Restricting the types of content that can be uploaded to the Community Manager developer portal is an important security feature. If you are a Site Admin, you might consider changing the setting so that you can upload the site help content, and then changing it back afterwards to maintain security.
What is the Resource Version Key and how do I find it?
UI resource files include all code-related components such as JavaScript files, templates, and stylesheets.
These types of files are cached for a long time, to improve performance, since generally the files do not change. The cache setting is one month.
For all resource files, the URL includes a dynamically-constructed unique ID, called a Resource Version Key.
If a new version of the platform resource files is uploaded, there is a new Resource Version Key. Because the URL is different, the next time the file is retrieved, the latest version replaces the older version. Therefore, a CDN, browser cache, forward proxy, etc. will need to make a new call to get the latest version. The change in the URL triggers the new call, and the updated resource is served.
The key is dynamically constructed every 10 minutes. This means that if you update a file, you won't see the change immediately. To see the update you'll need to do two things:
- Wait for 10 minutes to be sure the content is updated.
- Refresh the page so you'll see the change.
If you need to set up your platform version so that file updates are immediate, you'll need to:
- Make sure you are not using any other components between the browser and the server, that might cache the file, such as a CDN, forward proxy, or reverse proxy.
- Clear the browser cache and refresh the page.
The resource version key is used to construct the URL, but is not used when the request comes in. The server will always serve the latest file, independent of the version key specified in the URL. A request referencing an old version key will still get the new version in response.
How do I set up platform content to include a piece of shared content that's referenced across multiple files?
In the documentation that you upload to the Community Manager developer portal, you can reference one or more pieces of shared content across multiple content files by using special tags. When you update the piece of shared content, all files that reference it are automatically updated.
Some likely scenarios where you might want to use shared content:
- To include a navigation element in your content files, such as a left menu or Related Topics section.
- To include a piece of content that might change frequently, such as information about updates or new features, in all files.
In all cases, when you change one common content file that's referenced by one or more other files, all files are updated.
If your content includes similar information on multiple pages, it makes sense to use the common content feature, whether you have two content pages or 100.
To set up your files to use common content, you'll need to:
- Define each piece of shared content as a separate file: see Defining a common content file.
- Set up the files to reference the shared content: see Setting up files to reference shared content.
- Upload your files to the Community Manager developer portal and test: see Uploading and Testing.
Resources
To help you get your files set up to reference shared content, you can use the following:
- Video: A short video demonstrating how the common content feature works and showing how the example files are put together: Common content overview video (on this website)
- Sample Files: A ZIP file of the example shown in the video so that you can upload and test for yourself. See ex_common_content.zip. The ZIP file includes:
- Index page and four other simple content files that are tagged to reference two separate pieces of shared content.
- Two shared content files, both of which are referenced by all files. One shared content file is static text; the other is a navigational element that includes links.
- Readme file with simple setup instructions.
- CSS for the files.
Defining a common content file
This section includes:
File structure strategy
It's a good idea to store shared content files together, perhaps in a subfolder, so that relative paths are simple and consistent. You can see a set of example files: download ex_common_content.zip. In the example files, all content files are in the learnmore folder, and shared content files are in the /common subfolder.
Shared comment without links
If the common content file is just static text, with no links to other files, all you need to do is create a separate file with the HTML-coded content. Do not include <head> and <body tags.
An example is shown below. This example could be used as a banner at the top of each file, to share upcoming news or to specify the product version for the content.
<hr/>
<h3>Version Information</h3>
<p><strong>Note</strong>: The information in this file relates to version 1.5 of the product: release date 12 December 2017.</p>
<hr/>
Once you've created the content along the lines of the example above, if your content doesn't include links, you're done. Go to the next step: Defining a file that references common content: Adding values in the <head> tag.
Shared content with links
If your shared content includes links, and your content files are stored in a directory structure, rather than all in one folder, you'll need to consider how to code any links that are in a shared content file.
It's best to use absolute links, which will work regardless of the location of the source and destination files. In the context of the Community Manager developer portal, in practical terms, this means that the links are relative to the content root folder in the Community Manager developer portal. The root is /home.
For example, if the link is to the main index page in the /learnmore folder, the code for the link might look like this:
<a href="/home/learnmore/index.htm">Home page</a>
If the link is to a file in a /learnmore/examples subfolder, the path would be:
<a href="/home/learnmore/examples/example_01.htm">Example 1</a>
Example of Community Manager developer portal content pages:
- The Action Dashboard page is /home/dashboard.
- The help content page is /home/learnmore.
An example of a shared content file that includes links is shown below.
<ul">
<li><a href="/home/learnmore/index.htm" target="_parent">Index</a></li>
<li><a href="/home/learnmore/sample_page1.htm">Sample Page 1</a></li>
<li><a href="/home/learnmore/sample_page2.htm">Sample Page 2</a></li>
</ul>
In this example, to view the main index file (/home/learnmore/index.htm), you'd go to {protocol}://{hostname}/{tenantname}/#/home/learnmore in the Community Manager developer portal. For example:
http://acmepaymentscorp.com/acmepaymentscorp/#/home/learnmore
When you include the full path relative to the root content folder, the links work even if the piece of shared content is included in multiple files in different locations in your content folder structure.
Once you have the shared content ready, the next step is to code the source files so that they'll reference the shared content.
Setting up files to reference shared content
In each file that references a piece of shared content, you'll need to reference the dynamic_docs_lib.js file in the <head> tag and then reference the shared content file using the soa:include dynamic documentation tag.
This section includes:
- Defining a file that references common content: Adding values in the <head> tag
- Defining a file that references common content: Coding the content location
Defining a file that references common content: Adding values in the <head> tag
The Community Manager developer portal's support of the ability to reference common content relies on code included in a specific file, dynamic_docs_lib.js. This file is included as part of your installation, but you'll need to reference it in a <script> tag, within the <head> tag of each file that will reference a piece of common content.
Include the following:
<script language="javascript" src="/ui/apps/atmosphere/123/resources/console/SOA/console/common/dynamic_docs_lib/dist/dynamic_docs_lib.js"type="text/javascript"></script>
An example of a complete <head> tag, including this extra line, is shown below:
<head>
<meta http-equiv="Content-Type" content="text/html; charset=UTF-8" />
<meta http-equiv="X-UA-Compatible" content="IE=edge" />
<link rel="stylesheet" type="text/css" href="/resources/style/reset.css"/>
<link rel="stylesheet" type="text/css" href="/resources/style/base.css"/>
<link rel="stylesheet" type="text/css" href="../../style/document.css"/>

<script language="javascript" src="/ui/apps/atmosphere/123/resources/console/SOA/console/common/dynamic_docs_lib/dist/dynamic_docs_lib.js"type="text/javascript"></script>
</head>
Referencing this file gives you the additional capability to use the dynamic tag that you need to reference common content, but you still need to include the tag at the correct place in your document, as explained below.
Defining a file that references common content: Coding the content location
Within your content file, at the point where you want a piece of shared content to be included in the file, use the soa:include dynamic documentation tag, as shown below.
<soa:include file="{path}/{filename.htm}">
<div class="soa-ui-cm-dynamic-docs"></div>
</soa:include>
For example:
<soa:include file="/content/home/learnmore/common/include_relatedtopics.htm">
<div class="soa-ui-cm-dynamic-docs"></div>
</soa:include>
Note: When referencing the included file within the dynamic document tag, the full path to the file needs to include /content/home as shown above. However, when linking between files, including the links in the included file itself, the path starts with /home.
Uploading and Testing
Once you have your files set up:
To upload the content ZIP file to the Community Manager developer portal
- Log in as a Site Admin and go to the Admin section.
- Go to More > Admin > File Manager.
- In the Content section, click File Manager. The File Manager opens at the /content folder.
- Navigate down two levels to home/learnmore.
- In the learnmore folder, click Upload a ZIP Archive and upload the file. The file unzips automatically.
To test the content
- Go to the Community Manager developer portal home page ({protocol}://{hostname}/{tenant}/#/home/landing)/).
- Change the last part of the URL from home/landing to home/learnmore.
- The main index page, index.htm, is displayed.
- Click through to files that have common content and make sure that the common content is displaying correctly.
- Click on links in included content.
If there are any issues, check that you haven't missed any of the steps, starting at the top: see Defining a common content file.
You can also upload the test ZIP file, ex_common_content.zip, and see how those files work.
For any fixes, you'll need to modify the external files and upload them to the Community Manager developer portal again.
Managing Content in Simple Dev Theme:
What is the folder structure for content in Simple Developer Theme?
Note: Simple Dev theme is deprecated in version 2020.2.0, and will be removed in a future release.
The Simple Developer theme shares the same file and folder structure as Hermosa Theme (see What is the folder structure for content in Hermosa Theme? above), but uses different folders for content.
Simple Developer theme, by default, includes the following three content files/folders:
- Documentation page: documentation/index.htm. In the user interface, this is accessed via the Documentation link at the center of the top menu bar.
- Help page: documentation/index.htm. In the user interface, this is accessed via the Help link, right of top menu bar.
- Welcome page: documentation/index.htm. In the user interface, this is accessed by clicking on the logo at the top left.
In the file system, these are represented by a structure of three subfolders in the main /content/ folder:
- content/documentation/index.htm
- content/help/index.htm
- content/welcome/index.htm
For more detailed information about content development and management for the Simple Developer theme, see Content Development Guidelines for Simple Developer Theme.
How do I develop content for the Simple Developer theme?
Note: Simple Dev theme is deprecated in version 2020.2.0, and will be removed in a future release.
Content development for the Simple Developer theme is managed in the same way as content development for Hermosa Theme. The files share the same main folder structure, but there are unique subfolders for Simple Developer content.
In addition, you can develop and upload custom pages for Simple Dev.
For detailed information on working with Simple Developer content pages, including working with styles, linking, supported file formats, managing assets, and other information, refer to Content Development Guidelines for Simple Developer Theme.
For information about uploading the files, see How do I upload content for Simple Developer theme?
How do I upload content for Simple Developer theme?
Note: Simple Dev theme is deprecated in version 2020.2.0, and will be removed in a future release.
The Simple Developer theme shares the same file and folder structure as Hermosa Theme, but uses different folders for content. If you want to replace existing content, you must mirror the existing folder structure, as given in What is the folder structure for content in Simple Developer Theme? above.
When you navigate to the content folder in File Manager, you won't see these subfolders and files. However, to update the content, you must use identical folder and file names. Create the folder, click into the folder, and then upload the revised file, as explained below.
To update a Simple Developer default page
- Log in as a Site Admin and go to the Admin section.
- Go to More > Admin > File Manager.
- In the Content section, click File Manager to access the Content folder.
- Click New Directory, and create a folder with the exact name of the folder in which you want to update the content: for example, help.
- Click the new folder to go into it in File Manager.
- Click Upload a File.
- Go to the location of the updated file and upload it. You can also upload a ZIP archive if you want to add multiple files or assets.
Note: If you're uploading a ZIP file, make sure you're in the correct folder before uploading. The files are automatically unzipped as part of the upload process.
- Click Upload. The file is uploaded.
- Test by viewing in Simple Developer theme.
Note: to see the update immediately, you will need to clear cache and refresh the page. Cache is updated automatically every hour, so there is a delay before developers see the new page.
For more detailed information about content development and management for the Simple Developer theme, see Content Development Guidelines for Simple Developer Theme.