Install the JCEKS as an External Keystore
Learn how to configure an external keystore using the Java Cryptography Extension Keystore (JCEKS) for storing and managing Policy Manager PKI keys and certificates. By using an external keystore, you can simplify the management of certificates and keys.
On this page:
- Introduction
- Step 1: Prerequisite
- Step 2: Create Policy Manager and Network Director Containers
- Step 3: Install the External Keystore Feature
- Step 4: Install the Policy Manager Features
- Step 5: Configure the External Keystore
- Step 6: Assign Keys from the External Keystore
- Step 7: Assign Keys to the Administrator Account
- Step 8: Configure Network Director
- Step 9: Verify the External Keystore Installation
Introduction
Policy Manager provides an external keystore feature that implements a Java Cryptography Extension Keystore (JCEKS) format for storing and managing Policy Manager PKI keys and certificates. The JCEKS is a keystore format introduced with the Java Cryptography Extension (JCE) and implemented by the SunJCE cryptography provider. After the External Keystore feature is installed, information about all key management tasks performed using the Manage PKI Keys Wizard for each identity (service, organization, container, or user) will be stored in the designated external keystore.
To learn how the External Keystore feature is used, consider a use case with this basic configuration:
-
Policy Manager and Network Director are installed in separate containers.
-
The External Keystore is installed on each container.
-
Policy Manager and Network Director are referencing the same keystore.
-
JCEKS can be used as an external keystore for the Policy Manager and Network Director containers. In this case, the keys and aliases must be synchronized across the containers.
To set up and use JCEKS in this environment, take the following steps:
-
Obtain a JCEKS keystore that contains a .jceks file and a valid certificate. When Policy Manager is initially installed, it creates a default keystore where all PKI keys and certificates are stored.
-
To replace the Policy Manager keystore and allow an identity to use an external keystore, install and configure the External Keystore feature.
-
Install the Policy Manager Console and Policy Manager Services features.
-
Configure external keystore options (provider name, keystore type, keystore location, and keystore password) to integrate an external keystore with Policy Manager.
After the External Keystore feature is installed and the environment is configured, all key management tasks performed using the Manage PKI Keys wizard for any identity will be stored in the designated external keystore.
Step 1: Prerequisite
Obtain the following:
-
A JCEKS keystore that contains a .jceks file and a valid certificate. To do this, you can either generate a self-signed certificate or issue a certificate signing request to an existing Certificate Authority (CA) and import the signed certificate.
-
The provider name, keystore type, keystore location, and keystore password.
Step 2: Create Policy Manager and Network Director Containers
If you did not install and configure containers by using the automation recipe, install and configure the containers by using a wizard. Launch the Configure Container Instance Wizard and define containers for Policy Manager and Network Director. For installation instructions, go to Performing the installation section of Installing the Akana API Platform and complete steps 2-1 to 2-3 of the installation procedure and then use the following instructions for each container (Steps 3-9).
Step 3: Install the External Keystore Feature
-
Launch the Akana Administration Console (http://<hostname>:<port>/admin/).
-
On the Available Features tab, select Plug-in from the dropdown list, and select the External Keystore checkbox.

-
Click Install Feature. The required bundles are installed for the External Keystore feature.
-
If prompted, restart the container after installing the plug-in.
Step 4: Install the Policy Manager Features
-
On the Available Features tab, from the Filter menu, select Feature.
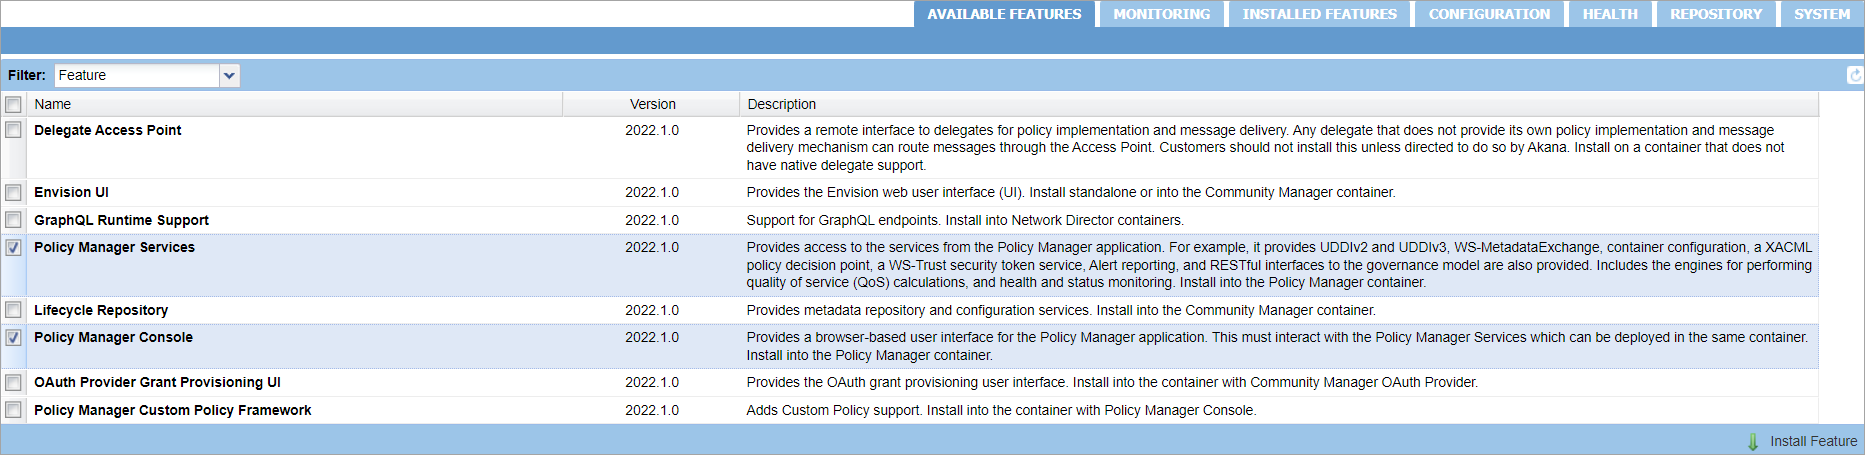
-
Install the Policy Manager features by selecting the Policy Manager Services and Policy Manager Console checkboxes.
-
Click Install Feature. The required bundles are installed for the Policy Manager Services and Policy Manager Console.
-
If prompted, restart the container after installing the Policy Manager features.
Step 5: Configure the External Keystore
-
In the Akana Administration Console, on the Configuration tab, select Configuration Actions and Configure External Keystore. The External Keystore Options window is displayed.
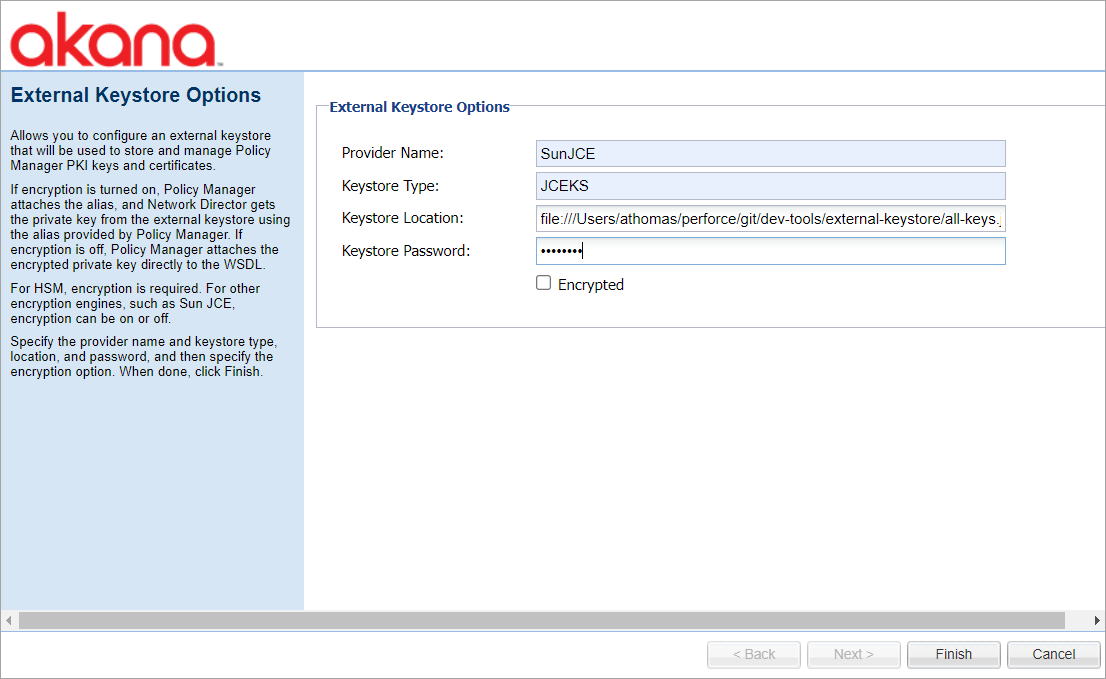
-
Specify the provider name, keystore type, keystore location, and keystore password (you obtained these values as part of the prerequisite task).
-
Specify the encryption option:
-
If you select the Encrypted checkbox, Policy Manager will attach an alias and Network Director will obtain the private key directly from the external keystore by using the alias provided by Policy Manager.
-
If you do not select the Encrypted checkbox, Policy Manager will attach the encrypted private key directly to the WSDL.
-
If you are using another type of encryption engine, such as Sun JCE, the Encryption checkbox can be selected or cleared.
-
-
To complete the configuration of the External Keystore feature, click Finish.
-
If prompted, restart the container for the changes to take effect.
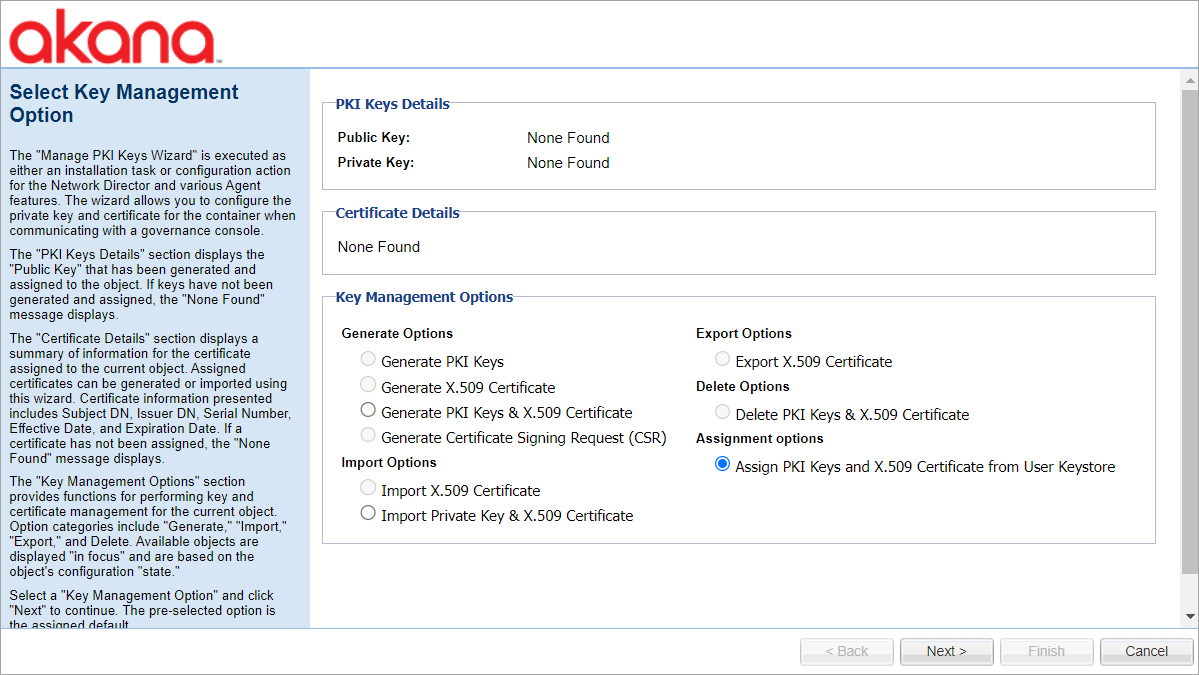
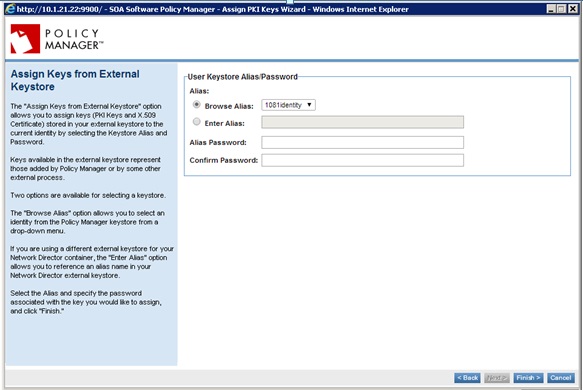
Step 6: Assign Keys from the External Keystore
-
To select the key management option, in the Akana Administration Console, click the Configuration tab. Then, select Configuration Actions and Manage PKI Keys. Under Assignment options, select Assign PKI Keys and X.509 Certificate from User Keystore. Click Next.
By selecting the Assign PKI Keys and X.509 Certificate from User Keystore option, you can assign PKI Keys and an X.509 Certificate from an external keystore to the current identity by selecting the keystore alias and password associated with the key that you want to assign. You will see the alias available in the external keystore.
-
Select the user keystore alias and specify the password associated with the key.
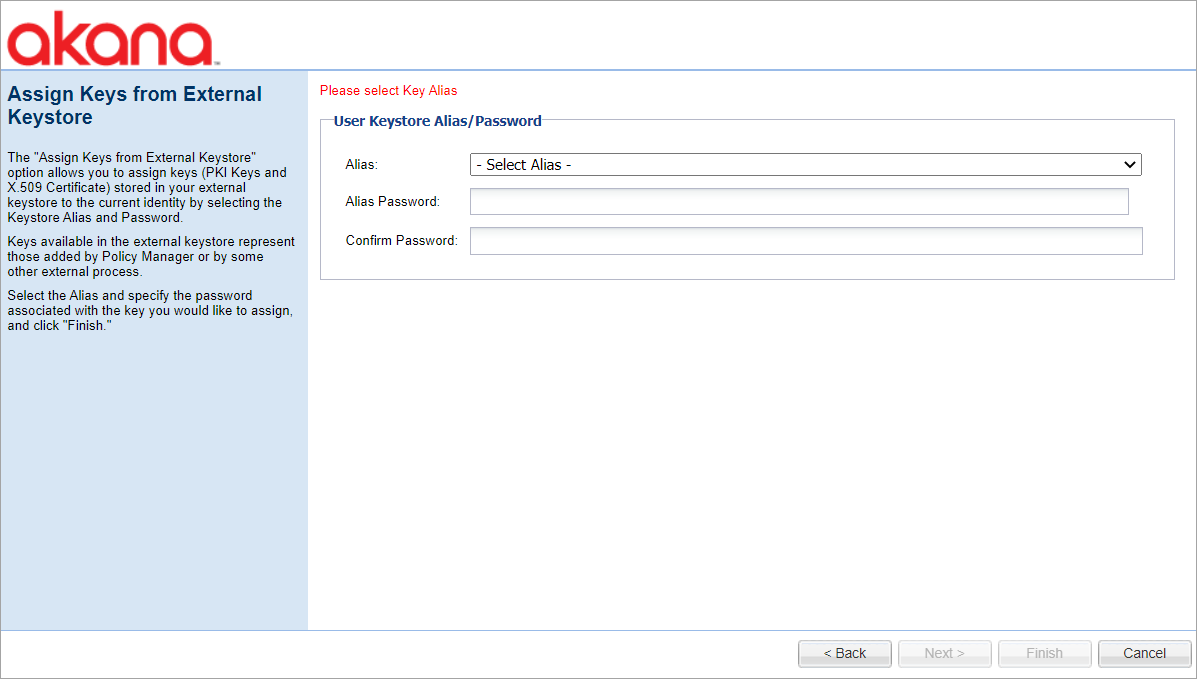
-
Click Finish.
Step 7: Assign Keys to the Administrator Account
When you install the External Keystore feature, keys are not automatically assigned to the Policy Manager administrator user account as they are when you are using the Policy Manager default keystore. For a list of Manage PKI Key Wizard options available for each identity type, see Key Management.
-
Launch the Policy Manager Management Console and go to Security > Users. Select the Administrator user account and click Manage PKI Keys.
-
If you select the Generate PKI Keys and X.509 Certificate option, you can define an alias to assign to the PKI Keys and X.509 Certificate being generated. This alias will be stored in your external keystore.
-
You can also assign the keys to an existing alias already defined in the keystore, on the Assign Keys from External Keystore page. The Assign Keys from External Keystore option allows you to assign keys stored in your external keystore to the current identity by selecting the keystore alias and password.
-
-
Select the user keystore alias and specify the password associated with the key.
-
Click Finish.
Step 8: Configure Network Director
- Launch the Akana Administration Console for the Network Director container instance (http://<hostname>:<port>/admin/).
- On the Available Features tab, select Network Director and External Keystore features, and then click Install Feature.
- When the installation is complete, on the Configuration tab, click Configuration Actions and Configure External Keystore. The External Keystore Options window is displayed.
- Specify the provider name and keystore type (you obtained these values as part of the prerequisite task), enter a keystore location, and provide the keystore password.
If you are using one external keystore for all container instances, enter the same values that you used to configure the external keystore on the Policy Manager container instance.
If you are using a different external keystore for your Network Director container instance, enter the unique values for the external keystore. After completing the configuration, refer to the Generate Options > Generate PKI Keys and X.509 Certificate > External Keystore section of Managing Keys and Certificates to learn how to reference an alias in the Network Director keystore using the Manage PKI Keys wizard.
- Click Finish and then complete the remainder of the Network Director configuration.
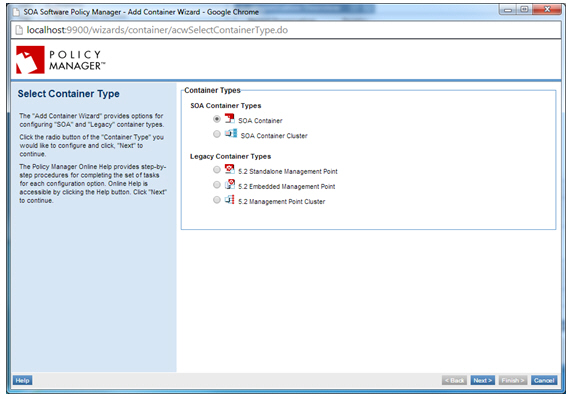
- Register the Network Director with Policy Manager by using the container wizard. Click Add Container Wizard.
- Configure a contract, physical and virtual services, and host on Network Director.
- Send requests to Network Director and verify that they are processed successfully.
The configuration is now complete. All key management tasks performed by the Manage PKI Keys Wizard for each identity type will now be stored in the external keystore. For the Manage PKI Key Wizard options available for each identity type, see Managing Keys and Certificates.
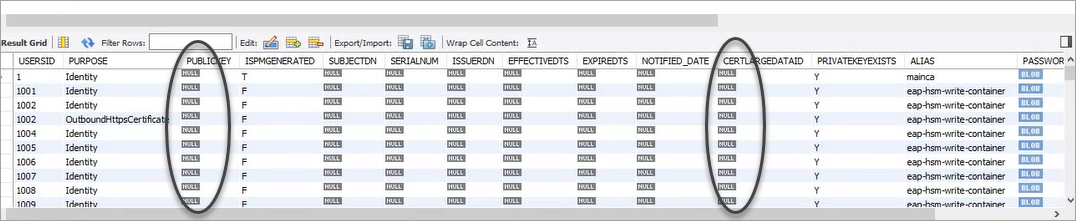
Step 9: Verify the External Keystore Installation
-
Restart the system.
-
Optionally, verify that the PKI keys are not stored in the database by querying the table PM_PKIKEYS. Policy Manager stores only the alias and encrypted password for external keystore entries.
Related Topics