Using the OAuth Client Policy
Learn how to use the OAuth Client policy to allow the API Gateway to act as the client, generating the OAuth 2.0 token and sending it to the downstream API.
For information about using policies in the context of the Community Manager developer portal, see Business Policies.
Table of Contents
- Introduction
- Creating an OAuth Client Policy
- Configuring the OAuth Client Policy
- OAuth Client Policy Configuration Options
- Configuring OAuth Client Audit Options
- Activating a policy
- Attaching a policy
- Token request parameters
- OAuth Client Policy: use case
- Alert Codes
Introduction
The OAuth Client Policy is an operational policy that allows the API Gateway to send an OAuth 2.0 token downstream.
In general terms, the API Gateway is in the middle, between the consumer and the downstream service. The consumer calls the Gateway, and then the Gateway typically calls the downstream service.
With the OAuth Client policy, the API Gateway acts as the client, generating the token and sending it to the downstream API.
This policy acts as the consumer of the downstream API. It gets a new OAuth token, and passes the token to the downstream service based on the policy configuration.
Note: This policy is available only for two-legged OAuth grant types: Resource Owner (Resource Owner Password Credentials grant type) or Client Credentials.
Creating an OAuth Client Policy
The first step in creating a policy is to define the basic policy information.
To add an operational policy
- Go to Workbench > Browse > Organization, and select Policies > Operational Policies. The Policies Summary is displayed.
- Click Add Policy.
- Choose the policy type and click Next.
- Specify a name (required) and description (optional) and click Finish. At the Completion Summary, click Close. The Add Policy Wizard creates a draft policy instance that you can then configure on the Policy Details page.
For more information, see Add Policy.
Configuring the OAuth Client Policy
Once you've created the policy, you can configure the policy details that determine how the policy works. Then you can activate the policy so that it can be used.
To configure an OAuth Client policy in Policy Manager
- In the Organization Tree, find the level where the policy was defined. Click to select.
- In the center pane, under the OAuth Client Policy section, click Modify. The Specify OAuth Client Policy Options page is displayed.
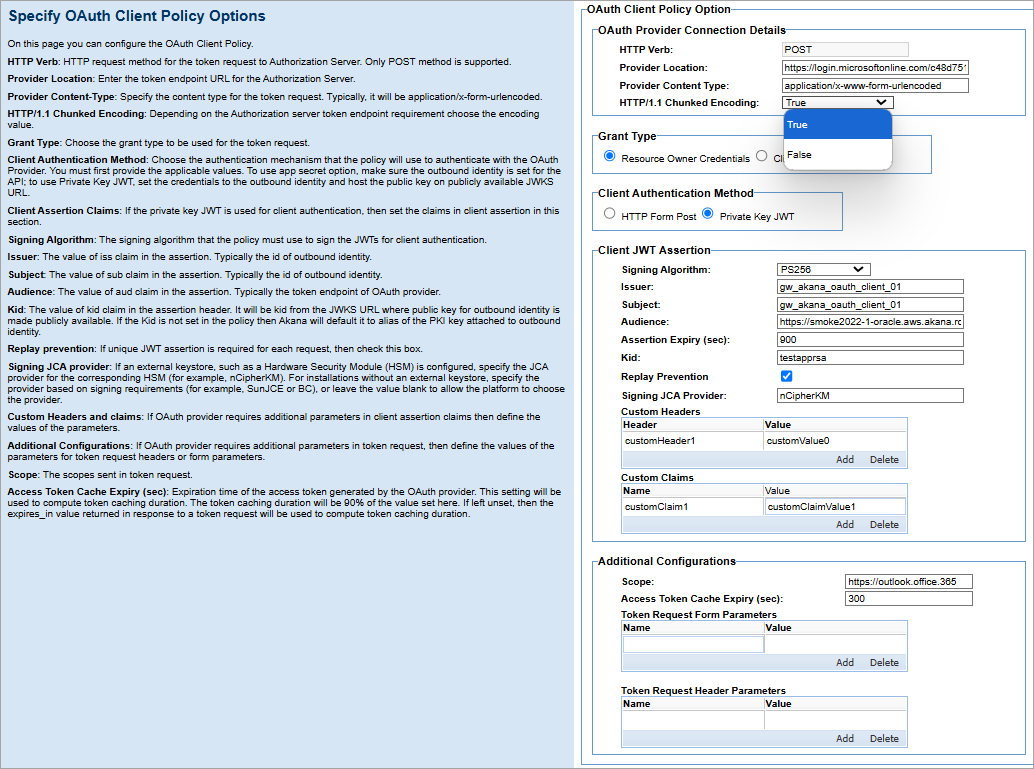
- Specify values. For details on field values, see OAuth Client Policy Configuration Options.
- Click Next to go to the Specify OAuth Client Policy Audit Options page. See Configuring OAuth Client Policy Audit Options.
- Click Finish to save the policy.
Now that the policy is defined, you can activate it and start using it. On the right, under Actions, choose Activate Policy.
OAuth Client Policy Configuration Options
The OAuth Client policy includes the following configuration options.
- OAuth Provider Connection Details
- Provide the OAuth Provider Connection Details.
- HTTP Verb
- The HTTP verb for communicating with the OAuth Provider is limited to the HTTP POST method for sending data.
- Provider Location
- Provide the full token endpoint for the OAuth Provider. This is a valid URL for the OAuth Provider's OAuth 2.0 token service. Examples:
- If you're using the platform's own OAuth provider, the location URL is: https://{akana_oauth_provider_host}:{port}/oauth/oauth20/token.
- For PingFederate the provider token endpoint is: https://{ping_oauth_provider_host}:{port}/as/token.oauth2.
- For Google it is: https://www.googleapis.com/oauth2/v4/token.
- Provider Content Type
- Specify the content type for the token request. The value will be application/x-form-urlencoded.
- HTTP/1.1 Chunked Encoding
- Indicate an encoding transformation applied to an entity-body during the transfer through the network. The content is wrapped and transferred as a series of chunks. The call to the OAuth external provider is made based on the policy's selected transfer encoding configured using the HTTP/1.1 Chunked Encoding option. The default value is True.
- Grant Type
- Indicate the OAuth 2.0 grant type that the policy will use. Two-legged OAuth grant types are supported: Resource Owner (Resource Owner Password Credentials grant type) or Client Credentials.
- Client Authentication Method
- Choose the authentication mechanism that the policy will use to authenticate with the OAuth Provider. You must first provide the applicable values. To use the App secret option, make sure the outbound identity is set for the API. The outbound identity is required for the HTTP Form Post and Private Key JWT authentication methods. The supported client authentication method are:
- HTTP Form Post: The client typically uses this method to authenticate with an authorization server by passing their client credentials (client_id and client_secret or other credentials) as form data in a POST request to the token endpoint.
- Private Key JWT (valid from version 2024.1.2 and later): The client verifies their identity by signing a JWT with their private key. When using a Private Key JWT for client authentication, the required additional claims must be included in the Client JWT Assertion. To use the Private Key JWT, set the credentials to the outbound identity and host the public key on the publically available JWKS URL.
- Client JWT Assertion
- Provide the following additional parameters when using the Private Key JWT authentication method.
- Signing Algorithm: The signing algorithm that the policy must use to sign the JWT for client authentication. The supported algorithms for signing content are:
- RS256
- RS384
- RS512
- PS256
- PS384
- PS512
- ES256
- ES384
- ES512
- Issuer: The value of the iss claim in the assertion typically contains the ID of the outbound identity.
- Subject: The value of the sub claim in the assertion typically contains the ID of the outbound identity.
- Audience: The value of the aud claim in the assertion typically represents the token endpoint of the OAuth provider. By default, the value of the aud claim is set to the provider's location.
- Assertion Expiry (sec): The assertion's validity period determines how long the assertion will remain valid.
- Kid: The value of the kid claim in the assertion header. It will be kid from the JWKS URL where the public key for outbound identity is made publically available.
- Replay Prevention: Click this checkbox to protect against malicious data reuse. When you enable this setting, a unique JSON Web Token (JWT) is generated for each request, rather than reusing the same token across multiple requests. This prevents valid transmissions from being repeated or delayed in a fraudulent manner.
- Signing JCA Provider: If an external keystore, such as a Hardware Security Module (HSM) is configured, specify the JCA provider for the corresponding HSM (for example, nCipherKM). For installations without an external keystore, specify the provider based on signing requirements (for example, SunJCE or BC), or leave the value blank to allow the platform to choose the provider.
- Custom Headers: If the OAuth provider requires additional parameters in the client assertion claims, you can define the custom header value of the parameter.
- Custom Claims: If the OAuth provider requires additional parameters in the client assertion claims, you can define the custom claim value of the parameter.
- Signing Algorithm: The signing algorithm that the policy must use to sign the JWT for client authentication. The supported algorithms for signing content are:
- Additional Configurations/Parameters
- If the OAuth provider requires additional parameters in the token request for the authorization server, you can add those additional parameters to the token request's header, form post, and private key JWT claim headers and claims. Specify:
-
Name Description Scope The scopes sent in token request. Access Token Cache Expiry (sec)
(valid from version 2024.1.2 and later)
The expiration time of the access token generated by the OAuth provider determines how long the token must be cached. This caching duration is set to 90% of the specified expiration time. If the expiration time is not set, the caching duration is based on the expires_in value returned in response to a token request.
The Access Token Cache Expiry (sec) property replaces the previous Cache Expiration Time and Cache Idle Time properties under com.akana.policy.oauth.client configuration. The old cache settings are removed and are no longer available from the 2024.1.2 version. Ensure that you use the new Access Token Cache Expiry (sec) setting to control the caching duration for access tokens generated by the OAuth provider.Token Request Form Parameters
(valid from version 2024.1.2 and later)
If the OAuth provider requires additional parameters in the token request, you can define the values of the parameters for token request in the form parameters. Token Request Header Parameters
(valid from version 2024.1.2 and later)
If the OAuth provider requires additional parameters in the token request, you can define the values of the parameters for token request in the header parameters.
Configuring OAuth Client Policy Audit Options
Once you've configured the settings for your OAuth Client policy, the next step is the Specify OAuth Client Policy Audit Options page, as shown below.
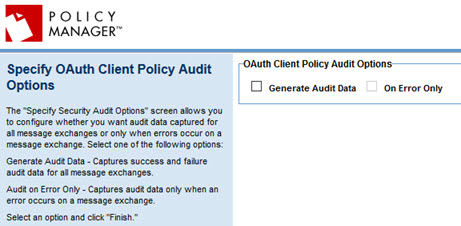
Choose from the available options controlling the audit data that's captured:
- Generate Audit Data
- Captures all message data, whether success or failure, for all message exchanges.
- On Error Only
- If you choose to generate audit data, you can specify that audit data is captured only when an error occurs on a message exchange.
That completes the policy configuration. Click Finish to close the wizard. You can now assign the policy to a service.
Activating a policy
When you create and configure a policy, the policy is in Draft state. When the policy configuration is complete, activate the policy: click Activate Policy and then confirm. See Activate a Policy.
A policy in Draft state is not available for general use. Once you activate the policy, it is in Active state and is available for use.
Attaching a policy
To use the OAuth Client policy, go to the Policies folder in the respective organization and attach the policy to a Target service.
Token request parameters
The downstream token request includes the following parameters based on the policy configuration.
| Parameter | Description |
|---|---|
| grant_type | The grant type. The policy utilizes either the Resource Owner Password Credentials grant type or the Client Credentials grant type. |
| scope | The scopes sent in token request. |
| client_id | A unique identifier used to recognize or authenticate a client. The client ID is retrieved from the outbound identity of type Consumer. |
| client_secret | A secret used by a client to authenticate with the authorization server. The client secret is retrieved from the outbound identity of type Consumer. Required only for the HTTP Form Post authentication method. |
| username | The username retrieved from the outbound identity of type end-user. This represents the user seeking authentication. |
| password | The password retrieved from the Outbound identity of type end-user. This is the user's credential used to authenticate with the OAuth provider. |
| client_assertion_type | A type of client_assertion. |
| client_assertion | A JWT that contains information for client authentication. It must be digitally signed using a private key. |
| client_assertion.header.alg | Identifies the specific type of JWT signing algorithm. This is a required header for the JWT assertion. |
| client_assertion.header.typ | Identifies the type of assertion. This must be Private Key JWT. |
| client_assertion.header.kid | Key Identifier. Identifies the trusted third-party certificate to validate the assertion signature. |
| client_assertion.iss | Issuer. This is the client id for the JWT assertion issued by the client. |
| client_assertion.sub | Subject. A valid client_id. |
| client_assertion.aud | Audience. A value that identifies the authorization server as an intended audience. The authorization server must verify that it is an intended audience for the token. The audience must be the URL of the authorization server’s token endpoint. |
| client_assertion.iat | Issued at. Time at which the JWT was issued. |
| client_assertion.exp | Expiration time on or after which the JWT token must not be accepted for processing. |
| client_assertion.jti | JWT ID. A unique identifier for the token, which can be used to prevent reuse of the token. |
OAuth Client Policy: use case
This section provides a usage scenario for using the OAuth Client policy to generate an OAuth token and send it to the downstream service.
It includes the following high-level steps:
- Configure New OAuth Client Policy
- Create user to be used for Client ID
- Create user to be used for Resource Owner
- Attach OAuth Client Policy to the Physical Service
- Configure outbound identity and Assign PKI Keys
- Cache Configuration
- Test
- Validate
Configure New OAuth Client Policy
First, create and configure a new OAuth Client Policy. Follow the steps.
To create and configure the OAuth Client policy
- Log in to the Policy Manager workbench.
- Choose the organization that the policy will belong to, and go to the Policies > Operational Policies folder.
- Click Add Policy.
- On the Select Policy Creation Option page, from the Type drop-down, choose OAuth Client Policy and click Next.
- Specify a value for Policy Name and click Finish.
- At the completion summary, click Close. The OAuth Client Policy Details page is displayed.
- The next step is to configure the policy details. In the center section, click Modify.
- On the Specify OAuth Client Policy Options page, specify values for the following properties:
- Provide the OAuth Provider Connection Details. See OAuth Client Policy Configuration Options for parameter description.
- Select the Grant Type that the policy will support: Resource Owner (Resource Owner Password Credentials grant type) or Client Credentials.
- Select the Client Authentication Method (either HTTP Form Post or Private Key JWT).
- Specify the claims and the assertion's validity period under Client JWT Assertion when using the Private Key JWT authentication method.

- Click Finish.
- Click Close.
- Under the Workflow actions, click the Activate Policy link.
- Click OK to activate the policy.
Create user to be used for Client ID
The client id and shared secret is used when invoking the OAuth provider. The gateway will send these to identify itself with the OAuth provider. The first step would be obtaining this information by registering this service in the OAuth provider. See the documentation provided by the OAuth provider for these steps.
You have the following options to create a user, choose one of the two options:
- Create a user as an App - This allows you to set up a user as an app, generating a Client ID for OAuth authentication.
- Create a user as an Identity - This allows you to define a user as an identity through the Policy Manager, generating a Client ID for OAuth authentication.
To create the user as an App
- Log in to the Community Manager developer portal.
- Create a new app: From the Plus icon (+), select Add App. To create an app in the context of a child organization, choose the organization first.
- Define the app, and then click Finish.
- On the App Details page, under Security, note the App ID.
- Click Show Keys to view the Shared Secret. An example is shown below.

- Copy the Shared Secret.
Store the Client ID and Shared Secret values as an outbound identity for the invoked service.
To create the user as an identity
- Log in to the Policy Manager workbench.
- Click the Security tab.
- From the Users sub-tab, on the bottom of the screen, click Add User.
- Populate the information: username, full name, and password. The Client Id from the OAuth Provider will be the user ID and the Shared Secret will be the password.
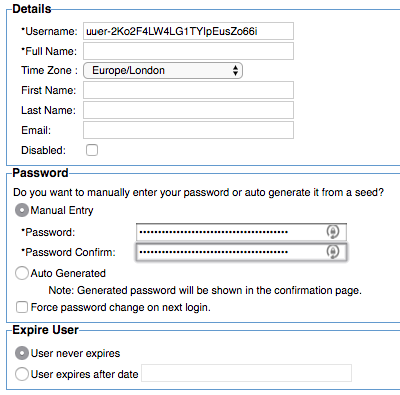
- Click Finish.
Create user to be used for Resource Owner
When using the Resource Owner flow, a user name and password is required to be passed to the OAuth Provider. Even though the username and password exist in the LDAP domain, you must set the user up as a local user and then add it to the service as an outbound identity. The policy uses these credentials to put in the request when calling the OAuth Provider.
To create the Resource Owner user
- Log in to the Policy Manager workbench.
- Click the Security tab.
- From the Users sub-tab, on the bottom of the screen, click Add User.
- Populate the information: username, full name, and password.
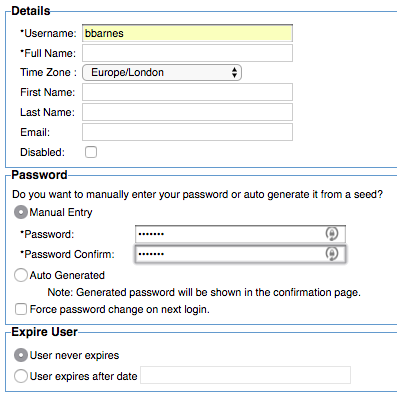
- Click Finish.
Attach OAuth Client Policy to the Physical Service
Assumption is that an API has been properly created in the platform.
The OAuth Client Policy is done on the Outbound side, so this policy needs to be added to the Physical Service (target) object that was created. The users that were created above will also need to be added to this service as Outbound Identities. Follow these steps to properly configure a service to use the OAuth Client Policy.
To configure the service to use the OAuth Client policy
- Log in to the Policy Manager workbench to configure the Physical Service.
- Navigate to the proper organization structure where this service was created.
- Select the physical service (the service with the name of target on it).
- Scroll down to the Policy Attachments section. In the Operational sub-section, click Manage.
- From the pop-up screen, navigate to the Policy -> Operational directory under the organization that the OAuth Client Policy was created and select it.
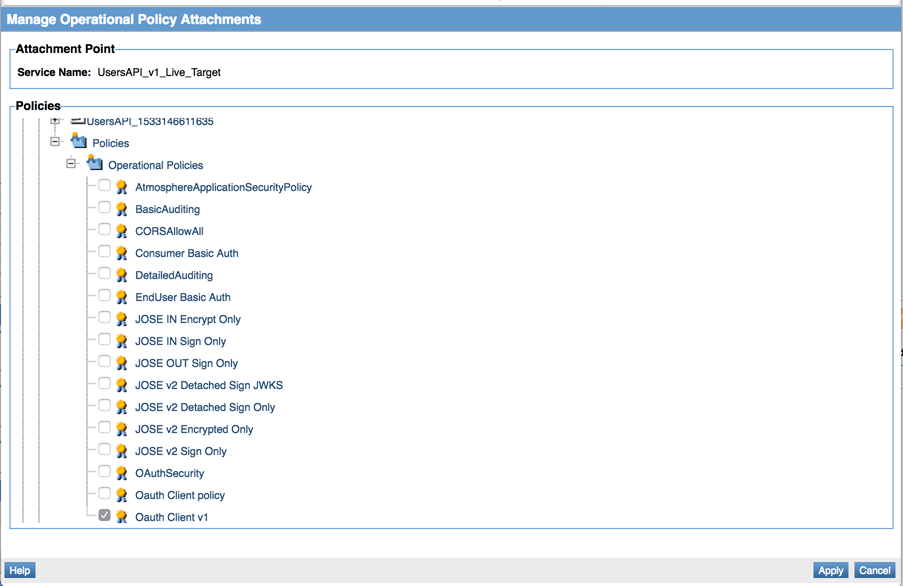
- Click Apply.
Configure outbound identity and Assign PKI Keys
At this point, the Outbound Identities need to be configured. This can be done from either the Policy Manager Workbench or the Community Manager developer portal. These directions describe the steps using the Policy Manager.
If the Resource Owner flow is being used, two outbound identities are required, one for the end user and the other for the client identity.
To configure the end-user identity
- In the Policy Manager Workbench, select the virtual service to configure the outbound identity.
- On the Service Overview Details page, click Manage Outbound Identities from the Actions portlet.
- The Manage Outbound Identities page is displayed. Under Identities, click Specify Outbound Identities and then click Add.
- The Add Outbound Identity page is displayed. Under the Source Identity, select Static User.
- Make sure the domain is set to Local Domain, and then populate the resource owner username and password that you created in To create the Resource Owner user.
- Under Outbound Identity, select End User.
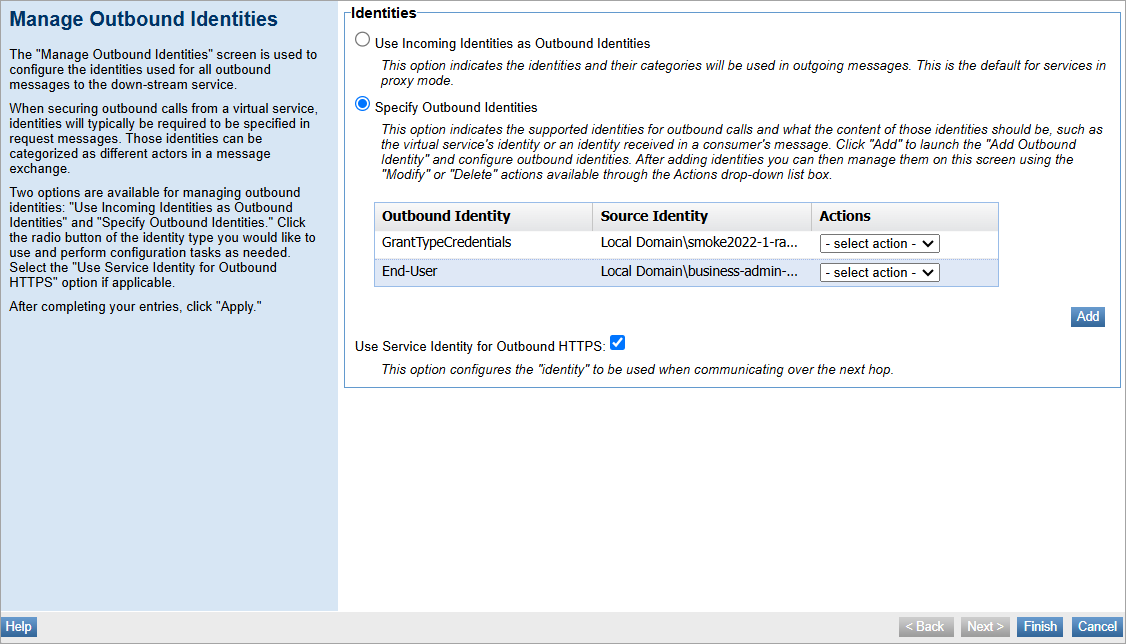
- Click Finish.
To configure the client outbound identity
- In the Policy Manager Workbench, select the virtual service to configure the outbound identity.
- On the Service Overview Details page, click Manage Outbound Identities from the Actions portlet.
- The Manage Outbound Identities page is displayed. Under Identities, click Specify Outbound Identities and then click Add.
- The Add Outbound Identity page is displayed. Under the Source Identity, select Static User.
- Make sure the domain is set to Local Domain, and then populate the username and password for the client identity that you created in To create the Client user. If you're using the platform as an OAuth provider, the values are the AppID and Secret.
- Under Outbound Identity, in the User Defined Category field, enter: GrantTypeCredentials.
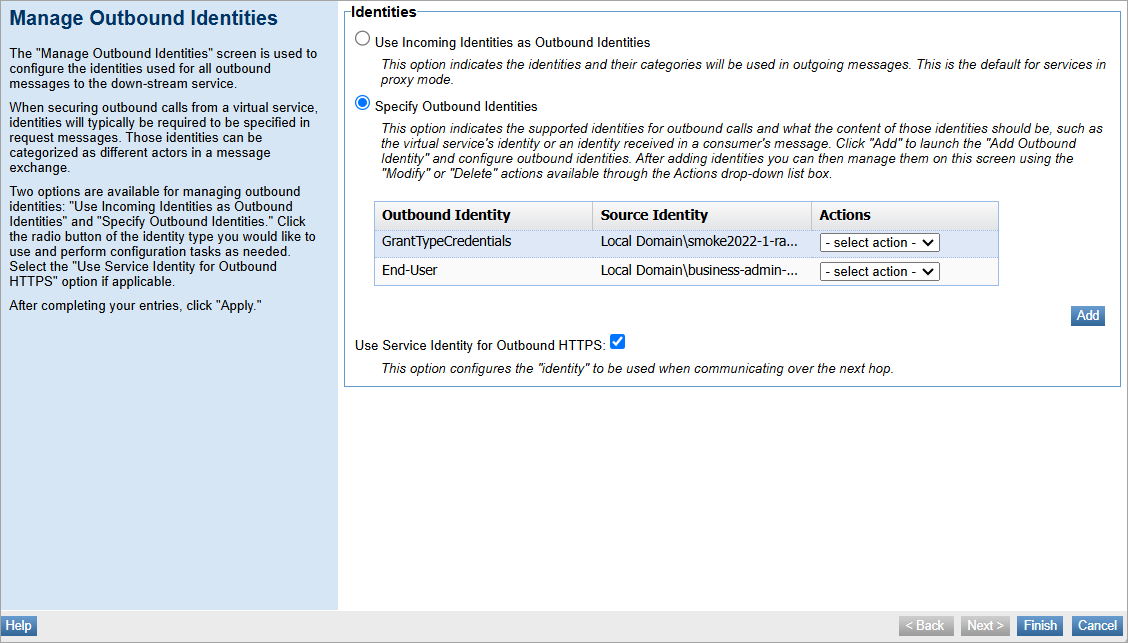
- Click Finish.
Assign PKI Keys to outbound identity
When using the Private Key JWT authentication method, you must assign PKI keys to the outbound identity by associating the appropriate key with the identity that will be used to send the request.
To assign PKI keys to outbound identity
- From the Organization Tree in the Policy Manager, click on the Organization you created.
- The Organization Overview Details page is displayed. In the Actions list under the Organization Identities tab, click Manage PKI Keys.
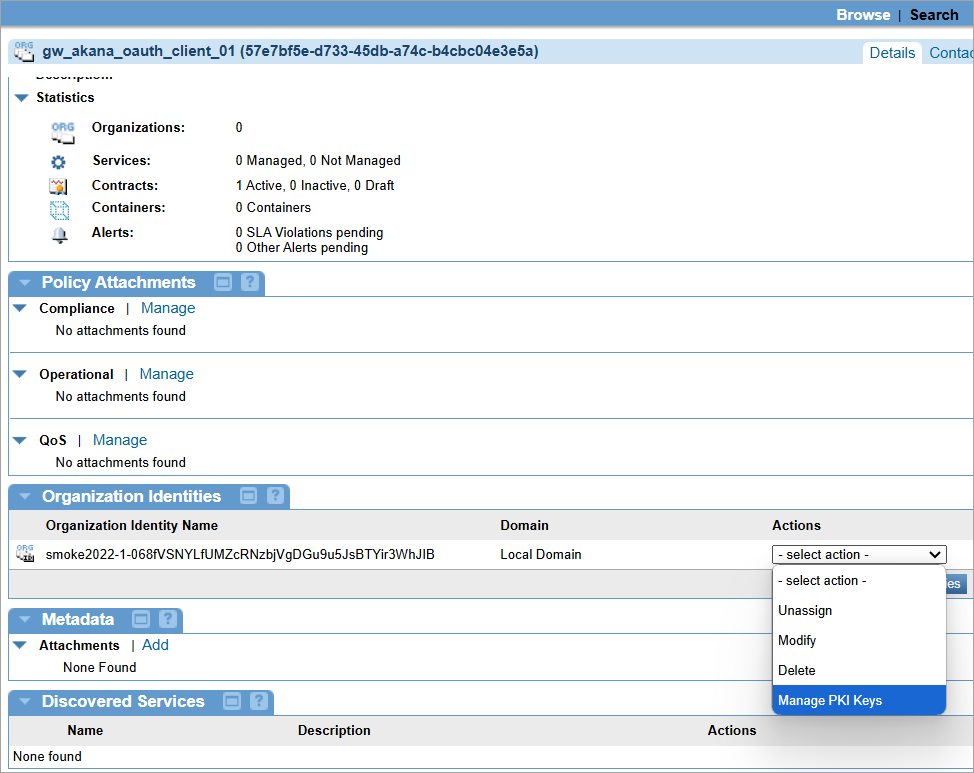
- The Select Key Management Option page is displayed. You can use different key management options. For more information, see Managing Keys and Certificates.
Cache Configuration
Tokens can be stored in a local cache to the Network Director. Tokens are cached based on a concatenation of the client id and scope. If you're using the Resource Owner grant type, the user ID is appended to the cache key. To configure the cache, follow the steps.
To set cache configuration value
Valid in Version: 2024.1.2 and later
- Log in to the Policy Manager console.
- In the Organization Tree, find the level where the policy was defined. Click to select.
- In the center pane, under the OAuth Client Policy section, click Modify. The Specify OAuth Client Policy Options page is displayed.
- Under Additional Configurations, specify the value for the Access Token Cache Expiry (sec) parameter. For more information, see OAuth Client Policy Configuration Options.
To set cache configuration value
Valid in Version: Older versions prior to 2024.1.2
The cache values can be controlled with a configuration category in the Akana Administration Console.
- Log in to Akana Administration Console for the Network Director container.
- Select the Configuration tab.
- Under Configuration Categories, select com.akana.policy.oauth.client.
- Set values for the following (see Cache configuration properties):
- Cache Expiration Time
- Cache Idle Time
Cache configuration properties
Cache configuration property settings.
- Cache Expiration Time
- The local cache expiration time. When this cache expires, the Client OAuth Policy requests a new token.
- The configured time should be less than the OAuth Provider token expiration time, to make sure that expired tokens are not sent downstream.
- Cache Idle Time
- The expiration time if the cache is idle. When a token is idle in the cache for the configured time, the Client OAuth Policy requests a new token.
- The configured time should be less than the OAuth Provider token expiration time, to make sure that expired tokens are not sent downstream.
Test
Invoke the API to test. The backend service should be properly invoked with an OAuth Token.
Validate
Follow these steps to validate that a proper OAuth Token has been added to the downstream API.
- Log in to the Policy Manager Workbench.
- Navigate the that API that was invoked during the testing. This will be the same API that the OAuth Client Policy was added too.
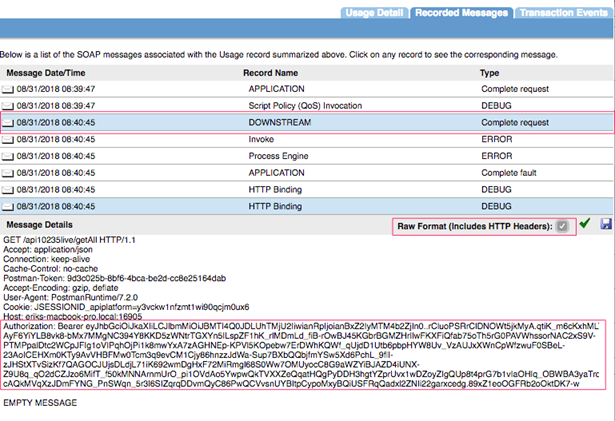
- In the top right tab, select the Monitoring tab, followed by the Logs tab.
- Select the latest transaction.
- Select the Recorded Messages tab.
- Select the Downstream Message and select the Raw Format checkbox.
- On this screen, the Authorization token should be shown. See example below.
Alert Codes
When an error occurs during the process of obtaining a token from the authorization server, a standard error message is returned along with a specific alert code. These error codes indicate different issues that occurred on the server side, which prevent the client’s request from being processed successfully. To aid troubleshoot and resolve these issues, the following alerts are generated.
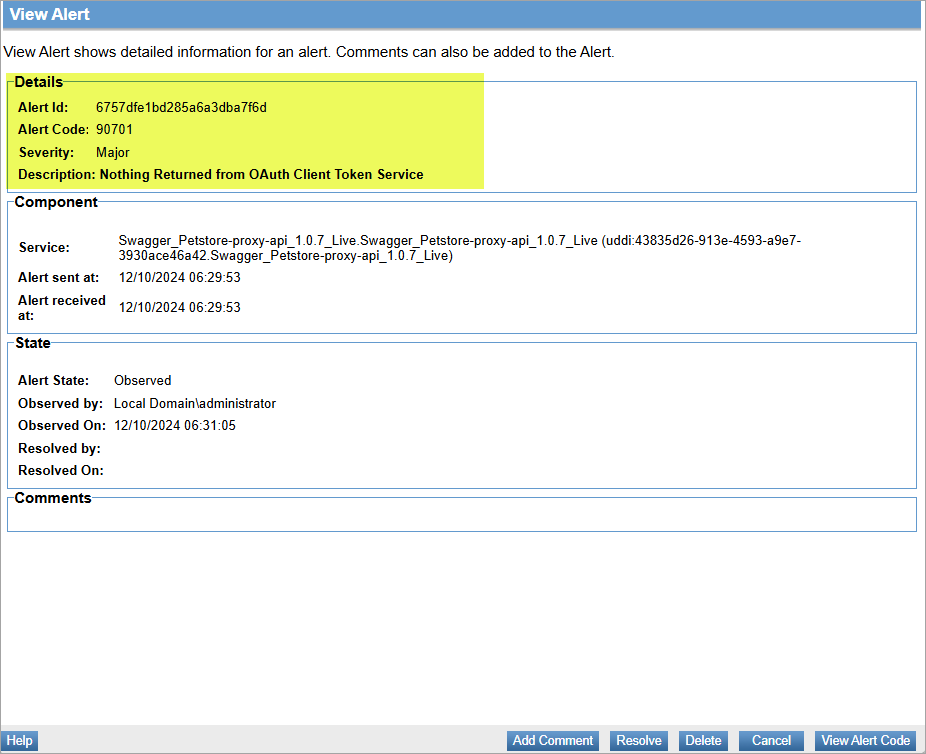
Alert code 90701
This alert indicates that the OAuth client token service did not return a response when attempting to obtain an authentication token.
To view the alert:
- Log in to the Policy Manager console and go to Alerts > Alert Monitoring.
- Select the generated alert code 90701 to view and click View Alert.
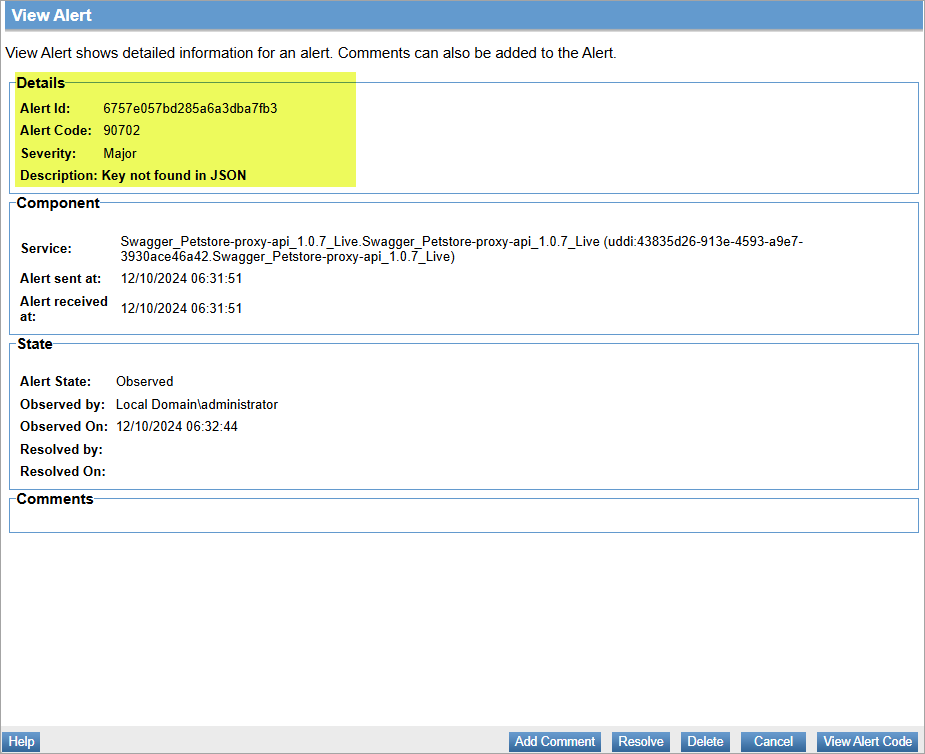
Alert code 90702
This alert indicates that a required key is missing or cannot be found in the JSON response or request.
To view the alert:
- Log in to the Policy Manager console and go to Alerts > Alert Monitoring.
- Select the generated alert code 90702 to view and click View Alert.
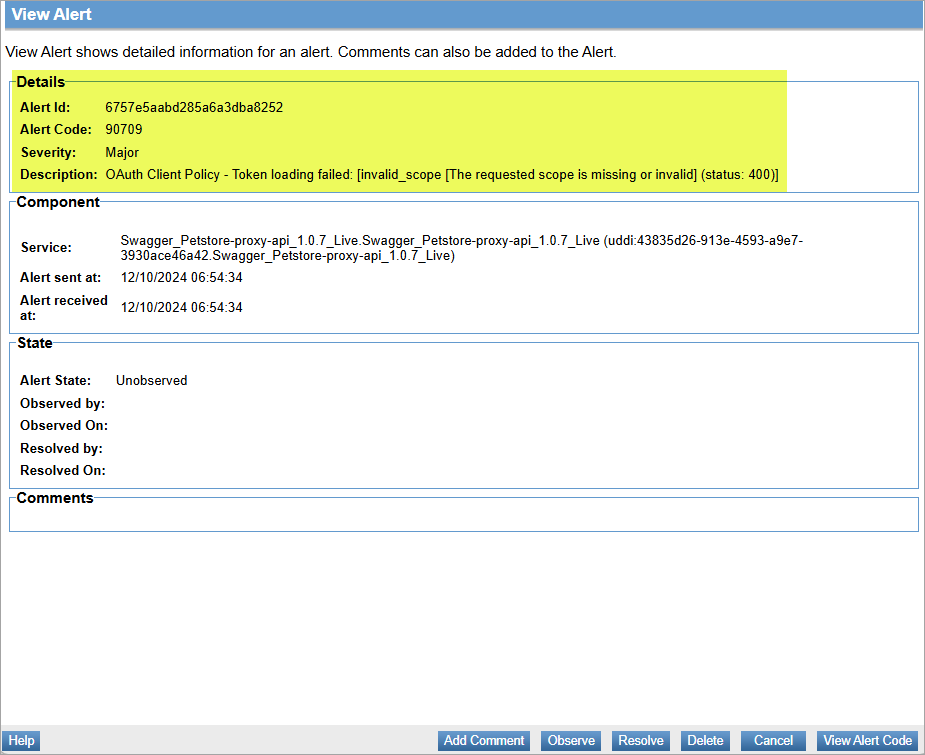
Alert code 90709
This alert indicates that the authorization server encountered an issue while processing or loading the token request. This can be due to an invalid client, invalid scope, invalid request, or a missing/invalid parameter.
To view the alert:
- Log in to the Policy Manager console and go to Alerts > Alert Monitoring.
- Select the generated alert code 90709 to view and click View Alert.
