Custom Workflows
Add, change, and delete custom workflows for resources on the platforms.
On this page:
- What is a custom workflow?
- Which workflows can I customize?
- How do I set up and manage custom workflows?
- How do I specify a custom workflow for APIs?
- How do I specify a custom workflow for apps?
- How do I specify a custom workflow for API contracts?
- How do I specify a custom workflow for groups?
- How do I specify a custom workflow for models?
- How do I specify a custom workflow for tickets?
- How do I specify a custom workflow for platform users?
- What is the default workflow for API contracts?
- What is the default workflow for groups?
- What is the default workflow for models?
- What is the default workflow for tickets?
- What is the default workflow for platform users?
- How do I specify a workflow for two-factor authentication of users?
- How do I set up custom workflow to implement 2FA by phone?
- How do I specify a custom workflow for reviews?
- How do I specify a custom workflow for discussions?
- How do I specify a custom workflow for OAuth grants?
- I uploaded a custom workflow, but it isn't showing as available. What do I do?
- How do I set up an app deletion approval workflow?
- How can I limit API access via custom workflow? (2019.1.32 and later)
What is a custom workflow?
There is a standard workflow for various types of resources on the platform. Some of these are controlled to some degree by options that can be specified in the user interface; for example, an API can be set up so that access requests to a specific environment are granted automatically or must be manually approved. However, other aspects of workflow cannot be modified by users via the user interface; for example, the roles required to modify a ticket.
In some cases, it's possible to replace the default workflow with a custom workflow, at the business level. The Site Admin can upload a customized workflow to the platform, and the Site Admin can modify the site configuration to change the workflow assigned to a specific type of object. For example, you could customize the Ticket workflow so that each new ticket automatically triggers an email to create a ticket in your own internal trouble ticketing system.
The workflow definition guides the sequences of activities associated with resources. Workflow definition includes two important factors:
- State: the current state of the resource, which determines what actions can be taken. For example, a ticket can only be closed if it is currently open.
- Role: certain actions are restricted to certain user roles. For example, only the individual who wrote a ticket, or the Administrator for the resource, can close a ticket.
The combination of these two factors, State and Role, guide the resource through its workflow.
Which workflows can I customize?
A Site Admin can upload certain custom workflows, in Administration/Workflows; the Site Admin can change the default workflow for certain resources in the applicable More > Admin >Settings page or, in the case of OAuth Grant workflow, in the OAuth Provider domain definition. For directions, see How do I set up and manage custom workflows? below.
| Resource Type | Set WF in... | Default WF? |
|---|---|---|
| API | Settings > APIs | No |
| App | Settings > Apps | No |
| Connections (API Access Request) | Settings > Apps | Yes |
| Discussions | Settings > Discussions | Yes |
| Discussion Comments | Settings > Discussions | Yes |
| Group Membership | Settings > Groups | Yes |
| Model Version | Settings > Models | Yes |
| OAuth Grant | Domains > add or modify Akana OAuth/OIDC Provider domain > Branding tab | Yes |
| Review | Settings > Reviews | Yes |
| Ticket | Settings > Tickets | Yes |
| User | Settings > Users | Yes |
How do I set up and manage custom workflows?
In the platform, with regard to workflow, resources fall into three categories:
- There is a default workflow assigned to the resource, but it can be customized.
- There is no default workflow assigned, but a custom workflow can be applied.
- The resource is not governed by workflow.
For a list of resources to which you can apply a custom workflow, see Which workflows can I customize? above.
Once the Site Admin has uploaded a custom workflow, the Site Admin can specify that workflow as the default for the resource type. From that point onwards, the new workflow applies to any new resources of that type.
For example, let's say you customize the Ticket workflow so that each new ticket automatically triggers an email to create a ticket in your own internal trouble ticketing system. New tickets trigger this action; existing tickets are not affected.
To upload a custom workflow
- Log in as a Site Admin and go to the Admin section.
- Go to Workflows.
- Click Add Workflow.
- Enter the following values to describe the new workflow:
- Name
- Description
- Object Type—the type of resource the workflow applies to; APIs, Application, API Access Request, Comment, Discussion, Group Membership, Model Version, OAuth Grant, Review, Ticket, or User.
- Browse to the location of your custom workflow file and upload it.
- Click Finish.
Once you've uploaded the custom workflow, the next step is for the Site Admin to assign the custom workflow to the correct resource type, following the instructions for the applicable object type:
- How do I specify a custom workflow for apps?
- How do I specify a custom workflow for APIs?
- How do I specify a custom workflow for API contracts?
- How do I specify a custom workflow for groups?
- How do I specify a custom workflow for models?
- How do I specify a custom workflow for tickets?
- How do I specify a custom workflow for platform users?
- How do I specify a workflow for two-factor authentication of users?
- How do I specify a custom workflow for reviews?
- How do I specify a custom workflow for discussions?
- How do I specify a custom workflow for OAuth grants?
Note: Generally, when you specify a new custom workflow for a resource, it affects all future resources. Existing resources are not affected. In some cases, it's possible to modify the workflow used for an individual resource. For example, the API Admin can modify the workflow that a specific API uses, in the API Details page. The Users workflow is an exception; if it is in place, it affects all users.
To delete a custom workflow
- Log in as a Site Admin and go to the Admin section.
- Go to Workflows.
- Find the workflow on the list and click Delete.
To edit a custom workflow
- Log in as a Site Admin and go to the Admin section.
- Go to Workflows.
- Find the workflow on the list and click Edit.
- At the Edit Workflow page, make changes as needed and then click Finish.
To view a custom workflow
- Log in as a Site Admin and go to the Admin section.
- Go to Workflows.
- Find the workflow on the list and click Download.
- Choose Open With, choose the application you want to open the file with, such as a browser or application, and click OK.
- Click OK to view the file in the specified application.
To download a workflow document from the Community Manager developer portal
If you're going to customize a workflow, it's best to download the latest default from the Community Manager developer portal as a starting point. Follow the steps below.
- Log in as a Site Admin and go to the Admin section.
- Go to Workflows.
- Find the workflow on the list and click Download.
- Choose Save File, specify the location, and click Save.
Note: When you download the file, it's best to change the file name so that later, when you upload the customized file, it doesn't overwrite the default.
How do I specify a custom workflow for APIs?
The Site Admin can specify a custom workflow and set that as the default workflow for all future APIs on the platform. When the default workflow is changed, the new workflow applies to all new APIs, but existing APIs are not affected.
Before you can specify the custom workflow as the platform default, you must first create the custom workflow externally and upload it. For instructions, see To upload a custom workflow.
To specify a custom workflow for APIs
- Log in as a Site Admin and go to the Admin section.
- Go to Settings > APIs.
- Under API Workflow Definition, click the drop-down list to choose the custom workflow.
Note: If the workflow isn't available for selection, it hasn't yet been uploaded. For instructions, see To upload a custom workflow.
- Click Save.
For more information on API settings, refer to To configure API settings.
How do I specify a custom workflow for apps?
By default, there is no workflow for apps. However, the Site Admin can specify a custom workflow.
Platform installation includes an out-of-the-box app workflow, appversion-workflow-template1.xml, that implements an approval process for app deletion.
If this workflow is in effect, and an app developer deletes an app version, a deletion request is sent to the Business Admin for approval. The app is inactivated pending approval; at this point, developers cannot make any changes to the app, although the Business Admin can still make changes. When the Business Admin approves the request, the app is fully deleted. If for any reason the Business Admin denies the request, the app is restored to normal operation.
To specify this workflow as the default for apps on the platform, the Site Admin must modify the app configuration settings.
To implement a different custom workflow, the Site Admin must first create the custom workflow externally and upload it. For instructions, see To upload a custom workflow. For information about custom workflows, see Custom Workflows in the Community Manager developer portal.
To specify a custom workflow for apps
- Log in as a Site Admin and go to the Admin section.
- Go to Settings > Apps.
- Under App Workflow Definition, click the drop-down list to choose the custom workflow.
Note: If the workflow isn't available for selection, it hasn't yet been uploaded. For more information, see To upload a custom workflow.
- Click Save.
- Click Save.
For more information on app settings, refer to To configure app settings.
How do I specify a custom workflow for API contracts?
The Site Admin can specify a custom workflow and set that as the default workflow for all future API contracts on the platform. When the default workflow is updated, existing app versions may or may not be affected depending on the workflow changes.
Before the Site Admin can specify the custom workflow as the platform default, the Site Admin must first create the custom workflow externally and upload it. For instructions, see To upload a custom workflow.
To specify a custom workflow for API contracts
- Log in as a Site Admin and go to the Admin section.
- Go to Settings > Connections.
- Under General App/API Connection Settings, choose Sandbox or Live and click the drop-down list to choose the custom workflow.
Note: If the workflow isn't available for selection, it hasn't yet been uploaded. For more information, see To upload a custom workflow.
- Click Save.
For more information on applicable settings, refer to To configure app/API connection settings.
How do I specify a custom workflow for groups?
The Site Admin can specify a custom workflow and set that as the default workflow for all future groups on the platform. When the default workflow is changed, the new workflow applies to all new groups, but existing groups are not affected.
Before the Site Admin can specify the custom workflow as the platform default, the Site Admin must first create the custom workflow externally and upload it. For instructions, see To upload a custom workflow.
To specify a custom workflow for groups
- Log in as a Site Admin and go to the Admin section.
- Go to Settings > Groups.
- Under Group Membership Workflow, click the drop-down list to choose the custom workflow.
Note: If the workflow isn't available for selection, it hasn't yet been uploaded. For more information, see To upload a custom workflow.
- Click Save.
- Click Save.
For more information on Group settings, refer to To configure group settings.
How do I specify a custom workflow for models?
The Site Admin can specify a custom workflow and set that as the default workflow for all future model objects on the platform. When the default workflow is changed, the new workflow applies to all new model objects, but existing objects are not affected.
The workflow is applied to the specific model version. For example, when a user with the Model Designer role requests approval for the model, and the Model Administrator approves or rejects, those actions apply to a model version. One model might have several versions.
This workflow applies to model objects defined by the Business Admin (Business > Models), see Managing Model Objects for a Business Organization. It does not apply to model objects defined in the context of a specific API.
Before the Site Admin can specify the custom workflow as the platform default, the Site Admin must first create the custom workflow externally and upload it. For instructions, see To upload a custom workflow. It's best to download the existing workflow and use that as a basis for customization.
To specify a custom workflow for model objects
- Log in as a Site Admin and go to the Admin section.
- Go to Settings > Models.
- Under Model Workflow Definition, click the drop-down list to choose the custom workflow.
Note: If the workflow isn't available for selection, it hasn't yet been uploaded. For more information, see To upload a custom workflow.
- Click Save.
How do I specify a custom workflow for tickets?
The Site Admin can specify a custom workflow and set that as the default workflow for all future tickets on the platform. When the default workflow is changed, the new workflow applies to all new tickets, but existing tickets are not affected.
Before the Site Admin can specify the custom workflow as the platform default, the Site Admin must first create the custom workflow externally and upload it. For instructions, see To upload a custom workflow.
To specify a custom workflow for tickets
- Log in as a Site Admin and go to the Admin section.
- Go to Settings > Tickets.
- Under Ticket Workflow Definition, click the drop-down list to choose the custom workflow.
Note: If the workflow isn't available for selection, it hasn't yet been uploaded. For more information, see To upload a custom workflow.
- Click Save.
- Click Save.
For more information on ticket settings, refer to To configure ticket settings.
How do I specify a custom workflow for platform users?
You can use the default out-of-the-box user workflow in combination with user settings and business security settings relating to users, to control user experience on the platform and if needed to restrict what users can do. If you need more flexibility, you can design your own custom workflow.
The Site Admin can specify a custom workflow and set that as the default workflow for all future users on the platform. When the default workflow is changed, the new workflow applies to all new users. In addition, for an API platform upgrade scenario, running the Upgrade CM Models task adds existing users to the new workflow.
Before the Site Admin can specify the custom workflow as the platform default, the Site Admin must first create the custom workflow externally and upload it. For instructions, see To upload a custom workflow. For information about custom workflows, see Custom Workflows in the Community Manager developer portal.
To specify a custom workflow for platform users
- Log in as a Site Admin and go to the Admin section.
- Go to Settings > Users.
- Under User Workflow Definition, click the drop-down list to choose the custom workflow.
Note: If the workflow isn't available for selection, it hasn't yet been uploaded. For more information, see To upload a custom workflow.
- Click Save.
For more information on user settings, refer to How do I configure settings for users?
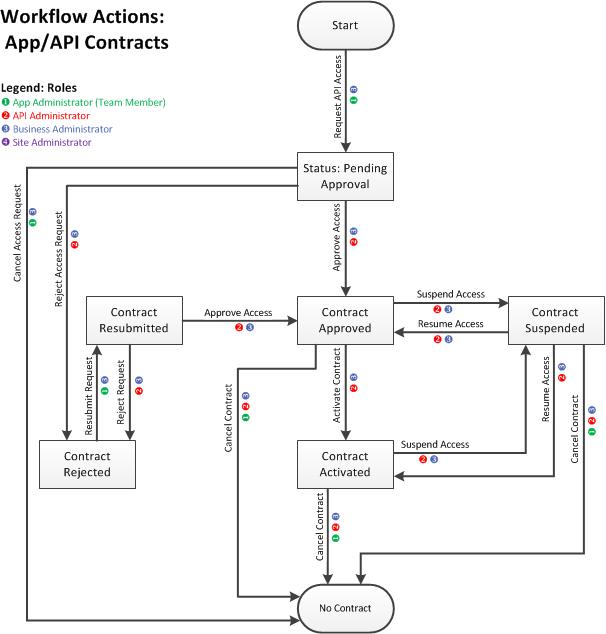
What is the default workflow for API contracts?
The default workflow for API contracts is shown below. This diagram shows all the states an API access contract can be in, and the actions that are valid for each state.
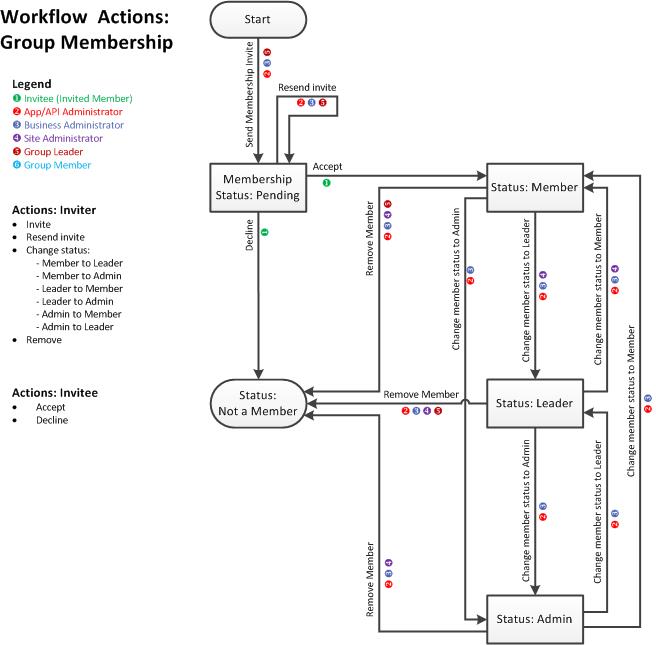
What is the default workflow for groups?
The default workflow for groups is shown below. This applies for all types of groups, including:
- App teams
- Independent Groups
- API Admins
- API Scope Groups
- Site Admins
- Business Admins
Note: The workflow below shows the most complex group scenario, where the group has Admins, Leaders, and Members (Independent Group, API Scope Group). For other types of groups, all members have Admin rights.
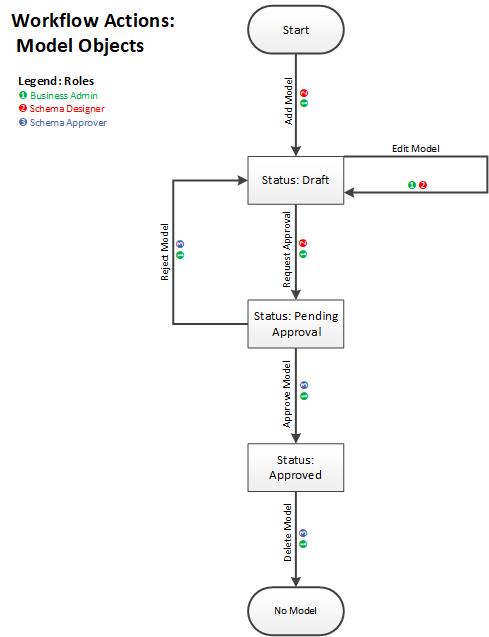
What is the default workflow for models?
The default workflow for models is shown below.
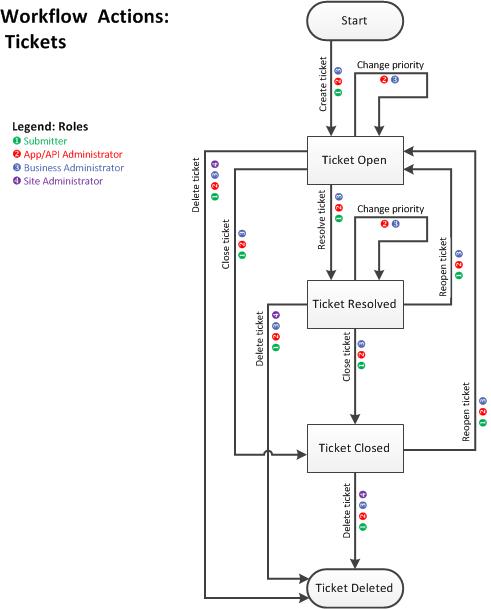
What is the default workflow for tickets?
The default workflow for tickets is shown below.
What is the default workflow for platform users?
There is currently a default workflow that applies to all local platform users. Users who log in using a third-party identity provider are not managed by the default workflow.
The default workflow for platform users has a slightly different process depending on the type of user:
- Self-signup user
- User invited by a Site Admin
In all cases, the user profile can be modified as needed by the Site Admin.
If the platform settings allow users to modify their profiles, the user can also modify his/her own profile. This is evaluated in the workflow by means of the @ModifyProfile reserved action. If @ModifyProfile is present in the workflow and is applicable to the logged-in user, the user can modify his/her own profile.
The default user workflow checks the platform setting that governs whether users can modify their own profiles (Business Security settings; see How do I configure settings for business security?
The default workflow guides users through the login process, checking whether any or all of the following possible login conditions are currently required:
- Must the password be changed? A user invited by a Site Admin logs in with a temporary password and must choose a new password as a first step.
- Is there a platform legal agreement in place that was not yet accepted by the user? If yes, the user must accept the legal agreement before proceeding with login.
- Must the user provide answers to security challenge questions? This could be the case on first login. There are also other circumstances that might trigger this; for example, the requirement to answer security challenge questions is added, or the number of answers each user must provide is increased.
If one of these is required, the login process required that the user complete that one step. Login is then evaluated again. When all required conditions are met, the user is logged in. If it is the user's first login, the user is then marked as permanent in the database; this ensures that the user is not purged. Temporary user records, such as invitation codes that were issued and not responded to, are periodically purged from the database.
If you want to, you can create a custom workflow for users and set your custom workflow as the default. See How do I specify a custom workflow for platform users? above.
How do I specify a workflow for two-factor authentication of users?
The platform includes the capability to use two-factor authentication, requiring that users enter a special one-time-only verification code after logging in, as a second level of security and verification. The code is sent by email.
By default, the two-factor authentication feature is turned off. However, the platform out-of-the-box installation includes a user workflow that you can use to implement this functionality. The workflow name is: workflow:definition:user:v2.
This user workflow, default-user-workflow-v2.xml, guides the user to enter an authentication code after normal login is complete. The authentication code, passed to the user in an out-of-band process, completes the login process.
The workflow retrieves values set up for two-factor authentication in a platform Settings page controlled by the Site Admin.
To specify the two-factor authentication workflow for users
- Log in as a Site Admin and go to the Admin section.
- Go to Settings > Users.
- Under User Workflow Definition, click the drop-down list and choose workflow:definition:user:v2.
- Click Save.
How do I set up custom workflow to implement 2FA by phone?
Note: Setting up 2FA by phone requires an on-prem installation and customization.
The platform supports two-factor authentication, with workflow functions, conditions, and variables and also platform settings that you can use to enable this functionality.
The out-of-the-box user workflow supports sending the 2FA verification code by email (see How do I specify a workflow for two-factor authentication of users? above). With customization, if you have an on-premise implementation you can also build a custom workflow that either:
- Sends the code via a different delivery mechanism instead of email, such as voice or text
- Offers multiple options that the user can choose from
In the out-of-the-box platform workflow, workflow:definition:user:v2, you'll see the section that defines the options offered to users. It looks something like the below:
<function type="setTwofaDeliveryOptions">
  <arg name="VoiceSupported">false</arg>
  <arg name="TextSupported">false</arg>
  <arg name="EmailSupported">true</arg>
</function>
By default, it is set to support email only. If you want to support voice, text, or both, set those arguments to true. However, you'll also need some customization to manage the process of sending the code to the customer by phone (voice or text).
The out-of-the-box workflow manages generating the code and sending it to the user by email with the function below:
<function type="send2FACodeToEmail">
  <arg name="DeliveryTargetAddress">${arg.twofa.delivery.target.address}</arg>
  <arg name="DeliveryMechanism">${arg.DeliveryMechanism}</arg>
  <arg name="2FAData">${arg.2fa.task.data}</arg>
  <arg name="2FAVerificationCode">${arg.verificationCode}</arg>
  <arg name="2FAVerificationCodeValidMinutes">${arg.2fa.verification.code.valid.minutes}</arg>
</function>
You'll need to have something along those lines to send the code by phone (voice or text).
For details about this function, see send2FACodeToEmail (user workflow documentation).
For example, the section of the out-of-the-box workflow below has a suggested template commented out for implementation of a custom function. As it stands, the workflow step generates the code but does not send it.
        <result old-status="${workflow.step.name}" status="${workflow.step.name}" step="-1">
  <conditions type="AND">
    <condition type="argumentValueEquals">
      <arg name="ArgName">Action</arg>
      <arg name="Value">generate</arg>
    </condition>
    <condition type="is2FACodeGenerated"/>
    <condition type="isDeliveryTypeVoice"/>
  </conditions>
  <pre-functions>
    <!-- <function type="send2FACodeToPhone"> custom workflow function
      <arg name="DeliveryTargetAddress">${arg.twofa.delivery.target.address}</arg>
      <arg name="DeliveryMechanism">${arg.DeliveryMechanism}</arg>
      <arg name="userPhoneNumber">${sessionuser.phone.number}</arg>
      <arg name="2FAData">${arg.2fa.task.data}</arg>
      <arg name="2FAVerificationCode">${arg.verificationCode}</arg>
      <arg name="2FAVerificationCodeValidMinutes">${arg.2fa.verification.code.valid.minutes}</arg>
    </function> -->
    <function type="setAuthTokenProperty">
      <arg name="PropertyName">2FAData</arg>
      <arg name="PropertyValue">${arg.2fa.authtoken.property}</arg>
    </function>
    <function type="setPendingTask">
      <arg name="PendingTask">2fa.required</arg>
      <arg name="TaskData">${arg.2fa.task.data}</arg>
    </function>
  </pre-functions>
For more information, refer to User Workflow: Functions (custom user workflow doc).
How do I specify a custom workflow for reviews?
The Site Admin can specify a custom workflow and set that as the default workflow for all future reviews on the platform. When the default workflow is changed, the new workflow applies to all new reviews, but existing reviews are not affected.
There is an out-of-the-box custom workflow for reviews. Any other custom workflow must first be created externally and uploaded. For instructions, see To upload a custom workflow.
To specify a custom workflow for reviews
- Log in as a Site Admin and go to the Admin section.
- Go to Settings > Reviews.
- Under Review Workflow Definition, click the drop-down list to choose the custom workflow.
Note: If the workflow isn't available for selection, it hasn't yet been uploaded. For more information, see To upload a custom workflow.
- Click Save.
- Click Save.
How do I specify a custom workflow for discussions?
The Site Admin can specify a custom workflow and set that as the default workflow for all future discussions on the platform. When the default workflow is changed, the new workflow applies to all new discussions, but existing discussions are not affected.
Before the Site Admin can specify the custom workflow as the platform default, the Site Admin must first create the custom workflow externally and upload it. For instructions, see To upload a custom workflow.
To specify a custom workflow for discussions
- Log in as a Site Admin and go to the Admin section.
- Go to Settings > Discussions.
- Under Discussion Workflow Definition, click the drop-down list to choose the custom workflow.
Note: If the workflow isn't available for selection, it hasn't yet been uploaded. For more information, see To upload a custom workflow.
- Click Save.
How do I specify a custom workflow for OAuth grants?
If you have a custom workflow for OAuth grants, you'll need to specify the custom workflow as the Grant Workflow Definition in your OAuth Provider domain definition, on the Branding page. See What are the settings on the Akana OAuth/OIDC Provider Branding page and what options should I choose?
The custom workflow applies for all APIs that use the OAuth Provider domain definition.
For instructions for setting up the OAuth Provider domain, including the custom workflow, see How do I set up and configure an OAuth Provider domain?
I uploaded a custom workflow, but it isn't showing as available. What do I do?
When you go into More > Admin >Settings and choose a resource for which you can use a custom workflow, any custom workflows that have been uploaded to your platform for that resource type should be available on the drop-down list for selection.
If the expected custom workflow is not available for selection, first go to More > Admin >Workflows and check that the workflow was uploaded.
If you see your workflow on the list, the most likely reason it's not available for selection is that an incorrect resource was specified when uploading the workflow. It's important to specify the correct resource, because only workflows designated for a specific resource—for example, tickets—are available on the Settings page for that resource.
To check the resource type, find your workflow on the list and then click Edit. In the Edit Workflow page, change the Object Type specified for the workflow, if needed, and then click Save.
How do I set up an app deletion approval workflow?
By default, apps do not follow a workflow. However, if needed, you can assign a custom workflow.
The platform includes a sample workflow definition that provides an example of how to specify app deletion approval. If this workflow is implemented, when an app team member deletes an app, the app is deactivated, and a deletion request is sent to the Business Admin for approval. No changes can be made to the app during this time. If the Business Admin approves the deletion request, the app is deleted; if the Business Admin denies the request, the app is restored to an active state.
You can use the sample as-is or use it as a resource for your own custom workflow.
Name for this sample app workflow: appversion-workflow-template1.
How can I limit API access via custom workflow?
Valid in Version: 2019.1.32 and later
By default, any user who has visibility of an API can request API access via the Access button on the API Overview page.
If needed, you can change this default behavior via custom workflow. You can create and implement a custom API version workflow that uses the reserved action, @DisallowApiAccess, so that the Access button is not available for certain users.
Using the API custom workflow, you an define users that are not allowed to have visibility of the Access button and define the users that are able to see the Access button using the API workflow. The visibility of the Access button can be controlled by Role, Domain or Actions assigned to the user.
Each of the sample custom workflows provided defines a custom role. You can modify as needed. For details and instructions, refer to the API version workflow documentation for this reserved action: @DisallowApiAccess.