Managing Containers
Description of container configuration process, container deployment options, and tools for managing containers.
On this page:
- Container Configuration Process
- Container Deployment Options
- Container Management Functions
- Add Container
- Modify Container Details
- View Capabilities
- Update Container Metadata
- Clone Hosted Services
- Add Container to Cluster
- Add Container Listener
- Modify Container Listener
- Delete Container Listener
- Manage Container Certificate
- Manage PKI Keys (Container)
- Change Organization (Containers)
- Delete Container
Container Configuration Process
The container configuration process involves the following configuration steps.
- Step 1: Install Container Instance—Uses the Configure Container Instance Wizard to create an empty container that includes support for HTTP/HTTPS protocols. A port number is assigned, and the container is optionally started.
- Step 2: Install and Configure Features—Uses the Administration Console to install features. Features can be installed to a newly configured container, a container with features already installed, or a container with features that are available but not yet installed.
- Step 3: Register Container—If you are configuring Policy Manager, this step uses the Add Container Wizard in the Policy Manager Management Console to create and register a container. The Container metadata URL is required to perform this configuration.
Container Deployment Options
The platform provides support for the following container deployment options:
Standalone Container
- Policy Manager 8.x—Default container type created by the Configure Container Instance Wizard.
- Policy Manager 7.x—Create by selecting the Standalone deployment option in the Configure Container Instance Wizard.
- This container type is a container for virtual services. A deployment includes a web service client that communicates with a container. The container is configured to manage a web service that resides on a network.
Note: The container is not configured for a specific service. If a policy configuration of a service is not met by an incoming request, the container blocks access to that service.
- If the container cannot be configured for a policy for a given service, it blocks access to that service.
- Typically installed as part of the Policy Manager configuration process (installation of Policy Manager Console and Policy Manager Services features) and is also is used for certain agent configurations.
- See Configuring a Standalone Container for installation and configuration details.
Network Director Container
- A Network Director Container is the same as a Standalone Container but port 9905 is used.
- It is most common to install the Network Director feature into its own container (separate from Policy Manager).
- See Using Network Director Feature for a complete walkthrough of configuring the standalone container, installing the feature, and registering the container in Policy Manager.
Container Management Functions
The following container management functions apply to containers defined in the Containers folder of the Policy Manager Management Console. They are available on the Containers Summary, the Containers Summary drop-down menu, or via the Actions Portlet on the Containers > Details page.
Add Container
The Add Container Wizard is used to create and configure the container types listed below. A container can be defined by invoking the Add Container action at the Root Organization level or via the Containers Folder > Container Summary within an Organization. Refer to Container Configuration Process for details on the sequence of steps required for configuring a container.
Containers (7.x and 8.0)
- Add Container (Container)—Part of the container configuration includes by specifying the Metadata URL previously defined during the container installation and configuration in the Administration Console. This URL enables Policy Manager to retrieve key information (for example, service hosting, database).
- Add Container (Container Cluster)—This container type is a logical grouping of container Cluster Nodes that horizontally scales the service message load to achieve enhanced performance for message processing. It supports configuration of a group wide set of properties and attributes. Each Cluster Node is considered a process and is a physical entity. Based on your requirements, you can add additional Cluster Nodes (processes) to continually enhance the load distribution. When configuring a Container Cluster, you assign capabilities to the Container by selecting one of the assigned Cluster Nodes that includes metadata (capabilities) that you would like to model the current Container Cluster after.
Legacy Containers (7.2 and below)
- Add Container (5.2 Standalone Management Point)—This container type is a container for virtual services. A deployment includes a web service client that communicates with a container. The container is configured to manage a web service that resides on a network. If the container cannot be configured for a policy for a given service, it blocks access to that service.
- Add Container (5.2 Embedded Management Point)—This option allows you to configure a 5.2 Embedded Management Point Container. This container type is a web service proxy that integrates with a J2EE container and its deployed web services. It provides standard container functionality plus additional features including a Discovery Agent and Handler that discovers physical services on your application server makes them accessible in the Policy Manager application.
- Add Container (5.2 Management Point Cluster)—This option allows you to configure a 5.2 Management Point Cluster. This container type is a logical grouping of 5.2 Standalone Management Point Cluster Nodes that horizontally scales the service message load to achieve enhanced performance for message processing. It supports configuration of a group wide set of properties and attributes. Each Cluster Node is considered a process and is a physical entity. Based on your requirements, you can add additional Cluster Nodes (processes) to continually enhance the load distribution.
Navigation:
Registry > System Summary > Actions Portlet > Add Container
Containers Summary > Add Container
Modify Container Details
Allows you to change the name and description of a container.
Navigation:
Container Details > Container Overview > Manage Container Details
View Capabilities
Displays a list of capabilities associated with the current container.
- Each capability represents a feature that is used in Policy Manager.
- Some capabilities are part of each containers default configuration and are considered out-of-box.
- Other features are pluggable and are added or removed when a container configuration changes.
- Feature information is derived from the container metadata. For example, if new features are installed to a container in the Administration Console, this may require an update to the container metadata using the Update Container Metadata function.
- If container capabilities change as a part of this update, they will be reflected on the View Container Capabilities screen.
Navigation:
Container Details > Container Overview > View Capabilities
Update Container Metadata
The Update Container Metadata Wizard allows you to update container metadata for Containers, Container Clusters, and Containers that are nodes in a Cluster. Updating container metadata is the equivalent of deleting a Container in Policy Manager, registering it again, and re-hosting all the virtual services.
This function is used to synchronize the container configuration in the Administration Console with the complementing Container configuration in the Management Console. Updating container metadata is required in certain scenario, such as if features have been added to a container via the Administration Console or the container port has changed.
The following options are supported for updating container metadata:
- Container—Specify Metadata URL or attach a Metadata File.
- Container Cluster—Specify Metadata Location by selecting a Network Director container from a hierarchy tree, or attach a Metadata File.
- Container node in Container Cluster—Specify Metadata URL or attach Metadata File. Also includes option to update metadata of Container Cluster.
Navigation:
Container Details > Actions Portlet > Update Container Metadata
Clone Hosted Services
Container cloning functionality provides the ability to replicate the configuration of a Container to a Target container. The cloning functionality optimizes the container configuration process by enabling the reusability of configuration parameters (Listeners). Hosted services configured in a Source container are also replicated in the process. This approach can be used to configure load balanced peers. Cloning functionality is useful for upgrades (cloning a legacy container configuration to a container target). A series of service unhosting options are provided to help you manage hosting scenarios for the cloning process including:
- Unhost all previously hosted services from the target container(s)—Used if the selected target container is currently hosting services. This option resets the hosting of the container.
- Preserve Virtual Service Access Point paths (6.0 targets only)—For upgraded containers that are selected to be cloned. This option maintains the access point paths of virtual services that are currently being hosted.
- Unhost from Source container (6.0 targets only)—Used for upgraded source containers that are being cloned to a target container. This option is used to preserve port names, and unhosts services from the source container during the cloning process.
Note: When cloning, make sure that the listener name is the same for the source container and the target container. For the cloning to work, the container listener names must match. You can set up the listener name manually in the container listener section.
Navigation:
Container Details > Actions Portlet > Clone Hosted Services
Add Container to Cluster
The Add Container to Cluster function is used to transition a single container to a Container Cluster. The single container is then considered a member of the cluster and is assigned the Cluster Node container type.
By using a Container Cluster, you can:
- Share virtual services hosting configuration among multiple Cluster Nodes.
- Make it easy to host or unhost services in the Container Cluster and automatically propagate those changes into the Cluster Nodes.
- Model load balancers as Container Clusters and configure a Container Cluster listener to represent the load balancer listeners.
- Generate virtual service WSDLs using the Container Clusters or container listeners.
Navigation:
Container Details > Actions Portlet > Add Container To Cluster
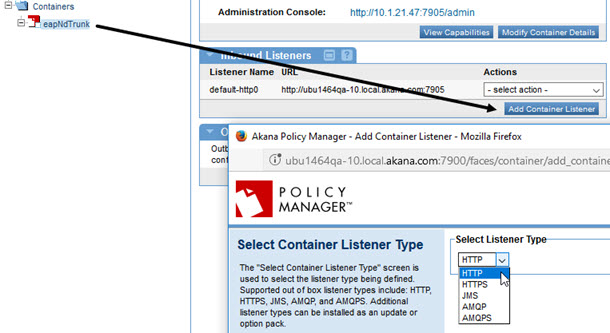
Add Container Listener
The Add Container Listener screen allows you to add a listener configuration to Policy Manager containers types.
Supported listener types:
- HTTP
- HTTPS
- JMS
- AMQP
- AMQPS
Navigation:
Container Details > Inbound Listeners > Add Container Listener, as shown below.
Modify Container Listener
Allows you to modify a listener configuration.
Note: Container protocol types are locked and cannot be de-selected, but the properties can be modified.
Navigation:
Container Details > Inbound Listeners > Modify Container Listener (from Actions drop-down menu)
Delete Container Listener
Allows you to delete a container listener.
Navigation:
Container Details > Inbound Listeners > Delete Container Listener (from Actions drop-down menu)
Manage Container Certificate
The Import X.509 Certificate screen is used to import an X.509 Certificate to replace the certificate assigned to the container during the initial configuration process using the Add Container Wizard. The import function supports .CER and .DER file formats.
The X.509 certificate to be imported must be issued by a third-party Certificate Authority. To achieve this, first the Generate CA Certificate Signing Request function in the Configure > Security > Certificates section of the Management Console must be used to generate a Certificate Signing Request for the Policy Manager CA. The Certificate Signing Request can be sent to a third-party Certificate Authority to request an X.509 Certificate. This X.509 Certificate can then be imported into the Policy Manager CA as a subordinate CA to the third-party Certificate Authority. After this process is complete, the X.509 certificate can be imported and assigned to the container.
Notes:
- This wizard does not accept self-signed certificates.
- If you see an error when importing a .CER or .DER certificate, this typically indicates that the X.509 certificate is not trusted. To resolve this error, add the CA Certificate to the Configure > Security > Certificates > Trusted CA Certificates section of the Management Console and retry.
Navigation:
Container Details > Actions Portlet > Manage Container Certificate
Manage PKI Keys (Container)
Provides key management options for:
- Inbound certificates that are used if you want a container to receive HTTPS messages with client authentication to the next hop.
- Outbound certificates that are used if you want a container to receive HTTPS messages with client authentication to the next hop.
For more information, refer to the Container Identities section of Identity Categories and Managing Keys and Certificates.
Navigation:
Either of the following:
- Container Details > Inbound Listener Portlet > Manage PKI Keys (from Actions drop-down menu)
- Container Details > Outbound Configuration > Manage PKI Keys
Change Organization (Containers)
Allows you to reassign the currently selected container to a new Organization.
- The reassignment process copies the entire container configuration to the Containers Folder of the newly selected Organization.
- Changing the Organization for a Container Cluster that includes one or more Cluster Nodes moves the Container Cluster and the Cluster Nodes.
- Changing the organization for a single Cluster Node is not supported.
Navigation:
Container Details > Actions Portlet > Change Organization
Delete Container
Allows you to delete a Container or Container Cluster. If you are deleting a container cluster that includes a container and you would like to retain the container, use the Remove from Cluster function to remove the container from the cluster prior to deleting the cluster container.
Navigation:
Container Details > Actions Portlet > Delete Container