JMS Configuration
Learn how to configure JMS or AMQP to initiate an HTTP/SOAP call that is then sent to JMS in a queue.
On this page:
- Introduction
- JAR files needed to support JMS/AMQP
- General: Create JMS Listener
- Use Case 1: Existing HTTP-based WSDL over JMS
- Use Case 2: Existing JMS-Based WSDL
- Testing and Debugging
Introduction
This topic provides documentation about two typical use cases when working with a JMS (AMQP setup is similar):
The result will allow you to initiate an HTTP/SOAP call (for example, via SOAPUI) that is then sent to the JMS in a queue. The result will be pulled from a result queue and sent back, over HTTP, to the client.
JAR files needed to support JMS/AMQP
In most cases, for an implementation that uses JMS/AMQP, you'll need to install the JAR files corresponding to the version you're using, in the /deploy/ folder of the Network Director container. An exception is RabbitMQ, which doesn't require JAR files.
The specific files you'll need depends on the products/providers you're using for JMS/AMQP support, and the version. Some options are:
- WebsphereMQ/IBM MQ
- ActiveMQ
- Tibco
- RabbitMQ
In some cases, Akana provides an automation recipe that installs the correct JAR files in the correct location. The following recipes are available:
As an example, an implementation with Apache ActiveMQ required installation of the following files, provided as part of the Apache download files, in the /deploy folder of the ND container:
- activemq-client-5.15.4.jar
- geronimo-j2ee-management_1.1_spec-1.0.1.jar
- hawtbuf-1.11.jar
General: Create JMS Listener
For both use cases you must configure a JMS listener first.
Client libraries
For the different JMS vendors, you'll need to deploy client libraries of the target system into the Network Director instance you are planning to use for the connections. Those are typically version-dependent and should be taken from the actual JMS server you are binding to.
- Copy them to your Network Director deploy directory. For example:
cp activemq-client-5.15.4.jar /akana/aap201901/instance/NetworkDirectorForJMS/deploy/
cp geronimo-j2ee-management_1.1_spec-1.0.1.jar /akana/aap201901/instance/NetworkDirectorForJMS/deploy/
cp hawtbuf-1.11.jar /akana/aap201901/instance/NetworkDirectorForJMS/deploy/
- Restart the instance.
Note: The above files are just an example, taken from a specific implementation of Apache ActiveMQ.
Configuring Network Director
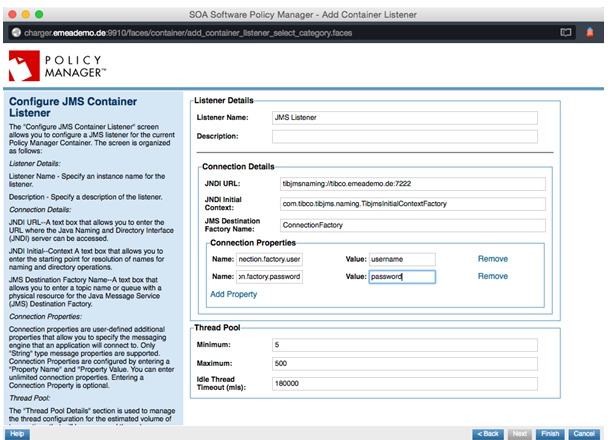
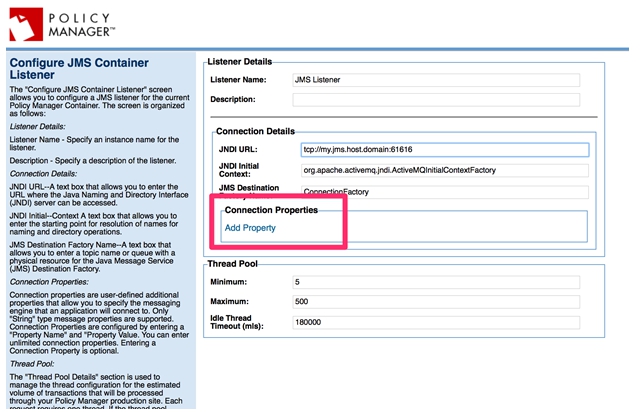
- Choose Add Container Listener and select JMS as Listener Type. Provide the connection details of the JMS server:
- JNDI URL—Address of the server, for example tibjmsnaming://tibco.emeademo.de:7222 (Tibco) or tcp://activemq.emeademo.de:61616 (ActiveMQ)
- JNDI Initial Context—com.tibco.tibjms.naming.TibjmsInitialContextFactory (Tibco) org.apache.activemq.jndi.ActiveMQInitialContextFactory (ActiveMQ)
- JMS Destination Factory Name—Depending on the JMS server configuration, for example ConnectionFactory
- If you need to enter credentials or other specific parameters for the connection to the server, use the Add Property link and add the parameters. Refer to JMS Additional Properties for the available options.
Use Case 1: Existing HTTP-based WSDL over JMS
This use case is based on the assumption that there is a WSDL, with the HTTP binding, for the underlying service.
Create Physical Service
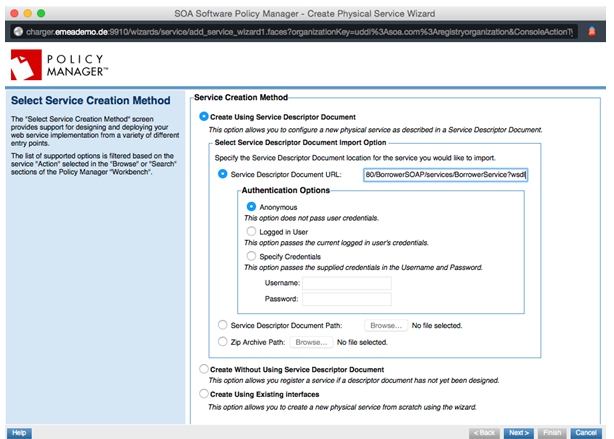
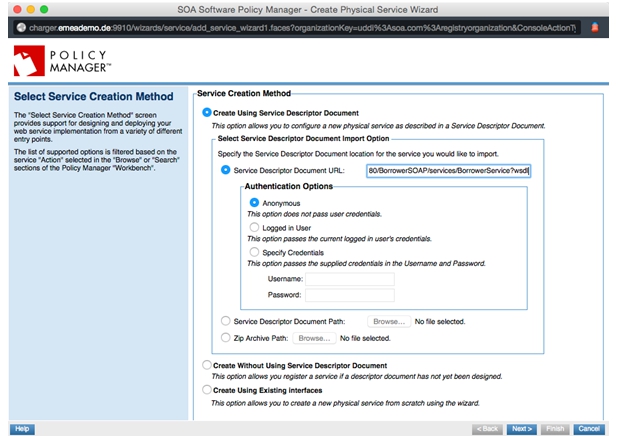
- Create a new physical service by providing the WSDL.
- When being asked to create a virtual service, choose Do not Manage at this time.
Add SOAP/JMS Binding
- Go to Configure > Binding and select Add Binding.
- Use the search field to find the physical service you just created.
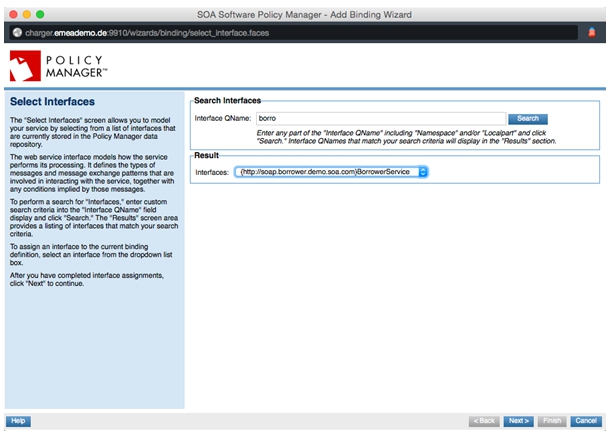
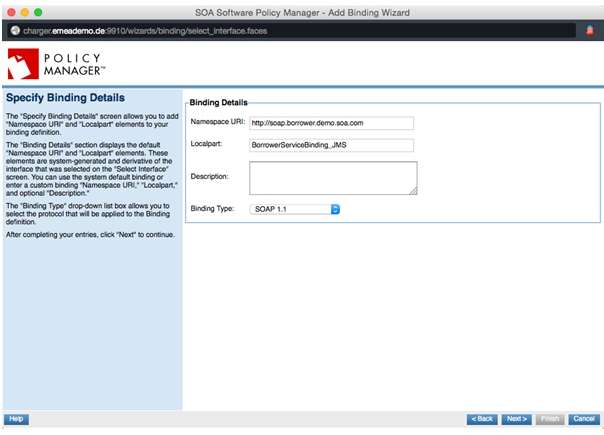
- Choose SOAP 1.1 or SOAP 1.2 according to your physical service.
- On the next screen, choose JMS for Transport and the Transport URI depending on the JMS server you are using.
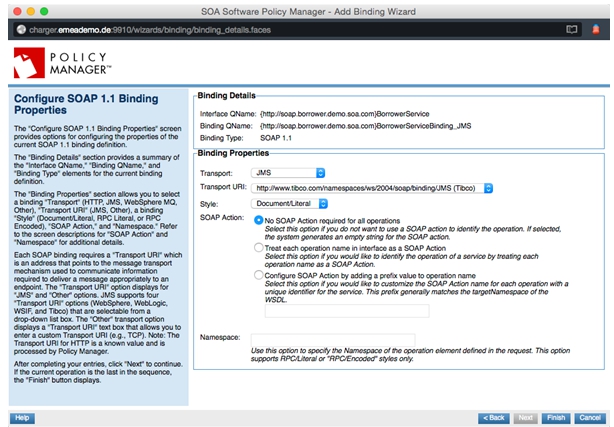
- For the SOAP action, check with the WSDL and JMS server setup for what option to choose.
Create Virtual Service for JMS
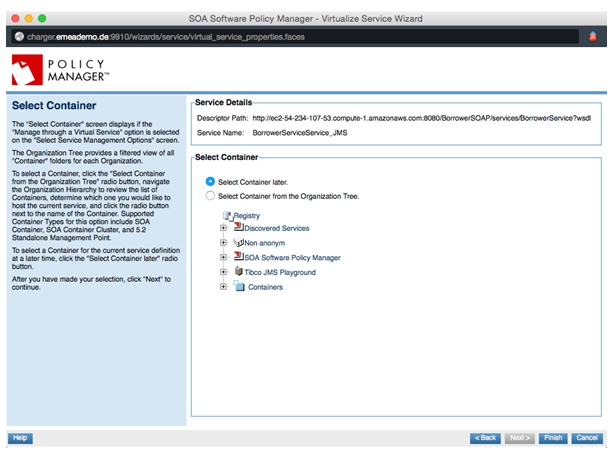
- Go to your physical service and select the Virtualize Service from the Actions Portlet.
Hint: Call the service YourServiceName_JMS so you can identify it easily.
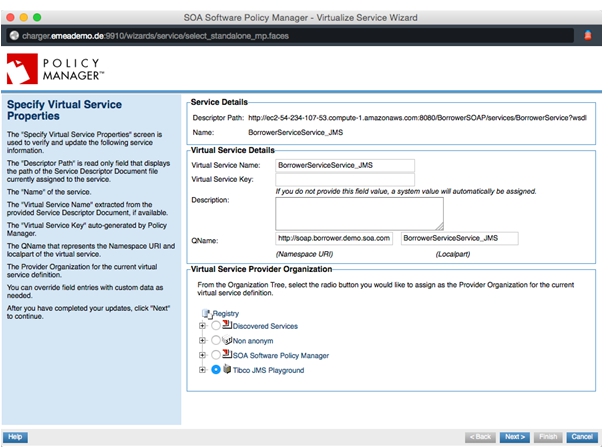
- Choose Select Container later, and then click Finish.
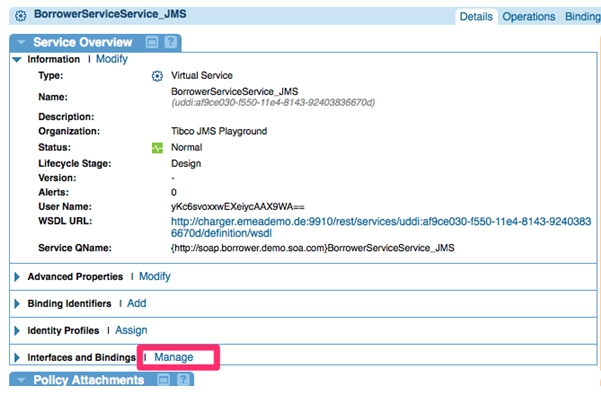
Manage Bindings
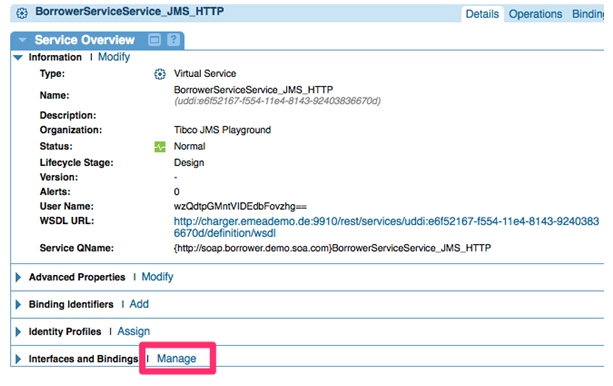
- In Service Overview > Interfaces and Bindings, select Manage Bindings.
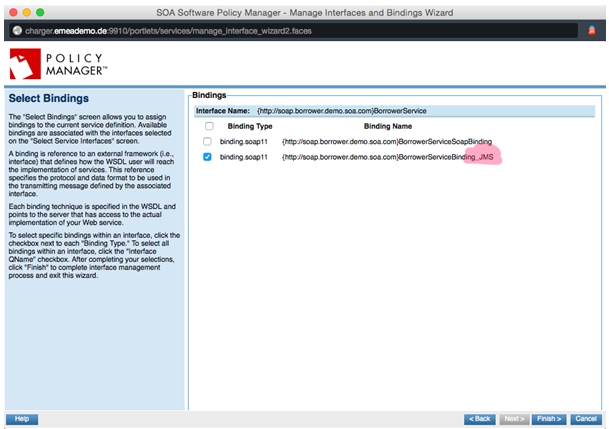
- Change the binding from the original SOAP/HTTP to the newly created SOAP/JMS.
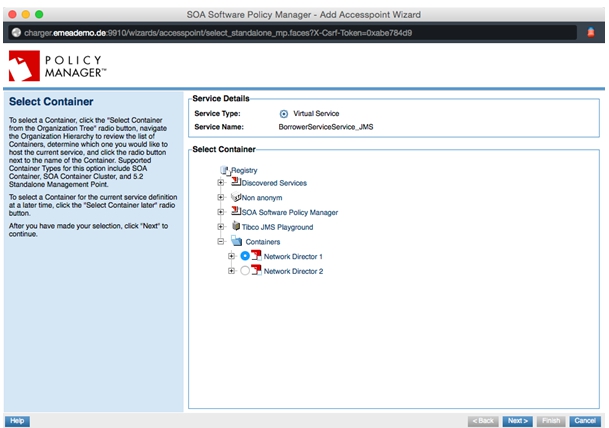
Add Access Point
- Add a new Access Point for your virtual service.

- Choose the Network Director instance which has been configured for JMS (see above).
- Choose the JMS listener for your JMS server.
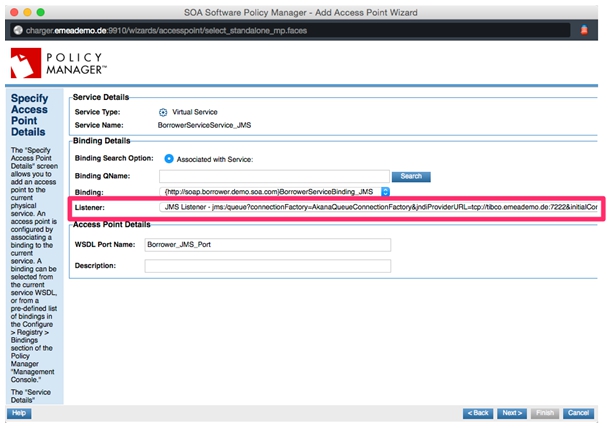
- Add the parameter for the destination queue.
- Define reply queue name.
For this use case, and depending on the configuration of the server, you must also define the reply queue name. This is either a fixed name, or you can choose to have a temporary one created on each request.
For a temporary queue, set the jms.use.temporaries to true.
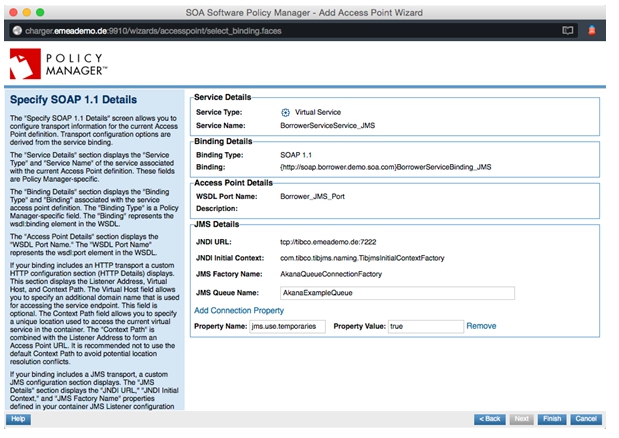
For a fixed reply queue, set the jms.replyto.name to the name of the reply queue.
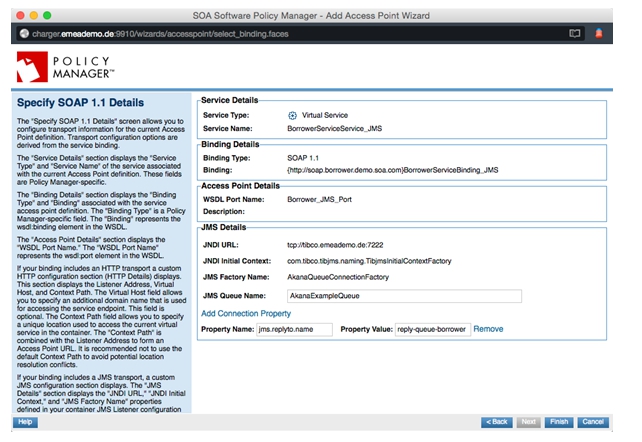
For additional parameters, see JMS Additional Properties.
Create Virtual Service for HTTP
- Virtualize your just created JMS virtual service.
- Hint: Name it YourServiceName_JMS_HTTP so you can identify it easily.
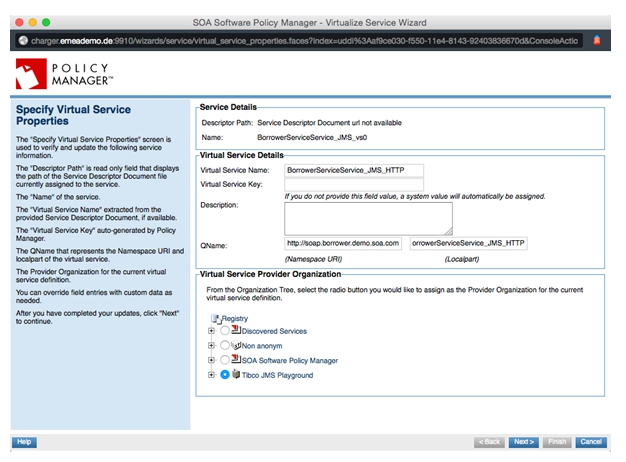
- Once again choose to Select Container later:
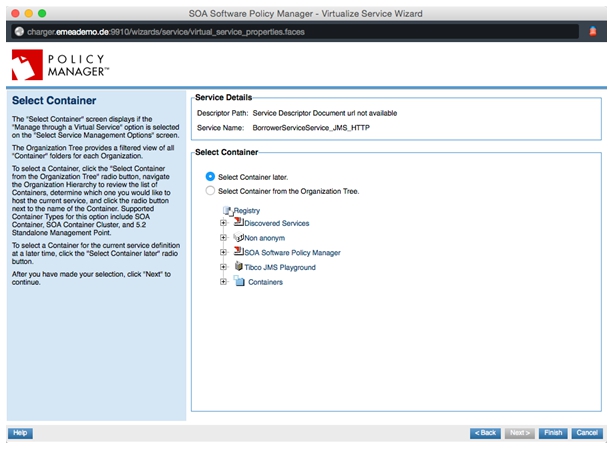
- Manage the binding of the virtual service you just created.
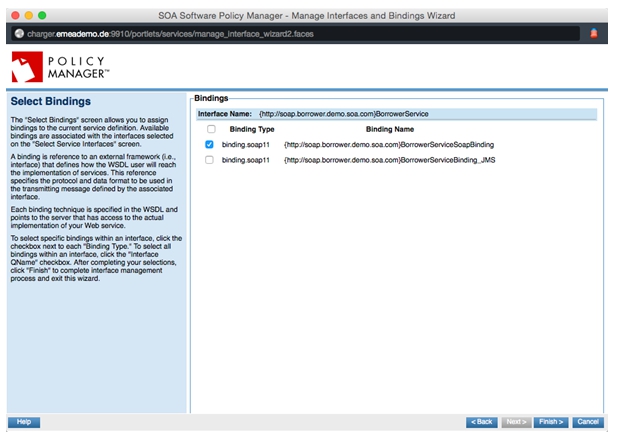
- Choose the non-JMS binding of the service (the opposite of what you did in the first virtual service). In this use case, the HTTP-based binding has been already generated at the creation of the physical service.
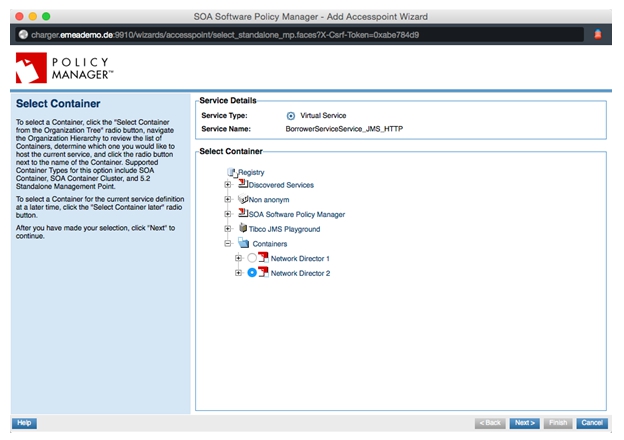
- Create an access point for the new virtual service.

- Choose a container with an HTTP binding. In typical scenarios, this is not the same container as the one with the JMS listener.
- Choose your HTTP listener.
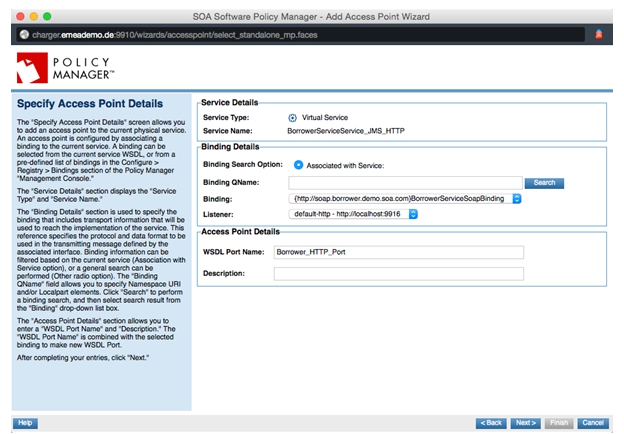
- Choose virtual host and context path. An example is shown below.
- Click Finish.
The configuration is complete. Copy the WSDL of this virtual service and start sending messages to the service. Be sure to have an authentication policy or contract applied.
Use Case 2: Existing JMS-Based WSDL
This use case is about having a WSDL with JMS binding included. This means we will have the physical service being JMS and consumed over a virtual HTTP-based service.
Create Physical Service
- Create a physical service using the existing WSDL with a JMS binding.
Checking WSDL
- Important note: Some JMS servers do provide vendor-specific JMS binding properties in the WSDL. Those entries might be in a format which cannot be imported directly into Policy Manager and therefore must be configured manually (see below). In this case, remove the wsdl:port element from the WSDL before importing.
<wsdl:service name="serviceESB">
  <wsdl:port name="serviceJMS" binding="tns:serviceJMS">
    <soap:address location=""/>
    <jndi:context>
      <jndi:property name="java.naming.factory.initial" type="java.lang.String">com.tibco.tibjms.naming.TibjmsInitialContextFactory</jndi:property>
      <jndi:property name="java.naming.provider.url" type="java.lang.String">tcp://tibco.emeademo.de:7221</jndi:property>
    </jndi:context>
    <jms:connectionFactory>QueueConnectionFactory</jms:connectionFactory>
    <!--The element targetAddress value (targetQueue) is the jndi name of the destination. Please replace this with physical destination name at the service consumption point.-->
    <jms:targetAddress destination="queue"> targetQueue</jms:targetAddress>
  </wsdl:port>
</wsdl:service>
Import WSDL
- Select Create Physical Service and import the WSDL.
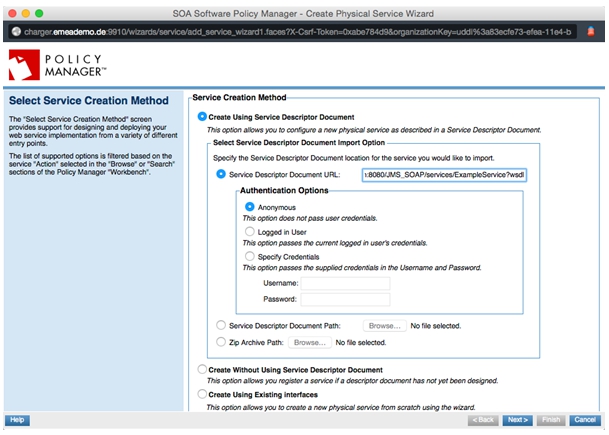
- Choose to virtualize the service later.
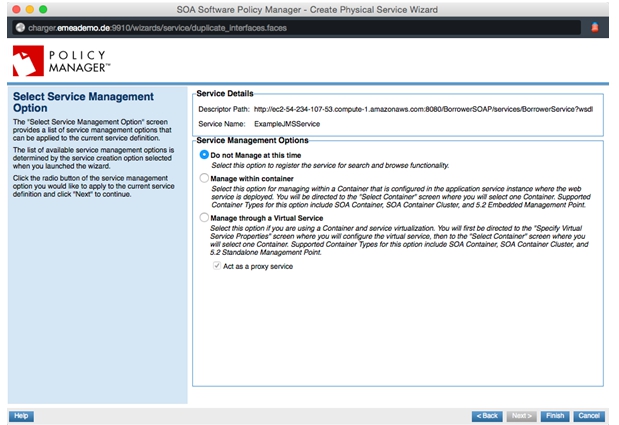
Add JMS Binding
- This task is only required if you need to remove the wsdl:port element (see above). Otherwise, the binding is already configured automatically.
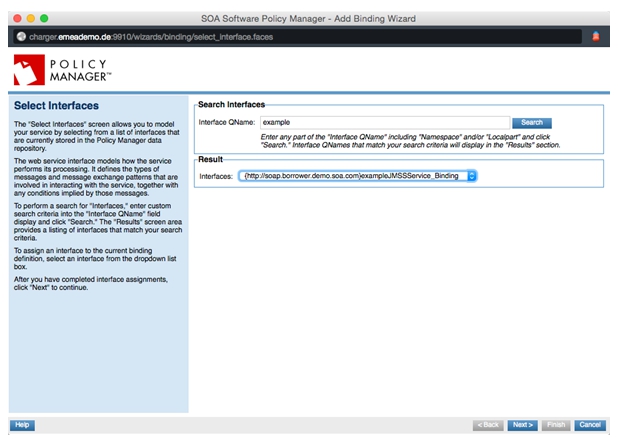
- Go to Configure > Bindings and select Add Binding.
- Choose the interface of your service:
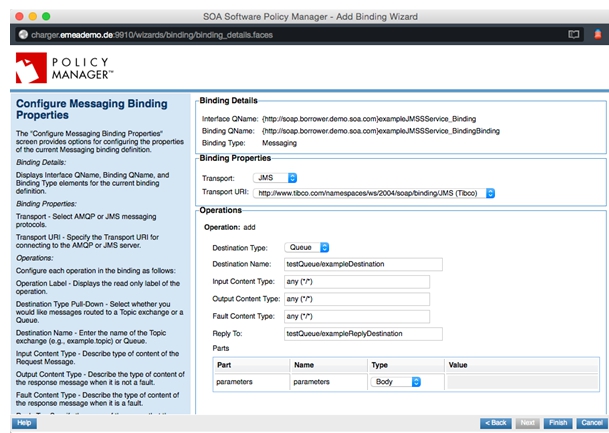
- For Binding Type, choose Messaging.
- Choose Transport JMS and Transport URI depending on your JMS server.
- For the operations in the service, choose the correct parameters for the queues and content types (see screenshot for example).
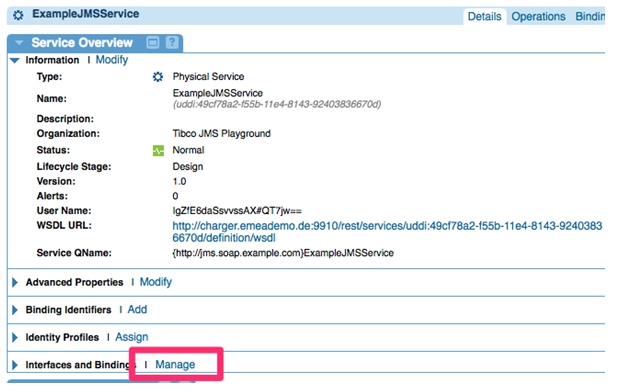
- Add the binding to the service by choosing the Manage link on Interfaces and bindings.
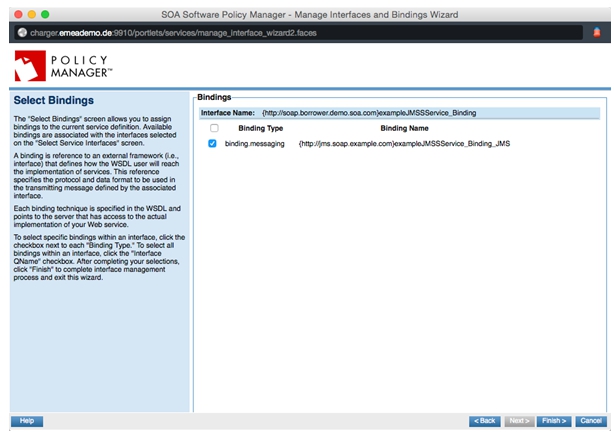
- Choose your created JMS binding.
Add Access Point
- Add an access point to the physical service.

- Choose the Network Director instance with JMS listener configured.
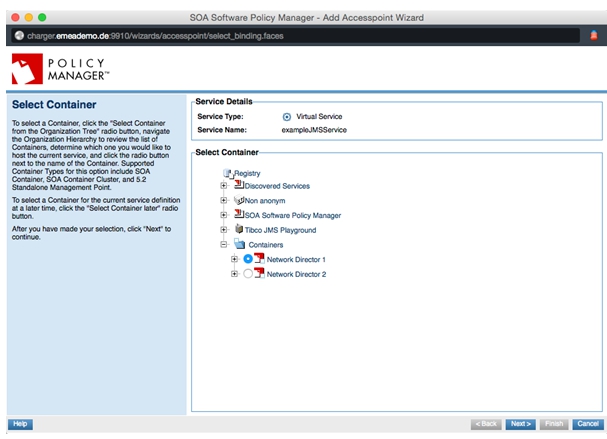
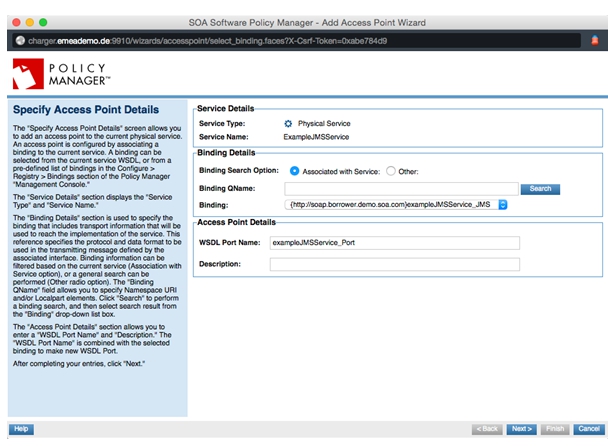
- Set the parameters according to the JMS server.
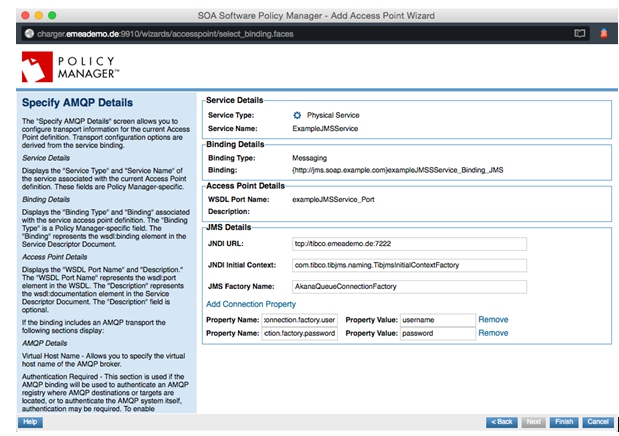
- JNDI URL—Address of the server, for example tibjmsnaming://tibco.emeademo.de:7222 (Tibco) or tcp://activemq.emeademo.de:61616 (ActiveMQ)
- JNDI Initial Context—com.tibco.tibjms.naming.TibjmsInitialContextFactory (Tibco) org.apache.activemq.jndi.ActiveMQInitialContextFactory (ActiveMQ)
- JMS Destination Factory Name—Depending on the JMS server configuration: for example, ConnectionFactory.
These parameters are inherited from the Network Director instance.
- If you need to enter credentials or other specific parameters for the connection to the server use the Add Property link and add the parameters. For the available options, see JMS Additional Properties.
Virtualize Service as HTTP
- Choose Virtualize Service on your physical service.
- Choose Select Container Later and click Next.
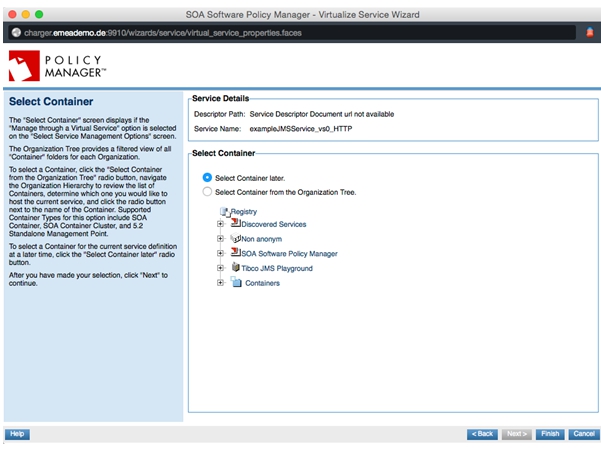
Create an HTTP binding
- Go to Configure > Bindings and select Add Binding.
- Use the search field to find your service in the drop-down list.
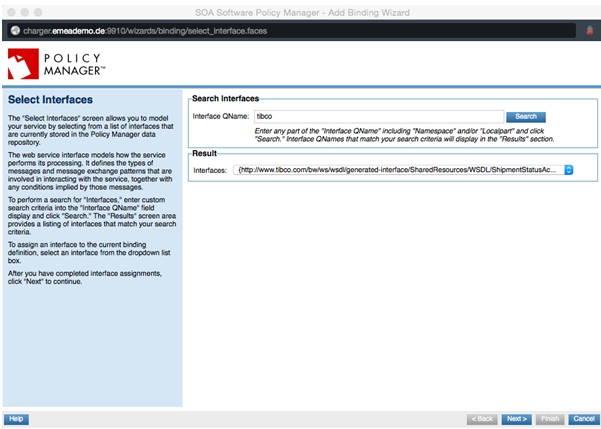
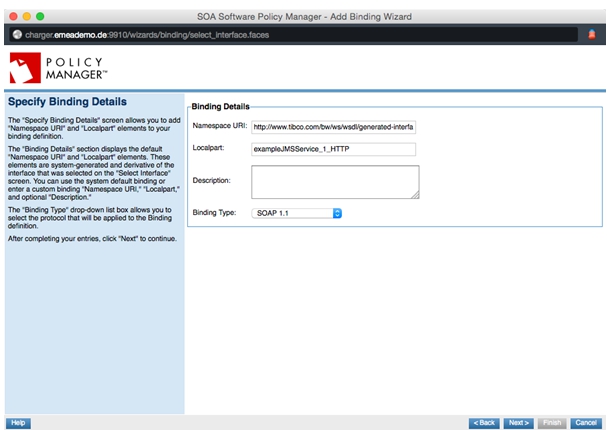
- Choose a Binding Type of SOAP 1.1 or 1.2.
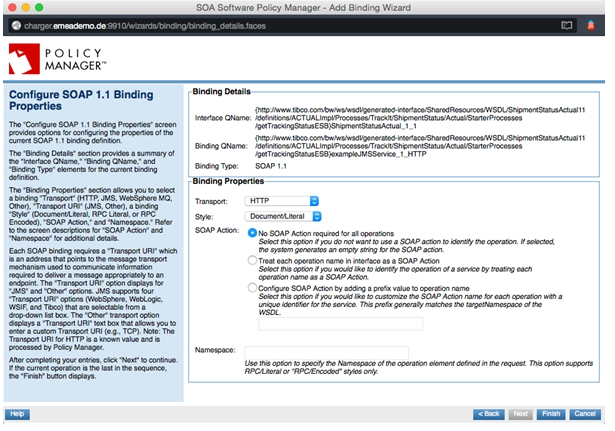
- Choose HTTP as transport. The parameters for SOAP Action depend on the actual service you are configuring.
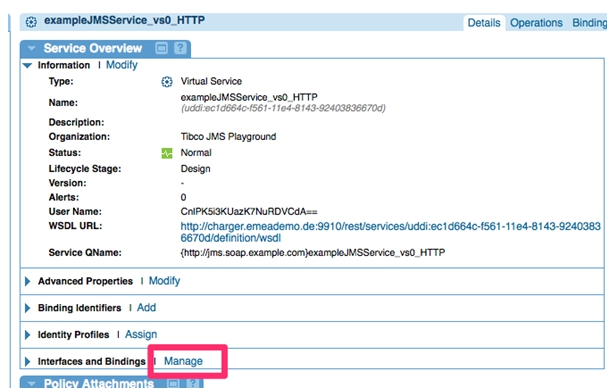
- Manage your virtual service’s Interfaces and Bindings.
- Choose the HTTP Binding you just created.
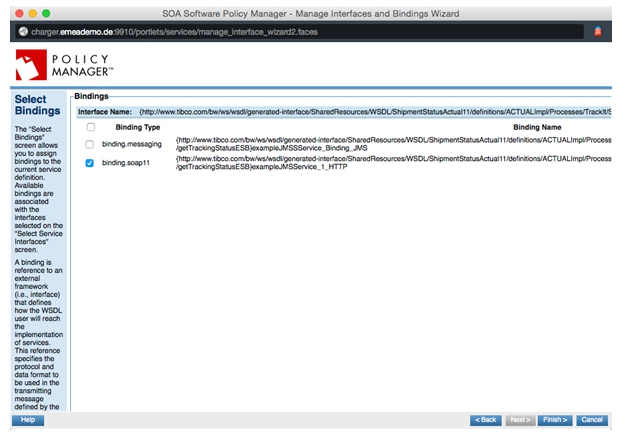
Add Access Point
- Add a new access point for your virtual service.

- Choose a container with an HTTP binding. In typical scenarios, this is not the same container as the one with the JMS listener.
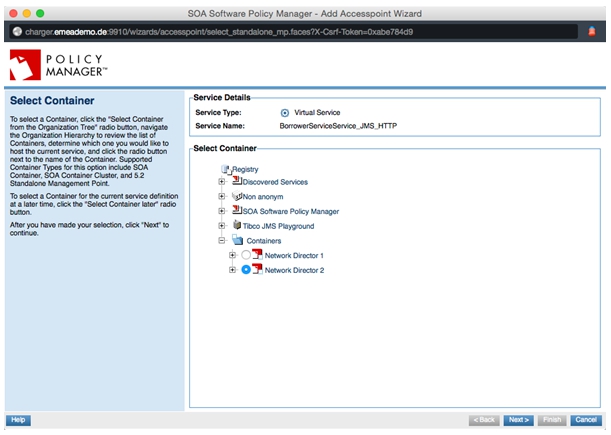
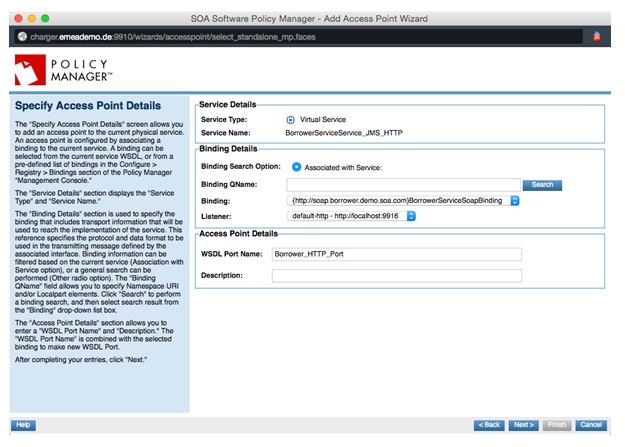
- Choose your HTTP listener.
- Choose virtual host and context path. An example is shown below.
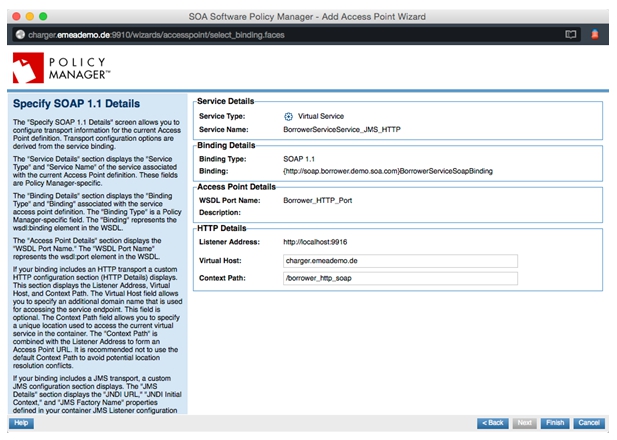
- Click Finish.
The configuration is complete. Copy the WSDL of this virtual service and start sending messages to the service. Be sure to have an authentication policy or contract applied.
Testing and Debugging
This section provides some general hints on how to test and debug your settings.
Set Auditing and Debug
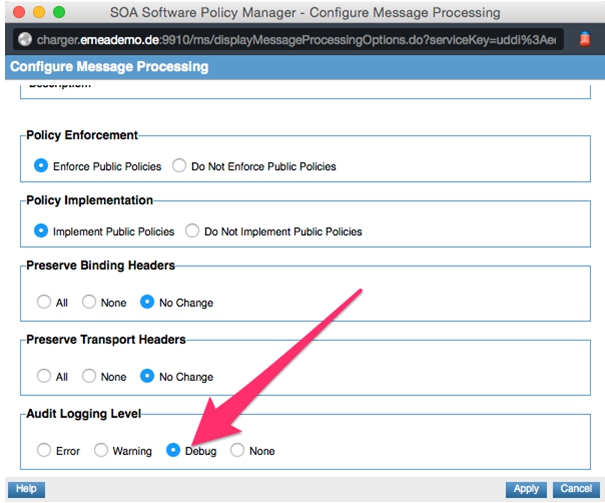
For all your virtual services, apply the Detailed Auditing Operational Policy.
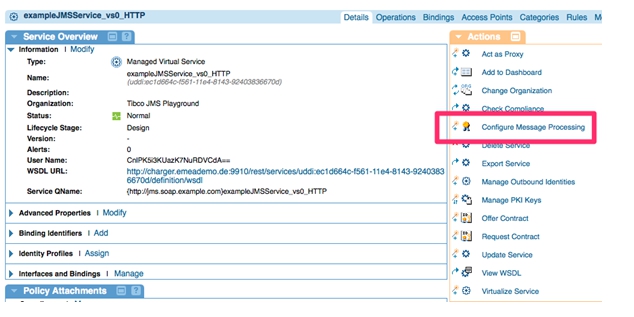
Also add debug settings to your virtual services by configuring the Audit Logging Level using Configure Message Processing.
Places to Look for Information
Typically you follow the way of the request through your virtual services, so the Monitoring tab of the virtual services (both Alerts and Logs) is a good point to start.
Also, the log files in the file system (instances/{yourNetworkDirector}/log) host some more detailed data. Keep in mind that in typical scenarios two Network Director instances (HTTP and JMS) are involved.
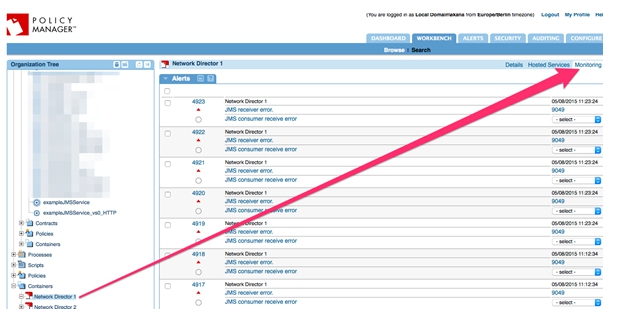
Finally, for the overall connection, the monitoring of Network Director with JMS configured might show some more logs:
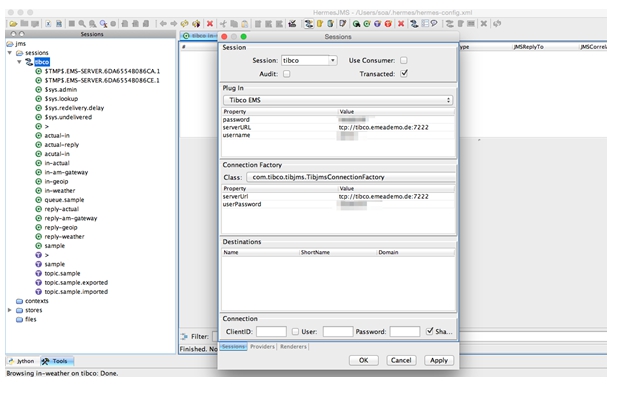
Configure HermesJMS to Have Access to the JMS Queues
For a Tibco EMS the documentation at http://tibcoadmin.com/tibco/ems/configuring-hermesjms-for-tibco-ems/ provides useful setup information.
Other JMS servers are configured in a similar way.
