Using the CORS Policy
Learn how to manage cross-origin requests for REST APIs using the CORS (Cross-Origin Resource Sharing) Policy. Includes information about configuring a tag allowlist, and use cases.
For information about using policies in the context of the Community Manager developer portal, see Business Policies.
On this page:
- Introduction
- Scope
- CORS Policy Assertion
- Configuration
- Activating a policy
- Attaching a policy
- CORS Policy: use cases for Policy Manager
Introduction
CORS (Cross-Origin Resource Sharing) enables users to access resources from within the browser serving a web page, and defines a way in which the browser and the server can interact to determine whether or not to allow the cross-origin request. This technique is commonly used on the web to load (that is, share) resources such as CSS style sheets, images, scripts, and other resources across sites. Abuse of this functionality can be a security risk; A CORS policy can be configured to limit or refuse cross-origin resource sharing.
Many HTTP (REST) APIs require support for CORS. Policy Manager provides a CORS Policy that dictates how cross-origin requests or CORS headers should be processed.
Specification:
Scope
A CORS policy applies only to REST APIs, or service endpoints implementing the HTTP binding. Accordingly, the CORS assertion is allowed to have the following Policy Subjects as defined in the WS-PolicyAttachment specification:
- Endpoint Policy Subject
- Binding Policy Subject
The WS-PolicyAttachment specification defines a set of WSDL/1.1 policy attachment points for each of the above Policy Subjects. A CORS policy assertion can be attached to the following physical WSDL policy attachment points:
- wsdl:port
- wsdl:binding
A CORS policy does not dictate behavior that is required by a consumer in order to exchange messages between a consumer and a Provider. Instead it dictates behavior that only the provider must follow. Therefore it is recommended that CORS policies be classified as “public” by including the gmp:Visibility attribute in the enclosing wsp:Policy element with a value of “public.”
The following is an example of a CORS policy attached to WSDL components:
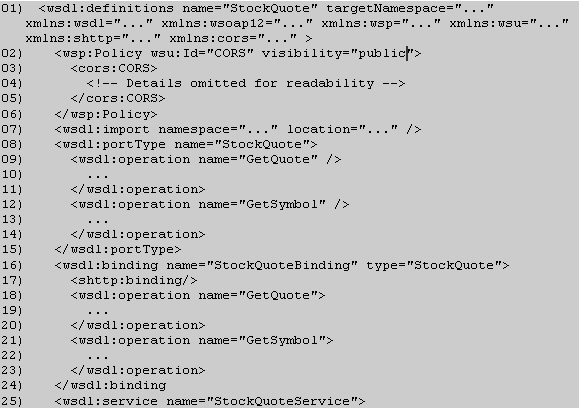
Lines 02 through 06 contain a policy named "CORS" that holds a CORS assertion.
CORS Policy Assertion
The CORS assertion specifies how responses to CORS requests, simple or preflight, will be made. Each CORS response header, with the exception of Access-Control-Request-Method, is represented with a sub-assertion to identify how it should be returned. The Access-Control-Request-Method response is determined by the API definition.
The syntax of the CORS policy assertion is illustrated and explained below.
Syntax

- cors:CORS
- CORS assertion element.
- cors:CORS/wsp:Policy
- This element defines additional requirements for the CORS policy.
- cors:CORS/wsp:Policy/cors:AllowOrgins
- This mandatory element is an assertion that specifies the set of origins that are allowed. If no child elements (allowed origins) are defined, the Access-Control-Allow-Origin response header is not displayed.
- cors:CORS/wsp:Policy/cors:AllowOrigins/cors:Origin
- This optional string element identifies an allowed origin. The string can either be a host name by itself or a protocol schema and host such as http://acme.com. If no scheme is specified, all schemes for that host are allowed.
- cors:CORS/wsp:Policy/cors:AllowCredentials
- This optional element is an assertion that when present indicates that the Access-Control-Allow-Credentials response header will be “true.” When absent it will be “false.”
- cors:CORS/wsp:Policy/cors:ExposeHeaders
- This optional element is an assertion that specifies what headers should be returned in the Access-Control-Expose-Headers response header. If it is not present, no headers will be returned.
- cors:CORS/wsp:Policy/cors:ExposeHeader/cors: Header
- This optional string element identifies an exposed header.
- cors:CORS/wsp:Policy/cors:AllowHeaders
- This optional element is an assertion that specifies what headers should be returned in the Access-Control-Allow-Headers response header. If it is not present, no headers will be returned.
- cors:CORS/wsp:Policy/cors:AllowHeaders/cors:Header
- This optional string element identifies an allowed header.
- cors:CORS/wsp:Policy/cors:MaxAge
- This optional element defines the time period in seconds. When the max age is set, a CORS request will not need to be preflighted, if it has already been preflighted, and falls within the max age duration.
- cors:CORS/wsp:Policy/cors:MaxAge /@duration
- This mandatory integer attribute holds the value that will be returned in the Access-Control-Max-Age response header.
An example of a CORS policy is given below.

The acme.com origin is permitted only on line 05. Credentials are allowed on line 07. The X-PINGOTHER header is allowed on line 09. A max duration of 3600000, or one hour, is stated on line 11. The CORS response headers that will be returned to a preflight request with an Origin of http://acme.com are shown below.
Note: Allowed Methods are outside the scope of the CORS Policy. Policy Manager returns methods based on how the service is defined. For example, if you defined a REST service in Policy Manager and defined operating using HTTP methods, Policy Manager would return the HTTP methods you defined for the service.

Note there is no Access-Control-Expose-Headers response header as there was no assertion present. Since the policy did not specify a protocol scheme for the allowed origin, a request with an Origin header of https://acme.com would also have been permitted.
Configuration Options
The policy includes the following configuration options:
| Option | Description |
|---|---|
| Max Age | This optional element defines the time period in seconds. When the max age is set, a CORS request will not need to be preflighted, if it has already been preflighted, and falls within the max age duration. |
| Allow Credentials | Enable sending credentials (that is, cookies and HTTP Authentication data) with requests. |
| Allow Origins |
List of origin domains that are permitted to make a request against the service via CORS. The origin domain is the domain from which the request originates. If no child elements (allowed origins) are defined, the Access-Control-Allow-Origin response header is not displayed. Each header can include one domain. |
| Allow Headers | Request headers that the origin domain might specify on the CORS request. |
| Expose Headers | Response headers that might be sent in the response to the CORS request and exposed by the browser to the request issuer. |
Configuration
Let's take a quick walkthrough of the CORS Policy configuration process to get you started.
Step 1: Add Policy
In Policy Manager, to create a CORS Policy instance, go to Policies > Operational Policies and choose Add Policy.
Step 2: Modify Policy
When you click Modify to make changes to the CORS Policy on the Policy Details page, the initial policy looks like this:
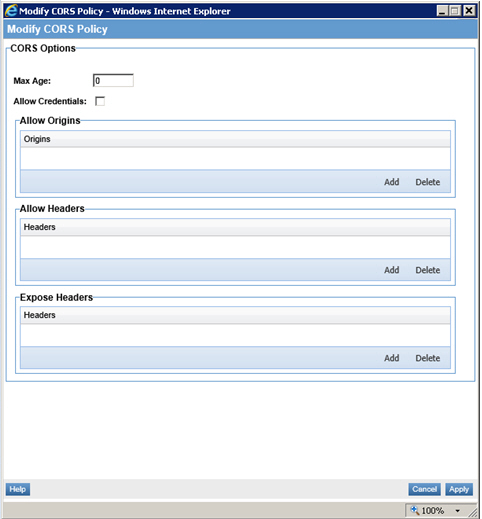
Configure the CORS Options based on your requirements.
Step 3: Activate and Attach Policy
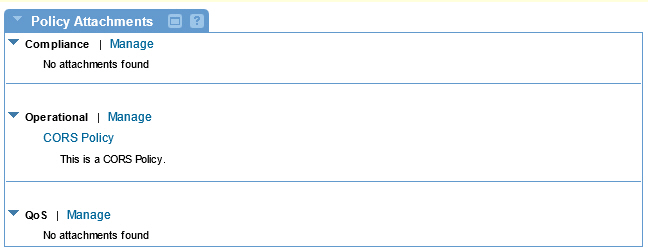
When the policy configuration is complete, activate the policy. You can then attach it to a web service at the Service level.
Step 4: Test Policy and View Monitoring Data
After you've attached the CORS Policy to a service, send a request to your service and view the results in your client. You can also go to the Services > Monitoring section to view the results for Logs (View Usage Record Details), Real Time Charts, and Historical Charts. Notes:
- If CORS is enabled for the service and there is a CORS policy assertion that matches the preflight request, the service responds with a status code 200 (OK), and includes the required Access-Control headers in the response.
- If CORS is not enabled for the service, the request is not preflighted.
- If the request does not contain the required CORS headers, the request is not preflighted and continues to run normally, and the browser behaves accordingly.
- If the Origin header is present, this indicates that the request is a CORS request. The service will then check the matching CORS policy assertion configuration for a match. If found, the Access-Control headers are added to the response and sent back to the client. If not found, the CORS Access-Control headers are not returned.
For more information on the configuration and test cycle, see Policy: use cases for Policy Manager below.
Activating a policy
When you create and configure a policy, the policy is in Draft state. When the policy configuration is complete, activate the policy: click Activate Policy and then confirm. See Activate a Policy.
A policy in Draft state is not available for general use. Once you activate the policy, it is in Active state and is available for use.
Attaching a policy
To use the policy, go to the Policies folder in the respective organization and attach the policy to a web service, binding, or binding operation.
CORS Policy: use cases for Policy Manager
This section provides a list of Policy Manager-specific usage scenarios for the CORS Policy.
It includes:
- Scenario 1: Send Preflight and CORS Response Headers
- Scenario 2: CORS with Credentials (Basic Authentication Policy)
- Scenario 3: Allow All Origins
- Scenario 4: Allow Custom Headers (Cookie Authentication)
- Scenario 5: CORS Preflight Limitation within MaxAge Defined (in seconds)
- Scenario 6: Origins Mismatch during Preflight
Scenario 1: Send Preflight and CORS Response Headers
- Create Policy Manager instance.
- Create a physical REST service (Example service name: PS - REST Borrower).
- Virtualize PS on Network Director (Example service name: VS1).
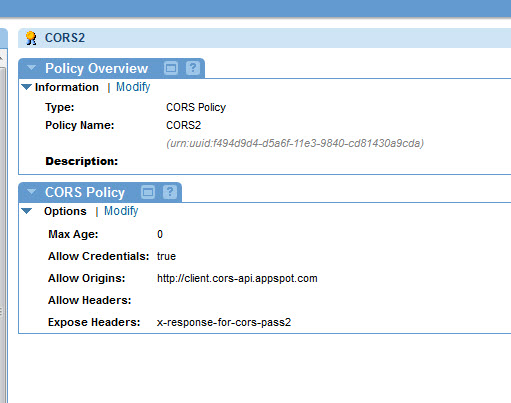
- Create CORS Policy with the following configuration:
- Max Age: 0
- Allow Credentials: true
- Allow Origins: http://client.cors-api.appspot.com
- Expose Headers: x-response-for-cors-pass2
- Attach the policy to the VS1 service.
- Navigate to the client: http://client.cors-api.appspot.com/client .
- Provide the URL of the VS1 resource for the DELETE method.
Example: http://10.7.20.47:9902/prd/111111111.
- Select Delete Method.
- Enable Developer tool for Browser (F12 for Chrome or Firebug in case of Firefox).
- Navigate to Network tab.
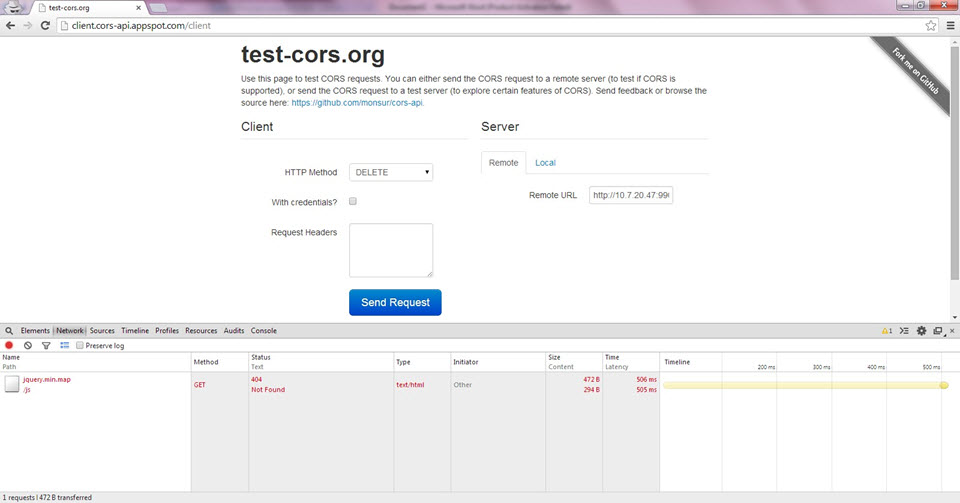
- The client over Chrome:
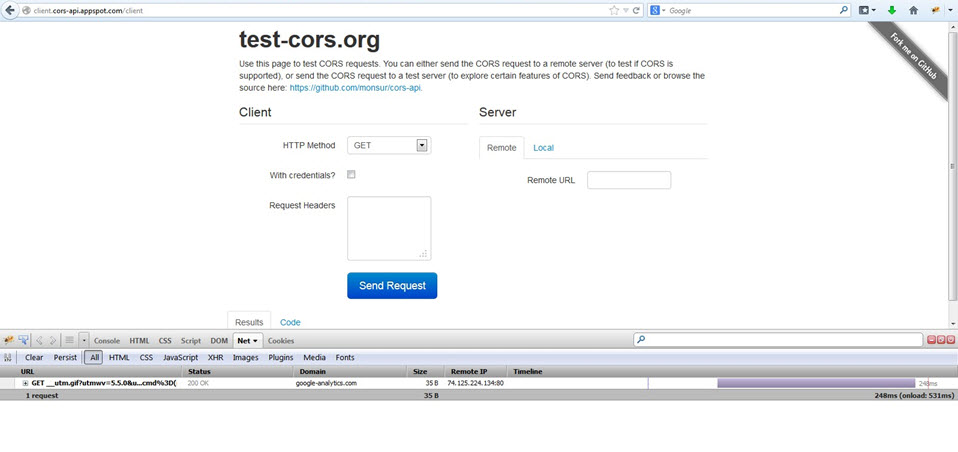
- The client over Firefox:
- Send request to DELETE method.
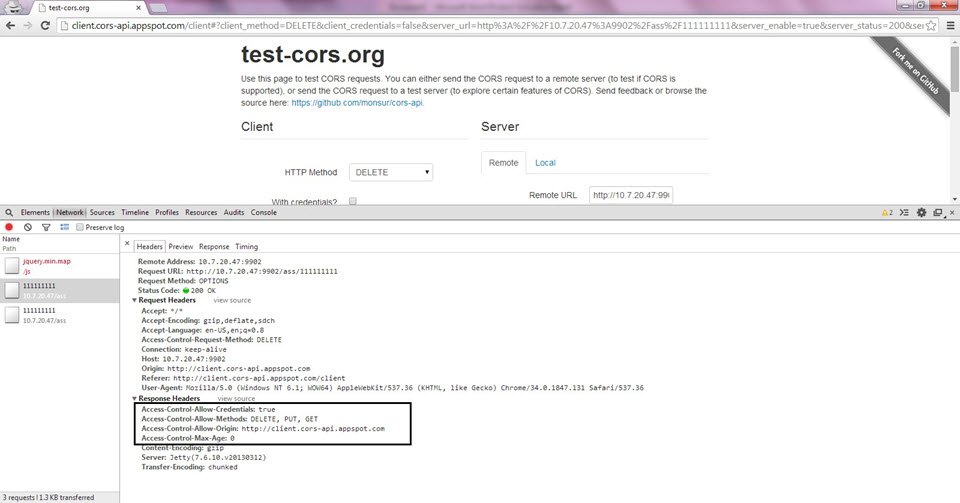
- Initially a preflight message is sent (OPTION method is used to send preflight request). If the request needs to be forwarded to the downstream Physical service then the OPTIONS method needs to be added to the Physical service design, see How do I add a resource in API Designer?
- After the success of preflight request, depending on the headers sent in response of preflight, the browser sends the actual DELETE request to the API.
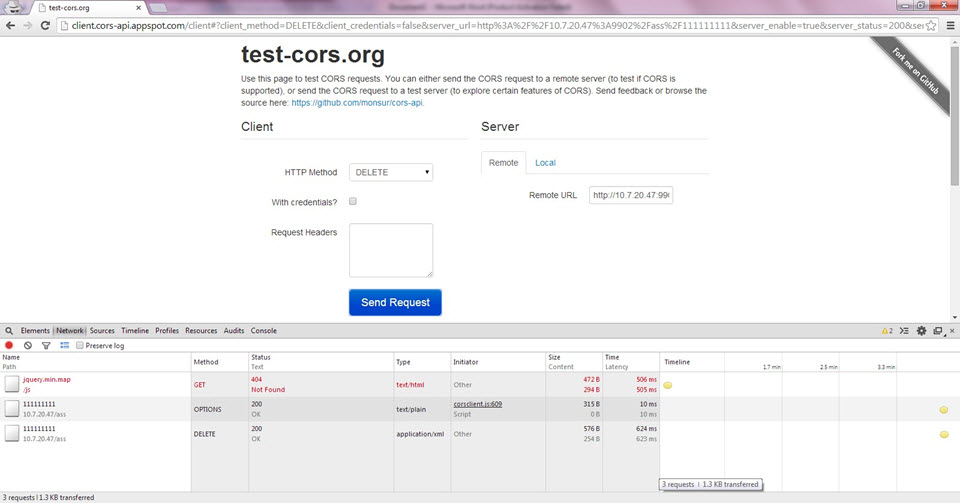
- Click the OPTIONS request to view the headers sent by the client: Access-Control-Request-Method and Origin.
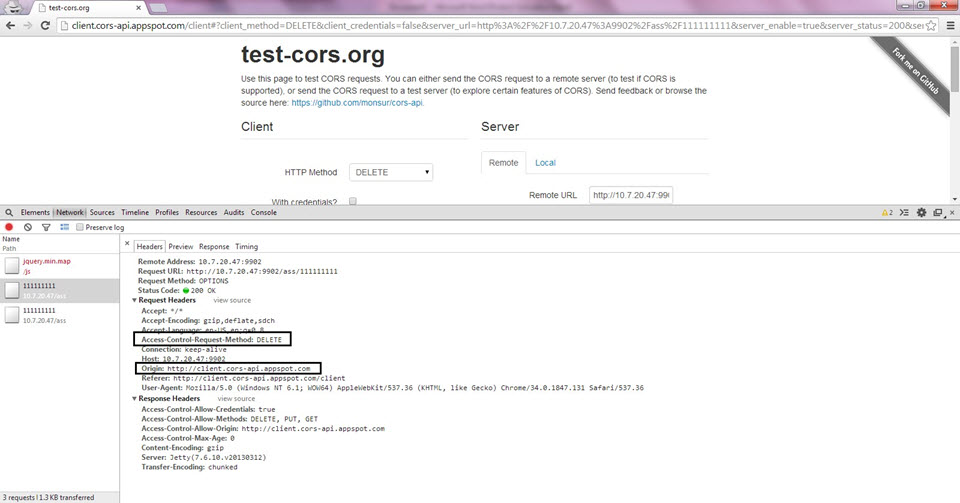
- Review the response headers, which should look like this:
- Access-Control-Allow-Credentials: true
- Access-Control-Allow-Methods: DELETE, PUT, GET
- Access-Control-Allow-Origin: http://client.cors-api.appspot.com
- Access-Control-Max-Age: 0
- Optional: To see the same thing in the usage data, enable auditing on the API.
- Since the preflight was successful, the actual DELETE request is sent following that by the browser.
- View the request and response headers:
- Access-Control-Allow-Credentials: true
- Access-Control-Allow-Origin: http://client.cors-api.appspot.com
- Access-Control-Expose-Headers: x-response-for-cors-pass2
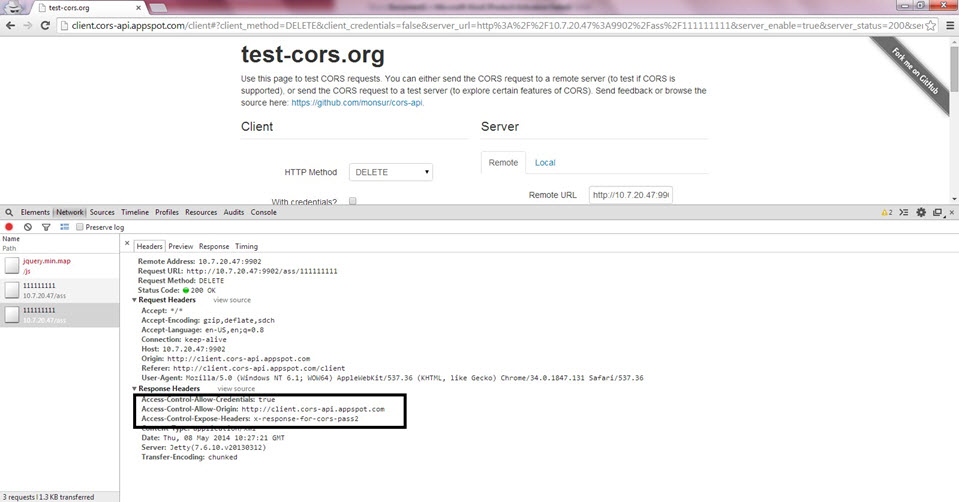
- All the headers provided in Expose headers in the policy should be displayed.
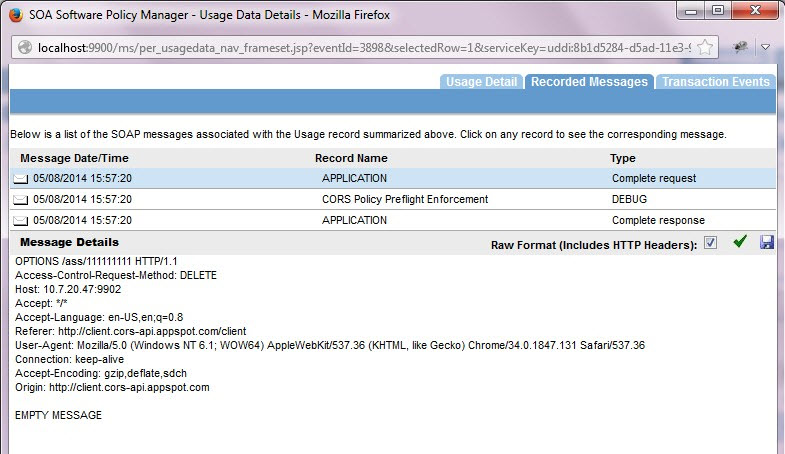
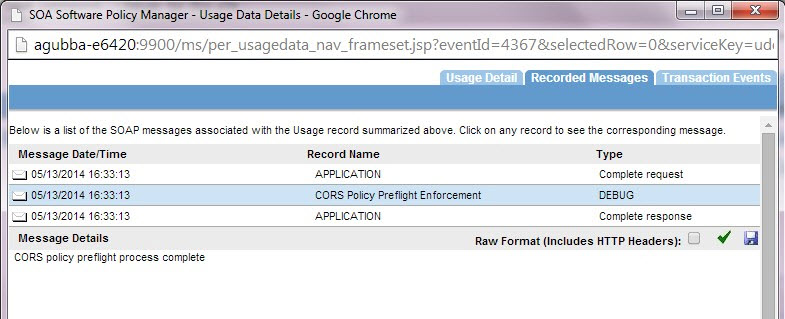
- Optional: To see the same thing in the usage data, enable auditing on the API.
- Preflight request message:
- Preflight policy enforcement:
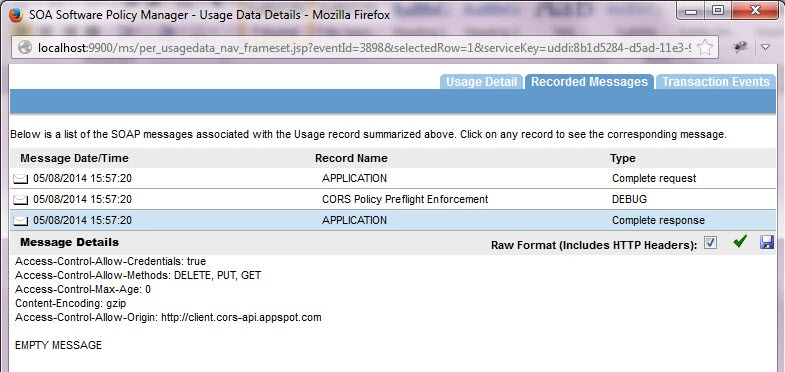
- Preflight response message:
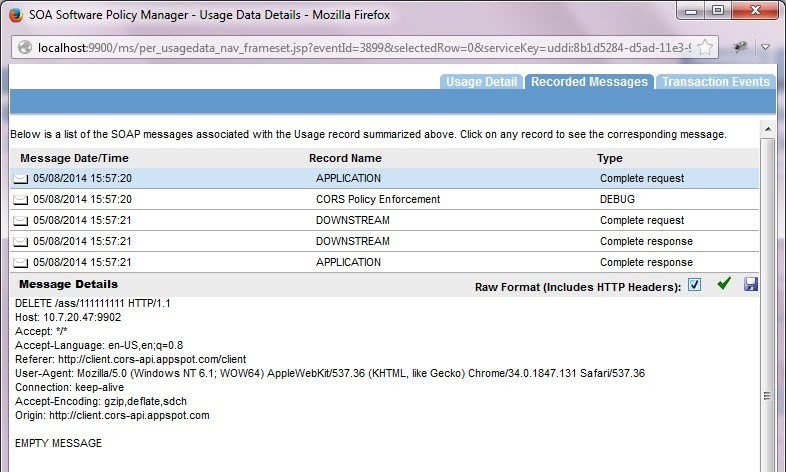
- DELETE request:
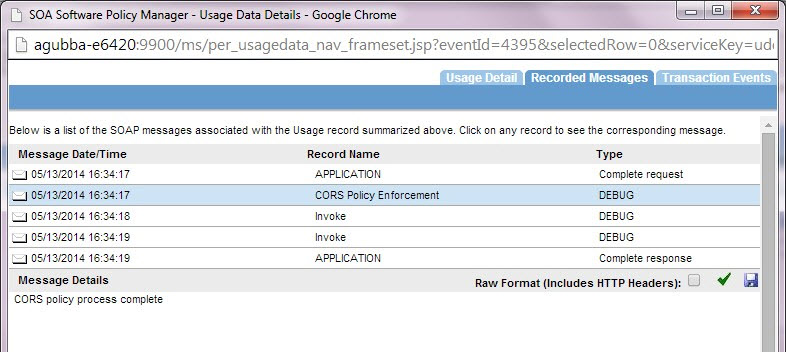
- CORS policy enforcement during actual request:
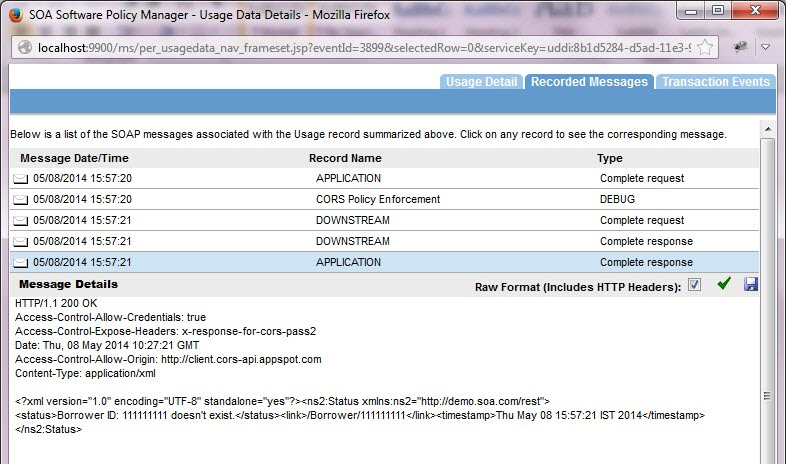
- Delete response message:
Scenario 2: CORS with Credentials (Basic Authentication Policy)
- Create Policy Manager instance.
- Create a physical REST service (Example service name: PS – REST Borrower)
- Virtualize the PS on Network Director (Example service name: VS1)
- Create CORS policy with the following configuration:
- Allow Credentials component must be set to true:
- Max Age: 0
- Allow Credentials: true
- Allow Origins: http://client.cors-api.appspot.com
- Allow Headers:
- Expose Headers: x-response-for-cors-pass2
- Attach the policy to the VS1 service.
- Attach Basic authentication policy to the VS1 service.
- Navigate to the client: http://client.cors-api.appspot.com/client.
- Provide the URL of the VS1 resource for the DELETE method.
Example: http://10.7.20.47:9902/prd/111111111.
- Select Delete Method.
- Select with Credentials check box in the client.
- Enable Developer tool for Browser (F12 for Chrome or Firebug in case of Firefox).
- View network monitoring for the browser.
- Send request to DELETE method.
- The client prompts for credentials.
- Provide valid credentials for basic authentication.
- Initially a preflight message is sent (OPTION method is used to send preflight request).
- After the success of preflight request, depending on the headers sent in response of preflight, the browser sends the actual DELETE request to the API.
- If the Allow Credentials flag is true in the policy, the DELETE request is sent to the service.
- Click the OPTIONS request to view the headers sent by the client: Access-Control-Request-Method and Origin.
- Review the response headers, which should look like this:
- Access-Control-Allow-Credentials: true
- Access-Control-Allow-Methods: DELETE, PUT, GET
- Access-Control-Allow-Origin: http://client.cors-api.appspot.com
- Access-Control-Max-Age: 0
- Optional: To see the same thing in the usage data, enable auditing on the API.
- Since the preflight was successful, the actual DELETE request is sent following that by the browser.
- View the request and response headers:
- Access-Control-Allow-Credentials: true
- Access-Control-Allow-Origin: http://client.cors-api.appspot.com
- Access-Control-Expose-Headers: x-response-for-cors-pass2
- Optional: To see the same thing in the usage data, enable auditing on the API.
Scenario 3: Allow All Origins
- Create Policy Manager instance.
- Create a physical REST service (Example service name: PS - REST Borrower)
- Virtualize the PS on Network Director (Example service name: VS1).
- Create CORS policy the following configuration:
- Max Age: 0
- Allow Credentials: true
- Allow Origins: *
- Allow Headers:
- Expose Headers: x-response-for-cors-pass2
- Attach the policy to the VS1 service.
- Navigate to the client: http://client.cors-api.appspot.com/client.
- Provide the URL of the VS1 resource for the DELETE method.
Example: http://10.7.20.47:9902/prd/111111111.
- Select Delete Method.
- Enable Developer tool for Browser (F12 for Chrome or Firebug in case of Firefox).
- Navigate to Network tab.
- Send request to DELETE method.
- Initially a preflight message is sent (OPTION method is used to send preflight request).
- After the success of preflight request, depending on the headers sent in response of preflight, the browser sends the actual DELETE request to the API.
- Click the OPTIONS request to view the headers sent by the client: Access-Control-Request-Method and Origin.
- Review the response headers, which should look like this:
- Access-Control-Allow-Credentials: true
- Access-Control-Allow-Methods: DELETE, PUT, GET
- Access-Control-Allow-Origin: *
- Access-Control-Max-Age: 0
- All the Origins should be allowed. This can be verified by sending the request from a different client.
Scenario 4: Allow Custom Headers (Cookie Authentication)
- Create Policy Manager instance.
- Create a physical REST service (Example service name: PS –REST Borrower)
- Virtualize the PS on Network Director (Example service name: VS1).
- Create CORS policy with the following configuration. Allow Headers component must be set to Cookie so as to allow cookie to be passed to the policy:
- Max Age: 0
- Allow Credentials: true
- Allow Origins: http://client.cors-api.appspot.com
- Allow Headers: Cookie
- Expose Headers: x-response-for-cors-pass2
- Attach the policy to the VS1 service.
- Add Cookie Identity system.
- Attach Cookie authentication policy to the VS1 service.
- Navigate to the client: http://client.cors-api.appspot.com/client .
- Provide the URL of the VS1 resource for the DELETE method.
Example: http://10.7.20.47:9902/prd/111111111.
- Select Delete Method.
- Select with Credentials check box in the client.
- Enable Developer tool for Browser (F12 for Chrome or Firebug in case of Firefox).
- View network monitoring for the browser.
- Send request to DELETE method.
- The client prompts for credentials.
- Provide valid credentials for basic authentication.
- Initially a preflight message is sent (OPTION method is used to send preflight request).
- After the success of preflight request, depending on the headers sent in response of preflight, the browser sends the actual DELETE request to the API.
- If the Allow Credentials flag is true in the policy, the DELETE request is sent to the service.
- Click the OPTIONS request to view the headers sent by the client: Access-Control-Request-Method and Origin.
- Review the response headers, which should look like this:
- Access-Control-Allow-Credentials: true
- Access-Control-Allow-Methods: DELETE, PUT, GET
- Access-Control-Allow-Origin: http://client.cors-api.appspot.com
- Access-Control-Max-Age: 0
- Optional: To see the same thing in the usage data, enable auditing on the API.
- Since the preflight was successful, the actual DELETE request is sent following that by the browser.
- In the response for DELETE request, Authentication Cookie is generated.
- Send Cookie in Custom Headers in the Client and Disable credentials option.
- Send request, and the request should pass the Cookie. Cookie authentication should be successful when sending a valid cookie.
Scenario 5: CORS Preflight Limitation within MaxAge Defined (in seconds)
- Create Policy Manager instance.
- Create a physical REST service (Example service name: PS – REST Borrower)
- Virtualize the PS on Network Director (Example service name: VS1)
- Create CORS policy with the following configuration:
- Max Age: 10
- Allow Credentials: true
- Allow Origins: http://client.cors-api.appspot.com
- Allow Headers:
- Expose Headers: x-response-for-cors-pass2
- Attach the policy to the VS1 service.
- Navigate to the client: http://client.cors-api.appspot.com/client.
- Provide the URL of the VS1 resource for the DELETE method.
Example: http://10.7.20.47:9902/prd/111111111.
- Select the Delete method.
- Enable Developer tool for Browser (F12 for Chrome or Firebug in case of Firefox).
- View network monitoring for the browser.
- Send request to DELETE method.
- Initially a preflight message is sent (OPTION method is used to send preflight request).
- After the success of preflight request, depending on the headers sent in response of preflight, the browser sends the actual DELETE request to the API.
- Click the OPTIONS request to view the headers sent by the client: Access-Control-Request-Method and Origin.
- Review the response headers, which should look like this:
- Access-Control-Allow-Credentials: true
- Access-Control-Allow-Methods: DELETE, PUT, GET
- Access-Control-Allow-Origin: http://client.cors-api.appspot.com
- Access-Control-Max-Age: 0
- Optional: To see the same thing in the usage data, enable auditing on the API.
Since the preflight was successful, the actual DELETE request is sent following that by the browser.
- Send a request again from client with in the MaxAge limit (for example, 10 seconds).
The preflight request is not sent because the previous preflight request is cached already.
- After the MaxAge limit is exceeded, send a request again.
Now, the request is again preflighted.
Scenario 6: Origins Mismatch during Preflight
- Create Policy Manager instance.
- Create a physical REST service (Example service name: PS – REST Borrower).
- Virtualize the PS on Network Director (Example service name: VS1).
- Create CORS policy with the following configuration:
- Max Age: 10
- Allow Credentials: true
- Allow Origins: http://abc.com
- Allow Headers:
- Expose Headers: x-response-for-cors-pass2
- Attach the policy to the VS1 service.
- Navigate to the client: http://client.cors-api.appspot.com/client .
- Provide the URL of the VS1 resource for the DELETE method.
Example: http://10.7.20.47:9902/prd/111111111.
- Select Delete Method.
- Enable Developer tool for Browser (F12 for Chrome or Firebug in case of Firefox).
- View network monitoring for the browser.
- Send request to DELETE method.
- Initially a preflight message is sent (OPTION method is used to send preflight request).
- After the success of preflight request, depending on the headers sent in response of preflight, the browser sends the actual DELETE request to the API.
- Click the OPTIONS request to view the headers sent by the client: Access-Control-Request-Method and Origin.
- Since the Origin is not a match, preflight is not sent and the request is processed as usual.
- The response headers related to CORS are also not seen.