Using the HTTP Security Policy
Learn how to specify the transport security requirements for web services (SOAP or REST) with HTTP or HTTPS as the underlying transport protocol, using the HTTP Security Policy.
For information about using policies in the context of the Community Manager developer portal, see Business Policies.
For a use case illustrating use of this policy, see How To Implement 2-Way SSL Using Policy Manager.
On this page:
- Introduction
- Creating and Configuring the HTTP Security Policy
- Specify HTTP Basic Authentication Options
- Specify HTTP Digest Authentication Options
- Specify SAML Bearer Token Options
- Specify JWT Bearer Token Options
- Specify Client Certificate Authentication Options
- Specify Cookie Authentication Options
- Configuring Security Audit Options
- Activating a policy
- Attaching a policy
Introduction
The HTTP Security Policy is an operational policy that specifies the transport security requirements for web services (SOAP or REST) using HTTP or HTTPS as the underlying transport protocol.
Options include:
- HTTP Basic Authentication—Allows a client to provide credentials in the form of a username and password with making a request.
- HTTP Digest Authentication—Allows a client to negotiate credentials using the HTTP protocol. It supersedes unencrypted use of Basic Authentication and makes it possible to establish a user identity securely without sending a password in plain text over the network.
- SAML Bearer Token Authentication—Allows a client to provide credentials in the form of a SAML token that uses the Bearer subject confirmation method when making a request.
- JWT Bearer Token Authentication—Allows a client to provide credentials in the form of a JWT Bearer token.
- Client Certificate—Allows authentication based on an X.509 certificate provided by the client. The certificate can be taken from the Secure Sockets Layer (SSL) protocol context. This option requires that your client application use SSL to make a secure connection with the application server. The application server must enable mutual authentication for the SSL connection.
- Cookie Authentication—Allows authentication by passing user credentials through HTTP cookies when making a request. The cookie is typically issued to clients by a third-party identity provider and Access Manager software for single sign-on purposes.
Creating and Configuring the HTTP Security Policy
There are two main tasks in configuring the HTTP Security Policy:
- Creating the policy. See To create the HTTP Security policy.
- Configuring the policy details. See To configure the HTTP Security policy.
To create the HTTP Security policy
- Log in to Policy Manager: {protocol}://{hostname}:{port}/ms/index.do.
- Go to Workbench > Browse and choose the organization that includes services you want to add this policy to.
- Go to the Policies > Operational folder.
- In the right pane, at the Policies Summary page, click Add Policy.
- On the Select Policy Creation Option page, in the Add Policy field, choose HTTP Security Policy, and then click Next.
- On the Specify Policy Details page, provide:
- Name (required)
- Policy Key (optional)
- Description (optional)
- Click Finish and then click Close.
To configure the HTTP Security policy
- Create the policy as covered above.
- At the Policies Summary page, in the HTTP Security Policy section, click Modify. The Select Authentication options page appears, as shown below.
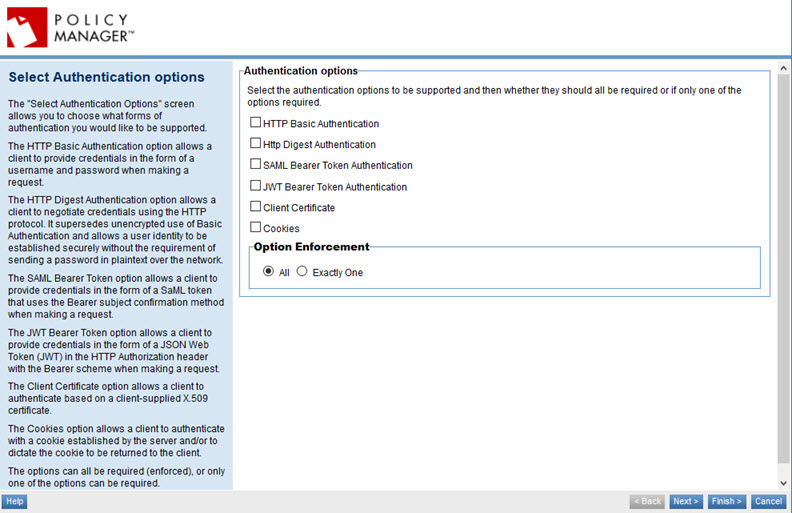
- Choose one or more authentication options and click Next.
- The page that's next, and the sequence of pages, is determined by the authentication option or options you choose. Possible pages, in sequence, are listed below. Specify values. For details of the choices available, refer to the information for each page:
- HTTP Basic Authentication: see Specify HTTP Basic Authentication Options
- HTTP Digest Authentication: see Specify HTTP Digest Authentication Options
- SAML Bearer Token Authentication: see Specify SAML Bearer Token Options
- JWT Bearer Token Authentication: see Specify JWT Bearer Token Options
- Client Certificate: see Specify Client Certificate Authentication Options
- Cookies: see Specify Cookie Authentication Options
- After each page, click Next.
- When you've set up the basic information for each authentication type you selected, the Specify Security Audit Options page appears. Choose options. For more information, refer to Configuring HTTP Security Audit Options below.
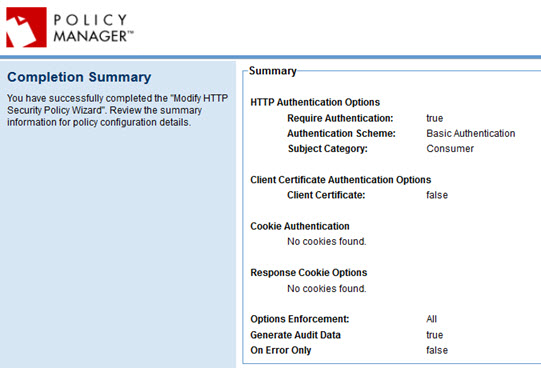
- When done, click Finish. The completion summary is displayed. An example is shown below.
- Click Close.
Once the policy is configured, you can attach it to a service.
Specify HTTP Basic Authentication Options
If you choose HTTP Basic Authentication, you'll see the page below.
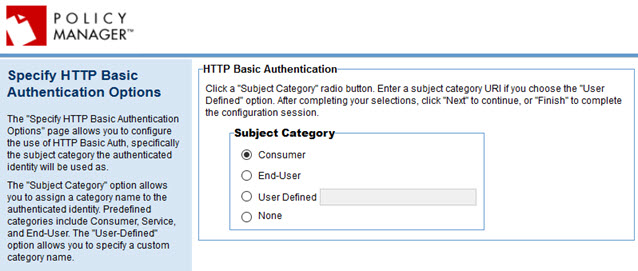
To configure basic authentication options
- Specify the subject category the authenticated identity will be used as. You can choose:
- Consumer (the default)
- End-User
- User-defined: specify the subject category you want to use
- None: no subject category will be used.
- Click Next to specify security audit options. See Configuring Security Audit Options below.
Specify HTTP Digest Authentication Options
If you choose HTTP Digest Authentication, you'll see the page below.
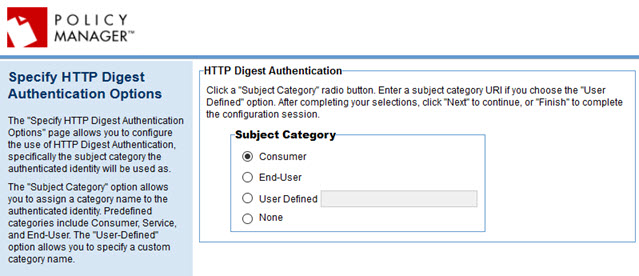
To configure http digest authentication options
- Specify the subject category the authenticated identity will be used as. You can choose:
- Consumer (the default)
- End-User
- User-defined: specify the subject category you want to use
- None: no subject category will be used.
- Click Next to specify security audit options. See Configuring Security Audit Options below.
Specify SAML Bearer Token Options
If you choose SAML Bearer Token, you'll see the page below.
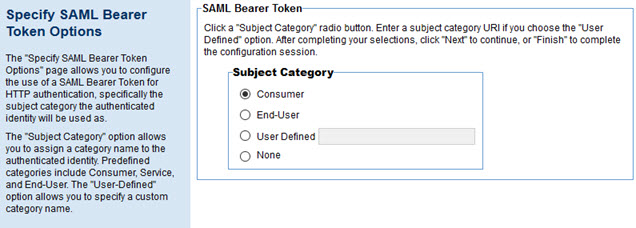
To configure SAML bearer token authentication options
- Specify the subject category the authenticated identity will be used as. You can choose:
- Consumer (the default)
- End-User
- User-defined: specify the subject category you want to use
- None: no subject category will be used.
- Click Next to specify security audit options. See Configuring Security Audit Options below.
Specify JWT Bearer Token Options
If you choose JWT Bearer Token, you'll see the page below.
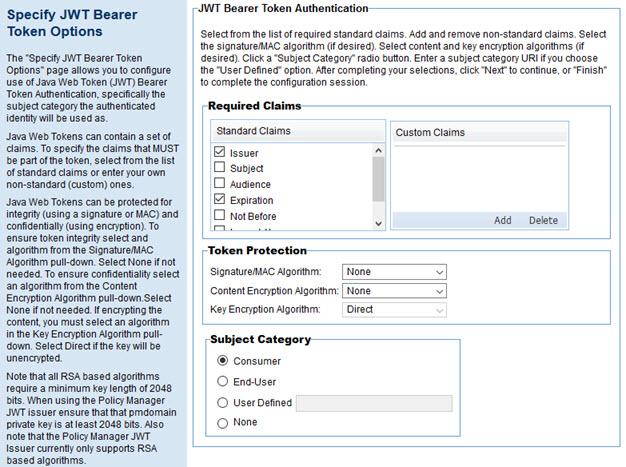
Note: for general information on JWT Bearer tokens, see https://jwt.io/introduction/ (external site).
To configure JWT bearer token authentication options
- Modify the Required Claims list as needed, adding or removing as applicable. Supported required claims are:
- Issuer (checked by default)
- Subject
- Audience
- Expiration (checked by default)
- Not Before
- issue At
- JWT ID
- Add one or more custom claims if needed.
- In the Token Protection section, specify the type of algorithm used to protect each aspect of the JWT bearer token:
- Signature/MAC algorithm—Supported values are: None, HS256, HS384, HS512, RS256, RS384, RS512, ES256, ES384, ES512. Default: None.
- Content Encryption algorithm—Supported values are: None, A128CBC-HS256, A192CBC-HS384, A256CBC-HS512, A128GCM, A192GCM, A256GCM. Default: None.
- Key Encryption algorithm—Supported values are: Direct, RSA1_5, RSA-OAEP, A128KW, A192KW, A256KW, A128GCMKW, A192GCMKW, A256GCMKW. Default: Direct.
- Specify the subject category the authenticated identity will be used as. You can choose:
- Consumer (the default)
- End-User
- User-defined: specify the subject category you want to use
- None: no subject category will be used.
- Click Next to specify security audit options. See Configuring Security Audit Options below.
Specify Client Certificate Authentication Options
If you choose Client Certificate authentication, you'll see the page below.
Note: By default, in earlier versions, the RFC compliance level of the HTTP parser provided compliance with earlier standards prior to RFC 2616 and RFC 7230. In 2020.0.0 and later, it offers compliance with the newer standards. In version 2020.2.8 and later, there is an additional configuration setting in the Akana Administration Console that you can use to configure the RFC compliance level for your installation. For details, see Configuring Compliance Modes for HTTP Parsing and Handling.
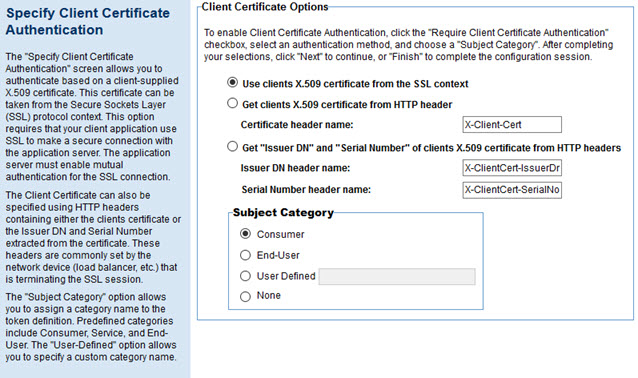
To specify client certificate authentication:
- Choose one of the following authentication methods:
- Use the client's X.509 certificate from the SSL context
- Get the client's X.509 certificate from HTTP header: if you choose this option, specify which header to get the certificate from. Default: X-Client-Cert. Supported format:
Versions prior to 2020.2.8: Raw PEM format.
2020.2.8 and later: Raw PEM format or URL-encoded PEM format.
- Get the Issuer DN and serial number of the client's X.509 certificate from HTTP headers. If you choose this option, specify which header to get each value from. Defaults: X-ClientCert-IssuerDn for Issuer DN and X-ClientCert-SerialNo for serial number.
Note: X-ClientCert-SerialNo must be in decimal format, not hexadecimal.
- Specify the subject category the authenticated identity will be used as. You can choose:
- Consumer (the default)
- End-User
- User-defined: specify the subject category you want to use
- None: no subject category will be used.
- Click Next to specify security audit options. See Configuring Security Audit Options below.
Specify Cookie Authentication Options
Each cookie represents a token and is stored in a text file. A cookie definition includes Cookie Name and Subject Category. Multiple cookies can be defined within one policy and can represent multiple identities.
If you choose Cookie Authentication, you'll see the page below.
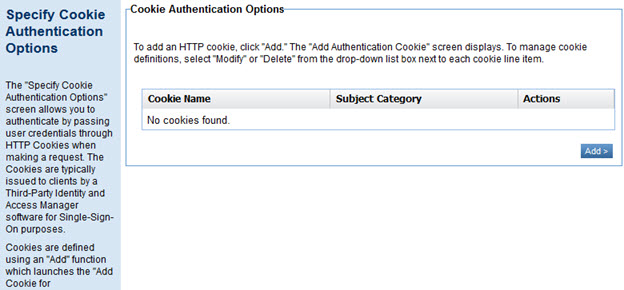
To specify cookie authentication:
- In the Specify Cookie Authentication Options page, click Add. The Add Cookie for Authentication page appears, as shown below.
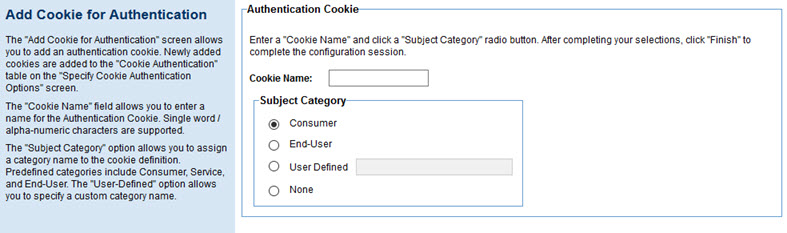
- Enter a name for the cookie, specify Subject Category, and click Finish.
- Enter additional cookies if needed and then click Next. The Specify Response Cookie Options page appears, as shown below.
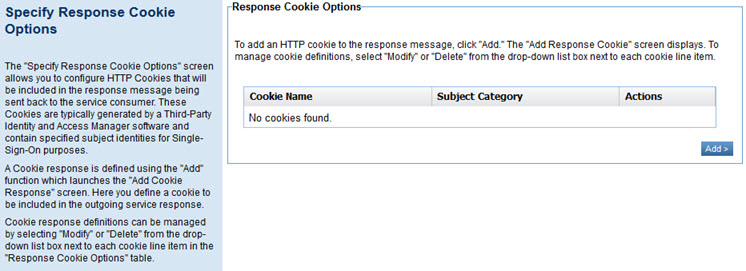
- To add a response cookie, click Add.
- In the Add Response Cookie page, enter the cookie name and subject category, and then click Finish.
- Enter additional response cookies if needed.
- Click Next to specify security audit options. See Configuring Security Audit Options below.
Configuring Security Audit Options
Once you've configured the settings for the specific type or types of HTTP Security policy that you chose, the next step is the Specify Security Audit Options page, as shown below.
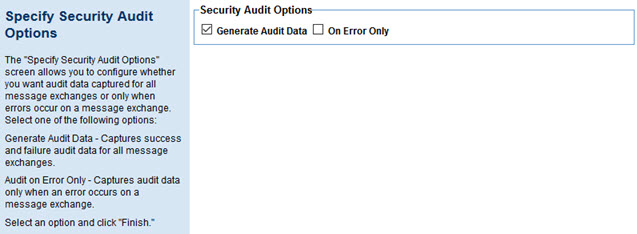
Choose from the available options controlling the audit data that's captured:
- Generate Audit Data
- Captures all message data, whether success or failure, for all message exchanges.
- On Error Only
- If you choose to generate audit data, you can specify that audit data is captured only when an error occurs on a message exchange.
That completes the policy configuration. Click Finish to close the wizard. You can now assign the policy to a service.
Activating a policy
When you create and configure a policy, the policy is in Draft state. When the policy configuration is complete, activate the policy: click Activate Policy and then confirm. See Activate a Policy.
A policy in Draft state is not available for general use. Once you activate the policy, it is in Active state and is available for use.
Attaching a policy
To use the policy, go to the Policies folder in the respective organization and attach the policy to a web service, binding, or binding operation.