Using the JOSE Profile-Driven Security Policy
Valid in version: 2022.1.0 and later
Learn how to use the JOSE Profile-Driven Security Policy to supplement your JOSE Security Policy v2 with additional security standards such as RSA Adaptive Authentication for eCommerce, Visa Token Service, or UK Open Banking.
For information about using policies in the context of the Community Manager developer portal, see Organization Policies.
On this page:
- Introduction
- Specifications
- If you have a JOSE profile policy defined as an XML policy in a previous version
- Creating a JOSE Profile-Driven Security Policy
- Configuring the JOSE Profile-Driven Security Policy in Community Manager
- Configuring the JOSE Profile-Driven Security Policy: RSA-AAEC-3.0, 3.1, and 3.2 settings
- Configuring the JOSE Profile-Driven Security Policy in Community Manager: Visa-TS-3.1 settings
- Configuring the JOSE Profile-Driven Security Policy in Community Manager: UKOpenBanking-3.1.2_SETS settings
- Configuration example: RSA-AAEC-3.1
- Configuring the JOSE Profile-Driven Security Policy in Policy Manager
- Configuring the JOSE Profile-Driven Security Policy in Policy Manager: Default Content
- Configuring the JOSE Profile-Driven Security Policy in Policy Manager: Validating the XML
- Activating a policy
- Attaching a policy
- Policy XML reference
Introduction
The JOSE Security Policy v2 allows you to enforce security standards required by the JSON Web Signature (JWS) Unencoded Payload Option (https://tools.ietf.org/html/rfc7797) specification. However, there are other security specifications you might want to use in combination with it.
In version 2022.1.x and later, the Akana JOSE Security Profile for RSA Adaptive Authentication for eCommerce, Akana JOSE Security Profile for UK Open Banking, Akana JOSE Security Profile for VISA Token Services, and Akana Enhanced JOSE Security Policy Plug-In for Network Director plugins have been merged into the Akana core product. Any existing XML JOSE Extension Policy will continue to work seamlessly as an XML based policy and not as a JOSE Profile-Driven Security policy that is created from the Community Manager UI. Similarly, any existing JOSE Profile-Driven Security policies will continue to work seamlessly as JOSE Profile-Driven Security policies.
You can use the JOSE Profile-Driven Security Policy as a supplement to the JOSE Security Policy v2, using existing out-of-the box templates to set up your API Platform to comply with additional security standards such as:
- Visa Token Service
- RSA Adaptive Authentication for eCommerce version 3.0
- RSA Adaptive Authentication for eCommerce version 3.1
- RSA Adaptive Authentication for eCommerce version 3.2
- UK Open Banking SETS (Security Event Tokens). See Configuring the JOSE Profile-Driven Security Policy in Community Manager: UKOpenBanking-3.1.2_SETS settings.
Note: It's best to use the Community Manager portal for configuring this policy. In Policy Manager, you can add the JOSE Profile-Driven Security Policy and configure it via XML; in Community Manager, you can load the out-of-the-box templates and add your configuration settings in the additional user interface pages.
Specifications
This policy complies with/enforces the following standards:
- JSON Web Signature (JWS): https://tools.ietf.org/html/rfc7515.
- JSON Web Encryption (JWE): https://tools.ietf.org/html/rfc7516
- JSON Web Key (JWK): https://tools.ietf.org/html/rfc7517
- JSON Web Algorithms (JWA): https://tools.ietf.org/html/rfc7518
If you have a JOSE profile policy defined as an XML policy in a previous version
If you created one or more JOSE policy profiles in a version prior to 2022.1.0, defining it as an XML policy, you can continue to use these policies, and configure them in Policy Manager.
For any new policy, use the JOSE Profile-Driven policy functionality provided in Community Manager.
For information about working with an existing JOSE profile defined as an XML policy, refer to Using the XML Policy.
Creating a JOSE Profile-Driven Security Policy
The first step in creating a policy is to define the basic policy information. You can add the policy:
To add a JOSE Profile-Driven Security policy in Policy Manager
- Go to Workbench > Browse > Organization, and select Policies > Operational Policies. The Policies Summary is displayed.
- Click Add Policy.
- At the Select Policy Creation Option page, do one of the following:
- Add Policy: from the drop-down list, choose the policy type.
Note: If you choose to add a JOSE Profile-Driven security policy in Poliy Manager, it's expected that you will create a new policy and then cut and paste valid XML, matching one of the supported profile types, from your source environment.
- Import Policy: Click Browse to import a valid JOSE Profile-Driven security policy XML definition file.
Note: If you choose to create a JOSE Profile-Driven security policy in Poliy Manager by importing, it's expected that you already have the XML, matching one of the supported profile types, configured as an XML policy in a previous version.
- Add Policy: from the drop-down list, choose the policy type.
- Click Next.
- In the Specify Policy Details page, specify:
- Policy Name: A short, descriptive name for the policy. Used on the policy summary page.
- Description: A brief description of the policy. Include any key information relating to how the policy is used and what it does.
- Click Finish.
- At the Completion Summary page, click Close. The Add Policy Wizard creates a draft policy instance that you can then configure on the Policy Details page.
For more information, see Add Policy.
To add a JOSE Profile-Driven Security policy in the Community Manager developer portal
- In the Developer Portal, go to More > Organizations > All Organizations.
- Find your organization on the list, and then click the title to view the Details page for the organization.
- On the left navigation bar, choose Policies. All policies associated with the organization are displayed.
- Click Add.
- On the Add Policy page, specify:
- Policy Name: A short, descriptive name for the policy. Used on the policy summary page.
- Policy Category: Choose Operational Policy.
- Policy Sub-Type: Choose JOSE Profile-Driven Security Policy.
- Policy Description: A brief description of the policy. Include any key information relating to how the policy is used and what it does.
- Click Save.
The next step is to configure the policy details. Follow the steps to configure in Community Manager as given below.
For more information about working with policies in Community Manager, see Organization Policies (Community Manager help).
Note: If you have an existing JOSE-based XML profile defined as an XML policy in a previous version, and you want to update it in 2022.1.x and later, see If you have a JOSE profile policy defined as an XML policy in a previous version above.
Configuring the JOSE Profile-Driven Security Policy in Community Manager
Once you've defined the basic policy information, you can configure the technical details that determine how the policy works when it's attached to a service.
The fields available on each policy configuration page are determined by the profile you're working with. For links to the details for each profile, see Step 7 below.
There are four policy configuration pages:
- JOSE Profile-Driven Security Policy Configuration
- JOSE Profile-Driven Security Policy Inbound Settings
- JOSE Profile-Driven Security Policy Outbound Settings
- JOSE Profile-Driven Security Policy Properties
To configure a JOSE Profile-Driven Security Policy in Community Manager
- Log in to the Community Manager developer portal as a Business Admin.
- Go to More > Organizations > All Organizations.
- Choose your organization.
- On the left navigation bar, choose Policies. All policies associated with the organization are displayed.
- Find the policy on the list and click to go to the Details page for the policy.
- In the Policy Summary section, click Edit to access the JOSE Profile-Driven Security Policy Configuration page.
- In the JOSE Profile-Driven Security Policy Configuration field, choose from the drop-down list to select a profile from the available options:
- RSA-AAEC-3.0: RSA Adaptive Authentication for eCommerce version 3.0. See Configuring the JOSE Profile-Driven Security Policy: RSA-AAEC-3.0, 3.1, and 3.2 settings.
- RSA-AAEC-3.1: RSA Adaptive Authentication for eCommerce version 3.1. See Configuring the JOSE Profile-Driven Security Policy: RSA-AAEC-3.0, 3.1, and 3.2 settings.
- RSA-AAEC-3.2: RSA Adaptive Authentication for eCommerce version 3.2. See Configuring the JOSE Profile-Driven Security Policy: RSA-AAEC-3.0, 3.1, and 3.2 settings.
- Visa-TS-3.1: Visa Token Service: See Configuring the JOSE Profile-Driven Security Policy in Community Manager: Visa-TS-3.1 settings.
- UKOpenBanking-3.1.2_SETS. See Configuring the JOSE Profile-Driven Security Policy in Community Manager: UKOpenBanking-3.1.2_SETS settings.
- Provided configuration options for the selected profile, for each of the three settings pages (Inbound, Outbound, and Properties). For information about the fields, refer to the linked sections provided above.
- When done, click Finish.
After you've configured your policy, remember to activate it so that it can be used. See Activating a Policy below.
Configuring the JOSE Profile-Driven Security Policy: RSA-AAEC-3.0, 3.1, and 3.2 settings
To configure your RSA-AAEC-3.0, 3,1, or 3.2 profile, provide configuration settings on the following pages:
- Inbound Settings: RSA-AAEC-3.0, 3,1, and 3.2 profiles
- Outbound Settings: RSA-AAEC-3.0, 3,1, and 3.2 profiles
- JOSE Profile-Driven Security Policy Properties: RSA-AAEC-3.0, 3,1, and 3.2 profiles
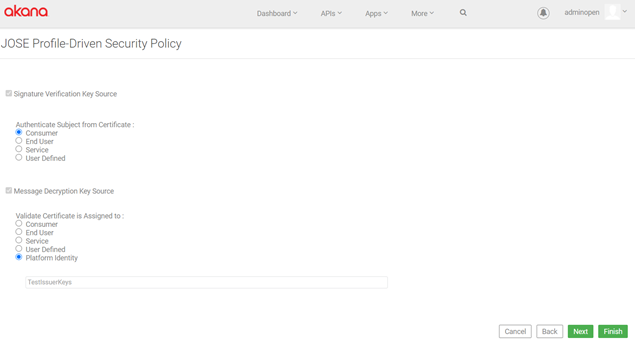
Inbound Settings: RSA-AAEC-3.0, 3,1, and 3.2 profiles
Specify applicable values for the following fields.
Signature Verification Key Source section:
- Authenticate Subject from Certificate
- The source for the signature verification key. Options: Consumer, End User, Service, or User Defined (specify value).
Message Decryption Key Source section:
- Validate Certificate is Assigned to
- The source location for the message decryption key. Options: Consumer, End User, Service, User Defined (specify value), or Platform Identity (specify value).
When done configuring inbound settings, click Next.
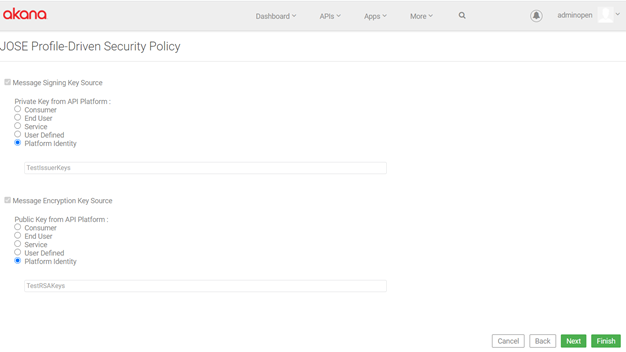
Outbound Settings: RSA-AAEC-3.0, 3,1, and 3.2 profiles
On the next page, configure the outbound settings. Specify applicable values for the following fields.
Message Signing Key Source section:
- Private Key from API Platform
- The source for the message signing key. The source must be a private key from the API Platform. Options: Consumer, End User, Service, User Defined (specify value), or Platform Identity (specify value).
Message Encryption Key Source section:
- Public Key from API Platform
- The source location for the message encryption key. The source must be a public key from the API Platform. Options: Consumer, End User, Service, User Defined (specify value), or Platform Identity (specify value).
When done configuring outbound settings, click Next.
JOSE Profile-Driven Security Policy Properties: RSA-AAEC-3.0, 3,1, and 3.2 profiles
On the next page, configure additional properties for the policy. Some default properties and values are provided as part of the default profile. Add, modify, or delete property name/value pairs as needed to complete your policy configuration.
In version 2022.1.0 and later, there are four fields for Java Cryptographic Provider, to support having different providers for different cryptographic functions such as for signing or for encryption.
- Name/value pair: clock.skew.secs
- The clock skew value, in seconds. Default: 120.
- Name/value pair: message.expiration.secs
- The message expiration time, in seconds. Default: 60.
- Java Cryptographic Sign Provider
- URL for the provider for Java cryptographic signing.
- Java Cryptographic Verify Provider
- URL for the provider for Java cryptographic verification.
- Java Cryptographic Encrypt Provider
- URL for the provider for Java cryptographic encryption.
- Java Cryptographic Decrypt Provider
- URL for the provider for Java cryptographic decryption.
- Generate Audit Data
- Check the box to activate this option. When you choose this option, you can check an additional box to choose On Error Only.
- Verbose Error Responses
- Check the box to activate this option.
- Forced Diagnostic Logging
- Check the box to activate this option.
- Note: This setting is not recommended for production environments, because it logs debug information for every request processed by the policy (success as well as failure).
That completes the policy configuration. Click Finish.
When you create and configure a policy, the policy is in Draft state. A policy in Draft state is not available for general use. The next step is to activate the policy: click Activate Policy and then confirm. See Activate a Policy. The policy is then in Active state and is available for use.
Configuration example: RSA-AAEC-3.1
The configuration properties for a default RSA-AAEC-3.1 profile are shown below.
Inbound settings:
Outbound settings:
Configuring the JOSE Profile-Driven Security Policy in Community Manager: Visa-TS-3.1 settings
To configure your Visa-TS-3.1 profile, provide configuration settings on the following pages:
- Inbound Settings: Visa-TS-3.1 profile
- Outbound Settings: Visa-TS-3.1 profile
- JOSE Profile-Driven Security Policy Properties: Visa-TS-3.1 profile
Inbound Settings: Visa-TS-3.1 profile
Specify applicable values for the following fields.
Signature Verification Key Source section:
- Public Key from API Platform
- The source for the signature verification key. Options: Consumer, End User, Service, User Defined (specify value), or Platform Identity (specify value).
- Create Subject for API Platform Identity
- The subject for the API Platform identity. Options: Consumer, End User, Service, or User Defined (specify value).
Message Decryption Key Source section:
- Private Key from API Platform
- The source location for the message decryption key. The source must be a private key from the API Platform. Options: Consumer, End User, Service, User Defined (specify value), or Platform Identity (specify value).
When done configuring inbound settings, click Next.
Outbound Settings: Visa-TS-3.1 profile
On the next page, configure the outbound settings. Specify applicable values for the following fields.
Message Signing Key Source section:
- Private Key from API Platform
- The source for the message signing key. Options: Consumer, End User, Service, User Defined (specify value), or Platform Identity (specify value).
Message Encryption Key Source section:
- Public Key from API Platform
- The source location for the message encryption key. The source must be a public key from the API Platform. Options: Consumer, End User, Service, User Defined (specify value), or Platform Identity (specify value).
When done configuring outbound settings, click Next.
JOSE Profile-Driven Security Policy Properties: Visa-TS-3.1 profile
On the next page, configure additional properties for the policy. Some default properties and values are provided as part of the default profile. Add, modify, or delete property name/value pairs as needed to complete your policy configuration.
- Name/value pair: clock.skew.secs
- The clock skew value, in seconds. Default: 120.
- Name/value pair: issuer.cert.kid
- The key ID value for the issuer certificate. Set it to the key ID of the issuer's keys.
- Name/value pair: jose.element.name
- A placeholder value for any JOSE standard element that might be needed for your policy configuration.
- Name/value pair: visa.client.cert.kid
- Set this property to the key ID of the Visa client certificate.
- Java Cryptographic Sign Provider
- URL for the provider for Java cryptographic signing.
- Java Cryptographic Verify Provider
- URL for the provider for Java cryptographic verification.
- Java Cryptographic Encrypt Provider
- URL for the provider for Java cryptographic encryption.
- Java Cryptographic Decrypt Provider
- URL for the provider for Java cryptographic decryption.
- Generate Audit Data
- Check the box to activate this option. When you choose this option, you can check an additional box to choose On Error Only.
- Verbose Error Responses
- Check the box to activate this option.
- Forced Diagnostic Logging
- Check the box to activate this option.
- Note: This setting is not recommended for production environments, because it logs debug information for every request processed by the policy (success as well as failure).
That completes the configuration of the Visa-TS-3.1 profile for the policy. Click Finish.
When you create and configure a policy, the policy is in Draft state. A policy in Draft state is not available for general use. The next step is to activate the policy: click Activate Policy and then confirm. See Activate a Policy. The policy is then in Active state and is available for use.
Configuring the JOSE Profile-Driven Security Policy in Community Manager: UKOpenBanking-3.1.2_SETS
The UKOpenBanking-3.1.2_SETS profile supports the Event Notification API which is defined as part of the UK Open Banking standard (see https://openbankinguk.github.io/read-write-api-site3/v3.1.4/profiles/event-notification-api-profile.html). It specifically addresses aggregated polling of Security Event Tokens.
This profile would typically be applied to messages that have a JSON payload and include an object that is a group of Security Event Tokens. Each Security Event Token becomes an individually signed JSON web signature (JWS).
For more information, see https://datatracker.ietf.org/doc/html/rfc8417 (Security Event Token specification).
To configure your UK Open Banking 3.1.2 SETS profile, provide configuration settings on the following pages:
- Outbound Settings: UKOpenBanking-3.1.2_SETS
- JOSE Profile-Driven Security Policy Properties: UKOpenBanking-3.1.2_SETS
Inbound Settings: UKOpenBanking-3.1.2_SETS profile
The UKOpenBanking-3.1.2_SETS profile is not applicable to inbound messages.
In the Community Manager developer portal user interface, the following fields are display-only:
- Signature Verification Key Source
- Message Decryption Key Source
Just click Next.
Outbound Settings: UKOpenBanking-3.1.2_SETS profile
On the JOSE Profile-Driven Security Policy Outbound Settings page, you can change the message signing key source:
- Message Signing Key Source: Under Private Key from API Platform, specify key source. Options: Consumer (the default), End User, Service, User Defined (specify value), or Platform Identity (specify value).
- Message Encryption Key Source: display-only.
Just click Next.
JOSE Profile-Driven Security Policy Properties: UKOpenBanking-3.1.2_SETS profile
On the next page, configure additional properties for the policy. Some default properties and values are provided as part of the default profile. Add, modify, or delete property name/value pairs as needed to complete your policy configuration.
- Name/value pair: ukob.outbound.iss.header
- The value for the http://openbanking.org.uk/iss iss (issuer) header field; the subject DN of the signing certificate.
- Name/value pair: ukob.outbound.tan.header
- The value for the tan (trust anchor) header field; required in the JOSE header per the Open Banking 3.1 specification. Per the specification, the tan header is a string consisting of a domain name that is registered to and identifies the Trust Anchor that hosts the public counter-part of the key used for signing.
- Name/value pair: ukob.outbound.kid.header
- The default value for the outbound kid JOSE header name—the header that the receiver, such as a trading partner, will use to find the signature verification certificate.
- The value depends on the environment. Refer to the Open Banking 3.1 specification: https://openbanking.atlassian.net/wiki/spaces/DZ/pages/937656404/Read+Write+Data+API+Specification+-+v3.1#Read/WriteDataAPISpecification-v3.1-ProcessforSigningaPayload (Step 2).
- Name/value pair: sets.json.path
- A JSONPath expression that results in a list of the SET elements.
- In the response message there is a JSON object that contains a list of name/values, where the values are the SET elements to be signed. This JSONPath expression results in pulling the SET elements out individually so that they can be signed.
- Default value: $.sets[*].
- Java Cryptographic Sign Provider
- URL for the provider for Java cryptographic signing.
- Java Cryptographic Verify Provider
- URL for the provider for Java cryptographic verification.
- Java Cryptographic Encrypt Provider
- URL for the provider for Java cryptographic encryption.
- Java Cryptographic Decrypt Provider
- URL for the provider for Java cryptographic decryption.
- Generate Audit Data
- Check the box to activate this option. When you choose this option, you can check an additional box to choose On Error Only.
- Verbose Error Responses
- Check the box to activate this option.
- Forced Diagnostic Logging
- Check the box to activate this option.
- Note: This setting is not recommended for production environments, because it logs debug information for every request processed by the policy (success as well as failure).
That completes the configuration of the UKOpenBanking-3.1.2_SETS profile for the policy. Click Finish.
When you create and configure a policy, the policy is in Draft state. A policy in Draft state is not available for general use. The next step is to activate the policy: click Activate Policy and then confirm. See Activate a Policy. The policy is then in Active state and is available for use.
Configuring the JOSE Profile-Driven Security Policy in Policy Manager
Once you've defined the basic policy information, you can configure the technical details that determine how the policy works when it's attached to a service.
In Policy Manager, you can configure by editing or uploading XML. In the Community Manager portal you can configure via the user interface (recommended). See Configuring the JOSE Profile-Driven Security Policy in Policy Manager: Default Content below.
To configure a JOSE Profile-Driven Security Policy in Policy Manager
- Go to Workbench > Browse > Organization and select the Policies > Operational Policies folder. The Policies Summary is displayed.
- Find the policy on the list and double-click to go to the Details page for the policy.
- In the second panel, click Modify to access the Modify XML Policy page. The default content is shown (see Configuring the JOSE Profile-Driven Security Policy in Policy Manager: Default Content below).
- Modify the XML as needed by typing or pasting content.
- As needed, use the validation options. See Configuring the JOSE Profile-Driven Security Policy in Policy Manager: Validating the XML below.
- Click Apply.
Configuring the JOSE Profile-Driven Security Policy in Policy Manager: Default Content
The default content on the Modify XML Policy page is shown below.
<wsp:Policy xmlns:wsp="http://schemas.xmlsoap.org/ws/2004/09/policy" visibility="private">
  <ns2:JoseExtPolicy xmlns:ns2="http://federatedgovernance.org/policy/jose_ext/">
    <ns2:properties />
    <ns2:audit>NONE</ns2:audit>
    <ns2:verboseErrors>false</ns2:verboseErrors>
    <ns2:forceLogging>false</ns2:forceLogging>
  </ns2:JoseExtPolicy>
</wsp:Policy>
If you're creating the policy by editing or pasting the XML in Policy Manager, update the XML as needed, validate, and save. You can also configure via the user interface in the Community Manager portal (recommended): see Configuring the JOSE Profile-Driven Security Policy in Community Manager above.
Configuring the JOSE Profile-Driven Security Policy in Policy Manager: Validating the XML
If you're creating the policy by editing or pasting the XML in Policy Manager, after you've modified the default content, you can validate it. It's best to use both options:
- Check Syntax: Validates the XML syntax to make sure that it is well-formed.
- Check Schema: Validates the XML against the specified schema to make sure it conforms with the schema.
Fix as needed to make sure the XML is valid before saving the policy.
Activating a policy
When you create and configure a policy, the policy is in Draft state. A policy in Draft state is not available for general use. The next step is to activate the policy: click Activate Policy and then confirm. See How do I activate a policy that's in Draft state? The policy is then in Active state and is available for use.
Attaching a policy
To use the JOSE Profile-Driven Security Policy:
- In the Community Manager developer portal, go to the API implementation policies section and click Attach. For instructions, see Managing Policies for an API Implementation.
- In Policy Manager, go to the Policies folder in the respective organization and attach the policy to a web service, binding, or binding operation.
Policy XML reference
This section describes the XML elements, sub-elements, and attributes supported by the JOSE Profile-Driven Security Policy in Policy Manager. The following table describes the configuration properties for the profile.
| XML element | Description |
|---|---|
| <profileName> | The name of the policy profile. For example, RSA-AAEC-3.2 (<rsa:profileName>RSA-AAEC-3.2</rsa:profileName>), Visa-TS-3.1 (<visa:profileName>Visa-TS-3.1</visa:profileName>), or Amazon-Arrow-API (<amz:profileName>Amazon-Arrow-API</amz:profileName>). |
| <properties> | This root element contains child elements that define the names of properties. The property name tag allows you to specify a global variable for use in both inbound and outbound settings. For example, the <rsa:property name="message.expiration.secs">60</rsa:property> element specifies a property named "message.expiration.secs" with a value of 60. |
| <audit> | The audit XML element captures all message data, including both successful and failed transactions, for all message exchanges governed by the JOSE policy. |
| <verboseErrors> | Logs the error messages for troubleshooting HTTP requests. |
| <forceLogging> | Enables force logging mode for the database if set to "true". Setting it to "false" disables the force logging mode. |
The following table describes the processInbound setting. If the "applyToIN" setting is set to true, the policy is enforced on any requests that enter the Gateway. If the "applyToOUT" setting is set to true, the policy is applied to responses passing through the Gateway. The inbound request and response include the following XML elements.
| XML element | Description |
|---|---|
| <profile> | The profile name. For example, Visa-TS-3.1 or RSA-AAEC-3.2 profile. |
| <applyToIN> | The "IN" Protection Scope determines the signing and encryption settings for incoming messages. By default, the value is set to true. |
| <applyToOUT> | The "OUT" Protection Scope determines the signing and encryption settings for outbound messages. |
| <applyToFAULT> | The "FAULT" Protection Scope determines the signing and encryption settings for fault messages. |
| <strictRules> | When this parameter is true, the policy enforces the order of JWS/JWE. |
| <serialization> | Specify JWS Compact (dot-separated, consumes less bandwidth) or JSON (key-value pairs) to digitally signed or MACed content as a compact, URL-safe string or JSON object. |
| <contentType> | Enforces the requirements for the content-type and accepts header values as per the applicable Open Banking specification. |
| <customValidatorName> | Specify the custom validator name. |
| <customErrorHandlerName> | Specify the custom error handler name. |
| <customContentHandlerName> | Specify the custom content handler name. |
| <errorURL> | Specify the URL to display an error message. |
| <jwsVerify> | Expects a JWS as input and verifies it using the public key associated with the private key that was used to sign the JWS. The public key can be obtained from the user or a JWKS URL, depending on the configuration. |
| <signedFirst> | Signs the key, and then encrypts it. However, the process cannot both sign and encrypt the key first - if the key is signed first, then it cannot be encrypted first, and vice versa. |
| <validSigningAlgorithm> | Indicates a valid signing algorithm to sign content. |
| <verifyKeySource> | Gets and verifies the public key from the X.509 certificate header. |
| <jwsSource> | The source for the key signature verification. The available options are Consumer, End User, Service, or User Defined (specify value). |
| <fromJwxHeader> | Retrieves the public key from the x5c parameter specified in the header. |
| <validateCerts> | Validates the authenticity and accuracy of the certificate provided in the source. |
| <authenticateEmbeddedCert> | Checks for a user with a corresponding certificate based on the jwsAuthSubject value. |
| <jwsHeaders> |
Specify a set of critical headers, including a header with the name. For example, <rsa: header name="exp"/> denotes an "exp" header in the following header structure. Copy
|
| <jweDecrypt> | Decrypts a JSON Web Encryption (JWE) payload using the provided private key. |
| <encryptedFirst> | If true, the encryption is performed first, before any other operations such as authentication or other processes. |
| <validEncryptAlgorithms> | Indicates a valid encryption algorithm that can be used to encrypt content. The supported encryption algorithms for encrypting content are: A128CBC-HS256, A192CBC-HS384, A256CBC-HS512, A128GCM, A192GCM, and A256GCM. |
| <validKeyMgmtAlgorithms> | Indicates a valid key management algorithm that can be used to encrypt content. The supported Key Management algorithms for encrypting content are: None, RSA1_5, RSA-OAEP, A128KW, A192KW, A256KW, A128GCMKW, A192GCMKW, and A256GCMKW. |
| <decryptKeySource> | Specifies the source used to decrypt the content, which is the platform identity. This platform identity is further identified by the XML tags jweCertOwner or jwePrivateKeySource. |
| <jweSource> | The JWE source is used to encrypt a key. |
| <validateAssignedEntity> | Verifies that the certificate in the x5c header matches the certificate assigned to the "jweCertOwner" entity. |
| <jwsAuthSubject> | Checks if there is a user with a corresponding certificate based on the provided "jwsAuthSubject" value. |
| <jweCertOwner> | Gets the private key associated with the user's identity. |
| <identity> | The identity of an end-user. |
The following table describes the processOutbound setting. The Gateway applies a policy to outgoing requests when the "applyToIN" setting is set to true. Likewise, the Gateway applies a policy to outgoing responses when the "applyToOUT" setting is set to true. The outbound request and response include the following XML elements.
| XML element | Description |
|---|---|
| <profile> | The profile name. For example, Visa-TS-3.1 or RSA-AAEC-3.2 profile. |
| <applyToIN> | The "IN" Protection Scope determines the signing and encryption settings for outgoing messages. By default, the value is set to true. |
| <applyToOUT> | The "OUT" Protection Scope determines the signing and encryption settings for outbound messages. |
| <applyToFAULT> | The "FAULT" Protection Scope determines the signing and encryption settings for fault messages. |
| <serialization> | Specify JWS Compact (dot-separated, consumes less bandwidth) or JSON (key-value pairs) to digitally signed or MACed content as a compact, URL-safe string or JSON object. |
| <customBuilderName> | Specify the custom builder name. |
| <customErrorHandlerName> | Specify the custom error handler name. |
| <customContentHandlerName> | Specify the custom content handler name. |
| <errorURL> | Specify the URL to display an error message. |
| <jweEncrypt> | Creates a JSON Web Encryption (JWE) object by encrypting a plain JSON payload using the public key. |
| <encryptFirst> | Encryption is the first step and must be completed before any other operations, such as authentication or other processes. |
| <encryptAlgorithm> | Indicates a valid encryption algorithm that can be used to encrypt content. The supported encryption algorithms for encrypting content are: A128CBC-HS256, A192CBC-HS384, A256CBC-HS512, A128GCM, A192GCM, and A256GCM. |
| <keyMgmtAlgorithm> | Indicates a valid key management algorithm that can be used to encrypt content. The supported Key Management algorithms for encrypting content are: None, RSA1_5, RSA-OAEP, A128KW, A192KW, A256KW, A128GCMKW, A192GCMKW, and A256GCMKW. |
| <encryptKeySource> | Retrieves the public key from the identity defined in the "jwePublicKeySource" element and then uses that public key to encrypt data, as directed by the "encryptKeySource" element. |
| <useSubjectOrIdentity> | Indicates that the encryption key must be retrieved based on the subject or identity. |
| <publicKeyHeaderName> |
The JWE message includes the corresponding certificate used to encrypt the content in the x5c header. This certificate serves two purposes in the PROVIDER-IN policy:
|
| <jwsSign> | Creates a JSON Web Signature (JWS) by signing a plain JSON payload using a private key. |
| <signFirst> | The "sign" parameter indicates whether the payload has been signed. If set to "false," it suggests the payload is signed after other processing steps, such as encoding have been completed. |
| <signingAlgorithm> | The signing algorithm specified for generating the JSON Web Signature (JWS) is RS256, which stands for "RSA Signature with SHA-256." This algorithm is used in JSON Web Tokens (JWT). |
| <signingKeySource> | Retrieves the private key from the identity specified in the "jwsPrivateKeySource". |
| <jwsHeaders> |
Specify a set of critical headers, including a header with the name. |
| <jwePublicKeySource> | Indicates the source of the public key used in the JWE encryption process. The public key encrypts the data, while the private key is used for decryption. |
| <identity> | The identity associated with the private key is specified. |
| <jwsPrivateKeySource> | Indicates that the private key used for signing JWT tokens is sourced from a specific identity. |
Example XML reference
This section provides an example of an XML-based JOSE Profile-Driven Security Policy that governs the interaction between service providers and consumers.
Use the following structure of the service provider that examines incoming requests to verify that the message complies with the security policy defined in the profile.
<wsp:Policy xmlns:wsp="http://schemas.xmlsoap.org/ws/2004/09/policy" xmlns:rsa="http://federatedgovernance.org/policy/jose_ext/" visibility="private">
<rsa:JoseExtPolicy>
<rsa:profileName>RSA-AAEC-3.2</rsa:profileName>
<rsa:properties>
<rsa:property name="message.expiration.secs">60</rsa:property>
<rsa:property name="clock.skew.secs">0</rsa:property>
</rsa:properties>
<rsa:audit>DEBUG</rsa:audit>
<rsa:verboseErrors>false</rsa:verboseErrors>
<rsa:forceLogging>true</rsa:forceLogging>
<!-- rsa:processInbound REQUEST coming into the Gateway and policy enforced on REQUEST and hence rsa:applyToIN = true -->
<rsa:processInbound>
<rsa:profile>
<!--
PROVIDER-IN rsa:applyToIN = true
-->
<rsa:applyToIN>true</rsa:applyToIN>
<rsa:applyToOUT>false</rsa:applyToOUT>
<rsa:applyToFAULT>false</rsa:applyToFAULT>
<rsa:strictRules>true</rsa:strictRules>
<rsa:serialization>Compact</rsa:serialization>
<rsa:contentType>application/json</rsa:contentType>
<!-- EXPLORE MORE -->
<rsa:customValidatorName>RSA-AAEC-3.2</rsa:customValidatorName>
<rsa:customErrorHandlerName>RSA-AAEC-3.2</rsa:customErrorHandlerName>
<rsa:customContentHandlerName>RSA-AAEC-3.2</rsa:customContentHandlerName>
<!-- EXPLORE MORE -->
<rsa:errorURL>https://community.rsa.com/community/products/adaptiveauthentication-ecommerce</rsa:errorURL>
<!-- Verifies JWS: expects a JWS, gets the public from certificate and verifies JWS with that public key -->
<rsa:jwsVerify>
<!-- [JWS[JWE]] -->
<rsa:signedFirst>false</rsa:signedFirst>
<rsa:validSigningAlgorithm>RS256</rsa:validSigningAlgorithm>
<!-- Gets the public key from the x5c certificate header -->
<rsa:verifyKeySource>
<rsa:jwsSource>
<rsa:fromJwxHeader header="x5c"/>
<rsa:validateCerts>false</rsa:validateCerts>
<!-- Checks if there a user with corresponding certificate based on rsa:jwsAuthSubject -->
<rsa:authenticateEmbeddedCert>true</rsa:authenticateEmbeddedCert>
</rsa:jwsSource>
</rsa:verifyKeySource>
<rsa:jwsHeaders>
   <rsa:criticalHeaders>
        <rsa:header name="exp"/>
   </rsa:criticalHeaders>
</rsa:jwsHeaders>
</rsa:jwsVerify>
<!-- Decrypts JWE: expects a JWE and decrypts with private key -->
<rsa:jweDecrypt>
<!-- [JWS[JWE]] -->
<rsa:encryptedFirst>true</rsa:encryptedFirst>
<rsa:validEncryptAlgorithms>A128CBC-HS256</rsa:validEncryptAlgorithms>
<rsa:validKeyMgmtAlgorithms>RSA-OAEP</rsa:validKeyMgmtAlgorithms>
<!--
Gets the private key associated with user rsa:jweCertOwner.rsa:identity .
-->
<rsa:decryptKeySource>
<rsa:jweSource>
<rsa:fromJwxHeader header="x5c"/>
<rsa:validateCerts>false</rsa:validateCerts>
<!--
Verifies if the certificate in x5c header is same as certificate assigned to rsa:jweCertOwner.
-->
<rsa:validateAssignedEntity>true</rsa:validateAssignedEntity>
</rsa:jweSource>
</rsa:decryptKeySource>
</rsa:jweDecrypt>
</rsa:profile>
<!--
To rsa:authenticateEmbeddedCert, we need to set subject to do loginModule.login().
If this is not set authenticateEmbeddedCert will fail
-->
<rsa:jwsAuthSubject>consumer</rsa:jwsAuthSubject>
<rsa:jweCertOwner>
<rsa:identity>akana-jwt-asym-enc-in.user</rsa:identity>
</rsa:jweCertOwner>
</rsa:processInbound>
<!-- rsa:processOutbound RESPONSE going out of the Gateway and policy implemented on RESPONSE and hence rsa:applyToOUT = true and rsa:applyToFAULT = true -->
<rsa:processOutbound>
<rsa:profile>
<!--
PROVIDER-OUT rsa:applyToOUT = true and rsa:applyToFAULT = true
-->
<rsa:applyToIN>false</rsa:applyToIN>
<rsa:applyToOUT>true</rsa:applyToOUT>
<rsa:applyToFAULT>true</rsa:applyToFAULT>
<rsa:serialization>Compact</rsa:serialization>
<!-- EXPLORE MORE -->
<!-- <rsa:contentType>application/jose</rsa:contentType> -->
<rsa:includeCtyHeader>false</rsa:includeCtyHeader>
<!-- EXPLORE MORE -->
<rsa:customBuilderName>RSA-AAEC-3.2</rsa:customBuilderName>
<rsa:customErrorHandlerName>RSA-AAEC-3.2</rsa:customErrorHandlerName>
<rsa:customContentHandlerName>RSA-AAEC-3.2</rsa:customContentHandlerName>
<!-- EXPLORE MORE -->
<rsa:errorURL>https://community.rsa.com/community/products/adaptiveauthentication-ecommerce</rsa:errorURL>
<!-- Creates JWE: expects a plain JSON and encrypts with public key -->
<rsa:jweEncrypt>
<rsa:encryptFirst>true</rsa:encryptFirst>
<rsa:encryptAlgorithm>A128CBC-HS256</rsa:encryptAlgorithm>
<rsa:keyMgmtAlgorithm>RSA-OAEP</rsa:keyMgmtAlgorithm>
<!-- EXPLORE <rsa:compress>true</rsa:compress> -->
<!-- Gets the public key from the identity defined in rsa:jwePublicKeySource -->
<rsa:encryptKeySource>
<rsa:useSubjectOrIdentity>true</rsa:useSubjectOrIdentity>
</rsa:encryptKeySource>
<!--
Puts corresponding certificate it used to encrypt as x5c header in JWE.
This certificate is used by the PROVIDER-IN policy
1. to find user if getPrivateKeyViaCert=true and rsa:jweCertOwner is not set
and private key associated with the user to decrypt.
2. to check this certificate is same as the certificate assigned to user if rsa:validateAssignedEntity
is set and rsa:jweCertOwner is configured.
-->
<rsa:publicKeyHeaderName>x5c</rsa:publicKeyHeaderName>
</rsa:jweEncrypt>
<!-- Creates JWS: expects a plain JSON and signs with private key -->
<rsa:jwsSign>
<rsa:signFirst>false</rsa:signFirst>
<rsa:signingAlgorithm>RS256</rsa:signingAlgorithm>
<!-- Gets the private key from the identity defined in rsa:jwsPrivateKeySource -->
<rsa:signingKeySource>
<rsa:useSubjectOrIdentity>true</rsa:useSubjectOrIdentity>
</rsa:signingKeySource>
<!-- Puts corresponding certificate of the private key used for signing as x5c header in JWS -->
<rsa:publicKeyHeaderName>x5c</rsa:publicKeyHeaderName>
<rsa:jwsHeaders>
<rsa:criticalHeaders>
<rsa:header name="exp"/>
</rsa:criticalHeaders>
</rsa:jwsHeaders>
</rsa:jwsSign>
</rsa:profile>
<!-- akana-jwt-asym-enc-in.user has both certificate(public key) and private keys -->
<rsa:jwePublicKeySource>
<rsa:identity>akana-jwt-asym-enc-out.user</rsa:identity>
</rsa:jwePublicKeySource>
<!-- akana-jwt-asym-sign-in.user has both public and private keys -->
<rsa:jwsPrivateKeySource>
<rsa:identity>akana-jwt-asym-sign-out.user</rsa:identity>
</rsa:jwsPrivateKeySource>
</rsa:processOutbound>
</rsa:JoseExtPolicy>
</wsp:Policy>Use the following structure of the service consumer that must construct a message that adheres to the policy, ensuring the message is either encrypted or signed.
<?xml version="1.0" encoding="UTF-8"?>
<wsp:Policy xmlns:wsp="http://schemas.xmlsoap.org/ws/2004/09/policy" xmlns:rsa="http://federatedgovernance.org/policy/jose_ext/" visibility="public">
    <rsa:JoseExtPolicy>
        <rsa:profileName>RSA-AAEC-3.2</rsa:profileName>

        <!-- rsa:processOutbound REQUEST going out of Gateway and policy implemented on REQUEST and hence rsa:applyToIN = true   -->
        <rsa:processOutbound>
            <rsa:profile>
                <!--
                    CONSUMER-IN rsa:applyToIN = true
                -->
                <rsa:applyToIN>true</rsa:applyToIN>
                <rsa:applyToOUT>false</rsa:applyToOUT>
                <rsa:applyToFAULT>false</rsa:applyToFAULT>

                <rsa:serialization>Compact</rsa:serialization>

                <!-- EXPLORE MORE -->
                <rsa:customBuilderName>RSA-AAEC-3.2</rsa:customBuilderName>
                <rsa:customErrorHandlerName>RSA-AAEC-3.2</rsa:customErrorHandlerName>
                <rsa:customContentHandlerName>RSA-AAEC-3.2</rsa:customContentHandlerName>

                <!-- EXPLORE MORE -->
                <rsa:errorURL>https://community.rsa.com/community/products/adaptiveauthentication-ecommerce</rsa:errorURL>

                <!-- [JWS[JWE]] -->

                <!-- Creates JWE: expects a plain JSON and encrypts with public key -->
                <rsa:jweEncrypt>
                    <rsa:encryptFirst>true</rsa:encryptFirst>
                    <rsa:encryptAlgorithm>A128CBC-HS256</rsa:encryptAlgorithm>
                    <rsa:keyMgmtAlgorithm>RSA-OAEP</rsa:keyMgmtAlgorithm>

                    <!-- Gets the public key from the identity defined in rsa:jwePublicKeySource -->
                    <rsa:encryptKeySource>
                        <rsa:useSubjectOrIdentity>true</rsa:useSubjectOrIdentity>
                    </rsa:encryptKeySource>

                    <!--
                        Puts corresponding certificate it used to encrypt as x5c header in JWE.
                        This certificate is used by the PROVIDER-IN policy
                            1. to find user if getPrivateKeyViaCert=true and rsa:jweCertOwner is not set
                            and private key associated with the user to decrypt.
                            2. to check this certificate is same as the certificate assigned to user if rsa:validateAssignedEntity
                            is set and rsa:jweCertOwner is configured.
                    -->
                    <rsa:publicKeyHeaderName>x5c</rsa:publicKeyHeaderName>
                </rsa:jweEncrypt>

                <!-- Creates JWS: expects a JWE (rsa:encryptFirst=true) and signs with private key -->
                <rsa:jwsSign>

                    <rsa:signFirst>false</rsa:signFirst>
                    <rsa:signingAlgorithm>RS256</rsa:signingAlgorithm>

                    <!-- Gets the private key from the identity defined in rsa:jwsPrivateKeySource -->
                    <rsa:signingKeySource>
                        <rsa:useSubjectOrIdentity>true</rsa:useSubjectOrIdentity>
                    </rsa:signingKeySource>

                    <!-- Puts corresponding certificate of the private key used for signing as x5c header in JWS -->
                    <rsa:publicKeyHeaderName>x5c</rsa:publicKeyHeaderName>

                    <rsa:jwsHeaders>
                        <rsa:criticalHeaders>
                            <rsa:header name="exp" />
                        </rsa:criticalHeaders>
                    </rsa:jwsHeaders>

                </rsa:jwsSign>

            </rsa:profile>

            <!-- akana-jwt-asym-enc-in.user has both certificate(public key) and private keys -->
            <rsa:jwePublicKeySource>
                <rsa:identity>akana-jwt-asym-enc-in.user</rsa:identity>
            </rsa:jwePublicKeySource>

            <!-- akana-jwt-asym-sign-in.user has both public and private keys -->
            <rsa:jwsPrivateKeySource>
                <rsa:identity>akana-jwt-asym-sign-in.user</rsa:identity>
            </rsa:jwsPrivateKeySource>

        </rsa:processOutbound>

        <!-- rsa:processInbound RESPONSE coming into the Gateway and policy enforced on RESPONSE and hence rsa:applyToOUT = true   -->
        <rsa:processInbound>
            <rsa:profile>
                <!--
                    CONSUMER-OUT rsa:applyToOUT and rsa:applyToFAULT should be set to true
                -->
                <rsa:applyToIN>false</rsa:applyToIN>
                <rsa:applyToOUT>true</rsa:applyToOUT>
                <rsa:applyToFAULT>true</rsa:applyToFAULT>

                <rsa:strictRules>true</rsa:strictRules>
                <rsa:serialization>Compact</rsa:serialization>
                <rsa:contentType>application/json</rsa:contentType>

                <!-- EXPLORE -->
                <rsa:customValidatorName>RSA-AAEC-3.2</rsa:customValidatorName>
                <rsa:customErrorHandlerName>RSA-AAEC-3.2</rsa:customErrorHandlerName>
                <rsa:customContentHandlerName>RSA-AAEC-3.2</rsa:customContentHandlerName>

                <!-- EXPLORE -->
                <rsa:errorURL>https://community.rsa.com/community/products/adaptiveauthentication-ecommerce</rsa:errorURL>

                <!-- [JWS[JWE]] -->
                <!-- Verifies JWS: expects a JWS, gets the public from certificate and verifies JWS with that public key -->
                <rsa:jwsVerify>

                    <rsa:signedFirst>false</rsa:signedFirst>

                    <rsa:validSigningAlgorithm>RS256</rsa:validSigningAlgorithm>

                    <!-- Gets the public key from the x5c certificate header -->
                    <rsa:verifyKeySource>
                        <rsa:jwsSource>
                            <rsa:fromJwxHeader header="x5c"/>
                            <rsa:validateCerts>false</rsa:validateCerts>

                            <!-- Checks if there a user with corresponding certificate based on rsa:jwsAuthSubject -->
                            <rsa:authenticateEmbeddedCert>false</rsa:authenticateEmbeddedCert>
                        </rsa:jwsSource>
                    </rsa:verifyKeySource>

                    <rsa:jwsHeaders>
                        <rsa:criticalHeaders>
                            <rsa:header name="exp"/>
                        </rsa:criticalHeaders>
                    </rsa:jwsHeaders>

                </rsa:jwsVerify>

                <!-- Decrypts JWE: expects a JWE and decrypts with private key -->
                <rsa:jweDecrypt>

                    <!-- [JWS[JWE]] -->
                    <rsa:encryptedFirst>true</rsa:encryptedFirst>

                    <rsa:validEncryptAlgorithms>A128CBC-HS256</rsa:validEncryptAlgorithms>
                    <rsa:validKeyMgmtAlgorithms>RSA-OAEP</rsa:validKeyMgmtAlgorithms>

                    <!--
                        Gets the private key associated with user rsa:jweCertOwner.rsa:identity .
                    -->
                    <rsa:decryptKeySource>
                        <rsa:jweSource>
                            <rsa:fromJwxHeader header="x5c"/>
                            <rsa:validateCerts>false</rsa:validateCerts>

                            <!--
                                Verifies if the certificate in x5c header is same as certificate assigned to rsa:jweCertOwner.
                            -->
                            <rsa:validateAssignedEntity>true</rsa:validateAssignedEntity>
                        </rsa:jweSource>
                    </rsa:decryptKeySource>
                </rsa:jweDecrypt>
            </rsa:profile>

            <!--
                To rsa:authenticateEmbeddedCert, we need to set subject to do loginModule.login().
                If this is not set authenticateEmbeddedCert will fail
            -->
            <rsa:jwsAuthSubject>consumer</rsa:jwsAuthSubject>

            <rsa:jweCertOwner>
                <rsa:identity>akana-jwt-asym-enc-out.user</rsa:identity>
            </rsa:jweCertOwner>
        </rsa:processInbound>

        <rsa:properties>
            <rsa:property name="message.expiration.secs">60</rsa:property>
            <rsa:property name="clock.skew.secs">120</rsa:property>
        </rsa:properties>

        <rsa:audit>NONE</rsa:audit>
        <rsa:verboseErrors>false</rsa:verboseErrors>
        <rsa:forceLogging>false</rsa:forceLogging>
    </rsa:JoseExtPolicy>
</wsp:Policy>