Modifying an Existing SAML Installation
Once you have everything set up correctly, your installation will be able to send SAML authorization request messages to your Identity Provider and receive SAML assertions or Artifacts in response.
However, certain changes in the Akana Platform will impact your SAML configuration. If any of these changes occur, the metadata is automatically updated on the Akana Platform side, but you will need to update the information on the Identity Provider side so that message exchange can occur successfully.
These changes are essentially anything that affects a URL used for the SAML feature; either adding or changing a URL. For example:
- Creating a new OAuth Provider domain in Community Manager
- Changing the Authorization Server URL currently used for an OAuth Provider domain in Community Manager
- Configuring a new login URL for Community Manager
This chapter includes information about the steps you will need to take to update your Service Provider account information with your Identity Provider if any of these changes occur.
Adding a new OAuth Provider domain: manual IdP configuration
When you set up the domain in Policy Manager and generate the metadata XML file, there are two endpoints in the metadata XML file in the AssertionConsumerService node. The first entry is designated as the default binding as shown in the following example.
<md:AssertionConsumerService Binding="urn:oasis:names:tc:SAML:2.0:bindings:HTTP-POST"
Location="http://acmepaymentscorp.com/api/login/ssoLogin" index="0" isDefault="true" />
You then import the metadata to set up your Service Provider account with your Identity Provider.
However, let's say that in Community Manager you go on to set up one or more OAuth provider domains referencing this domain. Each time a new OAuth provider domain is set up, the metadata XML file is updated dynamically with the endpoint for the new domain; but it will not work with the Identity Provider unless the new endpoint is set up on the identity provider side.
Each time a new OAuth Provider domain is set up in Community Manager, the new endpoint must be added in the Service Provider account with the Identity Provider so that the authorization endpoint for the new OAuth Provider domain will work.
Each Identity Provider has a different setup, refer the following applicable example.
To add a new authorization URL in PingFederate
- In Community Manager, create the new OAuth Provider domain. See, To configure a SAML OAuth Provider domain in Community Manager.
- Save the authorization server URL (set up on the last page of the wizard, Branding).
- Sign in to your PingFederate account.
- Go to Assertion Consumer Service URL.
- Add the new URL as shown below. Two values are important: Binding and Endpoint URL.
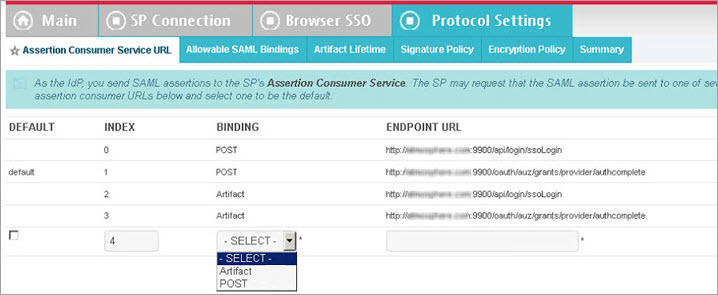
- Save the changes.
To add a new authorization URL in SSO Circle
- In Community Manager, create the new OAuth Provider domain. See, To configure a SAML OAuth Provider domain in Community Manager.
- Go to the updated metadata file ({protocol_scheme}://{host}:{port}/saml/{sp_domain_name}/metadata). Make sure the new URL is there; refresh the page if needed.
- Click View Source and copy the XML making sure you exclude the XML processing instruction at the top.
- Sign in to your account in SSO Circle and select Manage Metadata.
- Update the metadata for the account. If you are using the free SSO Circle service, you cannot edit the account; you will need to delete and recreate. Make sure you use exactly the same name.
- Paste the updated metadata and select Submit. The XML is processed and you should see a success message when processing is complete.