Configuring Elasticsearch with Security
Learn how to configure secure Elasticsearch, to add encryption for node to node communication and client communication.
Note: The information in this document is for configuring Elasticsearch security only. For general information about installing and configuring Elasticsearch, see Installing and Configuring Elasticsearch.
On this page:
- Secure Elasticsearch: version compatibility
- Setting up secure Elasticsearch: Overview
- Step 1: Modify the Elasticsearch YAML file
- Step 2: Change the bootstrap.password value for built-in users
- Step 3: Set up user and user roles
- Step 4: Add user with specific roles
- Step 5: Set up encryption for communications between nodes in a cluster/encrypting HTTP client communications
- Step 6: Set up encryption for communications from the client to the Elasticsearch cluster
Secure Elasticsearch: version compatibility
If you're using Elasticsearch and want security over SSL/TLS to add encryption for node to node communication and client communication, there are some additional setup and configuration steps, as covered in this document.
Elasticsearch uses X-Pack for encrypted communication. X-Pack is bundled free with Elasticsearch, as part of the free Basic service offered by Elasticsearch (see https://www.elastic.co/subscriptions). Nothing extra is required.
For information about the supported Elasticsearch versions for a specific Akana Platform version, go to the System Requirements doc, Elasticsearch section.
Setting up secure Elasticsearch: Overview
To set up and configure secure Elasticsearch, follow all steps below.
- Step 1: Modify the Elasticsearch YAML file
- Step 2: Change the bootstrap.password value for built-in users
- Step 3: Set up user and user roles
- Step 4: Add user with specific roles
- Step 5: Set up encryption for communications between nodes in a cluster/encrypting HTTP client communications
- Step 6: Set up encryption for communications from the client to the Elasticsearch cluster
Step 1: Modify the Elasticsearch YAML file
You will need to manually change some of the settings in one of the Elasticsearch configuration files, elasticsearch.yml, to enable X-Pack security.
The location of the elasticsearch.yml file depends on your installation method; for example, it might be stored in the /etc/elasticsearch/ folder. For information about the location, refer to the Elasticsearch documentation: https://www.elastic.co/guide/en/elasticsearch/reference/current/settings.html#config-files-location.
It might have some default placeholder content, but not all the placeholder values.
As a starting point to model your changes, you can use the example in Sample Elasticsearch YAML file with security settings.
Note: The first part of the file, up to the section titled Various, is needed for all Elasticsearch installation, even if security is not added. The last section, Various, is where you set up the values for your secure installation.
You'll also need to set up other values. For details on how to modify the elasticsearch.yml file with the general settings for an Akana API Platform implementation, see What changes do I need to make to the Elasticsearch YAML file?
For general information about the elasticsearch.yml file, see https://www.elastic.co/guide/en/elasticsearch/reference/current/settings.html.
To configure the Elasticsearch YAML file
If you're using a free version of Elasticsearch, you'll need to make sure both these lines are in your file, uncommented and set to true. If you have a paid version, the default for both these values is already true. Consult your Elasticsearch documentation.
- In the YAML file, change the value for the xpack.security.enabled setting to true.
xpack.security.enabled: true
Use the example in Sample Elasticsearch YAML file with security settings below as a guide (you can copy and paste). The secure values are set in the last section, Various.
- Change the value for the xpack.security.transport.ssl.enabled setting to true.
xpack.security.transport.ssl.enabled: true
- To enable security, change the value for the xpack.security.autoconfiguration.enabled setting to true. This property is specific to Elasticsearch 8.x version and enables security auto configuration. See Security Settings.
xpack.security.autoconfiguration.enabled: true
- Save the changes.
- Restart the Elasticsearch cluster.
Sample Elasticsearch YAML file with security settings
Note: The example below excludes the first part of the YAML file, and shows only the last part, with the security settings. For an example of the first part of the file, see Sample Elasticsearch YAML file.
The example below includes the following lines which are needed for implementing secure Elasticsearch:
- xpack.security.enabled: true
- xpack.security.transport.ssl.enabled: true
- xpack.security.autoconfiguration.enabled: true
# ======================== Elasticsearch Configuration =========================
#
...
#
# ---------------------------------- Various -----------------------------------
# (This section is needed only if you want to configure security)
#
# Require explicit names when deleting indices:
#
#action.destructive_requires_name: true
xpack.security.enabled: true
#xpack.ssl.client_authentication
#xpack.ssl.verification_mode: certificate
#xpack.security.transport.ssl.enabled: true
#xpack.security.http.ssl.enabled: true
#xpack.security.autoconfiguration.enabled: true
#pkcs12 or jks
#xpack.security.http.ssl.keystore.path: certs/elastic-keystore.p12
#xpack.security.http.ssl.keystore.key_password: xxx
#xpack.security.http.ssl.keystore.password : xxx
#xpack.security.http.ssl.truststore.path: certs/elastic-truststore.p12
#xpack.security.http.ssl.truststore.password : xxx
#
#xpack.security.transport.ssl.verification_mode: certificate
#xpack.security.transport.ssl.keystore.path: certs/elastic-keystore.p12
#xpack.security.transport.ssl.keystore.key_password: xxx
#xpack.security.transport.ssl.keystore.password : xxx
#xpack.security.transport.ssl.truststore.path: certs/elastic-truststore.p12
#xpack.security.transport.ssl.truststore.password : xxx
#pem
#xpack.security.transport.ssl.verification_mode: certificate
#xpack.security.transport.ssl.key: certs\instance.key
#xpack.security.transport.ssl.certificate: certs\instance.crt
#xpack.security.transport.ssl.certificate_authorities: [ "certs/ca.crt" ]
#xpack.security.http.ssl.enabled: true
#xpack.ssl.verification_mode: certificate
#xpack.security.http.ssl.keystore.path: certs/elastic-keystore.p12
#xpack.security.http.ssl.truststore.path: certs/elastic-truststore.p12
Step 2: Change the bootstrap.password value for built-in users
Elasticsearch comes with a built-in default user. You will need to change the bootstrap.password value.
For information about changing the bootstrap.password value for built-in users, refer to the Elasticsearch help: https://www.elastic.co/guide/en/elastic-stack-overview/current/get-started-built-in-users.html.
Step 3: Set up user and user roles
You can:
To add new roles using the X-Pack role management API
Use the built-in user, which you updated in the previous step, to call this API, which is part of the Elasticsearch API. See https://www.elastic.co/guide/en/elasticsearch/reference/current/security-api-get-role.html.
To use this API, you must have at least the manage_security cluster privilege.
Adding a new role: example
The following API adds a new role, read-only-user, with a privilege of read for the search indexes. This can be used on the containers where search is performed but indexing is not (Community Manager Scheduled Jobs feature is not installed).
URL:
POST /_security/role/read_only_user
Message body:
{
  "cluster": ["all"],
  "indices": [
    {
      "names": [ "index1", "index2" ],
      "privileges": ["all"],
      "field_security" : { // optional
        "grant" : [ "title", "body" ]
      },
      "query": "{\"match\": {\"title\": \"foo\"}}" // optional
    }
  ],
  "applications": [
    {
      "application": "myapp",
      "privileges": [ "read" ],
      "resources": [ "*" ]
    }
  ],
  "run_as": [ "other_user" ], // optional
  "metadata" : { // optional
    "version" : 1
  }
}
Example: adding a role es-admin with indices privilege all
URL:
POST /_security/role/es-admin
Message body:
{
  "cluster": ["all"],
  "indices": [
    {
      "names": [ "index1", "index2" ],
      "privileges": ["all"],
      "field_security" : { // optional
        "grant" : [ "title", "body" ]
     },
     "query": "{\"match\": {\"title\": \"foo\"}}" // optional
    }
  ],
  "applications": [
    {
      "application": "myapp",
      "privileges": [ "admin" ],
      "resources": [ "*" ]
    }
  ],
  "run_as": [ "other_user" ], // optional
  "metadata" : { // optional
    "version" : 1
  }
}
The container with Community Manager Scheduled jobs feature installed needs a user with indices privileges all. Use the above es-admin role on these containers.
You might also need a user with a built-in role of superuser to perform different tasks on the cluster. For information on setting this up, refer to https://www.elastic.co/guide/en/elastic-stack-overview/6.3/built-in-roles.html.
To add users and roles using role mapping files
For information about using this approach, see https://www.elastic.co/guide/en/elasticsearch/reference/6.3/users-command.html (Elasticsearch help).
Step 4: Add user with specific roles
Use the built-in user above to call this API. To use this API, you must have at least the manage_security cluster privilege.
For information about using this approach, see https://www.elastic.co/guide/en/elasticsearch/reference/6.3/security-api-put-user.html (Elasticsearch help).
Example #1: adding adminuser
The following example creates a user adminuser.
URL:
POST /_security/user/adminuser
Message body:
{
  "password":"Specify Password",
  "roles":[ "admin", "other_role1" ],
  "full_name":"Admin User",
  "email":"adminuser@example.com",
  "metadata" : {
    "intelligence" : 7
  }
}
Example #2: adding superuser
The following example creates a user superuser.
URL:
POST /_security/user/superuser
Message body:
{
  "password":"Specify Password",
  "roles":[ "superuser" ],
  "full_name":"Some Super User",
  "email":"superuser@example.com",
  "metadata" : {
    "intelligence" : 7
  }
}
Step 5: Set up encryption for communications between nodes in a cluster/encrypting HTTP client communications
For information about encryption, please follow the Elasticsearch instructions at this URL: https://www.elastic.co/guide/en/elasticsearch/reference/6.3/configuring-tls.html#node-certificates.
Step 6: Set up encryption for communications from the client to the Elasticsearch cluster
To complete the setup, configure the settings relating to secure Elasticsearch in the Akana Administration Console.
To configure secure Elasticsearch settings in the Akana Administration Console
- Log in to the Akana Administration Console for the container.
- Go to Configuration > com.akana.es.client.security. You'll see the settings, as shown below:
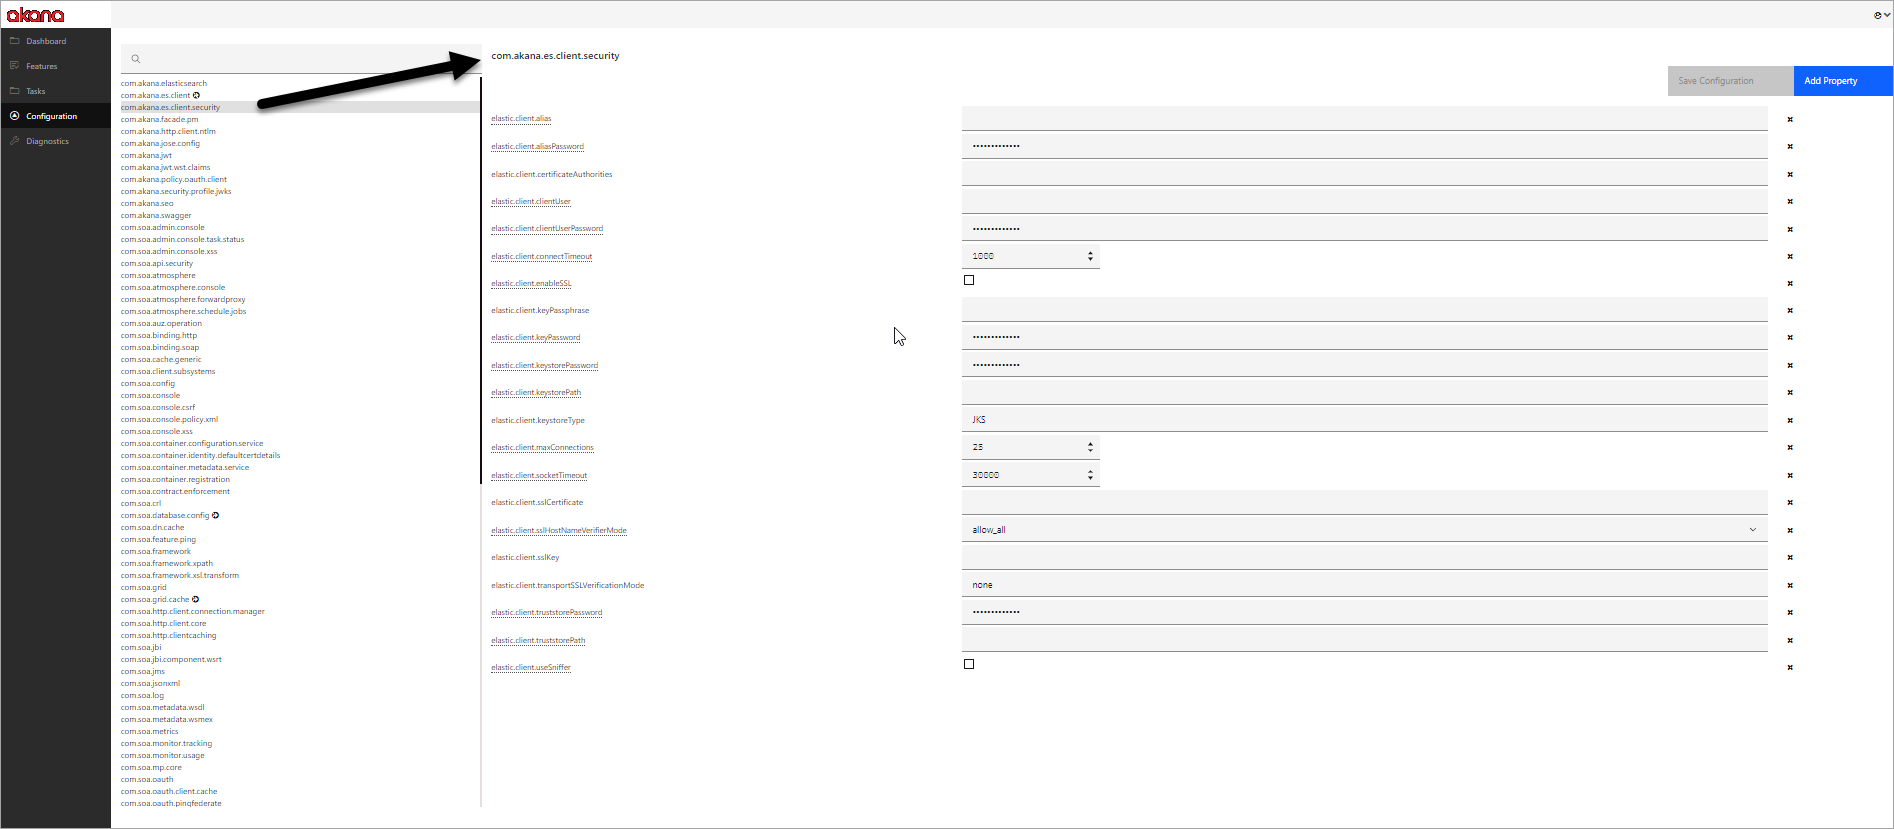
- For elastic.client.keystoreType, specify one of the following values:
- PKCS12 (the default)
- JKS
- PEM
- For elastic.client.transportSSLVerificationMode, specify one of the following values:
- none (the default)
- certificate
- full
For details about these values, please refer to the Elasticsearch documentation.
- If the mode is Rest Client, only PKCS12 and JKS formats are supported. Provide the following:
- elastic.client.keystorePath
- elastic.client.keystorePassword
- elastic.client.truststorePath
- elastic.client.truststorePassword
- elastic.client.sslHostNameVerifierMode—The default is allow_all. The other possible value is default, which enforces host name verification.
Note: For Rest Client, only PKCS12 and JKS formats are accepted at this time. The PEM formats are not supported.