Installing Lifecycle Manager
This document provides reference information and examples relating to installation and configuration of Lifecycle Manager version 8.0.2 and later with the Akana Platform.
Notes:
- This document provides the steps you need for a fresh install. If you're upgrading from a previous version of Lifecycle Manager, refer to the upgrade documentation. See Upgrading Lifecycle Manager.
- This document addresses installation of Lifecycle Manager version 8.0.2 and later.
On this page:
LM Installation Procedure:
- Lifecycle Manager 8.0.2 and later: Installation Overview
- Step 1: Gather ZIP files and download to the install folder
- Step 2: Unzip installation files in the correct sequence
- Step 3: Run Configurator to configure Lifecycle Manager container
- Step 4: Start the Lifecycle Manager instance
- Step 5: Install and configure the Akana Lifecycle Manager Application feature
- Step 6: Extract javaclients.zip file and specify the URL in the configuration settings
- Step 7: Update the Lifecycle Manager configuration settings
- Step 8: Create a Lifecycle Manager Library
LM Installation Tasks/Reference:
- Supported databases
- Database drivers
- Creating the LM properties file for silent install
- Creating a container using silent install
- Creating an asset library
- Related Topics
LM Installation Procedure:
Lifecycle Manager 8.0.2 and later: Installation Overview
You can install Lifecycle Manager in a single OSGi container.
You'll need to first install the Akana Platform, which provides the underlying infrastructure for Lifecycle Manager, and then install Lifecycle Manager itself.
For database version information, see Supported databases.
For version 8.0.2 and later, follow the steps in this document, from Step 1: Gather ZIP files and download to the install folder onwards.
Step 1: Gather ZIP files and download to the install folder
The first step is to download the required ZIP files for the Akana Platform and for Lifecycle Manager.
First, create two folders:
- A temporary download location for the Lifecycle Manager download ZIP file.
- A folder for your installation; for example, LM2019.1.
To download the installation ZIP files
- Log in to the Akana Support Center (https://www.akana.com/support).
Note: If you don't have login credentials for the site, contact Akana technical support to get access.
- In the Downloads section, select Login to Download Software (https://library.roguewave.com/display/SUPPORT/Akana+-+Product+Downloads).
- Choose Akana Lifecycle Manager Product Downloads.
- Download the Lifecycle Manager file to the temporary download location you set up in Step 1. For example, for 2019.1.20:
- Akana Lifecycle Manager 2019.1.20.zip
- For 2019.1.x, expand the relevant Additional Required files for LM 2019.1.x section, and download one of the zip files based on your operating system, to your temporary location:
- Linux: akana-platform-linux-jre_2019.1.x.zip
- Windows: akana-platform-win-jre_2019.1.x.zip
- No JRE: api-platform-no-jre-2019.1.x.zip
Step 2: Unzip installation files in the correct sequence
The next step is to extract the files, following the exact sequence below.
Note: You'll need a password to unzip the files. If you don't know the password, contact your Akana representative.
To unzip the installation files
- In the folder for your installation, unzip the Akana Platform file , for example, either akana-platform-linux-jre_2019.1.11.zip or akana-platform-win-jre_2019.1.11.zip.
- In the temporary folder, unzip the Akana Lifecycle Manager file. The directory structure will include:
- Lifecycle Manager ZIP file: for example, LifecycleManager 2019.1.20.zip.
- Java Clients ZIP file: for example, javaclients_2019.1.20.00410.zip.
- Other files, such as documentation.
- From the temporary folder, copy the main Lifecycle Manager file to the folder for your installation.
- In the folder for your installation, unzip the main Lifecycle Manager Platform file.
After installation, the directory structure will look similar to the following:
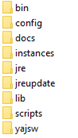
For information about the folders and folder contents for the Akana API Platform, see Installation folder structure.
Step 3: Run Configurator to configure Lifecycle Manager container
You can configure a Lifecycle Manager container using either GUI or silent install options.
GUI installation: follow this step in the Akana API Platform install instructions:
- Step 3: Run Configurator to create the first container (Akana API Platform installation instructions)
Note: If you click through to the Akana API Platform installation instructions, remember to come back to the Lifecycle Manager instructions to complete the LM install procedure.
Silent mode: follow these steps (later in this document):
At the end of this process, you can see that the container was successfully created. In the folder structure, there is a new folder under the instances folder: instances/{containername}. The files for your Lifecycle Manager container are stored in this folder.
Step 4: Start the Lifecycle Manager instance
The next step is to start the instance.
To start the instance
- Go to the /bin folder for your Lifecycle Manager container. For example:
opt/akana/lm802/bin
- Run the startup command.
For Windows:
startup.bat {container name} -bg
For Linux:
./startup.sh {container name} -bg
Step 5: Install and configure the Akana Lifecycle Manager Application Feature
The next step is to install the Lifecycle Manager feature into the new container you just created. Follow the steps below.
There are two features available for installation: Akana Lifecycle Manager Application and Lifecycle Repository. However, when you install Akana Lifecycle Manager Application, the repository is included. You only need to explicitly install the Repository if you want this feature but do not want Lifecycle Manager itself.
Before configuring the database, make sure you have the applicable database driver in place. See Database drivers.
To install the Lifecycle Manager feature on a container
This procedure is along the lines of the standard Akana API Platform instructions, Step 4: Install Policy Manager/Community Manager features on the container, with differences for Lifecycle Manager.
Note: If you click through to the Akana API Platform installation instructions, remember to come back to the Lifecycle Manager instructions to complete the LM install procedure.
- Log in to the Akana Administration Console, using the Admin username and password you specified in Step 3: Run Configurator to configure Lifecycle Manager container. The URL is composed like this: {protocol}://{hostname}:{port}:/admin.
For example: http://lm.acmepaymentscorp.com:9900/admin
- Go to the Available Features list.
- Choose Akana Lifecycle Manager Application and click Install Feature. The feature is installed, including the repository (you do not need to install the Lifecycle Repository option).
The next step is to configure the features you've just installed. You'll have these configuration actions to complete:
- Add Database
- Manage Schemas
- Initialize Repository Database
There are two ways you can work through the sequence:
- Click Configure at the end of the installation process in the previous step. The process steps you through the wizards for each configuration step.
- If you're not continuing straight from the Installation Complete summary, you can resume these tasks later: in the Akana Administration Console for the container, click the Installed Features tab. Pending installation steps are listed at the bottom left. To continue/complete configuration activities, click Complete Configuration.
Before configuring the database, make sure you have the applicable database driver in place. See Database drivers.
To configure the Lifecycle Manager feature on a container
- At the Configure Database Options Wizard, specify your database and other values. Since this is the first container, select Create new database (for subsequent containers, you'll use the same database, so you'd select Use existing database). An example is shown below.
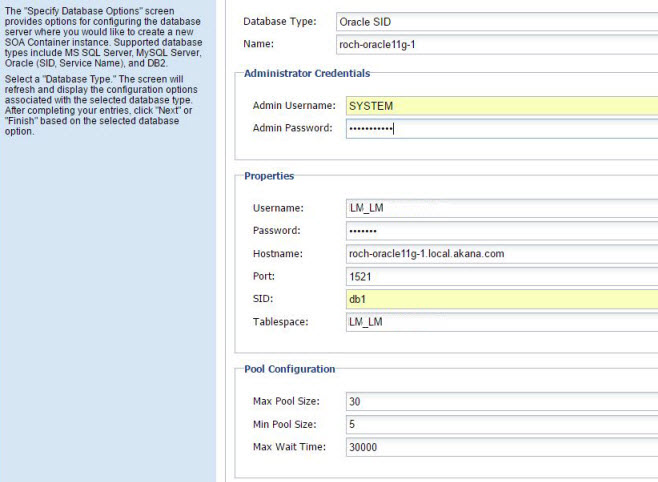
You'll need to have your database driver in place, in the {installation}\instances\{containername}\deploy folder, before running this wizard. See Database drivers.
Note, Oracle 12c only: When using Oracle 12c to configure a new database, the DBA must run this query: GRANT SELECT ON SYS.USER$ TO SYSTEM; (substitute the SYSTEM user for the user specified for the Administrator credentials). This is because Oracle 12c introduced restricted access to SYS.USER$, which the platform uses to query on.
- At the Manage Schemas wizard, check the box under Available Schemas and click Finish. The schema is installed.
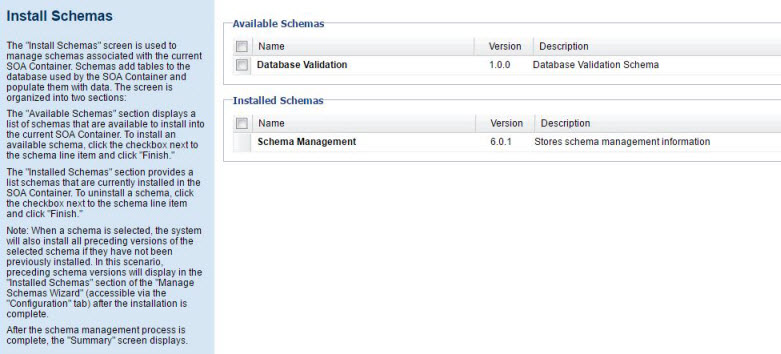
Note: What you see in the Manage Schemas wizard might vary according to the database you're using. For example, for Oracle 12 you'll need to check the Database Validation checkbox.
- At the Schema Management Successful summary page, close the wizard.
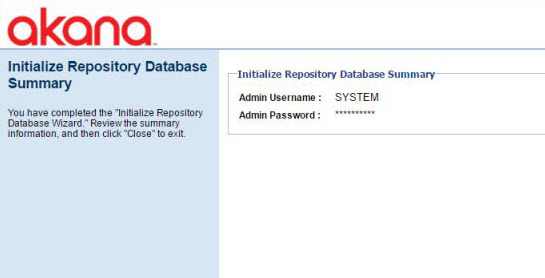
- Select the next configuration action, Initialize Repository Database. The Initialize Repository Database wizard appears, as shown below.
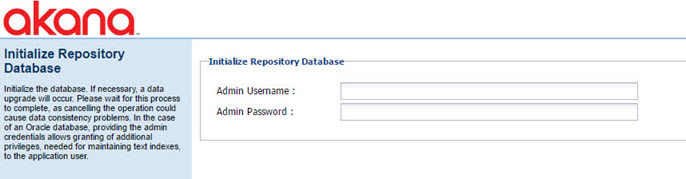
Note: If you're not using an Oracle database, the admin username and password fields are not on this page. Click Finish to complete the initialization task.
- Oracle database only: Follow the on-screen instructions. Entering the administrator credentials is optional, but if you do enter them, make sure you enter the correct credentials for the target database that you set up in the database configuration step earlier (see To configure the Lifecycle Manager feature on a container, Step 1).
- At the summary, as shown below, click Finish.
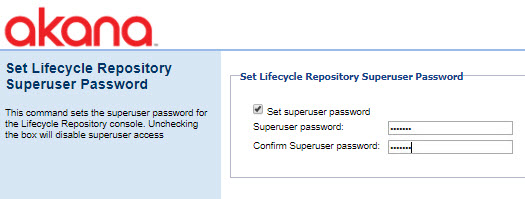
- At the Set Lifecycle Repository Superuser Password page, type in the password, confirm, and then click Finish.
Note: This step is optional; you can also set up the superuser information later, in Step 7. See To enable superuser access using the Akana Administration Console.
That completes the basic installation and configuration of Lifecycle Manager.
Note: MSSQL database only:
When using any version of MSSQL, the DBA will need to manually alter the database to set read committed snapshot and enable snapshot isolation mode. This is not required for installation; however, it will affect how the application behaves once asset content is being populated. Run the following:
ALTER DATABASE {db.instance.name}
	SET READ_COMMITTED_SNAPSHOT ON;
ALTER DATABASE {db.instance.name}
	SET ALLOW_SNAPSHOT_ISOLATION ON;
Step 6: Extract javaclients.zip file and specify the URL in the configuration settings
The Lifecycle Manager ZIP file you downloaded from the Akana Support center includes the javaclients.zip file.
To make the Java clients available on the Download Center pages for all Lifecycle Manager libraries on the server, there are two steps:
- Locate the javaclients.zip file in the temporary directory in which you unzipped the Lifecycle Manager download file (See Step 2: Unzip installation files in the correct sequence, Step 3).
- Extract the javaclients.zip file to a common directory of your choice, on an HTTP server of your choice that will be accessible to the platform.
- Specify the URL to this common directory in the Admin Console Configuration Settings as shown below.
Note: If you prefer, you can extract these ZIP files, and configure the setting, after completion of the installation. These steps are needed for the availability of the Java clients.
To specify the URL to the javaclients file in the configuration settings
- Log in to the Akana Administration Console, using Administrator credentials.
- Click the Configuration tab.
- On the left, under Configuration Categories, find the com.soa.repository category.
- Locate the repository.config.downloads property and set it to the URL of the folder in which you extracted the javaclients.zip file. For example, if you download the file to a folder named akana/temp, and your domain name is http://example.com, the path would be: http://example.com/akana/temp.
- Click Apply Changes (you might need to scroll down), and then click OK to confirm.
- Restart so that the changes take effect.
Note: You'll need to restart the container when you're setting up the URL for the first time. In a scenario where you're modifying an existing URL, restart is not necessary.
Step 7: Update the Lifecycle Manager configuration settings
When the Lifecycle Manager feature is successfully installed, the Lifecycle Manager superuser can configure specific settings, such as hostname and admin users, for your implementation.
High-level steps:
- If you didn't already do it as part of the installation wizard, enable superuser access: To enable superuser access using the Akana Administration Console.
Note: It's best to use the superuser login only to bootstrap the initial install, to configure the LDAP settings. Once you've configured LDAP and specified one or more Admin users, all Lifecycle Manager Admin tasks should be done via the Lifecycle Manager Console or Akana Administration Console. For security reasons, it's best to disable superuser access at that point, by removing the repository.config.superUserPassword value.
- Log in as the superuser and update the configuration settings: To update Lifecycle Manager configuration settings.
- Optional but recommended, see note in #1 above: verify Admin user access and then disable superuser access.
To enable superuser access using the Akana Administration Console
- Log in to the Akana Administration Console, using Administrator credentials.
- Click the Configuration tab.
- Set the superuser information:
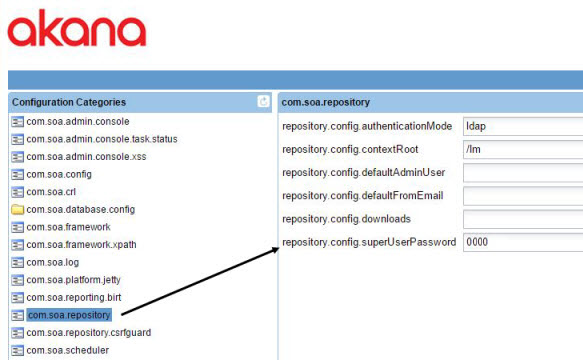
- On the left, under Configuration Categories, find the com.soa.repository category.
- Locate the repository.config.superUserPassword property and set the superuser password, as shown below.
- Click Apply Changes (you might need to scroll down), and then click OK to confirm.
- Log out of the Akana Administration Console.
To update Lifecycle Manager configuration settings
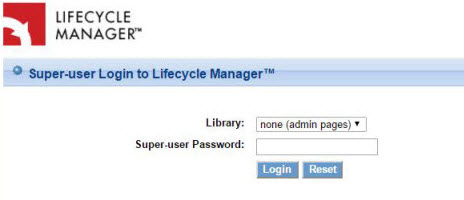
- Log in to the Lifecycle Manager superuser login page. For example: http://www.acmepaymentscorp.com:9900/lm/application/access/suLogin.do (see note about superuser login). An example of the login page is shown below.
- The Administration page shows a list of installation tasks, as shown below.
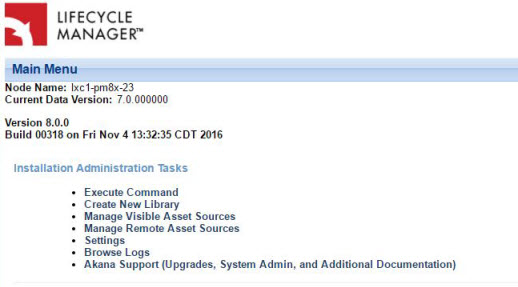
- Click Settings to access the Administration Settings page. The General Settings are displayed, as shown below.
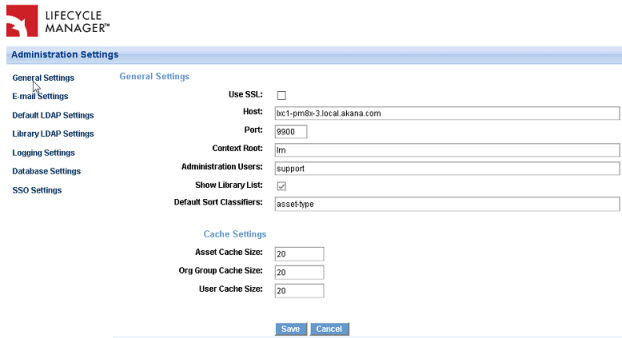
- In the General Settings page, add or change the following settings:
- Make sure the Use SSL checkbox is cleared. You'll complete separate steps later to manually configure the instance with SSL properties. For information on SSL configuration, refer to the Lifecycle Manager System Administrator Guide.
- Specify Host (for example: lxc1-pm8x-23.local.acmepaymentscorp.com).
- Specify Port (for example, 9900).
- Administration Users: A list of LDAP User IDs, separated by semi-colons. These are the users that have permission to access the Lifecycle Manager Admin Console (not the Akana Platform Admin Console). Specify one or more admin users, such as Technical Support personnel.
- Optional: Check the Show Library List checkbox. If you check this box, all libraries for the installation are displayed on the login page.
- Set each of the following cache settings to 20: Asset Cache Size, Org Group Cache Size, User Cache Size.
- Click Save.
- From the Administration page, click Settings, and then go to E-mail Settings, as shown below.
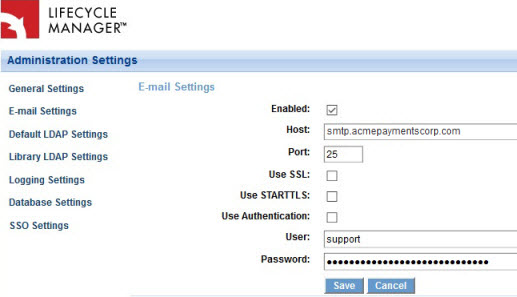
- Enter values as needed:
- Host field: for example, smtpl.acmepaymentscorp.com.
- Optional: If the SMTP server requires authentication, specify User and Password. Otherwise, leave these fields empty to allow anonymous access.
- Click Save.
- From the Administration page, click Settings, and then go to Default LDAP Settings, as shown below.
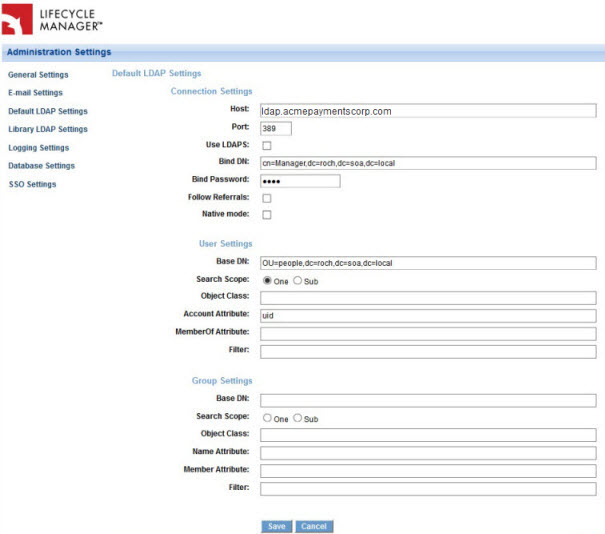
- In the Connection Settings section, enter correct values for your implementation, for the following fields:
- Host (example: ldap.acmepaymentscorp.com)
- Port (example: 389)
- BindDN (example: cn=Manager,dc=roch,dc=soa,dc=local)
- Bind Password (example: 0000)
- In the User Settings section, enter correct values for your implementation, for the following fields:
- Base DN; for example: OU=people,dc=roch,dc=soa,dc=local.
- Search Scope: set to One.
- Account Attribute: set to uid.
- In the Group Settings section, enter correct values for your implementation. Specific fields/values vary; see Establishing group membership in LDAP below. For example:
- Base DN; for example: OU=people,dc=roch,dc=soa,dc=local.
- Search Scope: set to One.
- Account Attribute: set to uid. For more information, see Establishing group membership in LDAP.
- Optional: Library LDAP settings. Not normally needed. The Library LDAP Settings allows specific libraries to use specific LDAP servers. A single library can only use a single LDAP server; if you want all your libraries to use the default LDAP server, library LDAP settings are not necessary.
- Click Save.
As noted above (see note), once Admin users are set up and functional, for security reasons it's best to disable the superuser password setting.
Establishing group membership in LDAP
Note: for more information about Group and Role support, refer to Setting up Group and Role support in LDAP (Lifecycle Manager System Administrator Guide).
There are two ways of establishing group membership in LDAP:
- As a Group object that lists all the members of that group. The example below shows an ldif of a Project Manager group. The name of the group is in the CN attribute, and the members are listed in the uniqueMember attributes (AD may use a different attribute for members; you'll need to verify with the customer LDAP admin):
dn: cn=Project Manager,ou=Groups,dc=roch,dc=soa,dc=local
objectClass: groupOfUniqueNames
objectClass: top
cn: Project Manager
uniqueMember: uid=support,ou=people,dc=roch,dc=soa,dc=local
uniqueMember: uid=ppirrip,ou=People,dc=roch,dc=soa,dc=local
uniqueMember: uid=asmith,ou=People,dc=roch,dc=soa,dc=local
uniqueMember: uid=jmead,ou=People,dc=roch,dc=soa,dc=local
uniqueMember: uid=jswift,ou=People,dc=roch,dc=soa,dc=local
- As a Person object that lists the groups that user is a member of (typically using the memberOf attribute). In the example below, Philip Pirrip is a member of the OU=Managers group:
dn: uid=ppirrip,ou=People,dc=roch,dc=soa,dc=local
objectClass: inetOrgPerson
objectClass: organizationalPerson
objectClass: person
objectClass: top
cn: Philip Pirrip
sn: Pirrip
givenName: Philip
homePhone: 123-456-7890
mail: philip.pirrip@acmepaymentscorp.com
memberOf: cn=Managers,ou=Groups,dc=roch,dc=soa,dc=local
uid: ppirrip
userPassword:: e1NTSEF9dEt5U3A0bWllRFViRTFIR05COUlBVHVRVGZRbk1Kd3V1VGY2SUE9P
Q==
Step 8: Create a Lifecycle Manager Library
Now it's time to test the LM install by creating a new Lifecycle Manager library.
To create a new Lifecycle Manager library
- Log in to the Akana Administration Console for Lifecycle Manager, using the previously designated installation administrator account, such as Technical Support. For example: http://www.acmepaymentscorp.com:9900/lm/admin/mainMenu.do.
- Select Create New Library. The Create Library page appears, as shown below.
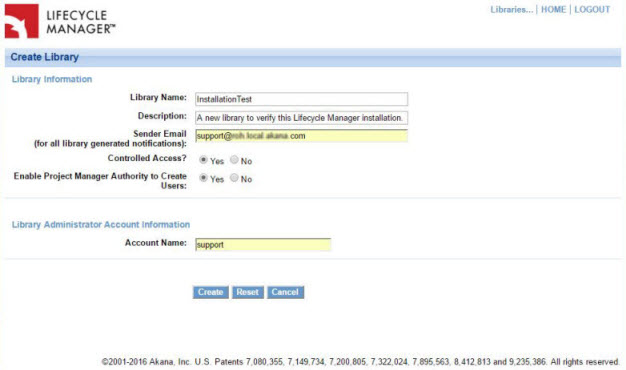
- Provide values for the following fields (for information about the fields, see Create Library page: field descriptions):
- Library Name
- Description
- Sender Email: this value is displayed in the From field on system-generated emails. The system doesn't process responses to these emails, so it's a good idea to include an address indicating that, such as no_reply@example.com.
- Library Administrator Account Name
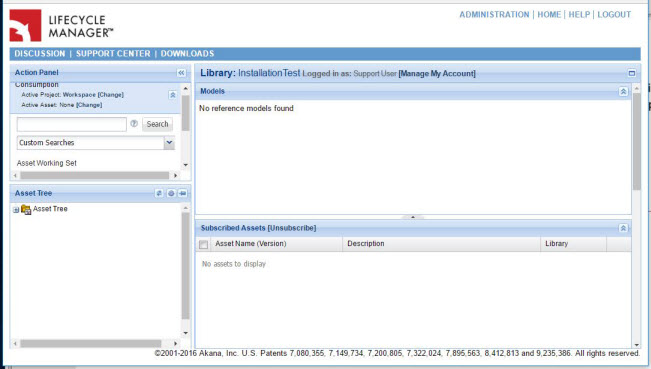
- When all is done, you'll see a message that the library was successfully created, and the ID of the new library. You can now click the Libraries link at the top of the page to load the home page for the newly created library. An example is shown below.
LM Installation Tasks/Reference:
Supported databases
Lifecycle Manager versions 8.0 and later support these databases:
- Microsoft SQL Server 2012, 2016
- Oracle 12c, 12c Release 2. Oracle 18c (18.3) supported in version 2019.1.0 and later. Oracle 19c supported in version 2019.1.5 and later.
Note: The Oracle database password must not start with a number or special character.
Note: Depending on the type and version of the database you're using, you might also need to place the database driver in the correct location as part of Step 5: Install and configure the Akana Lifecycle Manager Application Feature. See Database drivers.
Database drivers
Depending on which database server you're using, you might need to install a database driver before running the Configure Database Options Wizard.
If you need to install a database driver, place it in this location:
- {installation}/instances/{containername}/deploy folder
For example, for Oracle 12c, it might be:
- /akana/lm2019.1/instances/lm/deploy/ojdbc7.jar (Downloadable from: http://www.oracle.com/technetwork/database/features/jdbc/jdbc-drivers-12c-download-1958347.html; requires accepting the agreement and logging in.)
Database options, with driver information:
- Oracle 12c: Install the appropriate driver that aligns with your Oracle 12c instance version. See Oracle Database 12c Release 1 JDBC Driver Downloads.
Also, for Oracle 12c, see note about database permissions needed.
Oracle 19c: Install the appropriate driver (see Oracle Database 19c (19.3) JDBC Driver & UCP Downloads).
- Microsoft SQL Server: No database driver installation is required. The Akana Platform provides the required JTDS support for connecting to MS SQL.
Note: If you're using MSSQL, see additional information to set read committed snapshot and enable snapshot isolation mode.
Creating the LM properties file for silent install
If you're using silent install mode for your installation, you'll need to define the various properties needed by the installation process, in a properties file that is then used in the silent mode install.
Recommended filename and path:
akana/lm.properties
The specific path and filename are not important as long as the silent install command references the correct path and filename.
Values to define in the properties file:
You'll have to provide valid values for the following properties:
- container.instance.name
- credential.username
- credential.password
- default.host
- default.port
Example properties file:
The example below shows how the properties file is put together, with actual values for each property.
container.instance.name=lm
credential.username=administrator
credential.password=password
default.host=lxc1-pm8x-23.local.acmepaymentscorp.com
default.port=9900
Creating a container using silent install
You can create the container using silent install mode, in Step 5 of the installation process. See Step 3: Configure Lifecycle Manager Container above.
To create the container, use the command below. Adjust these values as needed:
- Path to the startup.sh file for your installation
- Path and filename for your properties file
/opt/akana/lm802/bin/startup.sh configurator -Dsilent=true -Dproperties=/home/akana/properties/lm.properties
Creating an asset library
To create an asset library, follow the steps below.
To create an asset library
- Open one of the following URLs in a browser, depending on your setup. If you're using native LDAP mode and have not bootstrapped the setup according to the above instructions, use the superuser login page and the configured password {superuser.password}. Otherwise, use the installation administration login page and specify a valid LDAP user configured in {admin.users} with a valid password. URLs:
- http://{web.server.url.host}/lm/admin (installation administration login page)
- http://{web.server.url.host}/lm/application/access/suLogin.do (superuser login page)
- Select Create Library.
- Fill in the information for your library. For information about the various fields, see Create Library page: field descriptions below.
- Save changes.
Create Library page: field descriptions
Use the information below to determine which values to use in the Create Library page.
| Name | Description |
|---|---|
| Library Name |
The name for the Asset Library. The name is used in the URL when accessing the library via the web with thick clients. Choose a name that is fairly short and will be easy for users to remember. |
| Description | A brief description of the Asset Library. |
| Sender Email | The email address to use as the "from" address on notifications that go out from this library to end users. The format is: username@domain. For example, internalsupport@example.com. The system doesn't process responses to these emails, so it's a good idea to include an address indicating that, such as no_reply@example.com. |
| Controlled Access | If the library is set up for controlled access, all user account requests must be approved by a usage controller before access is allowed. With uncontrolled access, any user who already has an account or requests an account is allowed access. If bootstrapping (in native LDAP mode), it is best to choose No. |
| Enable Project Manager Authority to Create Users |
Choose an option:
|
| Library Administrator information: Account |
The library login account name for the initial library administrator. It must already be an existing user (in LDAP if using guest LDAP mode, or an existing account if using native LDAP mode). If this is the first library created on a new installation in native LDAP mode, there are no accounts yet, and this property should be left blank. To assign a library administrator later, you must log in to the library using the superuser account. |