Installing the Akana API Platform 8.4x
Learn how to download, install, and configure the Akana API Platform 8.4x, including the Akana Platform and all features previously included in Policy Manager and Community Manager.
On this page:
Installation Procedure:
- Overview
- Step 1: Gather ZIP files and download to the install folder
- Step 2: Unzip files into the installation folder in the correct sequence
- Step 3: Run Configurator to create the first container
- Step 4: Install Policy Manager/Community Manager features on the container
- Step 5: (as needed) Install plug-ins on the container
- Step 6: Complete pending tasks to configure container features
- Step 7: Create and configure additional containers
- Step 8: Add Network Director to Policy Manager
- Step 9: Create Community Manager tenant using the Jython script
- Step 10: Run the Community Manager developer portal
Installation Tasks/Reference:
- Supported databases
- Database notes
- Database drivers
- Installation folder structure
- Clear Configurator cache
- Starting a container
- Stopping a container
- Creating a container via the GUI
- Creating a container using silent install (Linux)
- Unregistering and re-registering the Windows service
- Linux install: exporting the JAVA_HOME variable
- Installation wizard: Manage PKI Keys
- Installation wizard: Add Database
- Installation wizard: Manage Schemas
- Installation wizard: Define Policy Manager Administrator Credentials
- Installation wizard: Provisioning
- Installation wizard: Configure Container Instance
- Installation wizard, ND container: Configure WS-Metadata Exchange Options
- Installation Options: Full List
- Policy Manager Add Container wizard
- Sample installation scenarios
- Feature notes: Scheduled jobs
- Feature Notes: Akana Embedded Elasticsearch Node feature
- Optional additional features
Installation Procedure:
Overview
This document provides instructions for installing the Akana API Platform version 8.4.
It covers a very simple scenario of setting up two containers:
- One container for Policy Manager and Community Manager.
- One container for Network Director.
This document covers the following broad activities associated with the installation process:
- Preparation (Steps 1 and 2)
- Creating the first container, installing features and plug-ins, and configuring the container (Step 3 to Step 6)
- Creating and configuring additional containers (Step 7, which is Step 3 to Step 6 repeated for each container as needed)
- Adding Network Director to Policy Manager (Step 8)
- Creating and running the API Platform tenant (Step 9 and Step 10)
Note: Installation task sequence
There are different approaches to the install tasks:
- You can create one container, configure it, and then create the next container, or you can create all containers and then configure the containers. It really doesn't matter. This documentation creates and configures the first container and then the next.
- You can install features and then configure them before installing plug-ins, or you can install features and plug-ins and then configure them. Again, it really doesn't matter. Just make sure all pending installation tasks are complete, on all containers, before creating the Community Manager developer portal tenant. This documentation installs features and plug-ins and then configures.
Step 1: Gather ZIP files and download to the install folder
The first step is to gather the installation ZIP files from the Rogue Wave Support Center and download them to your install folder.
First, create two folders:
- A temporary download location for the download ZIP file.
- A folder for your installation; for example, AAP84.
To download the installation ZIP files
- Log in to the Rogue Wave Support Center (https://library.roguewave.com).
Note: If you don't have a login for the site, contact Akana technical support to get access.
- In the My Resources section, click Product Downloads, and then click Akana - Product Downloads.
- Choose the major version release page: Akana 8.4.x Product Downloads.
- Expand the links at the top of the page to access the files.
- Download the Akana Platform 8.4 GA file to your temporary download location. See Akana Platform: Operating system versions below.
- Download the cumulative update file for the latest version to your temporary location.
- Download the Akana API Platform file to your temporary location. This contains all necessary files for Akana API Platform installation, including Policy Manager and Community Manager installation.
- Download the cumulative update file for the Akana API Platform to your temporary location.
- Optional: if you're using plug-ins, you might also need to download ZIP files for those, and any updates.
Akana Platform: Operating system versions
The Akana Platform 8.4 download file contains within it ZIP files for each operating system, so you can choose the appropriate file for the operating system you're using:
- Windows (includes JRE: akana-platform-win-jre-8.4.xxx.zip
- Linux (includes JRE): akana-platform-linux-jre-8.4.xxx.zip
- Windows, Linux, or Solaris (does not include JRE; provide your own JRE, version 1.8): akana-platform-8.4.xxx.zip
Note: If you're running on Windows and using your own JRE, be sure to set your JAVA_HOME system variable. The platform uses this when registering Windows services.
Step 2: Unzip files into the installation folder in the correct sequence
The next step is to extract the files, following the exact sequence below.
Note: You'll need a password to unzip the files. If you don't know the password, contact your Akana representative.
The sequence is very important. Be sure to install products, and updates, in the sequence given below.
To unzip the installation files
- In the temporary folder, unzip the Akana Platform 8.4 main file. Find the correct version for your operating system (see Akana Platform: Operating system versions above), and unzip that file into your installation folder.
- Unzip the Akana Platform update ZIP file from the temporary folder to your installation folder. If you're prompted whether to overwrite a file, select Yes.
- Unzip the Akana API Platform main file from the temporary folder to your installation folder.
- Unzip the Akana API Platform updates. If you're prompted whether to overwrite a file, select Yes.
- Optional: Install the plug-ins for your installation, if any.
- Optional: Install updates to the plug-ins, if applicable: earliest to latest, overwriting if needed, as above.
Step 3: Run Configurator to create the first container
The Configurator steps you through creating a container, specifying basic values about the container.
Once you've created the container, you can go into the Akana Administration Console for the container and install features into it.
You can create a container:
- Via the GUI, a Windows-based wizard that steps you through the installation process: See Creating a container via the GUI.
- Via silent install using a properties file: see Creating a container using silent install (Linux).
Follow the applicable linked procedure to create the first container, and then continue to the next step.
Step 4: Install Policy Manager/Community Manager features on the container
Follow the short procedure below to install the Policy Manager/Community Manager features on the first container for this two-container scenario (one PM/CM, one ND). For additional information on features for different scenarios, see Sample installation scenarios.
For a summary of features and add-ins for this scenario, see One container with both Policy Manager and Community Manager installed.
To install Policy Manager/Community Manager features on the container
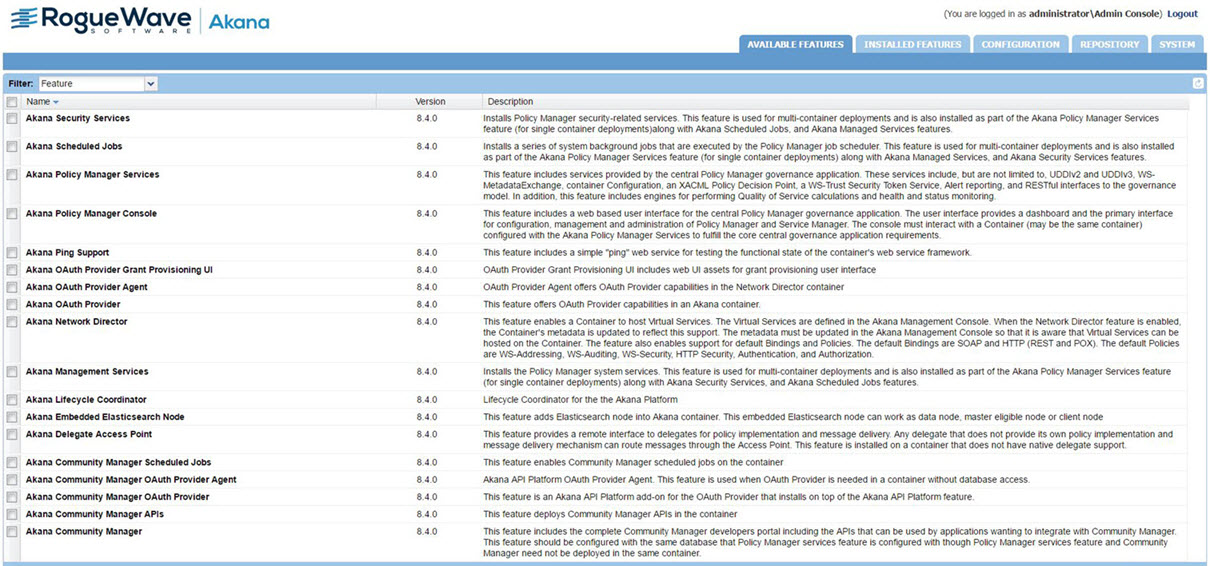
- In the Akana Administration Console, go to the Available Features list.
- Choose the options applicable to your install, and then click Install Feature; then, at the Resolution Summary, click Install Feature again. In this example, you'd choose the features below for the PM/CM container:
- Akana Community Manager
- Akana Community Manager APIs
- Akana Community Manager OAuth Provider
- Akana Community Manager Scheduled Jobs
- Akana Embedded Elasticsearch Node
- Akana OAuth Provider
- Akana Policy Manager Console (for more information on this feature see Using the Policy Manager Console Feature)
- Akana Policy Manager Services (Includes Akana Management Services, Akana Security Services, and Akana Scheduled Jobs. For more information on this feature see Using the Policy Manager Services Feature.)
- At the Installation Complete summary, click Configure (if you are installing plug-ins, click Close and install plug-ins first).
For additional information, if needed, refer to the following topics:
- For more detailed installation instructions: Configure Standalone Container.
- For container deployment options: Container Deployment Options.
The next step is to install any plug-ins that are needed for the container.
Step 5: (as needed) Install plug-ins on the container
Depending on your installation scenario, you might need to install one or more plug-ins on your container to support the container features.
The procedures below walk you through installing the plug-ins for a PM/CM container.
To install plug-ins on the PM/CM container
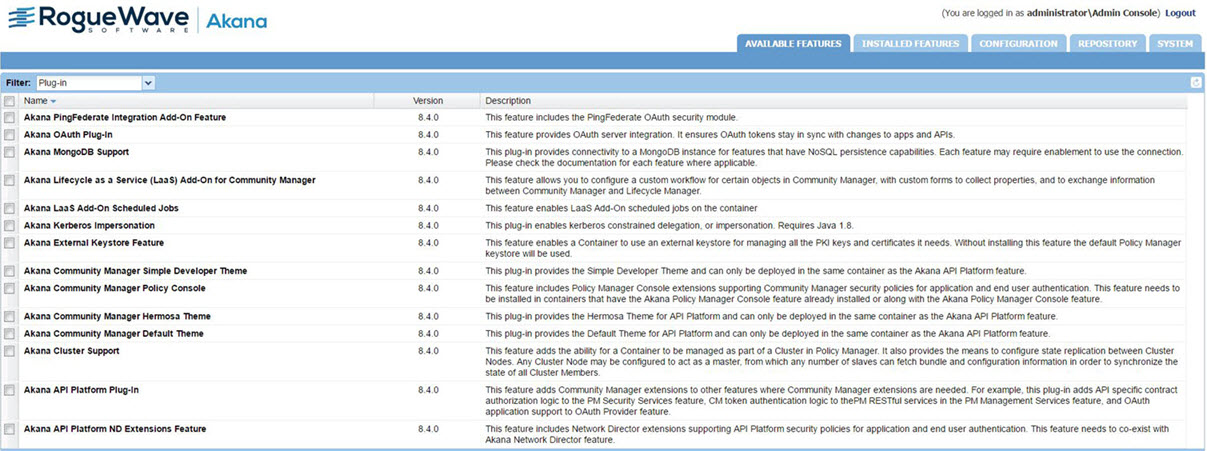
- At the Available Features list, from the Filter drop-down list at the top left, choose Plug-Ins.
- Choose features to install. For example, if Community Manager is installed on the container you'd choose the Akana Community Manager Policy Console and one or more themes:
- Akana Community Manager Policy Console
- Akana Community Manager Default Theme
- Akana Community Manager Hermosa Theme
- Akana Community Manager Simple Developer Theme
- Click Install Feature; then, at the Resolution Summary, click Install Feature again.
- Review the installation summary. To continue to the configuration step, click Configure.
Step 6: Complete pending tasks to configure container features
The next step is to configure the features you've just installed on the container. You can either:
- Click Configure at the end of the installation process in the previous step. The process steps you through the wizards for each configuration step.
- Manually start the configuration tasks at any point. In the Akana Administration Console for the container, click the Installed Features tab. Pending installation steps are listed at the bottom left. Click Complete Configuration to start the process.
Note: Before configuring the database, make sure you have the applicable database driver in place. See Database drivers.
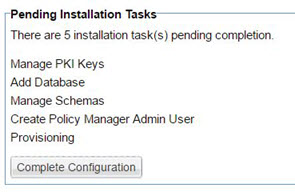
Pending installation tasks for this installation scenario are shown below.
|
|
To configure features for the PM/CM container
- Start the configuration step, either by clicking Configure at the end of the installation process or by choosing Installed Features > Complete Configuration as shown above. Configuration steps vary depending on the features you're installing. The tasks below apply to the PM/CM container scenario.
- At the Manage PKI Keys wizard, choose key management options and other values and then click Finish. Review the summary and then click Go to Next Task.
For more information on this wizard, see Installation wizard: Manage PKI Keys below.
- At the Configure Database Options Wizard, specify your database and other values. Since this is the first container, select Create new database/ For subsequent containers, you'll use the same database, so for a subsequent container you'd select Use existing database. Be sure to follow any applicable database-specific notes from the list below.
Notes:
- You'll need to have your database driver in place, in the {installation}\instances\{containername}\deploy folder, before running this wizard. See Database drivers.
- Oracle: If you're using a new Oracle database, see Database notes: Oracle for additional Oracle-specific information about DBA permissions, password configuration, and database table updates.
- Microsoft SQL Server: For additional notes, refer to Database notes: Microsoft SQL Server below.
- MySQL: If your installation will include Lifecycle Manager, you'll need to add the required grants to the DB user before continuing to Step 4. For details, see Database notes: MySQL with Lifecycle Repository.
For more information on this wizard, see Installation wizard: Add Database below.
- At the Manage Schemas wizard, check the checkbox for the Policy Manager schema, as shown below, and click Finish. Review the summary and then click Go to Next Task.
For more information on this wizard, see Installation wizard: Manage Schemas below.
- At the Define Policy Manager Administrator Credentials Wizard, specify Administrator credentials (username and password). Click Finish. Review the summary and then click Go to Next Task.
For more information on this wizard, see Installation wizard: Define Policy Manager Administrator Credentials below.
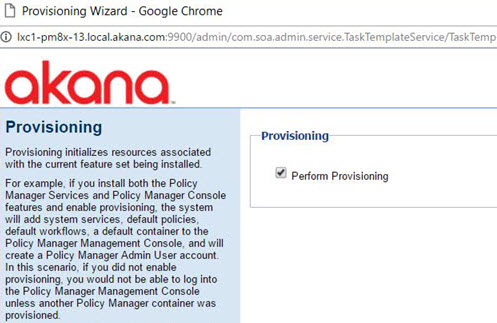
- At the Provisioning Wizard, make sure the box is checked, and then click Finish.
For more information on this wizard, see Installation wizard: Provisioning below.
- When the provisioning task is complete, you'll see a message box prompting you to restart your system. Click OK.
Note: It's important to make sure that the Provisioning task is 100% complete before restarting.
- At the Complete Configuration page, click Close.
Configuration of the first container is now complete.
Step 7: Create and configure additional containers
Once you have the first container set up, it's time to create and configure additional containers. Essentially you'll follow these steps for each container: Step 3: Run Configurator to create the first container through Step 6: Complete pending tasks to configure container features. See To create an additional container below.
Create containers in this sequence:
- First, create all Policy Manager/Community Manager containers.
- Then, create all Network Director containers.
You can create a Network Director container using either GUI or Silent options. For instructions on how to install a Network Director Container (ND1), install and configure the Network Director feature, and register the ND1 container in Policy Manager, refer to Using Network Director Feature.
To create an additional container
- Run Configurator to create the container. See Step 3: Run Configurator to create the first container. Note these differences:
- Use a different port number for each container.
- Install features on the container. See Step 4: Install Policy Manager/Community Manager features on the container. For information on which features you might choose, see Sample installation scenarios. For the Network Director container in this scenario, you would install:
- Akana Network Director
- Install any needed plug-ins on the container.
For the Network Director container, you don't need any plug-ins unless you are setting up a cluster.
- Configure the features. See Step 6: Complete pending tasks to configure container features. Note these differences:
- If you had to copy a database driver for the first container, you'll need to complete the same action for each subsequent container.
- In the Configure Database Options Wizard, choose Use existing database, and add the information about the database you set up for the first container.
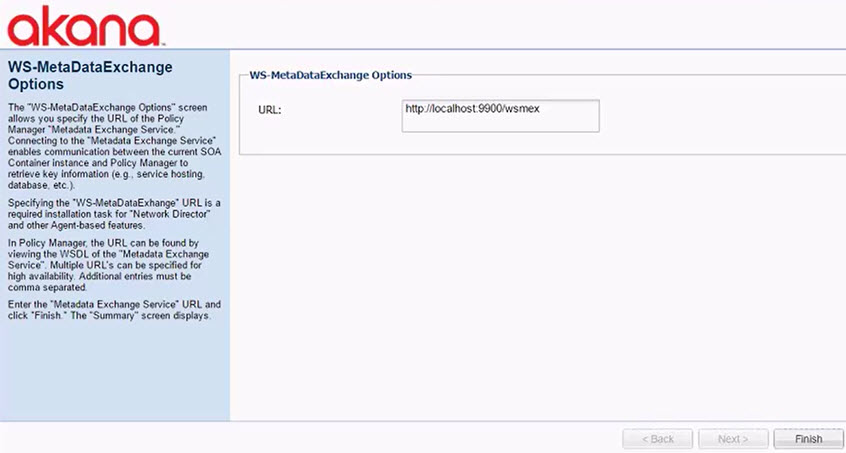
- For the Network Director container, you'll need to configure WS-MetaDataExchange options. Make sure the URL is set to {PM_URL}/wsmex. For example: http://localhost:9900/wsmex. If you have multiple PM/CM containers set up as a cluster, use the URL for the primary node.
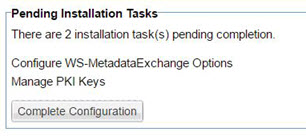
Pending installation tasks for a Network Director container are shown below. For more information on these tasks, see Installation wizard, ND container: Configure WS-Metadata Exchange Options and Installation wizard: Manage PKI Keys.
Follow the steps for each container until all containers are set up and configured.
As you complete the configuration for each container, be sure to restart at the prompt.
Step 8: Add Network Director to Policy Manager
The next step is to add the Network Director to Policy Manager so that you can access the Community Manager developer portal and start sending traffic.
Note: If you are using the Community Manager developer portal, it's not strictly necessary to complete this step, since in version 8.4 you can add and manage API Gateways in the Community Manager developer portal. However, you'll still need this step if you are setting up a single API Gateway to be used by multiple tenants in a multi-tenant deployment.
To add Network Director to Policy Manager
- Using the URL you set up for Policy Manager (Step 3 above), access Policy Manager in the browser. For example: http://localhost:9900. This redirects to the Policy Manager login page: {pm_url}/admin/login.html. Log in using the credentials you set up.
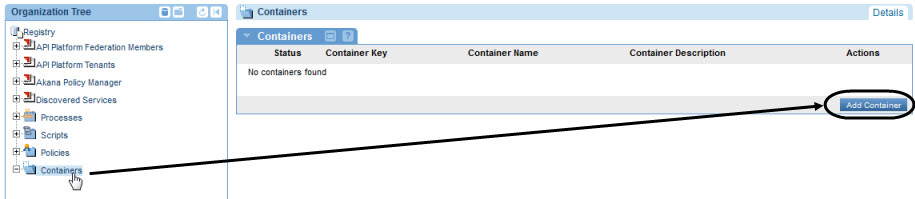
- In the Organization Tree, under Containers, click Add Container, as shown below.
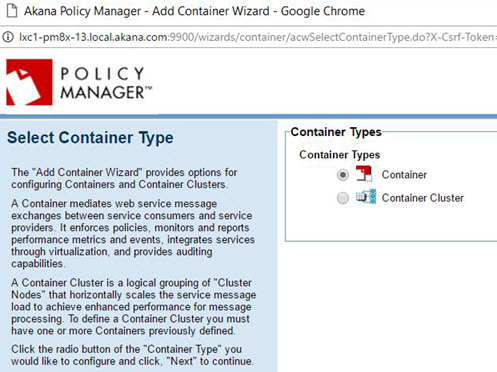
- At the Add Container wizard:
- Select Container Type: Container or Container Cluster. Click Next.
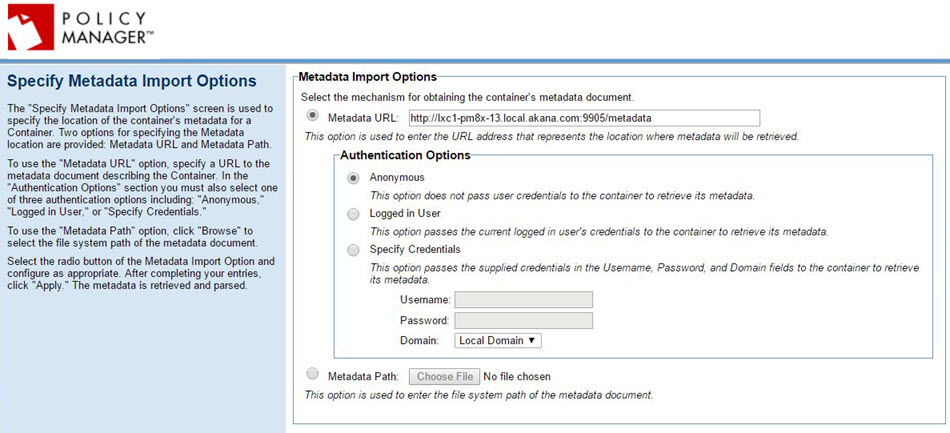
- Specify Metadata Import Options: Set up the metadata URL for the Network Director container, using the URL you set up for the container and appending /metadata. For example: http://localhost:9902/metadata. Click Next.
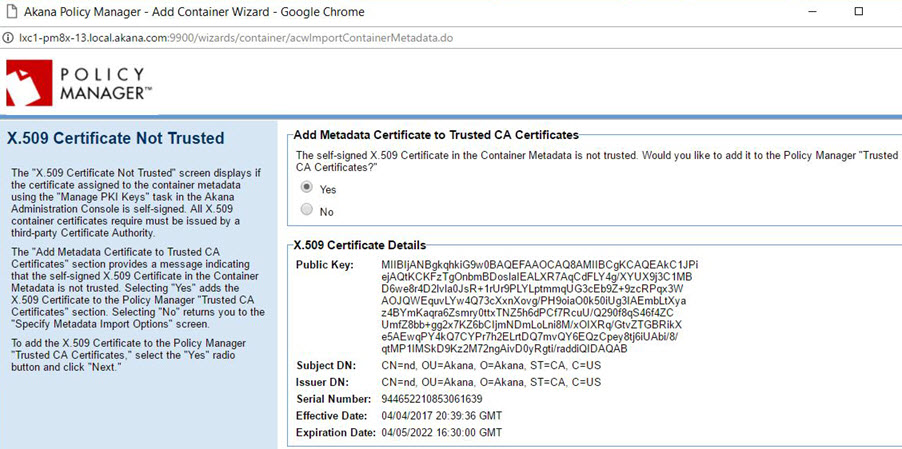
- X.509 Certificate Not Trusted: If you get this message, modify the certificate or accept the default to add the certificate to the Policy Manager trusted certificate store. Click Next.
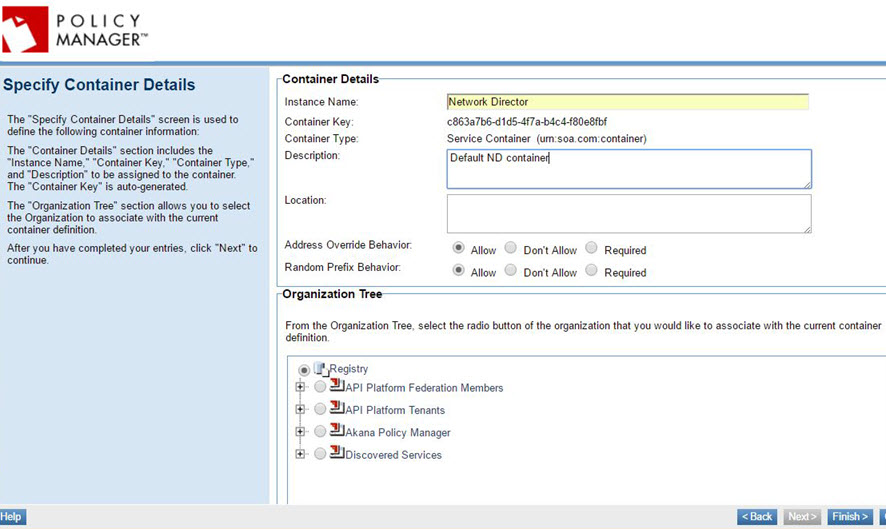
- Specify Container Details: Provide an instance name (for example, ND1). Click Finish.
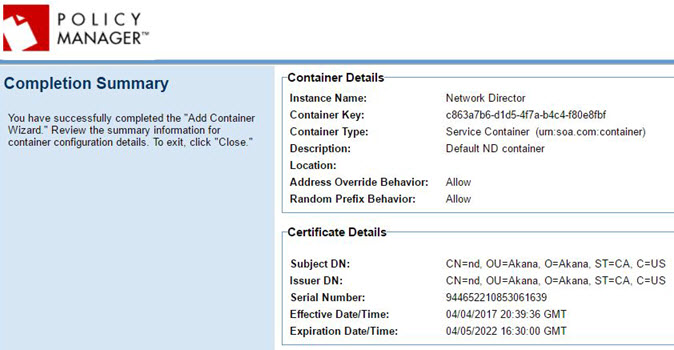
- Completion Summary: review the summary and then click Close.
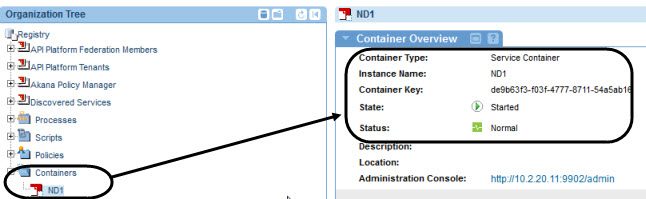
- Check that the container appears in Policy Manager. It should look something like the below. The initial state value is Stopped, but after a short time it changes to Started as shown below.
If you're using the Community Manager developer portal, the next step is to create the Community Manager tenant.
Step 9: Create Community Manager tenant using the Jython script
The next step is to create the tenant for the Community Manager developer portal. To do this, you'll need to do the following, in sequence.
| Scenario | Action |
|---|---|
| Conditional, Linux users only | Export the JAVA_HOME location to your installation directory. See Linux install: exporting the JAVA_HOME variable. |
| All users | Determine the values you'll use in your Jython script. The script includes various parameters that you can use to specify values for your tenant. See Developing and running the Jython script below. |
| All users | Run the Jython script at the command line. See To run the Jython script below. |
| Conditional, for custom tenant name | If you choose a tenant name other than the default (atmosphere), update a configuration setting to the new value, in the Akana Administration Console for the CM container. See Conditional: updating configuration setting for new context root below. |
Developing and running the Jython script
In composing your script, refer to the examples below:
- Example 1: Template script with each parameter on a separate line, with placeholder values.
- Example 2: An example with each parameter on a separate line, with sample values.
- Example 3: Jython script example for Unix.
Note: Hostnames in the Jython script must be lowercase.
For detailed information about the various parameters that make up the Jython script, and the values you can choose, see Jython Script Elements.
Note: The default value for the context path in the consoleAddress parameter is atmosphere. If you change the value, as in Example 2 below where the value is set to acmepaymentscorp, there is an additional step you'll need to take before running the Community Manager developer portal, to update the atmosphere.context.root value in the Akana Administration Console. See Conditional: updating configuration setting for new context root below.
Example 1: Template script with placeholders
In the template script below, each parameter is shown on a separate line, for clarity. Replace the values enclosed in curly brackets with the values for your implementation (remove the curly brackets). When running the script, remove the line breaks and leave a space between parameters.
jython.bat ../scripts/Lib/soa/atmosphere/tenant.py -a -v
--url {CM_URL}
--tenantName {tenantid}
--tenantId {tenantid}
--address {CM_URL}
--consoleAddress {CM_URL/{context_path}
--theme default
--themeImpl default
--email {emailaddress}
--password {password}
--contactEmailAddress {emailaddress}
--fromEmailAddress {emailaddress}
--username {username}
--userpassword {password}
Example 2: Each parameter on a separate line, with sample values
The example below installs Hermosa theme (theme = hermosa, themeImpl = default).
jython.bat ../scripts/Lib/soa/atmosphere/tenant.py -a –v --url http://localhost:9901 --tenantName acmepaymentscorp --tenantId acmepaymentscorp --address http://localhost:9901 --consoleAddress http://localhost:9901/acmepaymentscorp --theme hermosa --themeImpl default --email administrator@acmepaymentscorp.com --password MyPassword --contactEmailAddress support@acmepaymentscorp.com --fromEmailAddress notifications@acmepaymentscorp.com --username admin_123 --userpassword AdminPassW0rd123
Example 3: Unix example
./jython.sh ../scripts/Lib/soa/atmosphere/tenant.py -a -v --url http://pm84-13.local.akana.com:9900 --tenantName EnterpriseAPI --tenantId enterpriseapi --address http://pm84-13.local.akana.com:9900 --consoleAddress http://pm84-13.local.akana.com:9900/enterpriseapi --theme default --themeImpl default --email support@acmepaymentscorp.com --password password --contactEmailAddress support@acmepaymentscorp.com --fromEmailAddress no_reply_cm@acmepaymentscorp.com --username admin_123 --userpassword AdminPassW0rd123
To run the Jython script
- At a command prompt, go to the \bin folder for your installation.
- Run the Jython script command, customized for your installation, as shown in the example above.
- The script runs, and returns a response code 200 with a message that it was successful, as shown in the example below.
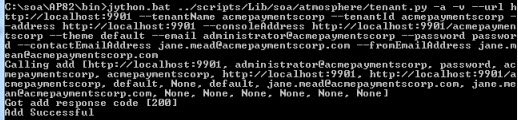
Note: If you get a 404, make sure that the container is started. Start the container and run the script again.
Conditional: updating configuration setting for new context root
The default value for the context path part of the consoleAddress parameter is atmosphere. This means that, by default, the Community Manager developer portal will be accessible via this URL: {consoleAddress}/atmosphere. If you prefer to use a different value for the context path, you'll have to use that value in the Jython script (--consoleAddress {CM_URL}/{new context path value}.
If you make this change in the Jython script, you'll also need to update a configuration setting to the new value so that you can access the portal using the new context path.
Note: There are certain values that are reserved for other uses. They include: /portal, /api. If you need to change atmosphere.context.root, do not use these values.
Follow the instructions below.
To update the configuration setting for the new context root
- Log in to the Akana Administration Console for the CM container.
- Click the Configuration tab.
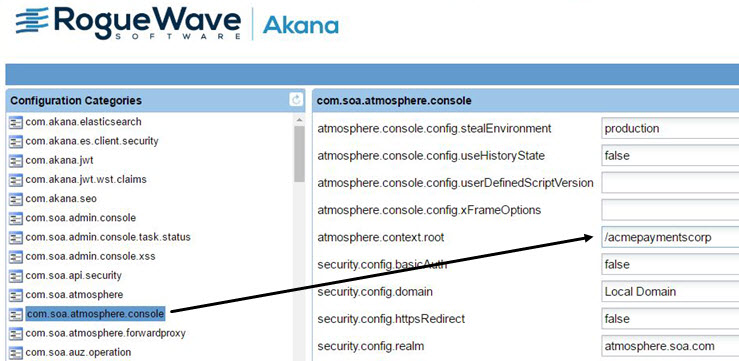
- On the left, under Configuration Categories, find the com.soa.atmosphere.console category.
- On the right, find the atmosphere.context.root property, and update the value. An example is shown below.
- Click Apply Changes.
- Restart the container so that the changes take effect.
Now, you can log in to the Community Manager developer portal and start configuring settings and adding apps and APIs. See Step 10: Run the Community Manager developer portal below.
Step 10: Run the Community Manager developer portal
Installation steps are now complete, and you can run the develop portal and set up domains and users, configure settings, and add apps and APIs.
To run the Community Manager developer portal
- Compose the Community Manager developer portal URL as follows:
- Take the root address for the container that CM is installed on: for example, http://localhost:9901.
- Append /{tenantid}. For example: http://localhost:9901/acmepaymentscorp.
- Paste the URL in the browser. The browser redirects to the default landing page; for example: http://localhost:9901/acmepaymentscorp/#/home/landing.
- Log in, using the username and password from the Jython script.
For information about tasks relating to the Community Manager developer portal, including Site Admin tasks such as configuring platform login, setting up domains, and choosing platform settings, as well as user tasks such as adding apps and APIs, see Community Manager Developer Portal Help Content Overview.
Installation Tasks/Reference:
Supported databases
Akana API Platform 8.4.x supports the following database versions:
- Oracle 12c and 12c Release 2 (supported in version 8.4.16 and later). See Database notes: Oracle below.
- MySQL 5.6. Note:
- If you're using MySQL, there are specific configuration requirements for certain MySQL properties. See MySQL: database settings for the API Platform below.
- If you're running MySQL and are using the Lifecycle Repository feature, see Database notes: MySQL with Lifecycle Repository below.
- Microsoft SQL Server 2012, 2014 (supported in version 8.4.2 and later), and 2016 (supported in version 8.4.15 and later). Note that you'll need to modify a specific property in the Akana Administration Console; see Database notes: Microsoft SQL Server below.
Database notes
This section includes notes and additional information relating to installation with supported databases. It includes:
- Database notes, all: user permissions
- Database notes: Oracle
- Database notes: Microsoft SQL Server
- MySQL: database settings for the API Platform
- Database notes: MySQL with Lifecycle Repository
Database notes, all: user permissions
You'll need to grant the following database permissions, depending on the user role:
- User creating the database: This user will need to have permissions to:
- Create a user.
- Create the schema, including creating, altering and dropping tables, indices and constraints.
- Runtime user: The runtime user created by the scripts should have a minimal set of permissions for runtime plus schema updates. If you remove this user's ability to add/alter/drop objects, you'll need to add them back when it's time to perform schema updates.
Database notes: Oracle
Please note the following if you're working with an Oracle database:
Database drivers
For Oracle database drivers, see Database drivers.
Oracle password
If you're creating a new Oracle database using the Create New Database wizard (standard installation procedure), make sure the Oracle database password does not start with a number or special character.
Database permissions, Oracle 12c or later
When using Oracle 12c or later to configure a new database, the DBA must GRANT SELECT ON SYS.USER$ TO SYSTEM; (substitute the SYSTEM user for the user specified for the Administrator credentials). This is because Oracle 12c introduced restricted access to SYS.USER$, which the platform uses to query on.
Database notes: Microsoft SQL Server
Please note the following if you're working with a Microsoft SQL Server database:
- Updating the quartz trigger property for Microsoft SQL Server
- Database notes: Microsoft SQL Server with Lifecycle Repository
For additional information on using a Microsoft SQL Server database with Akana products, see Microsoft SQL Server Database Installation and Configuration.
Updating the quartz trigger property for Microsoft SQL Server
If you're using Microsoft SQL Server, you must configure a setting in the Akana Administration Console. The quartz trigger property must be set to True. Follow the steps below.
- Log in to the Akana Administration Console for the CM container.
- Click the Configuration tab.
- On the left, under Configuration Categories, find the com.soa.scheduler.quartz category.
- On the right, find the org.quartz.jobStore.acquireTriggersWithinLock property, and set it to True.
- Save your changes.
Database notes: Microsoft SQL Server with Lifecycle Repository
When using any version of MSSQL with Lifecycle Repository, the DBA will need to manually alter the database to set read committed snapshot and enable snapshot isolation mode. This is not required for installation; however, it will affect how the application behaves once asset content is being populated. Run the following:
ALTER DATABASE {db.instance.name}
  SET READ_COMMITTED_SNAPSHOT ON;
ALTER DATABASE {db.instance.name}
  SET ALLOW_SNAPSHOT_ISOLATION ON;
MySQL: database settings for the API Platform
If you're using MySQL 5.6, the settings below are required for the API Platform. You'll need to configure these settings in the my.ini file before loading the database schema in MySQL.
Specific properties are listed below, with references to the applicable MySQL documentation:
- innodb_large_prefix=ON; (http://dev.mysql.com/doc/refman/5.6/en/innodb-parameters.html#sysvar_innodb_large_prefix)
- innodb_file_format=barracuda; (http://dev.mysql.com/doc/refman/5.6/en/innodb-parameters.html#sysvar_innodb_file_format)
- innodb_file_per_table=ON; (http://dev.mysql.com/doc/refman/5.6/en/innodb-parameters.html#sysvar_innodb_file_per_table)
- Optional, for better performance:
innodb_flush_log_at_trx_commit=0; (http://dev.mysql.com/doc/refman/5.6/en/innodb-parameters.html#sysvar_innodb_flush_log_at_trx_commit)
- max_allowed_packet=1073741824; (http://dev.mysql.com/doc/refman/5.6/en/server-system-variables.html#sysvar_max_allowed_packet)
For more information, refer to MySQL Database Property Settings.
Database Notes, MySQL 5.7: modifications to sql_mode default value
Note: Akana support of MySQL 5.7 ends October 2020.
In MySQL 5.7, the default value of sql_mode includes NO_ZERO_IN_DATE and NO_ZERO_DATE, which are not currently compatible with Akana.
The default value for sql_mode in MySQL 5.7 is:
ONLY_FULL_GROUP_BY,STRICT_TRANS_TABLES,NO_ZERO_IN_DATE,NO_ZERO_DATE,ERROR_FOR_DIVISION_BY_ZERO,NO_AUTO_CREATE_USER,NO_ENGINE_SUBSTITUTION
If you're using MySQL 5.7 with Akana products, you must modify sql_mode in your MySQL config files to exclude these two values.
An example of a valid setting for sql_mode with the Akana API Platform is:
ONLY_FULL_GROUP_BY,STRICT_TRANS_TABLES,ERROR_FOR_DIVISION_BY_ZERO,NO_AUTO_CREATE_USER,NO_ENGINE_SUBSTITUTION,ALLOW_INVALID_DATES
Database notes: MySQL with Lifecycle Coordinator/Lifecycle Repository
For Akana API Platform installs using the Lifecycle Coordinator or Lifecycle Repository features, there are some constraints.
The Lifecycle Repository feature requires the following installation features:
- Akana Lifecycle Repository (Provides metadata repository and configuration services)
- Akana API Platform Repository Plug-In (Extended Properties and Workflow feature)
The Lifecycle Coordinator feature requires the following installation features:
- Akana Lifecycle Coordinator (Lifecycle Coordinator for the Akana Platform)
Review the following information:
- LC/LR: Additional database privileges required for installation
- LC/LR: Adding the correct database permissions
- LC/LR: Setting the log_bin_trust_function_creators system variable
- LC/LR: Create libraries before enabling extended properties in the Community Manager developer portal
LC/LR: Additional database privileges required for installation
When installing on MySQL, you'll need to do one of the following:
- Disable MySQL binary logging. Note that this might not be feasible in some cases because binary logging is a hard requirement for replication. In addition, if you're using AWS RDS with a Multi-AZ deployment, the replication used for Multi-AZ implicitly enables binary logging.
For more information on binary logging, see https://dev.mysql.com/doc/refman/5.7/en/stored-programs-logging.html (MySQL documentation).
- Grant the super privilege to the database user for the Akana API Platform for the duration of the time that Lifecycle Coordinator/Lifecycle Repository features are being installed and libraries (either tenant libraries or topology libraries) are being created.
An alternative to granting the super privilege is to modify the log_bin_trust_function_creators variable. See LC/LR: Setting the log_bin_trust_function_creators system variable below.
LC/LR: Adding the correct database permissions
With the Lifecycle Coordinator or Lifecycle Repository features, the database user requires specific additional grants when using MySQL. These grants are required for successful completion of the Initialize Repository Database configuration task; otherwise, the task fails.
For MySQL installs, the user must have the following grants:
- TRIGGER
- CREATE ROUTINE
- ALTER ROUTINE
You'll need to run the following MySQL statement to add the correct permissions:
GRANT ALTER ROUTINE, CREATE ROUTINE, TRIGGER ON {database_instance_name}.* TO '{database_user}'@'%';
For example:
GRANT ALTER ROUTINE, CREATE ROUTINE, TRIGGER ON LXC1PM8X21.* TO 'LXC1PM8X21'@'%';
In the above, LXC1PM8X21 is both the database instance name and the database user name.
Use the following command to confirm the change:
mysql> show grants for 'LXC1PM8X21'@'%';
You'll see a response such as the following, which confirms that the grants were updated successfully:
+--------------------------------------------------------------------------------------------------------------------------------------------------------------------------------------------------------------------------------------------------------+
 | Grants for LXC1PM8X21@%                                                                                                                                                                                                                               |
 +-------------------------------------------------------------------------------------------------------------------------------------------------------------------------------------------------------------------------------------------------------+
 | GRANT SELECT, INSERT, UPDATE, DELETE, CREATE, DROP, RELOAD, PROCESS, REFERENCES, INDEX, ALTER, CREATE TEMPORARY TABLES, EXECUTE, CREATE VIEW, SHOW VIEW ON *.* TO 'LXC1PM8X21'@'%' IDENTIFIED BY PASSWORD '*2A5FDEE54AE88A62B88A1A6C5389C23A529F20EE' |
 | GRANT ALTER ROUTINE, CREATE ROUTINE, TRIGGER ON 'LXC1PM8X21'.* TO 'LXC1PM8X21'@'%'                                                                                                                                                                                   |
 +-------------------------------------------------------------------------------------------------------------------------------------------------------------------------------------------------------------------------------------------------------+
 2 rows in set (0.00 sec)
Note: Lifecycle Coordinator and/or Lifecycle Repository on MySQL imposes limitations on such things as Advanced Queries using custom XPathCriteria, and only a limited number of fixed XPathCriteria are support in the default searches.
LC/LR: Setting the log_bin_trust_function_creators system variable
Additional user privileges are needed to successfully initialize the repository database. If the privileges are not in place, the Initialize Repository Database task might fail, with the following error message:
exception:java.sql.SQLException: You do not have the SUPER privilege and binary logging is enabled (you *might* want to use the less safe log_bin_trust_function_creators variable)
In some cases, it might not be feasible to grant the super privilege to the database user or to disable binary logging. An alternative approach is to set the log_bin_trust_function_creators system variable to a value of 1, as shown below:
mysql> set global log_bin_trust_function_creators=1;
Query OK, 0 rows affected (0.00 sec)
However, this is only an in-memory variable. For persistence, you could add the following to the /etc/my.cnf file:
log-bin-trust-function-creators=1
LC/LR: Create libraries before enabling extended properties in the Community Manager developer portal
For more information on using the log_bin_trust_function_creators system variable, see https://dev.mysql.com/doc/refman/5.7/en/faqs-stored-procs.html, sections A.4.25 and A.4.26 (MySQL documentation).
When the Akana API Platform is installed on MSSQL, tenant (repository) libraries should initially be created using the Synchronize Lifecycle Manager Data admin task, before enabling the Extended Properties and Workflow flag in the Community Manager developer portal settings (Admin > Site).
Database drivers
Depending on which database server you're using, you might need to install a database driver before running the Configure Database Options Wizard.
If you need to install a database driver, place it in this location:
- /instances/{container_name}/deploy folder
Database options, with driver information:
- MySQL 5.6: install this file:
mysql-connector-java-5.1.40-bin.jar
Downloadable from: https://mvnrepository.com/artifact/mysql/mysql-connector-java/5.1.40
- Oracle 12c Release 2: install this file:
Ojdbc8.jar
Downloadable from: http://www.oracle.com/technetwork/database/features/jdbc/jdbc-ucp-122-3110062.html (download requires accepting the agreement and logging in).
Also, for Oracle 12c and later, see note about database permissions needed.
- Oracle 12c: install this file:
Ojdbc7.jar
Downloadable from: http://www.oracle.com/technetwork/database/features/jdbc/jdbc-drivers-12c-download-1958347.html (download requires accepting the agreement and logging in).
Also, for Oracle 12c and later, see note about database permissions needed.
- Microsoft SQL Server: no database driver installation is required.
Installation folder structure
The installation process creates the folder structure shown below.:
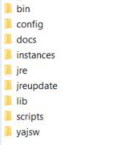
Installation includes the following folders:
- bin
- Includes the Akana Platform shell and batch scripts. This includes Start/Stop scripts for all the Akana Platform processes, scripts used to register and un-register Windows services, and scripts for launching the Akana Platform administration and configuration wizards. This folder also includes a script to run the Akana Platform product as a unique Cron job.
- config
- Includes Akana Platform properties files. Reserved for system use.
- docs
- Includes product documentation.
- instances
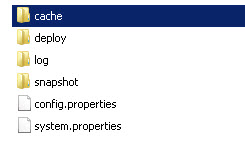
- After installation, the initial instances folder includes config.properties and system.properties files.
- When you launch and complete the Configure Container Instance wizard, a Configurator folder is created that includes the following sub-folders:
- asynchworkflow—Stores code samples for platform APIs.
- cache—Stores OSGi bundles for installed features.
- deploy—Includes properties files (com.soa.config.cfg and com.soa.log.cfg) that include Akana Platform default configuration settings. These files are used to push default configuration information to the Administration Console and are typically for one-time use only. After initial configuration, you can update properties in the Administration Console via the Configuration tab. Bundles and other .cfg files can also be added to the \deploy folder and will be published to the Administration Console. These properties can also be updated via the Configuration tab.
- log—Stores log files that are automatically generated when an Akana Platform function is operating. The logging process records the actions performed for each Akana Platform function and stores the information in the log file. You can archive log files for historical record as needed.
- Each time a new container instance is created, the platform creates a new folder using the container name. For example, if you install the Policy Manager ZIP file and name the container instance, the associated folder includes the above folders plus the following:
- cachedir—Reserved for system use.
- cm—Stores configuration data associated with the Akana Administration Console Configure tab.
- scriptStore—Stores code samples for platform APIs.
- snapshot—Stores changes to a container made during updates. Also used for update rollbacks.
- wsdlStore—Stores code samples for platform APIs.
- jre
- A Java Runtime Environment (JRE) folder that is automatically created during an Akana product installation. The Akana Platform is packaged with the applicable JRE version for each release.
- jreupdate
- Includes an ext folder that stores bouncy castle artifacts, and a security folder that provides security algorithms and is used for PKCS12 keystore management.
- lib
- Includes the jar files needed by the available Akana features.
- scripts
- Includes script utilities that you can use to create containers without using the Configure Container Instance wizard UI.
- yajsw
- Includes files used by the Akana Platform to support YAJSW. See http://yajsw.sourceforge.net.
Clear Configurator cache
You might need to clear the configurator cache. Follow the steps below.
To clear configurator cache
- Locate the configurator cache folder: \instances\configurator\cache, as shown below.
- Delete the folder if it exists (if there is no cache, the folder will not be there).
Starting a container
There are several approaches to starting a container:
- In Windows:
- At a command prompt: see To start a container in Windows at a command prompt below
- As a Windows service: see To start a container as a Windows service below
- In Unix:
- At the command line: see To start a container in Unix below
- With background option: see To start a container in Unix (background) below
To start a container in Windows at a command prompt
- At a command prompt, navigate to the \bin folder for the implementation. For example: c:\akana\aap84\bin.
- Type:
startup {containername}
There might be a short delay while the container starts.
To start a container as a Windows service
Note: You can only start a container as a Windows service if it was installed as a Windows service.
- Launch the Services list (Control Panel > Administrative Tools > Services).
- Select the instance name on the list.
- From the right-click Actions menu, choose Stop.
There might be a short delay while the container starts.
To start a container in Unix
- At the command line, navigate to the /bin folder for the implementation. For example: /akana/aap84/bin.
- Type:
startup.sh {containername}
There might be a short delay while the container starts.
To start a container in Unix (background)
- At the command line, navigate to the /bin folder for the implementation. For example: /akana/aap84/bin.
- Type:
startup.sh {containername} -bg
There might be a short delay while the container starts.
Stopping a container
You can stop a container in several ways.
To stop a container at a command prompt
- Go to the command prompt window where the process is running.
- Type Ctrl+C or close the command prompt.
To stop a container as a Windows service
Note: You can only start/stop a container as a Windows service if it was installed as a Windows service.
- Launch the Services list (Control Panel > Administrative Tools > Services).
- Select the instance name on the list.
- From the right-click Actions menu, choose Stop.
To stop a container in Unix
- Go to the command line window where the process is running.
- Send the process a KILL signal or type Ctrl+C.
To stop a container in Unix (background)
- At the command line, navigate to the /bin folder for the implementation. For example: /akana/aap84/bin.
- Type:
shutdown.sh
Creating a container via the GUI
As part of Step 3: Run Configurator to create the first container, you might choose to create the container via the GUI, a Windows-based wizard that steps you through the installation process.
To create a container via the GUI
For more information on the wizard, see Installation wizard: Configure Container Instance.
- Open a command prompt.
Note: if you want to install the container as a Windows service, open the command prompt in Administrator mode.
- Go to the new folder where you unzipped the version 8.4x files (for example, aap84).
- Navigate to the \bin subfolder and run one of the following commands, depending on your operating system:
Windows:
startup.bat configurator
Unix:
startup.sh configurator
The Configurator starts with the Welcome to Configure Container Instance wizard page, as shown below.
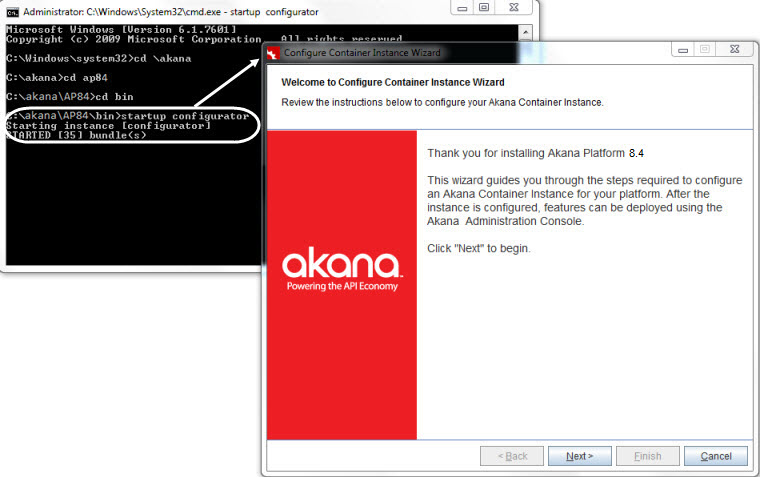
- Click Next. The wizard steps you through the following pages:
- Instance Name: Specify the name of the Akana container instance; for example, pmcm1. Click Next.
- Default Admin User: Specify Administrator Credentials (username and password). Click Next.
- Default HTTP Listener: Specify port, host IP address, and bind to all interfaces/specified interface only, or accept defaults. Click Next.
- Instance Startup: Choose Standalone, Install as Windows Service, or Do Not Start Instance. Click Next.
Note if you want to install as Windows service, the command prompt you used to start the Configurator must be running in Administrator mode.
- Launch Admin Console: The checkbox is selected by default. If you do not want to launch the Akana Administration Console, clear the checkbox. Click Next.
- Instance Configuration Summary: Review the summary. If all OK, click Finish. The container is configured. When configuration is complete, the Akana Administration Console starts automatically (unless you cleared the checkbox in the previous step; if so, you'll need to start it manually).
When you've created the container, continue with the next step of the installation procedure: see Step 4: Install Policy Manager/Community Manager features on the container.
Creating a container using silent install (Linux)
As part of Step 3: Run Configurator to create the first container, in some scenarios such as Linux installations, you'll create the container using silent install.
Before you begin, make sure you have Administrator rights on the machine you're using.
A silent installation is an automatic process that installs the Akana Platform without any user interaction. Before running the silent install, you must configure the properties file that you'll use for the installation. This file will include the specific values that you'd provide in the user interface if you're doing an installation using the GUI. For example, you must specify a target installation directory, install set, and input options to be executed at the end of the installation. Once you've configured the properties file, you can deploy the platform onto multiple machines in a scripted, non-interactive way.
The name of the properties file you use doesn't matter as long as you reference it correctly when running the silent install.
One way to generate a "starter" properties file is to first create a container using the GUI. When you do this, the properties file for the container is automatically saved in the directory for the container (../instances/{container_name}/system.properties). For example, if you create a pm01 container via the GUI, you can then look in the /instances/pm01 folder and you'll see the system.properties file for the container. You can use the values in this file as a help in setting up the properties file for creating subsequent containers, such as pm02, using the silent install method.
Be sure to copy and modify the file rather than changing the original file, and update the container.key property so that it's unique. Note: container.key can only be specified at the time of container creation; you cannot change it later.
You can also create the properties file from scratch. An example is shown below. For more details about the properties file, see Configure Container (Silent Option).
Note: When you create the properties file, make sure there are no trailing spaces.
Properties file with placeholders:
//Required properties
container.instance.name={instancename}
credential.username = {username}
credential.password = {password}
default.host={hostname}
default.port={port}
//Optional properties
container.key={container_key_name}
Sample properties file with values:
container.instance.name=AAP84
credential.username = administrator
credential.password = password
default.host=rhe12345.akana.local
default.port=9945
container.key=AAP84
To run the properties file in a Linux environment, go to the {release_directory}/bin folder and run the following command:
startup.sh configurator -Dsilent=true -Dproperties={full path to properties file}/{filename}.properties
For example:
startup.sh configurator -Dsilent=true -Dproperties=/home/akana/aap/properties/pmcm_silentinstall.properties
Then:
- Start the container.
- Continue with the rest of the procedure from Step 4: Install Policy Manager/Community Manager features on the container.
For full instructions, refer to: Configure Container (Silent Option).
Unregistering and re-registering the Windows service
If you have a container registered as a Windows service so that the container will start automatically when Windows starts, and you want to unregister and re-register the Windows service, follow the steps below for each container.
Unregistering/re-registering the Windows service is generally part of upgrade procedure, but you might need to do this for some other reason.
If you're not sure which containers are registered as a Windows service, you can check (Control Panel > Administrative Tools > Services).
Note: To change the services, you must run the process as an Administrator. If you don't use Administrator mode, Windows prompts for Admin permission before unregistering/registering the service, but doesn't actually start the service.
To unregister and re-register the Windows service
- Open a command prompt in Administrator mode.
- Run the command below:
.\sm70\bin\unregisterContainerServiceYAJWS.bat {instance_name} - Register the new version as a Windows service:
.\{aap84_foldername}\bin\registerContainerServiceYAJWS.bat {instance_name}If you're running in Administrator mode, Windows registers the service and also starts it.
Note: The product also includes files unregisterContainerService.bat and registerContainerService.bat. These are present for compatibility with earlier versions. Do not use those files; use the versions listed above.
- Repeat steps 2 and 3 for each additional container that's registered as a Windows service.
Linux install: exporting the JAVA_HOME variable
Because Linux containers don't have a JAVA_HOME environment variable set, you'll need to export the JAVA_HOME location to your installation directory.
For example:
export JAVA_HOME=/opt/akana/aap84/jre
If you omit this step, you'll get an error during the installation.
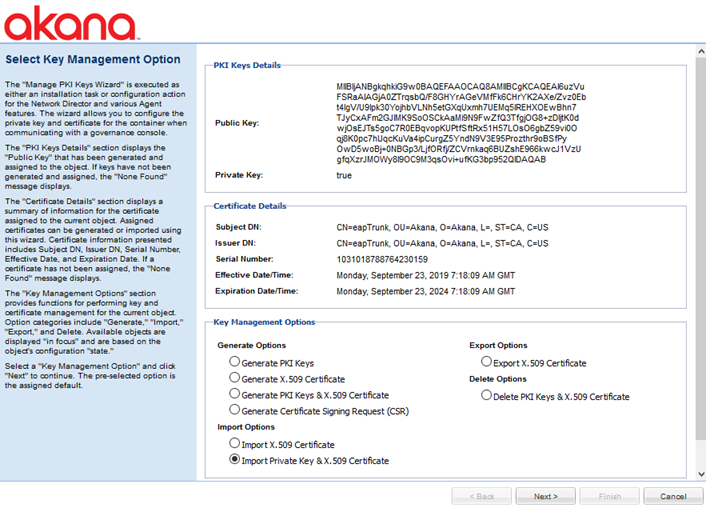
Installation wizard: Manage PKI Keys
The Manage PKI Keys pending installation task opens the Manage PKI Keys wizard, as shown below.
It's best to use external keys for your container. See Manage PKI Keys (Akana Administration Console configuration task).
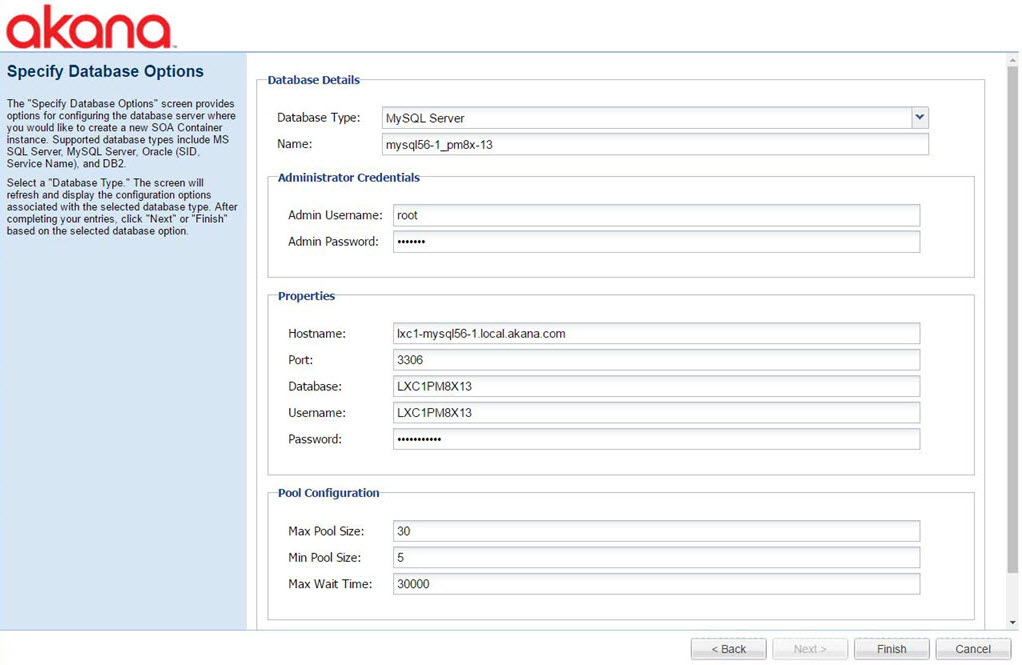
Installation wizard: Add Database
The Add Database pending installation task opens the Configure Database Options wizard. This task creates the database for the installation. The wizard has two pages, as shown below.
On the first page, specify new, existing, or JNDI database, and then click Next.
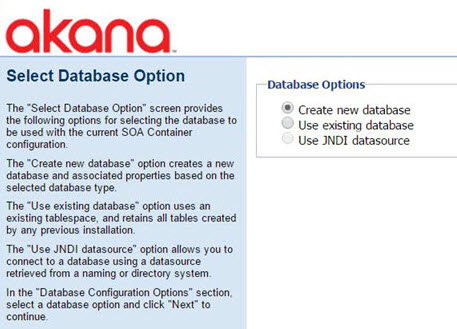
On the second page, enter all the database details such as type and credentials, and then click Finish.
Installation wizard: Manage Schemas
The Manage Schemas pending installation task opens the Manage Schemas wizard. This task manages the database schemas for the container.
Make sure available schemas are checked, and then click Finish.
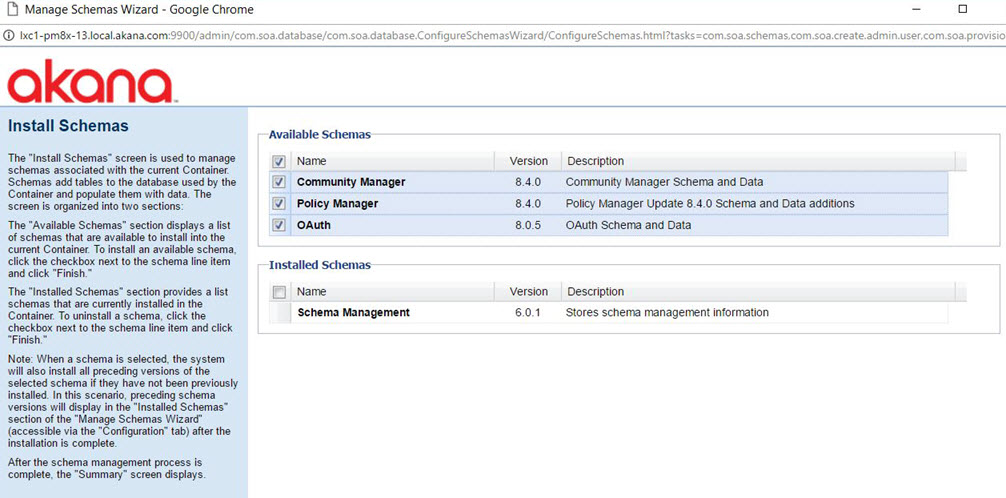
When schema installation is complete, a Summary page is displayed. Click Go to Next Task.
Installation wizard: Define Policy Manager Administrator Credentials
The Create Policy Manager Admin User pending installation task opens the Define Policy Manager Administrator Credentials wizard. This task creates the top-level Policy Manager user.
Enter the user credentials, and then click Finish.
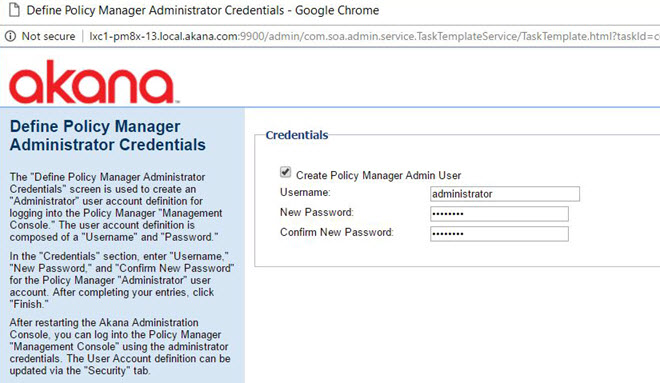
Review the summary page and then click Go to Next Task.
Installation wizard: Provisioning
The Provisioning pending installation task opens the Provisioning wizard. This task Initializes resources associated with the features installed on the container.
Make sure the box is checked, and then click Finish.
Note: Make sure the Provisioning task is 100% complete before moving to the next task.
Installation wizard: Configure Container Instance
Configure Container Instance wizard pages:
- Instance Name: provide name; for example, aap84.
- Default Admin User: specify Administrator Credentials (username and password).
- Default HTTP Listener: port, host IP address, bind to all interfaces/specified interface only.
- Instance Startup: Choose Standalone, Install as Windows Service, or Do Not Start Instance.
Note: If you want to run Install as Windows Service, the command prompt you used to start the Configurator must be in Administrator mode. If necessary, restart the Configurator in a new window in Administrator mode.
- Launch Admin Console: The checkbox is selected by default. If you do not want to launch the Akana Administration Console, clear the checkbox. Click Next.
- Instance Configuration Summary: review options. If all OK, click Finish.
Installation wizard, ND container: Configure WS-Metadata Exchange Options
The Configure WS-Metadata Exchange Options task for the Network Director container opens the WS-Metadata Exchange Options wizard. This task Initializes resources associated with the features installed on the container.
Put in the metadata URL for the Network Director container, using the URL you set up for the container and appending /wsmex; for example: http://localhost:9902/wsmex. Click Finish.
Installation Options: Full List
Installation can include one or more of the following:
- Features: Core products or major features that support core products.
- Plug-Ins: Additions to core products that add to the functionality.
- Tools: Tools that provide specific functionality for maintaining or upgrading features and plug-ins.
The full list of installation features is shown below.
The full list of plug-ins is shown below.
The full list of tools is shown below.

Policy Manager Add Container wizard
When adding the Network Director to Policy Manager (step 8 above) you'll use the Add Container wizard. The pages for this wizard are shown below.
Page 1: Select Container Type
Select Container Type and click Next.
Page 2: Specify Metadata Import Options
Specify the metadata URL and click Next.
X.509 Certificate Not Trusted
If you get this message, you'll need to decide whether to add the certificate to the Policy Manager certificate store.
Page 3: Specify Container Details
If needed, add information about the container.
Completion Summary
At the Completion Summary page, click Close.
Sample installation scenarios
The examples below show which features to install for some sample scenarios, including:
- One container with Policy Manager installed (no Community Manager)
- Multi-container setup with Policy Manager installed (no Community Manager)
- One container with both Policy Manager and Community Manager installed
- Needed in any multi-container deployment that does not include Community Manager
One container with Policy Manager installed (no Community Manager)
Install these features on the Policy Manager container:
- Akana Policy Manager Console
- Akana Policy Manager Services (Includes Akana Management Services, Akana Security Services, and Akana Scheduled Jobs. For more information on this feature see Using the Policy Manager Services Feature.)
Install this feature on the Network Director container:
- Akana Network Director
Multi-container setup with Policy Manager installed (no Community Manager)
Policy Manager Container Features:
- Akana Policy Manager Console
- Akana Policy Manager Services (Includes Akana Management Services, Akana Security Services, and Akana Scheduled Jobs. For more information on this feature see Using the Policy Manager Services Feature.)
Network Director Container Features:
- Akana Network Director
One container with both Policy Manager and Community Manager installed
Community Manager Container Features:
Install these features:
- Akana Community Manager APIs
- Akana Community Manager OAuth Provider
- Akana Community Manager Scheduled Jobs
- Akana Embedded Elasticsearch Node
- Akana OAuth Provider
- Akana Policy Manager Console
- Akana Policy Manager Services (Includes Akana Management Services, Akana Security Services, and Akana Scheduled Jobs. For more information on this feature see Using the Policy Manager Services Feature)
- Akana Community Manager
Community Manager Container Plug-ins:
Install these plug-ins:
- Akana Community Manager Policy Console
- One or more of the following (at least one theme is required for Community Manager):
- Akana Community Manager Default Theme
- Akana Community Manager Hermosa Theme
- Akana Community Manager Simple Developer Theme
Install this feature on every Network Director container:
- Akana Network Director
Needed in any multi-container deployment that does not include Community Manager
Install these features on every non-Network Director container:
- Akana Policy Manager Services (Includes Akana Management Services, Akana Security Services, and Akana Scheduled Jobs. For more information on this feature see Using the Policy Manager Services Feature.)
Install this feature on every Network Director container:
- Akana Network Director
Feature Notes: Scheduled jobs
Platform installation options include the following scheduled jobs features:
- Akana Scheduled Jobs—bundled with the Akana Policy Manager Services feature
- Akana Community Manager Scheduled Jobs
There might be additional scheduled jobs features for additional add-ons.
In general, we recommend that you install all scheduled jobs on the same container. In a scenario where Policy Manager and Community Manager are on different containers, you'd most likely install the scheduled jobs on the Policy Manager container. This helps avoid overload on the Community Manager container, since Community Manager might be processing a lot of traffic, whereas the Policy Manager container is likely to be inside the firewall and used internally.
Feature Notes: Akana Embedded Elasticsearch Node feature
If you are using Elasticsearch in Embedded Mode, note that the Akana Embedded Elasticsearch Node feature requires that the Akana Community Manager Scheduled Jobs feature is installed on the same container, as well as the Community Manager portal features where the search is being performed.
However, bear in mind that we do not recommend using Elasticsearch Embedded mode in a production environment.
If you are running an external Elasticsearch server with Transport Client mode, it's not necessary to install the Akana Embedded Elasticsearch Node feature.
For more information on installing and configuring Elasticsearch, see Elasticsearch: Information for Site Admins (Community Manager developer portal help).
Optional Additional Features
The platform installation includes some optional additional features:
- Admin Monitoring tool: an optional plug-in, this tool provides a way to view the monitored attributes published by different components in the product. This tool is used mainly to monitor thread pools and usage data queues. For more information on this tool, see Using the Admin Monitoring Tool.
Note: The product also includes the System Health tool (Akana Administration Console for the container > Health tab), which is part of basic installation and also allows you to create your own monitoring dashboard. We recommend using the System Health tool rather than the Admin Monitoring tool. See Monitoring the Health of a Container: Akana System Health Tool.
- Additional themes: As part of setting up Community Manager you'll need to set up at least one theme. However, you might want to use more than one. For example, you might install Hermosa Theme for the full functionality of the Community Manager developer portal and have a separate Simple Developer theme instance for your app developers to connect to APIs (streamlined UI with app and API functionality but without Site Admin functions).