Using the Anti-Virus Policy
Learn how to set up the anti-virus policy to direct the scanning of messages for viruses.
For information about using policies in the context of the Community Manager developer portal, see Business Policies.
On this page:
- Introduction
- ICAP Based Message Scanning
- Creating an Anti-Virus Policy
- Configuring an Anti-Virus Policy
- Viewing the Anti-Virus Policy Details
- Activating a policy
- Attaching a policy
- Using an Anti-Virus policy to scan uploaded files
- Alerts
Introduction
The Anti-Virus Policy is used to direct the scanning of messages for viruses. The Network Director itself does not scan for viruses; the virus scanning is managed by an anti-virus server.
The Network Director communicates with the anti-virus server using the Internet Content Adaptation Protocol (ICAP) protocol. The Anti-Virus policy dictates details of the virus scanning, such as:
- What messages should be scanned.
- How to communicate with the anti-virus server.
- What action should be performed when a virus is detected.
How the Anti-Virus Policy works (ICAP-Based Message Scanning)
The Anti‑Virus Policy safeguards APIs by scanning HTTP requests, responses, and fault messages for malicious content by using an external ICAP (Internet Content Adaptation Protocol) server. During processing, the Akana Gateway sends the message payload to the ICAP server for inspection and enforces the configured policy action based on the server’s scan results.
ICAP Server Integration
The gateway integrates with an ICAP‑compatible anti‑virus engine (for example, Symantec Protection Engine or ClamAV) to perform malware scanning in accordance with RFC 3507: Internet Content Adaptation Protocol (ICAP).
To support full message inspection, the gateway uses two ICAP services:
- REQMOD: Scans incoming HTTP requests before they are forwarded to the backend service.
- RESPMOD: Scans HTTP responses and fault messages before they are returned to the client.
During scanning, the gateway encapsulates the HTTP message headers and body and sends them to the ICAP server for scanning. The ICAP server analyzes the message payload and returns the scan result by using ICAP status codes and response headers.
Akana interprets the ICAP server’s response in the following manner:
| ICAP response | Header condition | Interpretation |
|---|---|---|
| 204 - No content | No headers related to infection | No virus detected. |
| 200-OK | No headers related to infection | No virus detected. |
| 200 OK | X-Violations-Found or X-Infections-Found header present | Virus detected irrespective of the value of the X-Violations-Found header count or X-Infections-Found count value. |
| 403- Forbidden | Virus detected by engine | Virus detected. |
| 5xx | Error processing the request | Cannot detect virus due to configuration issue. Generate alert. |
Supported Content-Types
The Anti‑Virus policy supports scanning of commonly used API payload formats.
- text/plain — Scanned as a single text stream to detect malicious patterns or encoded payloads.
- application/json — The JSON body is scanned as structured text, including detection of encoded scripts or malicious content embedded within fields.
- text/xml, application/xml,or application/soap+xml — The XML or SOAP envelopes are scanned to identify threats in SOAP services.
- multipart/related (SOAP/XML) — The XML envelope and related attachments are scanned to detect threats in SOAP services.
- multipart/form-data — Commonly used for file uploads. Each form part and attachment is extracted and scanned individually.
- multipart/mixed — Multiple binary attachments are parsed, and each MIME part is scanned independently.
- Other binary formats — Such as application/octet-stream, archive files (application/zip, application/x‑7z‑compressed, application/x‑rar‑compressed), document formats (application/pdf, application/msword, application/vnd.ms-excel, Office Open XML types like .docx/.xlsx/.pptx), and common image formats (image/jpeg, image/png).
If a multipart payload includes multiple attachments, each attachment is scanned individually to ensure full inspection. When the first part is text/plain, it is treated as the request body.
Scanning options
The Anti‑Virus policy supports the following scanning options:
- Scan Entire Message: Scans the full message, including the body and all attachments. This option ensures comprehensive inspection by analyzing every part of the message for potential threats.
- Scan All Attachments: Scans only the attachments included in the message. This option is useful when attachment‑based threats are the primary concern.
- Scan By Content Type: Scans only the message parts that match specific content types. You can select one or more supported types, such as application/msword, application/octet-stream, application/vnd.ms-excel, application/vnd.ms-powerpoint, application/vnd.ms-project, application/vnd.ms-works, application/x-msaccess, video/mpeg, and x-world/x-vrml. This option allows you to limit scanning to targeted file formats for optimized processing.
Policy behavior after Scan
After the gateway receives the ICAP response, the policy evaluates the scan result and applies the configured action.
- Log — The virus detection event is recorded in the logs. Message processing continues without modification, and the request or response is forwarded to the next policy in the chain or to the downstream service or client.
- Reject — The gateway blocks the request or response. No subsequent policies in the chain are executed. The Audit Log displays accurate detection details to support troubleshooting.
- Strip — The Strip action is currently not supported in this policy.
If the content is clean, the gateway forwards the message with its original Content‑Type unchanged. The forwarding behavior depends on the value of the corresponding administrator console property, see Normalize Content Type.
Normalize Content Type
When the Anti‑Virus policy scans incoming requests that contain multipart payloads, it may adjust the Content‑Type header before forwarding the request downstream. Because scanning is delegated to an external ICAP engine, the gateway may adapt the request payload during processing and determine the appropriate Content‑Type for the forwarded message.
By default, the gateway normalizes certain multipart media types to multipart/related after scanning. This behavior can cause issues for downstream services—particularly services that require the original multipart/form-data type for file‑upload workflows.
Multipart media types subject to Normalization
When normalization is enabled, any incoming multipart/form-data payload is automatically converted to multipart/related after anti‑virus scanning. Services that rely on the original media type may fail if they expect multipart/form-data. This behavior can lead to downstream errors if the target service expects the original media type.
To manage Content‑Type normalization, a new configuration property antivirus.config.provider.normalizeContentType under the com.soa.policy.handler.antivirus PID determines whether the gateway preserves the original Content‑Type or normalizes it after the antivirus scan.
- If antivirus.config.provider.normalizeContentType = true (default) — The gateway normalizes multipart/form-data to multipart/related after scanning and forwards the modified request downstream.
- If antivirus.config.provider.normalizeContentType = false — The gateway preserves the original Content‑Type header and forwards the request unchanged after scanning.
Creating an Anti-Virus Policy
There are two steps to creating a policy in Policy Manager:
- Create the policy definition.
- Configure the policy details. See Configuring an Anti-Virus Policy.
Once you've completed both those steps, you can activate the policy so that it's in effect and can be attached to organizations and services.
To create an anti-virus policy in Policy Manager
- In the Organization Tree, find the level at which you want to create the policy. Expand Policies and click Operational Policies.
- In the right pane, in the Policies Summary section, click Add Policy.
- In the Select Policy Creation Option page, do one of the following:
- To create a new policy: Choose Anti Virus Policy and then click Next.
- To import an existing policy: Click Import Policy, browse for the file, and then click Next.
- Enter Policy Name (required), Policy Key, and Description (optional). If you don't specify a key, one is assigned automatically.
- Click Finish and then click Close.
At this point, you've created the policy, but it doesn't do anything. The next step is to configure the policy details. See Configuring an Anti-Virus Policy below.
Configuring an Anti-Virus Policy
Once you've created the policy, you can configure the policy details that determine how the policy works. Then you can activate the policy so that it can be used.
To configure an anti-virus policy in Policy Manager
- In the Organization Tree, find the level where the policy was defined. Click to select.
- In the center pane, in the Anti Virus Policy section, click Modify. The Modify Anti-Virus Policy overlay is displayed.
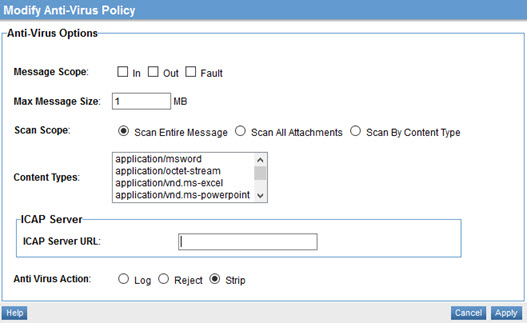
- Specify Message Scope. This determines which messages in a message exchange should be scanned. The values correspond to the WSDL message types of an operation. Choose one or more:
- IN
- OUT
- FAULT
- Choose a value for Max Message Size (MB). Messages exceeding the specified size will be rejected by the policy.
- Choose a value for Scan Scope:
- Scan Entire Message: Scans all message content including attachments.
- Scan All Attachments: Scans only attachments.
- Scan By Content Type: You can specify message content-types that must be scanned. Choices: application/msword, application/octet-stream, application/vnd.ms-excel, application/vnd.ms-powerpoint, application/vnd.ms-project, application/vnd.ms-works, application/x-msaccess, video/mpeg, x-world/x-vrml. You can multi-select to specify multiple content types.
- Specify the URL of the ICAP server (the anti-virus server).
- Choose the action to be taken if a virus is detected:
- Log: Allows the content through but generates an alert.
- Reject: Rejects the message and generates an alert.
- Strip: Removes the infected portion of the message and generates an alert.
- Click Apply.
Now that the policy is defined, you can activate it and start using it. On the right, under Actions, choose Activate Policy.
Viewing the Anti-Virus Policy Details
You can review the details of the existing anti-virus policy, then change them if needed.
To view the anti-virus policy details:
- Enter the following navigation path: Workbench > Browse > Organization. Choose the Policies folder. The Policies Summary screen displays.
- To navigate to the Policy Details tab, do either of the following:
- Click the policy name and then double-click the Anti-Virus Policy line item.
- Select View Policy Details from the Actions drop-down list box.
The Policy Details page for the Anti-Virus Policy is displayed.
Activating a policy
When you create and configure a policy, the policy is in Draft state. When the policy configuration is complete, activate the policy: click Activate Policy and then confirm. See Activate a Policy.
A policy in Draft state is not available for general use. Once you activate the policy, it is in Active state and is available for use.
Attaching a policy
To use the policy, go to the Policies folder in the respective organization and attach the policy to a web service, binding, or binding operation.
Using an Anti-Virus policy to scan uploaded files
For an example of how you could use an anti-virus policy to scan uploaded files, refer to Configure the Anti-Virus policy to scan for uploaded files in the platform hardening doc.
Alerts
Alerts provide quick visibility into issues detected during message processing. The policy generates alerts, each identified by an alert code and triggered under defined conditions to help identify potential problems and take appropriate action, see Alert Codes.