Using the HTTP Caching Policy
Learn how to enhance performance of message processing through caching responses to previously made service requests using the HTTP Caching Policy.
For information about using policies in the context of the Community Manager developer portal, see Business Policies.
On this page:
- Introduction
- Creating an HTTP Caching Policy
- HTTP Caching Policy Modes
- How Stale Caches are Managed
- HTTP Caching Policy Options
- Public/Private Caching
- Configuration
- HTTP cache default configuration in the Akana Administration Console
- Activating a policy
- Attaching a policy
Introduction
Caching is used to increase performance by storing responses to previous requests so that they can be served as a response to similar new requests that come in, often without requiring the overhead of a downstream server round-trip.
To support caching, Akana provides an HTTP Caching Policy.
The HTTP Caching Policy is an Operational policy that allows you to:
- Define how long a response can be cached for HTTP requests.
- Select a caching mode (HTTP Proxy Mode or HTTP Mediation/Server Mode).
- Select a caching scope (shared or private)
Creating an HTTP Caching Policy
The first step in creating a policy is to define the basic policy information.
To add an operational policy
- Go to Workbench > Browse > Organization, and select Policies > Operational Policies. The Policies Summary is displayed.
- Click Add Policy.
- Choose the policy type and click Next.
- Specify a name (required) and description (optional) and click Finish. At the Completion Summary, click Close. The Add Policy Wizard creates a draft policy instance that you can then configure on the Policy Details page.
For more information, see Add Policy.
HTTP Caching Policy Modes
The HTTP Caching policy supports the following modes:
- HTTP Proxy Mode: Using this mode, the container expects the downstream call to be HTTP and to return cache control headers. If downstream cache control headers are provided in the response, caching is executed according to the directives contained in these headers. Note that directives might take precedence over policy configuration settings (for example, max-age directive will override policy time-to-live setting).
- HTTP Mediation / Server Mode: Using this mode, the presence or absence of downstream headers is not taken into consideration. In effect, caching headers included in the response are ignored. In this scenario, the way that caching decisions are executed by the HTTP Caching policy is based completely on the client cache-control headers, if present.
How Stale Caches are Managed
When a message is processed and the headers are read, a determination is made as to whether the cache is stale or not. If a cache is discovered to be stale, response validators are used to send a conditional response to the originating server. If it's determined that the cache is not stale, the cached response is used. Otherwise, a full response will be received that will be used instead of the cached response.
For more information on the stale cache handling approach used for this policy, see:
- https://tools.ietf.org/html/rfc7234 (RFC 7234 for HTTP caching).
- https://www.w3.org/Protocols/rfc2616/rfc2616-sec13.html#sec13 (RFC 2616 for HTTP caching).
HTTP Caching Policy Options
The policy includes the following configuration options:
- Time To Live: Allows you to specify the maximum time in seconds a response will be cached. If not specified, the maximum time is determined by the container settings.
- Staleness Period Seconds: If a value is entered, any cached entry will live in the cache for the number of seconds in Time To Live, plus the number of seconds in the Staleness Period. The "stale" portion of the entry is only used if Cache-Control directives on the request allow for a stale entry to be used, by the use of a max-stale directive. The default is 0.
- Act as HTTP Proxy: There are two options:
- Checked (the default): The platform acts as HTTP proxy, and sends the additional headers associated with HTTP caching.
- Cleared: Use this for downstream services that do not run over HTTP; for example, a REST to SOAP mediation where the downstream server is JMS, not HTTP. When this setting is cleared, the policy defaults and the back-end policy handler fill in any gaps due to missing HTTP headers.
- Shared Cache: Uncheck to enable the ability to use a private cache. In this case, you must also select a Subject Category (below).
- Subject Category: Allows you to select a subject category if Shared Cache is unchecked. The subject category is used to find the cache's principal name that is set when the cache is created, and use it as part of the cache key.
Public/Private Caching
By default, the caching module considers itself to be a shared (public) cache (Shared Cache checked), and will not, for example, cache responses to requests with Authorization headers or responses marked with Cache-Control: private. If, however, the cache is only going to be used by one logical "user" (behaving similarly to a browser cache), then you will want to turn off the shared cache setting (Shared Cache unchecked).
Configuration
Let's take a quick walkthrough of the HTTP Caching Policy configuration process to get you started.
Step 1: Add Policy / Use System Policy
In Policy Manager, to create an HTTP Caching Policy instance, go to Policies > Operational Policies and choose Add Policy.
Step 2: Modify Policy
When you click Modify to make changes to the HTTP Caching policy on the Policy Details page, the initial policy looks like this:
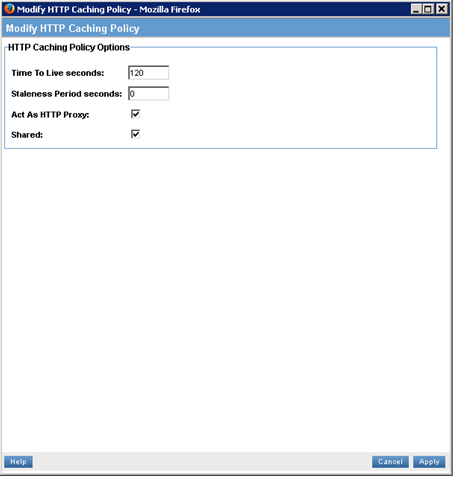
Configure the policy options based on your requirements and click Apply.
Step 3: Activate Policy
When the policy configuration is complete, activate the policy so that you can use it.
Step 4: Attach Policy
After you've saved and activated your policy, you can attach it to a web service, binding, or binding operation that you would like to enhance the message processing of.
Step 5: Test Policy and View Monitoring Data
After you've attached the HTTP Caching Policy to a web service, operation, or binding, send a request to your service and go to the Services > Monitoring section to view the results for Logs, Real Time Charts, and Historical Charts.
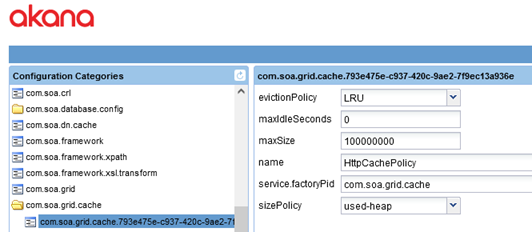
HTTP cache default configuration in the Akana Administration Console
During product installation, a preconfigured cache is created, HTTPCachePolicy, as part of the com.soa.grid.cache grid cache service (see Grid cache service). This cache is used by any HTTP Caching policy that is created.
The default values are shown below.
Field descriptions:
- evictionPolicy
- Determines the order in which cache entries are evicted from the cache. When the cache fills up, and there are new entries, old entries are removed based on the evictionPolicy setting. Possible values:
- LRU (default)—Less Recently Used.
- LFU—Least Frequently Used
- maxIdleSeconds
- The default maximum idle time for an entry, in seconds. If an entry is in the cache longer than the maxIdleSeconds time, without being used, it is removed.
- Default value: 0
- maxSize
- The maximum size of the cache. If maxSize is reached, some entries are evicted. How it's determined that maxSize is reached is determined by the sizePolicy property (see below):
- If sizePolicy is used-heap: maxSize is volume.
- If sizePolicy is percent-heap: maxSize is a percent. Provide a value up to 100.
- If sizePolicy is entry-count: maxSize is the number of entries.
- Default value: 100000000
- Name
- The name of the cache. Default value is HTTPCachePolicy, which is specific to the HTTP Caching policy.
- Note: If you want to modify the cache properties, change the property values, but do not change the name. If the HTTP Caching policy does not find a cache with this name, it creates a new one, with the default values.
- sizePolicy
- Determines the way in which the maxSize property (see above) is calculated, to determine when the allowable maximum cache size has been reached and some items must be evicted from the cache. Possible values:
- used-heap (default)—When the cache size reaches the maxSize value, some entries are evicted.
- percent-heap—When a percentage value specified in maxSize is reached, some entries are evicted; for example, if maxSize is set to 75 and 75% of the total heap allocation is used.
- entry-count—When a count specified in MaxSize is reached, some entries are evicted.
Activating a policy
When you create and configure a policy, the policy is in Draft state. When the policy configuration is complete, activate the policy: click Activate Policy and then confirm. See Activate a Policy.
A policy in Draft state is not available for general use. Once you activate the policy, it is in Active state and is available for use.
Attaching a policy
To use the policy, go to the Policies folder in the respective organization and attach the policy to a web service, binding, or binding operation.