Using the Service Level Policy
Learn how to define conditions for measuring and reporting on API performance.
Note: This policy does not enforce service level, and does not operate in real time. Service level is checked at intervals as defined in the policy configuration, and alerts are generated if a defined rule is violated, but this policy does not block service calls. To block service calls, use this policy together with the Service Level Enforcement policy.
For information about using policies in the context of the Community Manager developer portal, see Business Policies.
On this page:
- Introduction
- Creating a Service Level policy
- Configuring a Service Level policy
- Configuring Service Level Policy Rules
- Configuring Service Level Policy Access Time options
- Activating a policy
- Attaching a policy
- Testing the Policy and Viewing Monitoring Data
- Service Level Policy: Use cases for Policy Manager
Introduction
The Service Level Policy defines conditions for measuring and reporting performance of a specific contract.
Note that this policy measures and reports on service level. It provides metrics, but it does not block any service calls.
In this policy, you can define:
- Rule (one or more): Each rule represents a set of conditions you define to measure and report performance of a service contract. When a defined system condition matches a defined rule, an alert is raised. A Rule is composed of Rule Elements (Alert Code, Metric, Operator, Value, Units, and Interval) that you can configure to meet your service monitoring requirements.
Note: To see the alerts in Policy Manager: Policy Manager > Workbench. Alerts are not displayed in the Community Manager developer portal, but you can see the behavior with regard to whether messages are allowed or limited by attaching a Detailed Auditing policy to the API and reviewing the metrics and logs.
- Access time: Defines the time periods during which the policy is enforced. You can define access time periods uniquely for each day of the week—all day, or a start/end range (HH:MM)—and the time zone.
Here's how it works:
- The platform collects statistics for all API calls. The raw data is recorded in the database.
- Platform processes run at intervals to analyze the data to see if any Service Level Policy limits have been reached.
The platform uses the time frame specified in the policy rule (see Interval below). For example:
- A rule limit of 5 faults per hour is checked each hour, on the hour.
- A limit of 100 transactions per 15 minutes is checked on the quarter-hour (for example, 1:00, 1:15, 1:30, 1:45).
- Alert: If a rule has been violated for the specified interval, an alert is generated.
- "Clearing" Alert: At the next scheduled interval, the rule is checked again. The platform applies the following logic:
- If the message count is still exceeded, no action is taken; there is no additional alert, but the alert is not cleared.
- If a rule is no longer exceeded, the Service Level Policy generates a "Clearing" alert to notify users that the violation is over.
Creating a Service Level policy
The first step in creating a policy is to define the basic policy information.
To add a Quality of Service (QoS) policy
- Go to Workbench > Browse > Organization, and select Policies > QoS Policies. The Policies Summary is displayed.
- Click Add Policy.
- Choose the policy type and click Next.
- Specify a name (required) and description (optional) and click Finish. At the Completion Summary, click Close. The Add Policy Wizard creates a draft policy instance that you can then configure on the Policy Details page.
For more information, see Add Policy.
Configuring a Service Level policy
To configure your Service Level policy, follow the steps below.
To configure a Service Level policy
- Create the policy as covered above.
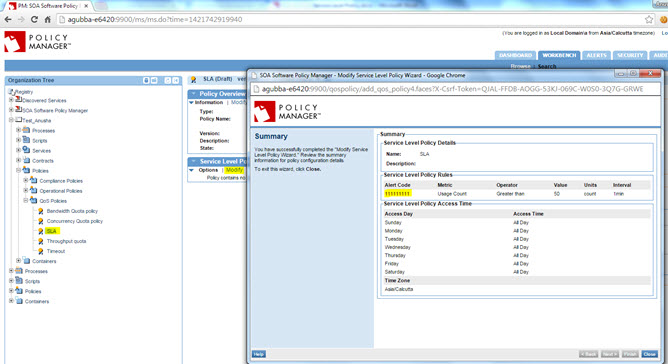
- At the Policies Summary page, in the Service Level Policy section, click Modify. The Modify Service Level Policy Rules page appears.
- Add one or more rules, as needed. For information about the fields, see Configuring Service Level Policy Rules.
- Click Next. The Modify Service Level Policy Access Time page appears.
- Configure values for the access times, for each day of the week, and specify time zone. For information about the fields, see Configuring Security Level Policy Access Time options.
- When done, click Finish.
- At the Completion Summary page, click Close.
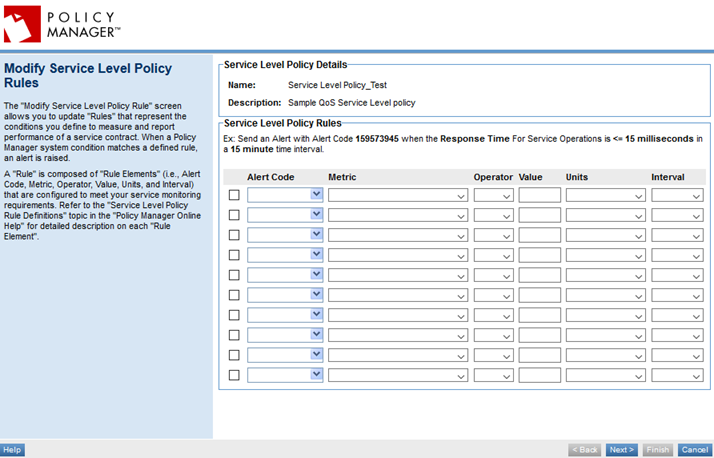
Configuring Service Level Policy Rules
Rules represent the conditions you define to measure and report performance for the specific service that is referencing or contains the configuration of a Service Level Policy. When a defined system condition matches a defined rule, an alert is generated.
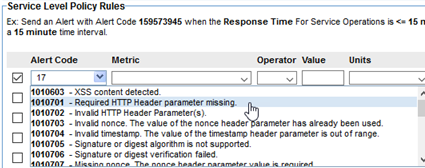
Note: You can select from available SLA Custom Alert Codes in the drop-down list box on the Alert Code field. You can also enter a new SLA Custom Alert Code directly into the Service Level Policy Rule line item. The minimum SLA Alert Code start number is 700000. For more information on defining an Alert Code, see Using Alert Codes.
A rule is composed of the elements shown below.
| Rule Element | Description |
|---|---|
| Alert Code |
The Alert Code identification number that represents the alert that is sent when the defined condition is met. Choose from the drop-down list or manually enter an alert code.
|
| Metric |
A measurable function (such as a Response Time) that is used in the rule calculation. Valid values:
Note: The Total metric options for request and response message size represent the combined size of all the message payloads over the time period. |
| Operator |
A symbol representing a mathematical function, such as > (greater than) or <+ (less than or equal to), used to limit or expand your search to qualify the metric. Available values are shown below.
|
| Value |
A numerical value that establishes the threshold of the metric. Type the value in the box. |
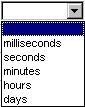
| Units |
The unit measure by which the value is counted. Available values are: milliseconds, seconds, minutes, hours, days, as shown below.
|
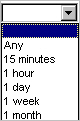
| Interval |
The time interval over which the rule is measured. Available values, as shown below: Any, 15 minutes, 1 hour, 1 day, 1 week, 1 month.
|

Example Rule Definition
Send alert code [30002] when the [Maximum Response Time] for Service Operation is:
[>] [5] [Seconds] in a [1 hour] time interval.
Before you begin creating rules, review the list of available alert codes to determine which codes you want to use. One common approach is to establish a series of two or three thresholds, each using the same metric:
- The first threshold indicates that there might be a problem with a service monitored by the Service Level Policy.
- The second indicates that there is a problem, but it might not be a serious one.
- The third is a warning that there is a major problem that needs to be addressed immediately.
Example Rule Definition with Thresholds
| Rule | Significance |
|---|---|
| Send alert code [30002] when the [Maximum Response Time] for Service Operation is [>] [5] [Seconds] in a [15 minute] time interval. |
Response time is slow, but tolerable. Monitor this service. |
| Send alert code [30004] when the [Maximum Response Time] for Service Operation is [>] [30] [Seconds] in a [1 hour] time interval. | Response time is unacceptable. Investigate. |
| Send alert code [30007] when the [Maximum Response Time] for Service Operation is [>] [2] [Minutes] in a [ANY] time interval. | Response time is critical. Address immediately. |
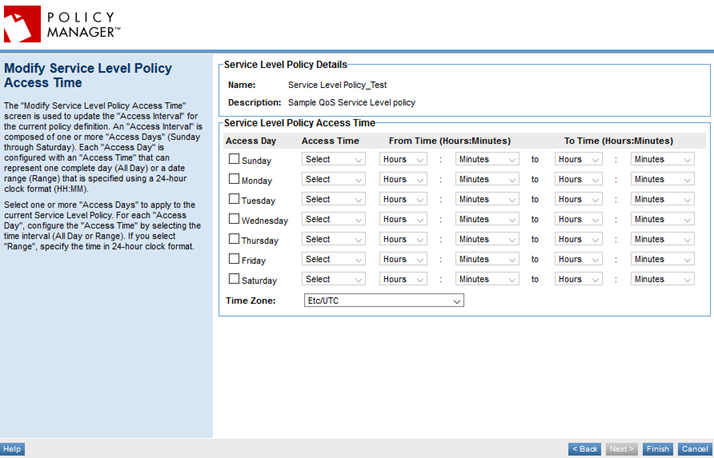
Configuring Service Level Policy Access Time options
An Access Interval is composed of one or more Access Days (Sunday through Saturday). Each Access Day is configured with an Access Time that can represent one complete day (All Day) or a date range (Range) that is specified using a 24-hour clock format (HH:MM).
When you add a Service Level Policy Rule, you define the service measurement and reporting configuration that will be referenced by services and contracts. The attributes you will define are listed below.
| Access Time Option | Description |
|---|---|
| Access Day |
Checkbox options that allow you to select the days you would like to include in the Access Interval. Selectable days: Monday, Tuesday, Wednesday, Thursday, Friday, Saturday, and Sunday. |
| Access Time | A drop-down list box option that allows you to select All Day or Range for each Access Day defined in the Access Interval. All Day represents a full 24-hour day. Range allows you to select To and From times using a 24-hour clock format (HH:MM). |
| From Time (Hours:Minutes) | Hour and Minute drop-down list boxes that allow you to select the From Time range to apply to the Access Time selection for the Access Interval definition. Hour increments are based on a 24-Hour. |
| To Time (Hours:Minutes) |
Hour and Minute drop-down list boxes that allow you to select the To Time range to apply to the Access Time selection for the Access Interval definition. Hour increments are based on a 24-hour period. |
| Time Zone |
Specify the time zone that will apply to the Access Time for the current Access Interval definition. |
Activating a policy
When you create and configure a policy, the policy is in Draft state. When the policy configuration is complete, activate the policy: click Activate Policy and then confirm. See Activate a Policy.
A policy in Draft state is not available for general use. Once you activate the policy, it is in Active state and is available for use.
Attaching a policy
To use the Service Level policy, go to the Policies folder in the respective organization and attach the policy to a web service, binding, or binding operation.
Testing the Policy and Viewing Monitoring Data
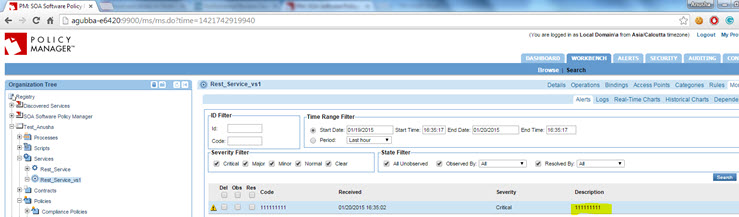
After you've attached the Service Level Policy to a web service, operation, or binding, send a request to your service and go to the Services > Monitoring section to view the results for Logs, Real Time Charts, and Historical Charts.
Service Level Policy: Use cases for Policy Manager
This section provides a list of Policy Manager-specific usage scenarios for the Service Level Policy.
It includes:
- SLA Generates Alert / Email When Requests Exceed Limit
- SLA Generates Clear Alert / Email When Throughput Drops Below Limit
- Timeline Diagram
- SLA Generates Alert / Email When App Requests Sent by API Exceed Limit
SLA Generates Alert / Email When Requests Exceed Limit
With the configuration in the example below, the Service Level policy generates an alert, and sends an email to notify the administrator that the SLA has been violated, when more than 50 requests have been sent to an API in 1 minute.
- Create a physical service in the Policy Manager Management Console using Create Physical Service.
- Provide service details and finish the wizard.
- Using Virtualize Service, virtualize and host the physical service on Network Director (ND1), and assign a name (for example, Vs1).
- Navigate to Organization > Policies > QoS Policies and use Add Policy to create a Service Level Policy.
- Configure the Service Level Policy as per the use case with an alert code and a usage count of greater than 50 messages in 1 minute, as shown below.
- Activate the policy in the Policy Workflow portlet and attach it to the Vs1 service in the Service Details > Policy Attachments > QoS section.
In this scenario, when there are more than 50 hits for a service in the 1-minute interval that was configured in the policy rules, an alert is triggered at the beginning of the next configured time interval (in this example, at the beginning of the next minute), and an email is sent to the administrator.
SLA Generates Clear Alert / Email When Throughput Drops Below Limit
In this scenario, generate an alert because the range defined in the policy is exceeded, and then generate a clear alert that sends an email to alert the administrator when the throughput has dropped back into the defined range.
- Add an alert code to the Policy Manager Management Console in the Alerts > Alert Codes tab with email configuration.
- Create a physical service in the Policy Manager Management Console using Create Physical Service.
- Provide service details and finish the wizard.
- Using Virtualize Service, virtualize and host the physical service on Network Director (ND1), and assign a name (for example, Vs1).
- Navigate to Organization > Policies > QoS Policies and use Add Policy to create a Service Level Policy.
- Configure the Service Level Policy to generate the alert code you created in Step 1 for a usage count of greater than 50 in 1 minute.
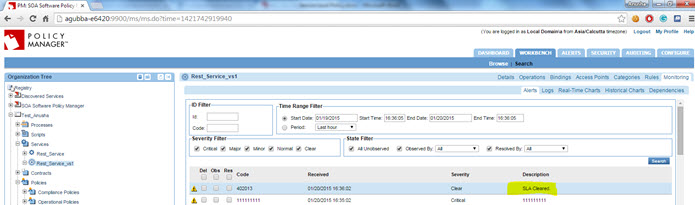
- Activate the policy in the Policy Workflow portlet and attach it to the Vs1 service in the Service Details > Policy Attachments > QoS section. You will see:
- If there are more than 50 hits for the service in the 1-minute interval that was configured in the policy rules, an SLA alert is triggered at the beginning of the next configured time interval (in this example, at the beginning of the next minute), and an email is sent to the administrator.
- If there are no SLA violations for the next 1-minute interval, a clear alert is generated at the beginning of the next configured interval (minute).
- In the alert, email has to be configured so as to send an email to the administrator as below.
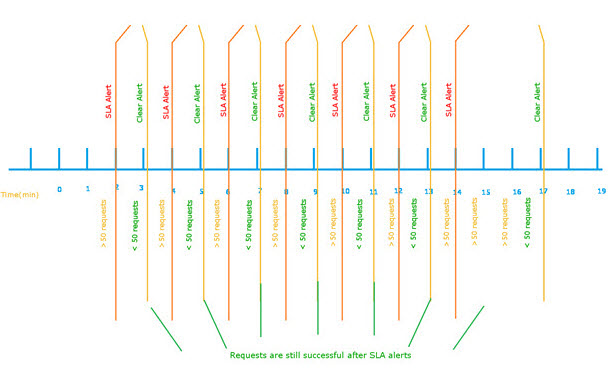
Timeline Diagram
The diagram below shows the points at which alerts are generated or cleared. Note that requests are still successful even after an alert is generated.
SLA Generates Alert / Email When App Requests Sent by API Exceed Limit
In the example below, the SLA policy generates an alert and sends an email to the alert the administrator when more than 300 requests by a configured App have been sent to the API in a 15-minute interval.
- Add an alert code to the Policy Manager Management Console in the Alerts > Alert Codes tab with email configuration.
- Create a physical service in the Policy Manager Management Console using Create Physical Service.
- Provide service details and finish the wizard.
- Using Virtualize Service, virtualize and host the physical service on Network Director (ND1), and assign a name (for example, Vs1).
- Navigate to Organization > Policies > QoS Policies and use Add Policy to create a Service Level Policy.
- Configure the Service Level Policy as per the use case with the above alert code, and greater than 300 usage count in 15 minute.
- Activate the policy in the Policy Workflow portlet and attach it to the Vs1 service in the Service Details > Policy Attachments > QoS section.
If there are more than 300 hits for a service in the interval that was configured, in this case 15 minutes, the SLA alert is triggered at the beginning of the next 15-minute interval.