Setting Up the SAML Web Browser SSO Feature
This section provides information about setting up the SAML Web Browser SSO feature, including planning, installation, setup steps in Policy Manager and Community Manager.
Note: Once you have everything set up, any change made in the Akana Platform that affects the URLs used for sending and receiving messages related to SAML will require update in the Service Provider account configuration with the Identity Provider. For information on updating, see Modifying an Existing SAML Installation.
On this page:
- Requirements for the SAML domain to work in Community Manager
- Step 1: Download and install the plug-ins to support SAML web browser SSO
- Step 2: Gather information
- Step 3: Determine setup sequence
- Step 4: Configure the domain in Policy Manager
- Step 5: Configure the service provider account with the identity provider
- Step 6: Community Manager configuration
- Step 7: Verify the test setup
Requirements for the SAML domain to work in Community Manager
At a high level, to set up a domain that uses SAML Web Browser SSO to provide single sign-on services in Community Manager, you must complete the steps below. This document assumes that you have already created an account with your selected Identity Provider.
To set up the SAML Web Browser SSO feature: high-level procedure
- Download the plug-ins relating to the SAML Web Browser SSO feature and install them in the correct containers. See, Step 1: Download and install the plug-ins to support SAML web browser SSO.
- Gather the information you'll need to provide in the configuration steps. See, Step 2: Gather Information.
- Determine setup sequence. Whether it's best to do the Policy Manager setup first or the Identity Provider setup first depends on which Identity Provider you are using. See, Step 3: Determine setup sequence.
- In Policy Manager, set up the SAML domain with the values relating to your SAML installation (gathered in Step 2). See, Step 4: Configure the domain in Policy Manager.
- In your Identity Provider account, set up the Service Provider connection, using the values you gathered in Step 2. The specific steps will vary depending on the Identity Provider you're using. Examples for specific IdPs:
- Identity Provider Configuration Example: SSO Circle
- Identity Provider Configuration Example: PingFederate
Note: Depending on your specific setup and the Identity Provider you are using, it might be more efficient to do the setup in the Identity Provider (Step 4) first. In either case, the important thing is to make sure that the applicable values are set up correctly in both places.
- In Community Manager, complete the setup by following the applicable procedure, depending on how you will be using the SAML domain:
- As a login domain: see, To enable a SAML login domain in Community Manager.
- As an OAuth provider domain: see, To configure an Akana OAuth/OIDC Provider domain using a SAML SSO domain as the Resource Owner Authentication domain in Community Manager.
- In Community Manager, test to make sure your domain that uses the SAML Web Browser SSO feature works correctly:
- As a login domain: see, Testing the SAML domain as a Login Domain.
- As an OAuth provider domain: see, Testing the SAML domain as the Resource Owner Authentication domain for an OAuth Provider Domain.
Step 1: Download and install the plug-ins to support SAML web browser SSO
The SAML Web Browser SSO feature is only available with the "Option-pack". To get support for the SAML Web Browser SSO feature, you will first need to download and install the saml-web-sso option pack.
To download the installation ZIP file
- Log in to the Rogue Wave Support Center (https://library.roguewave.com).
- In the My Resources section, click Product Downloads and then click Akana - Product Downloads.
- Choose the major version release page; for example, Akana 2019.1.x Product Downloads.
- Expand the Plugins link at the top of the page and download the plugin.
As part of your production installation, install the ZIP file after the Akana Platform and Akana API Platform main files and any updates. For installation sequence and details, see Installing the Akana API Platform for installation instructions.
Then, install the following optional plug-ins:
In the Akana Administration Console for the Policy Manager container:
- SAML 2.0 Web Browser SSO Service Provider UI
In the Akana Administration Console for all other containers:
- SAML 2.0 Web Browser SSO Service Provider
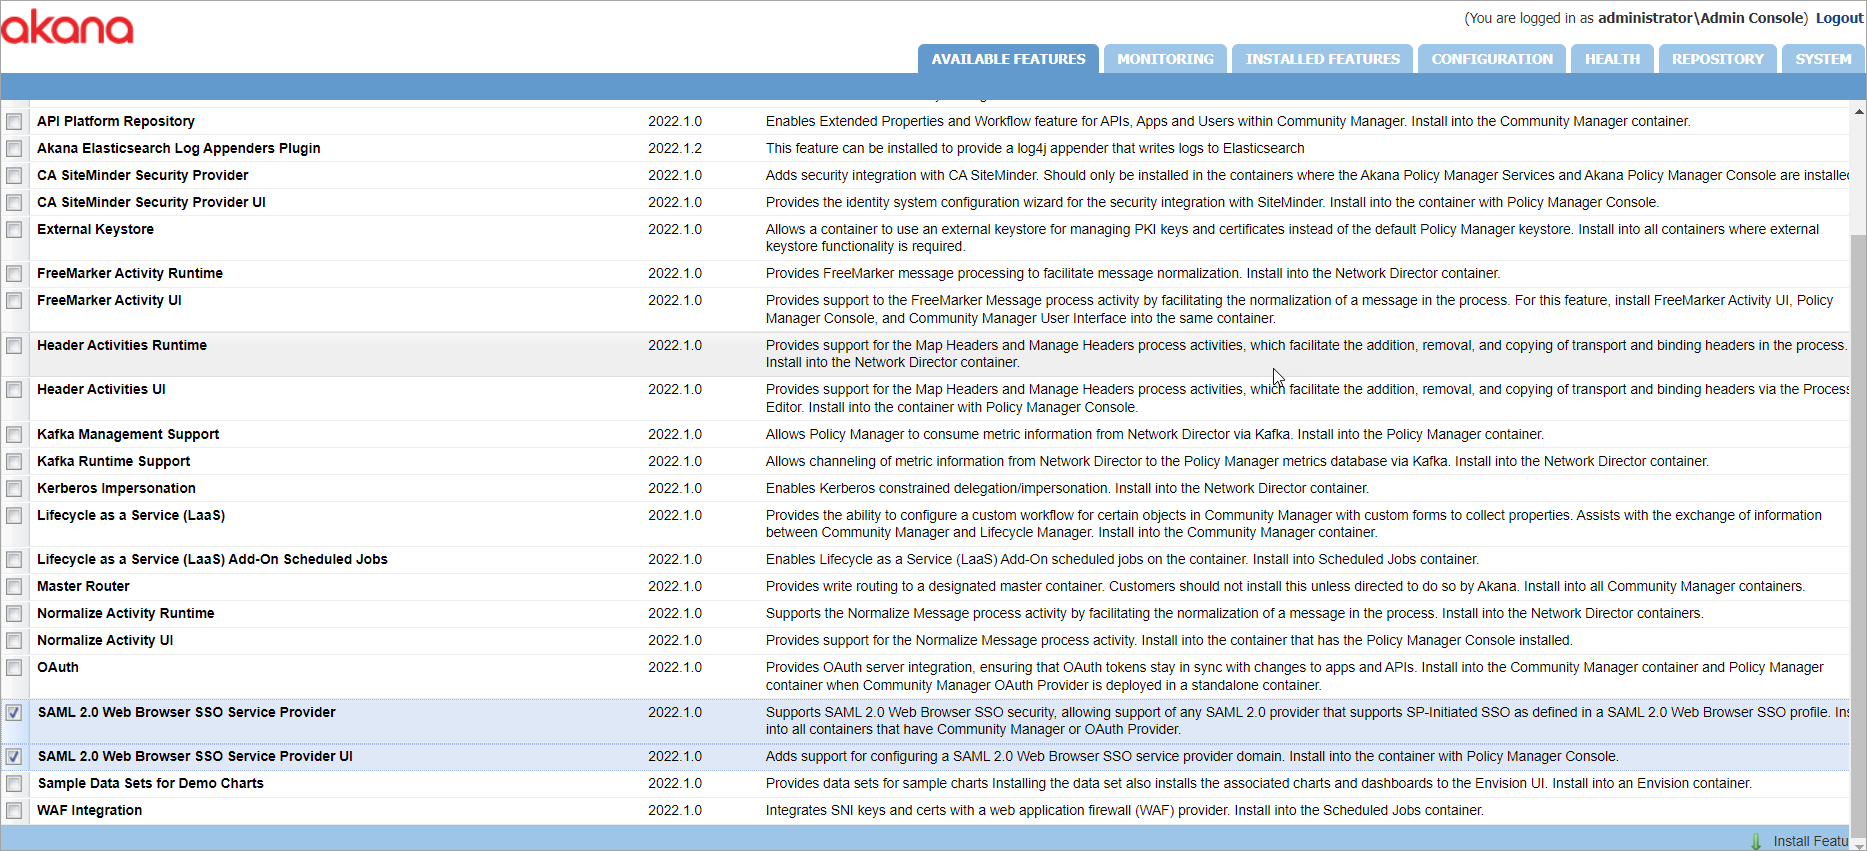
The plug-ins you would need to install depends on the container as follows:
- In the Policy Manager Console container, install SAML 2.0 Web Browser SSO Service Provider UI.
- In every other container (Community Manager or OAuth Provider), install SAML 2.0 Web Browser SSO Service Provider.
After the plug-in installation is complete, select Configure to install available schemas. The installed schemas are used to manage schemas associated with the current container. Select the checkbox next to SAML Web SSO to install the schemas and then select Finish to complete the configuration.
Step 2: Gather information
When registering with the SAML Identity Provider, the terminology used or the organization of information might be a little different, depending on the specific provider, however, you can expect to be asked for the following pieces of information. Before setup, gather this information and have it ready when completing the configuration steps in Policy Manager and your Identity Provider:
- The request SAML binding you will be using (HTTP POST or HTTP Artifact).
- The response SAML binding you will be using (HTTP POST, HTTP Redirect, or HTTP Artifact).
- Security key information for your request messages.
- If you are using HTTP Artifact binding for the response, security key information for encryption of the artifact.
- Your SAML Service Provider Entity ID (see Entity ID). This value is determined by you, but must be set up with the Identity Provider and must be unique for that Identity Provider.
Note: The Service Provider's entity ID, along with the certificate and private key, bind both sides together so that information can be exchanged securely.
- Optional attributes, such as firstname, lastname, and email address to be sent in the SAML Assertion. For more information, see Attributes.
- The base URL for your implementation: {protocol_scheme}://{host}:{port}. For more information, see Base URL.
- Metadata information for the Service Provider (the platform). This is created as a result of Identity System setup in Policy Manager.
- Security keys and certificates.
Step 3: Determine setup sequence
For the SAML Browser Web SSO feature to work, you must set up certain values on the platform side in Policy Manager and the same values on the Identity Provider (IdP) side in your Service Provider (SP) account setup. These values enable the exchange of information between the SP and the IdP.
Whether it's best to do the Policy Manager setup first or the Identity Provider setup first depends on which Identity Provider you are using. Each Identity Provider has a different user interface. This document includes generic instructions and also setup examples for two Identity Providers:
- Identity Provider Configuration Example: SSO Circle
With SSO Circle, it's easiest to do the Policy Manager setup first. SSO Circle publishes a generic metadata file, so you can easily provide a link to the file, or upload it to Policy Manager, and Policy Manager prefills many of the values needed for the setup wizard. Policy Manager then generates the Service Provider metadata file and you can then paste the contents of this file into SSO Circle.
- Identity Provider Configuration Example: PingFederate
With PingFederate, you could do it either way. It's more efficient to get the couple of values needed to set up Policy Manager in the PingFederate account, then export the XML and import it to Policy Manager. However, you could also configure Policy Manager manually.
The sequence is not as important as the fact that the values must match on both sides.
Step 4: Configure the domain in Policy Manager
This section provides general information about the setup steps you will need to complete in Policy Manager, including the basic procedure and an overview of the wizard.
To configure the SAML Web Browser SSO Domain in Policy Manager
- Log in to the Policy Manager Console.
- Under Configure tab, select Security and then select Identity Systems.
- Click Add Identity System to access the Add Identity System wizard.
- Provide the values on each page of the wizard. For details about the wizard and significant fields and values, see SSO Domain Configuration Wizard.
- Click Finish.
The Service Provider metadata file is generated and is available at the following URL: {protocol_scheme}://{host}:{port}/saml/{sp_domain_name}/metadata.
SSO Domain Configuration Wizard
The SSO Domain Configuration wizard takes you through setting up the values needed to create a SAML Web Browser SSO domain in Policy Manager. The information below is general to all Identity Providers.
Summary of pages:
- Add Identity System Wizard
- Select SAML Identity Provider Configuration Method
- SAML Identity Provider Configuration
- SAML Service Provider Configuration
- Identity Mapping
- Manage PKI Keys
Add Identity System Wizard
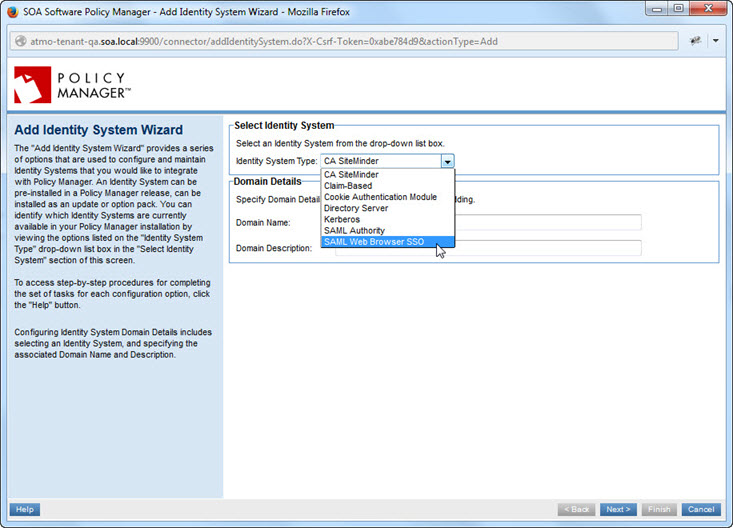
Provide initial values:
- From the drop-down list, choose SAML Web Browser SSO
- Provide a domain name and description.
Note: The domain name is part of the path for the Service Provider metadata file Policy Manager generates when the wizard is finished. Also, the first letter of the domain name is used by Community Manager as the default for the login. So, for example, if your IdP is PingFederate and your domain name is PingFederate domain, users will see a button labeled P at login.
Select SAML Identity Provider Configuration Method
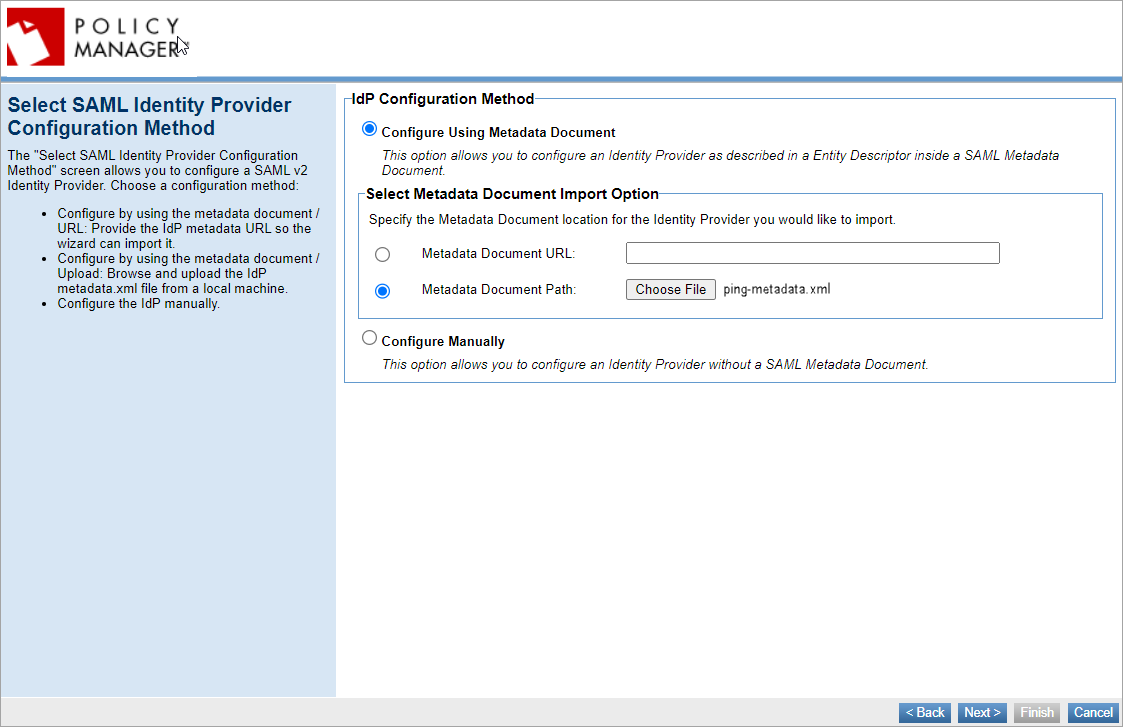
Choose a configuration method out of the three options:
- Configure by using the Metadata Document URL: Provide the IdP metadata URL so the wizard can import it.
- Configure by using the Metadata Document Path: Upload the IdP metadata.xml file.
- Choose to configure the IdP manually.
SAML Identity Provider Configuration
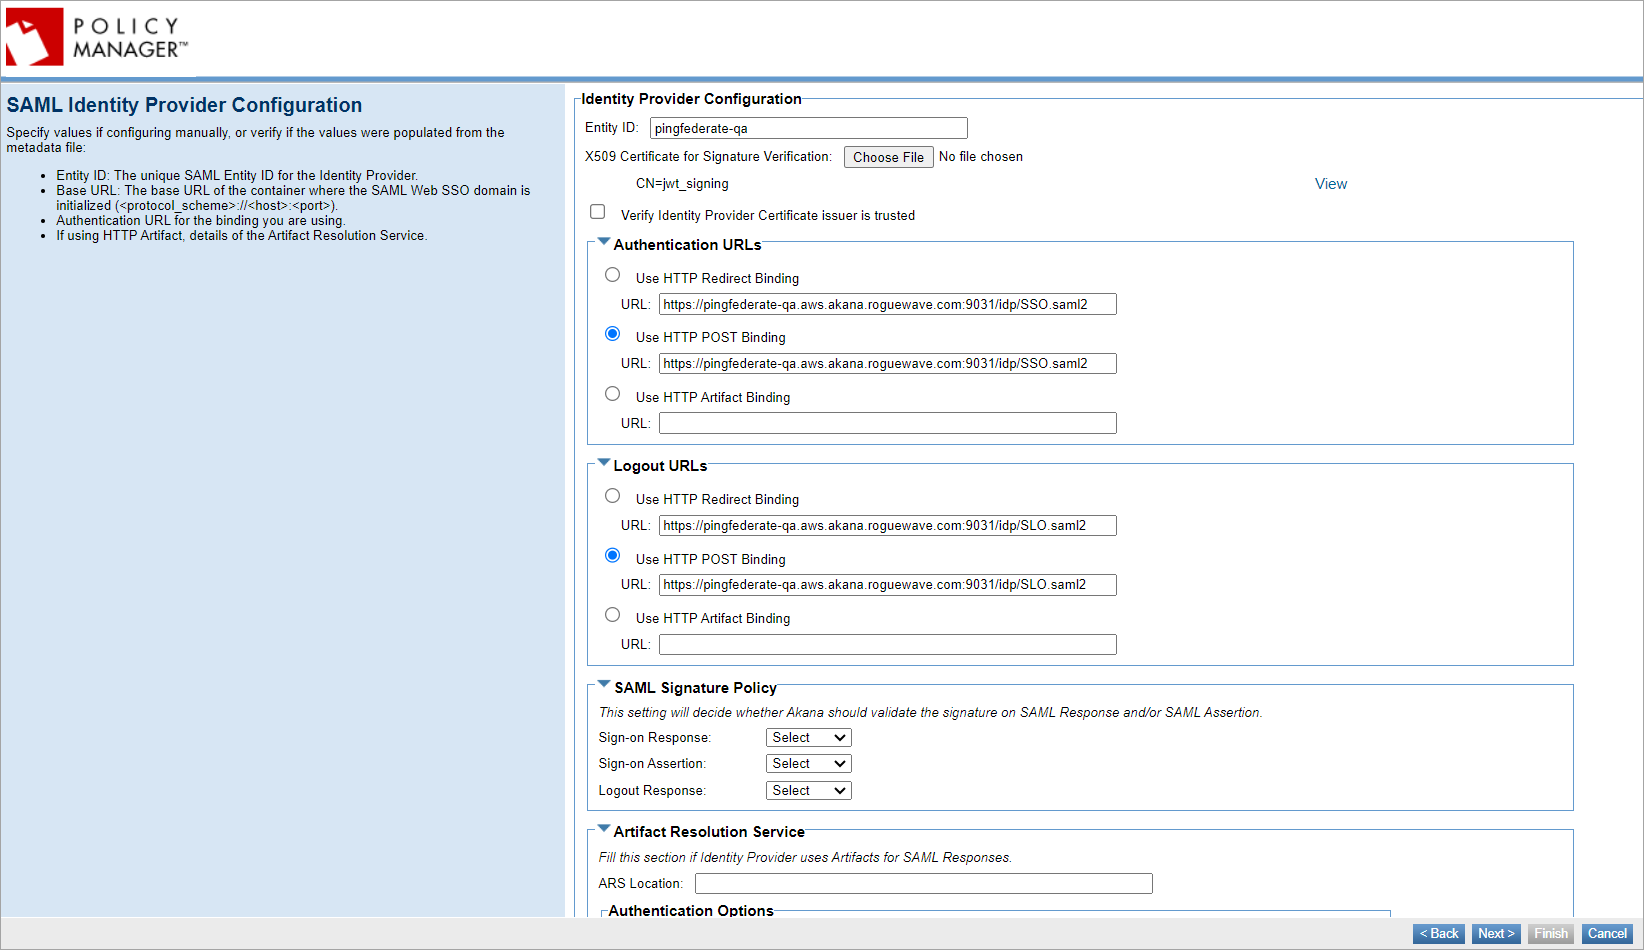
Specify values if configuring manually or verify if uploading metadata.xml file:
- The unique SAML Entity ID for the Identity Provider.
- Authentication URLs and Logout URLs: Choose the binding you will be using, either HTTP POST or HTTP Redirect and put in the applicable URL from your Identity Provider account.
- SAML Signature Policy: Choose this setting to validate the signature on SAML Response and/or SAML Assertion. Choose to select, sign, or unsign the SAML sign-on response, sign-on assertion, or logout response.
- If you choose the Sign-on Response, Sign-on Assertion, or Logout Response option to signed, this ensures that the signature is present and validates the response and assertion signature using the public keys or X.509 certificates issued by the identity provider.
- If you choose the Sign-on Response, Sign-on Assertion, or Logout Response option to unsigned, this will skip the validation of the response and assertion signatures.
- If you choose the Sign-on Response, Sign-on Assertion, or Logout Response option to select, this will validate the signature if present and skip the signature validation if not present. For more information, see Enforce signature validation for SAML Web Browser SSO login domain.
- If you are using HTTP Artifact for the SAML response messages, provide details of the Artifact Resolution Service.
SAML Service Provider Configuration
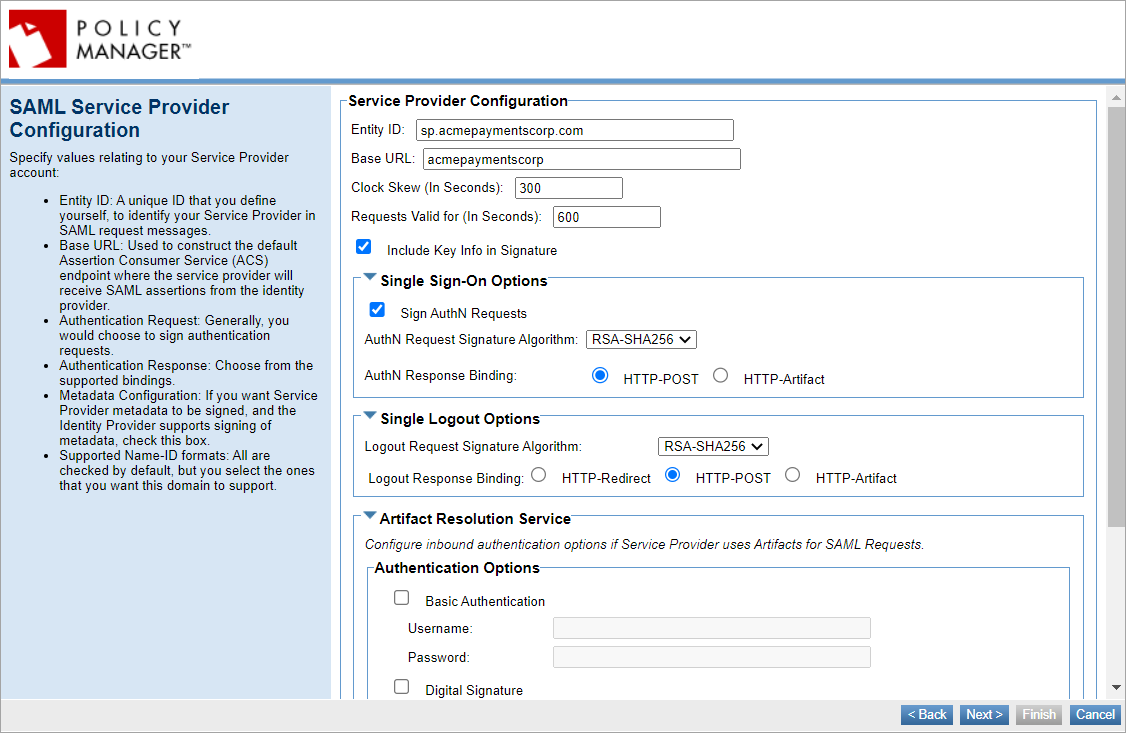
Enter SAML Service Provider configuration values:
- Entity ID: A unique ID that you define yourself to identify your Service Provider in the SAML authentication request messages. When setting up your account with the Identity Provider you must specify the Entity ID, which must be unique within the IdP so that the IdP can identify your Service Provider; then, you set up the same value in Policy Manager.
- Base URL: Used to construct the default Assertion Consumer Service (ACS) endpoint, the endpoint where the Service Provider will receive SAML assertions from the Identity Provider. Must be the container address of the container where the SAML Web Browser SSO feature is initialized ({protocol_scheme}://{host}:{port}). For more information, see Base URL.
- Single Sign-On Options: Select to sign the authentication requests by using response binding either, HTTP-POST or HTTP-Artifact.
- Single Logout Options: Select from the supported bindings, either HTTP-Redirect, HTTP-POST or HTTP-Artifact.
- Artifact Resolution Service: Configure inbound authentication options if Service Provider uses Artifacts for SAML requests.
- Metadata Configuration: Select if you want Service Provider metadata to be signed.
- Supported Name-ID formats: All are checked by default, but you can select the ones that you want this domain to support.
Identity Mapping
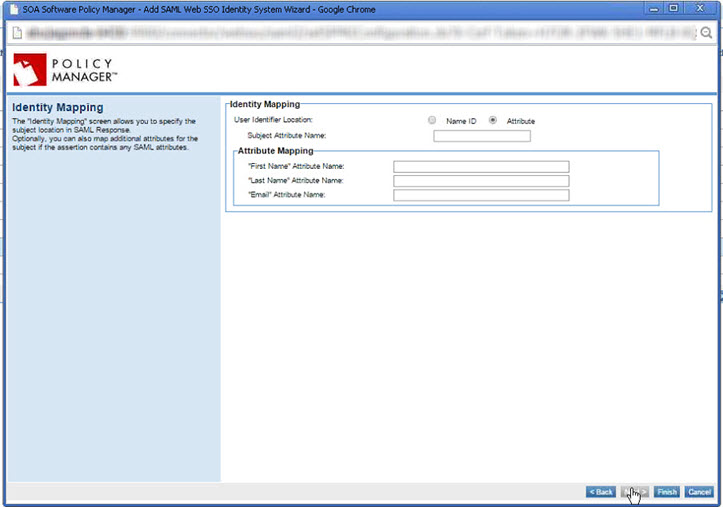
Specify attribute information:
- User Identifier Location: Choose whether to send the Name ID as the subject of the SAML assertion or to use an Attribute: if needed, define the subject attribute name.
- Subject Attribute Name: In general, the subject would be part of the Name ID. However, in some cases, such as Google, the IdP does not send the subject directly. Instead, they send a unique Name ID, a lengthy string. In those cases, the IdP can be configured to send the actual subject, the username, in the attribute.
- Attribute Mapping: Make sure the attribute names set up here exactly match the values you have in your account with the Identity Provider. These are the attributes the IdP will send in the response. If the Identity Provider supports it, you can map additional attributes for Group Memberships that contain all of the groups, which can be assigned to the platform roles.
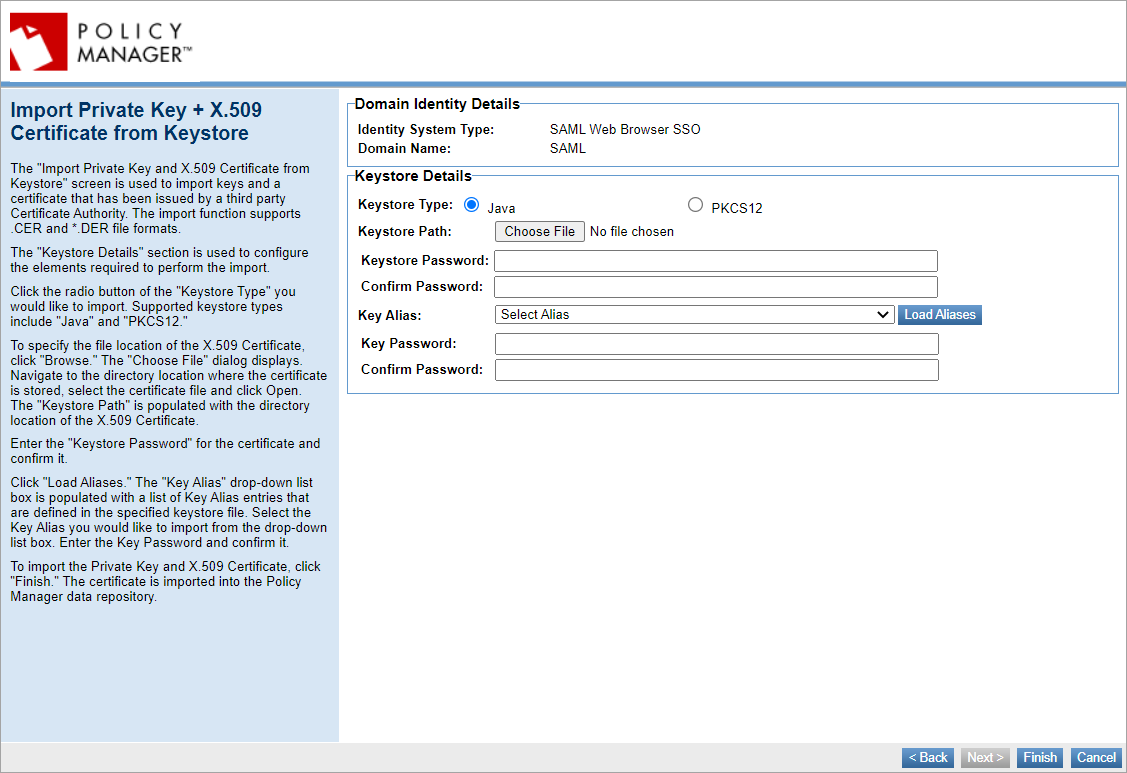
Manage PKI Keys
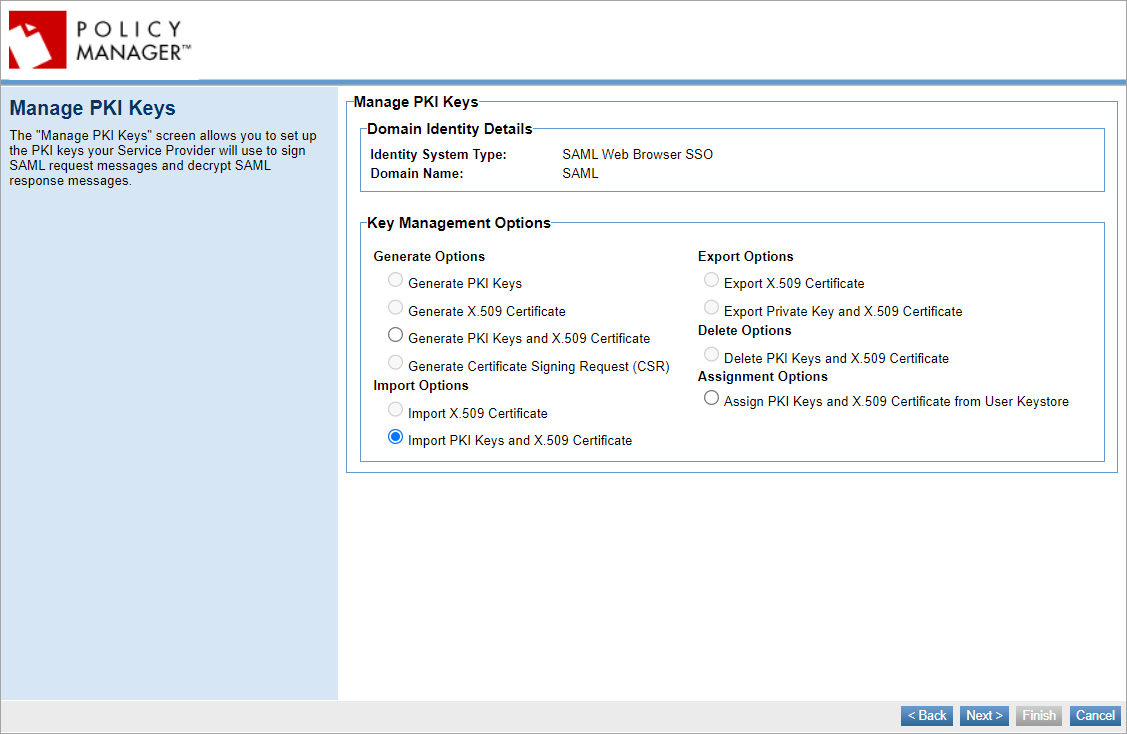
Set up information about the keys you will use to sign SAML authentication request messages. Outgoing messages are signed with the private key; the public key is published in the metadata file generated at the end of the wizard. The Identity Provider needs this key to verify the signature on the SAML authentication request messages.
Choose to generate, import, or assign keys.
-
If you choose Generate PKI Keys and X.509 Certificate, provide values in the Certificate Details section.
-
If you choose Import PKI Keys and X.509 Certificate, you will need to choose a key management option and provide keystore details.
-
If you choose Assign PKI Keys and X.509 Certificate from User Keystore, you will need to assign keys from external keystore to the current identity by selecting the Keystore Alias and Password. The Assign PKI Keys and X.509 Certificate from User Keystore option is only available if you have the External Keystore feature installed. You can use the Hardware Security Module (HSM) or JCEKS as an external keystore for storing and managing Policy Manager PKI keys and certificates. For more information, see Using the JCEKS as an External Keystore to configure an external keystore using the JCEKS for storing and managing Policy Manager PKI keys and certificates. To configure HSM as an external keystore, see Using the HSM as an External Keystore to enable your own hardware security module (HSM) as an external keystore for storing and managing Policy Manager PKI keys and certificates.
Step 5: Configure the service provider account with the identity provider
Identity Provider user interfaces vary, but all essentially gather the same information that is needed for your SAML Web Browser SSO feature to work.
Provide the values you collected in Step 2: Gather Information.
Get the correct metadata file generated by Policy Manager in Step 4: Configure the domain in Policy Manager.
- If the domain will be used for Community Manager login: the metadata.xml file for the container that has Community Manager installed.
- If the domain will be used for Community Manager OAuth domain, for resource owner authentication for at least one OAuth Provider: the metadata.xml file for the container that has the OAuth Provider feature installed.
If needed, you could refer to the two examples provided later in this publication:
- Identity Provider Configuration Example: SSO Circle
- Identity Provider Configuration Example: PingFederate
Step 6: Community Manager configuration
This section includes procedures in Community Manager to complete the setup. It includes:
- Enabling the Login Domain: see, To enable a SAML login domain in Community Manager.
- Configuring an Akana OAuth/OIDC Provider domain to use the SAML SSO domain as the OAuth Resource Owner Authentication domain: see, To configure an Akana OAuth/OIDC Provider domain using a SAML SSO domain as the Resource Owner Authentication domain in Community Manager.
To enable a SAML login domain in Community Manager
- In Community Manager, log in as the Site Admin.
- Go to the More tab, select Admin, and then select Logins.
- Find the SAML SSO domain and click Enable.
To configure an Akana OAuth/OIDC Provider domain using a SAML SSO domain as the Resource Owner Authentication domain in Community Manager
For instructions and additional information about this domain, see How do I set up and configure an Akana OAuth/OIDC Provider domain? (Community Manager developer portal help).
-
In the Community Manager, log in as the Site Admin.
-
Go to the More tab, select Admin, and then select Domains.
-
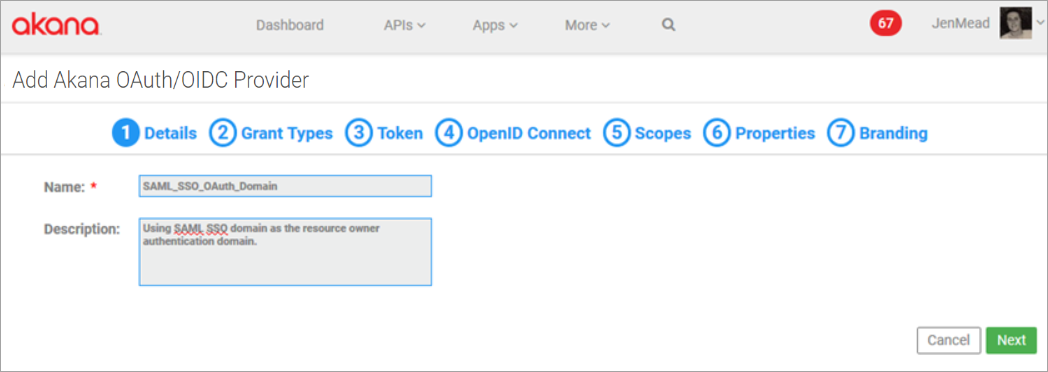
Click Add Domain and select Akana OAuth/OIDC Provider domain type. The wizard opens.
-
Tab 1, Details: Provide name and optional description and click Next. In this example, SAML_SSO_OAuth_Domain
-
Tab 2, Grant Types: Select one or more grant types. This example uses the Authorization Code grant type. In the Resource Owner Authentication Domain, select the SAML domain, and then click Next.
-
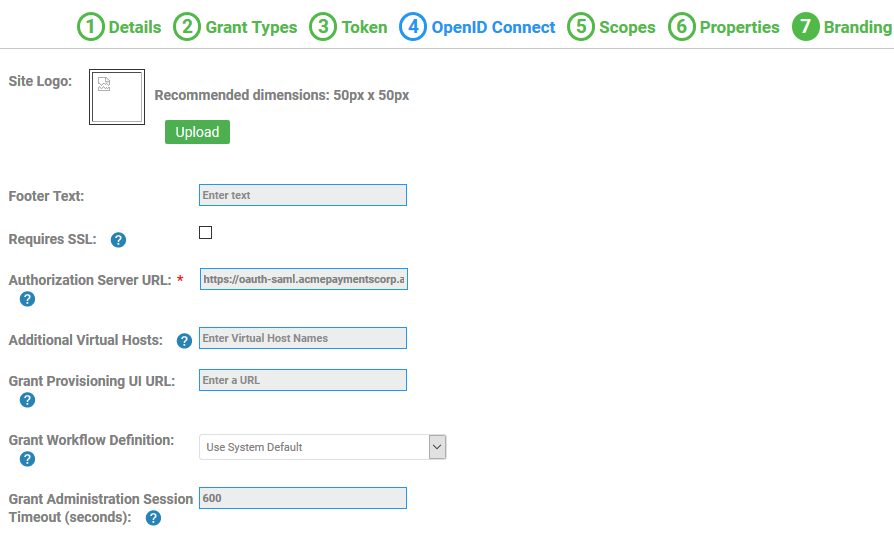
The rest of the OAuth domain configuration is according to your preferences. The only setup step for SAML is to specify the Resource Owner Authentication Domain. This example uses the following values:
- Tab 3, Token: Token type: Referenced Bearer.
- Tab 4, OpenID Connect: Not applicable since we are using SAML Web SSO for authentication.
- Tab 5, Scopes: Provide at least one scope. In this example: Email.
- Tab 6, Properties: No configuration needed for this example.
- Tab 7, Branding: Provide the Authorization Server URL for your OAuth Provider. In this example: https://oauth-saml.acmepaymentscorp.apiportal.akana.com
- Click Save. The domain is created.
Note: When you create a new OAuth Provider Domain, you must also add the authorization server URL to your account with your SAML Identity Provider if it isn't already there. See Adding a New OAuth Provider Domain: Manual IdP Configuration.
Step 7: Verify the test setup
Once you have completed the setup steps, it's important to test to make sure everything is working properly. Depending on how you are using the SAML Web Browser SSO functionality, complete either or both of the following:
- Testing the SAML domain as a Login Domain
- Testing the SAML domain as the Resource Owner Authentication domain for an OAuth Provider Domain
Testing the SAML domain as a Login Domain
To test the login domain, follow the steps below.
To test the SAML login domain
- Log out of the Community Manager.
- Log in via the new SAML login domain and verify that it works.
If you encounter any issues, check to make sure that the values in your IdP account and your SAML Web Browser SSO domain match.
You can also refer to the Troubleshooting section: see, Troubleshooting.
Testing the SAML domain as the Resource Owner Authentication domain for an OAuth Provider Domain
This section provides the steps you need to complete in Community Manager after setting up a SAML domain as the OAuth Provider domain to verify that the domain is correctly set up as the OAuth Provider domain and is working. A high-level overview of the steps is given below. In some cases, a separate procedure is provided; in other cases it is not. If you need more information, refer to the Community Manager online help for domains.
To test the SAML OAuth Provider domain: high-level procedure
- Create an API that uses an OAuth Provider domain that has SAML as the Resource Owner Authentication Provider. See, Create API and specify OAuth Details.
- Create an app. See, Create App.
- Create a contract for the app with the API. See, Request App/API Contract and Approve App/API Contract.
- Test the app in Test Client to verify that the SSO Login screen is presented and the token is passed. See, In Community Manager, Test in Test Client.
If you encounter any issues, check to make sure that the values in your IdP account and your SAML Web Browser SSO domain match.
You can also refer to the Troubleshooting section: see Troubleshooting.
Create API and specify OAuth Details
- In Community Manager, go to APIs and select Add API.
- Create the API, making sure you attach the following policies to the API implementation:
- OAuth Security Policy
- Detailed Auditing policy
For more information, refer to Adding an API (Community Manager developer portal online help).
- Save the API and then at the API Details page, click OAuth Details to access the API OAuth wizard.
- Tab 1, Provider: Select the OAuth provider that you set up and is using SAML for authentication. Select Next.
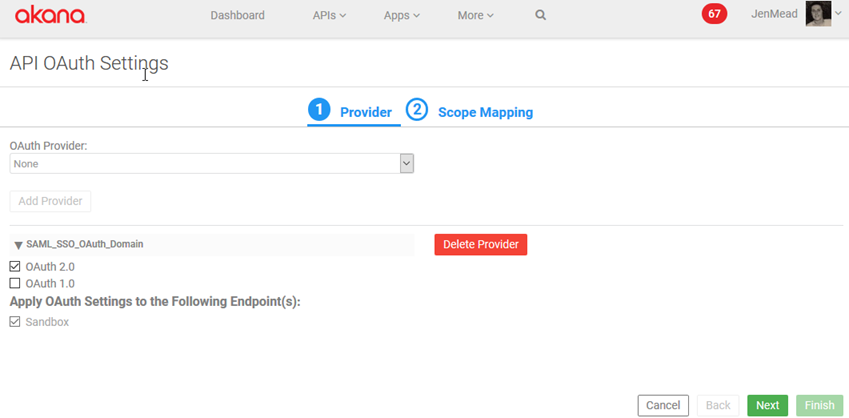
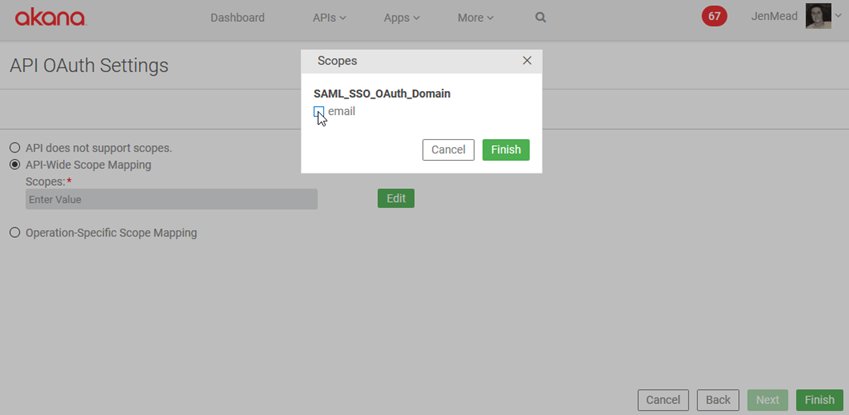
- Tab 2, Scope Mapping: Select either API-Wide Mapping or Operation-Specific Scope Mapping. Specify Scopes and then click Finish.
Create App
- In Community Manager, go to Apps and then select Add App.
- Provide the app name and version ID details and then click Finish.
Request App/API Contract
- In Community Manager, go to APIs and then select My APIs to search for the API you created, and select Access.
- Select the app you created and complete the API Access wizard. Select Save.
Approve App/API Contract
Unless you set up the API for auto-approval, you'll need to approve the API access request.
- Go to your notifications and find the API access request you just made.
- Click Activate to approve the request and then select Confirm.
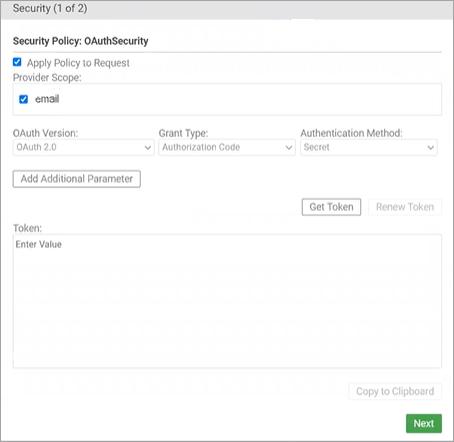
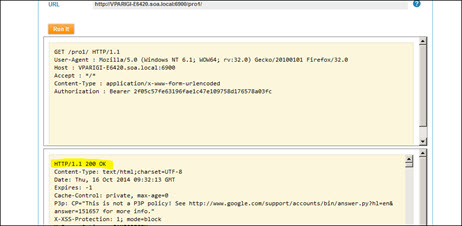
In Community Manager, Test in Test Client
- Go to the App Details page and click Test Client.
- Choose the API and select Security to view the security settings.
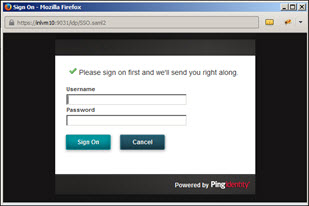
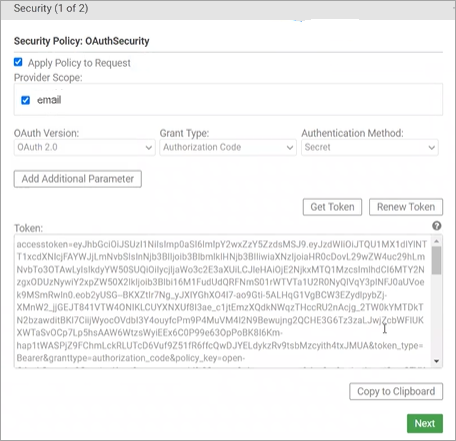
- Select the OAuth version and then click Get Token. The SSO login screen opens.
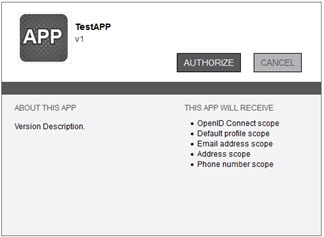
- Provide username and password and click Sign On. The Authorization window opens.
-
Click Authorize to retrieve the token. Click Next.
-
In Test Client, click Run it. The API request is authorized and runs successfully.