Identity Provider Configuration Examples
Provides examples of configuring the Service Provider account for SSO Circle and PingFederate.
On this page:
- Identity Provider Configuration Example: SSO Circle
- Identity Provider Configuration Example: PingFederate
Identity Provider Configuration Example: SSO Circle
If you are using SSO Circle as your SAML Identity Provider, you can set up the domain in Policy Manager and then configure your Service Provider account in SSO Circle at www.ssocircle.com. Since SSO Circle's Identity Provider metadata file is publicly available, you can copy and paste the metadata when setting up the domain in Policy Manager.
To set up SSO Circle: high-level procedure
- In Policy Manager, set up SSO Circle as an Identity Provider. See, To set up SSO Circle as an Identity Provider in Policy Manager.
- In Community Manager, complete the setup by following the applicable procedure depending on how you will be using the SAML domain:
- As a login domain: see, To enable a SAML login domain in Community Manager.
- As an OAuth provider domain: see, To configure a SAML OAuth Provider domain in Community Manager.
- In your SSO Circle account, set up the platform as a Service Provider. See, To set up the platform as a Service Provider using SSO Circle as the Identity Provider.
- In Community Manager, test to make sure your domain that uses the SAML Web Browser SSO feature works correctly:
- As a login domain: see, Testing the SAML domain as a Login Domain.
- As an OAuth provider domain: see, Testing the SAML domain as an OAuth Provider Domain.
Prerequisites:
- Create an SSO Circle account at http://idp.ssocircle.com.
- In the Akana Administration Console, install the SAML feature. See, Step 1: Download and install the plug-ins to support SAML web browser SSO.
- In Policy Manager, set up your PKI keys. See, Step 4: Configure the domain in Policy Manager.
To set up SSO Circle as an Identity Provider in Policy Manager
- Log in to the Policy Manager Console.
- Under Configure tab, select Security, and then select Identity Systems.
- Click Add Identity System to access the Add Identity System wizard.
- In the first page of the wizard, for identity system type, select SAML Web Browser SSO. Provide name and description and then click Next.
- In the second page of the wizard, Select SAML Identity Provider Configuration Method, choose to configure using the metadata document and enter the metadata URL for SSO Circle: http://idp.ssocircle.com.
- Click Next to access the SAML Identity Provider Configuration page, populated with the SSO Circle values.
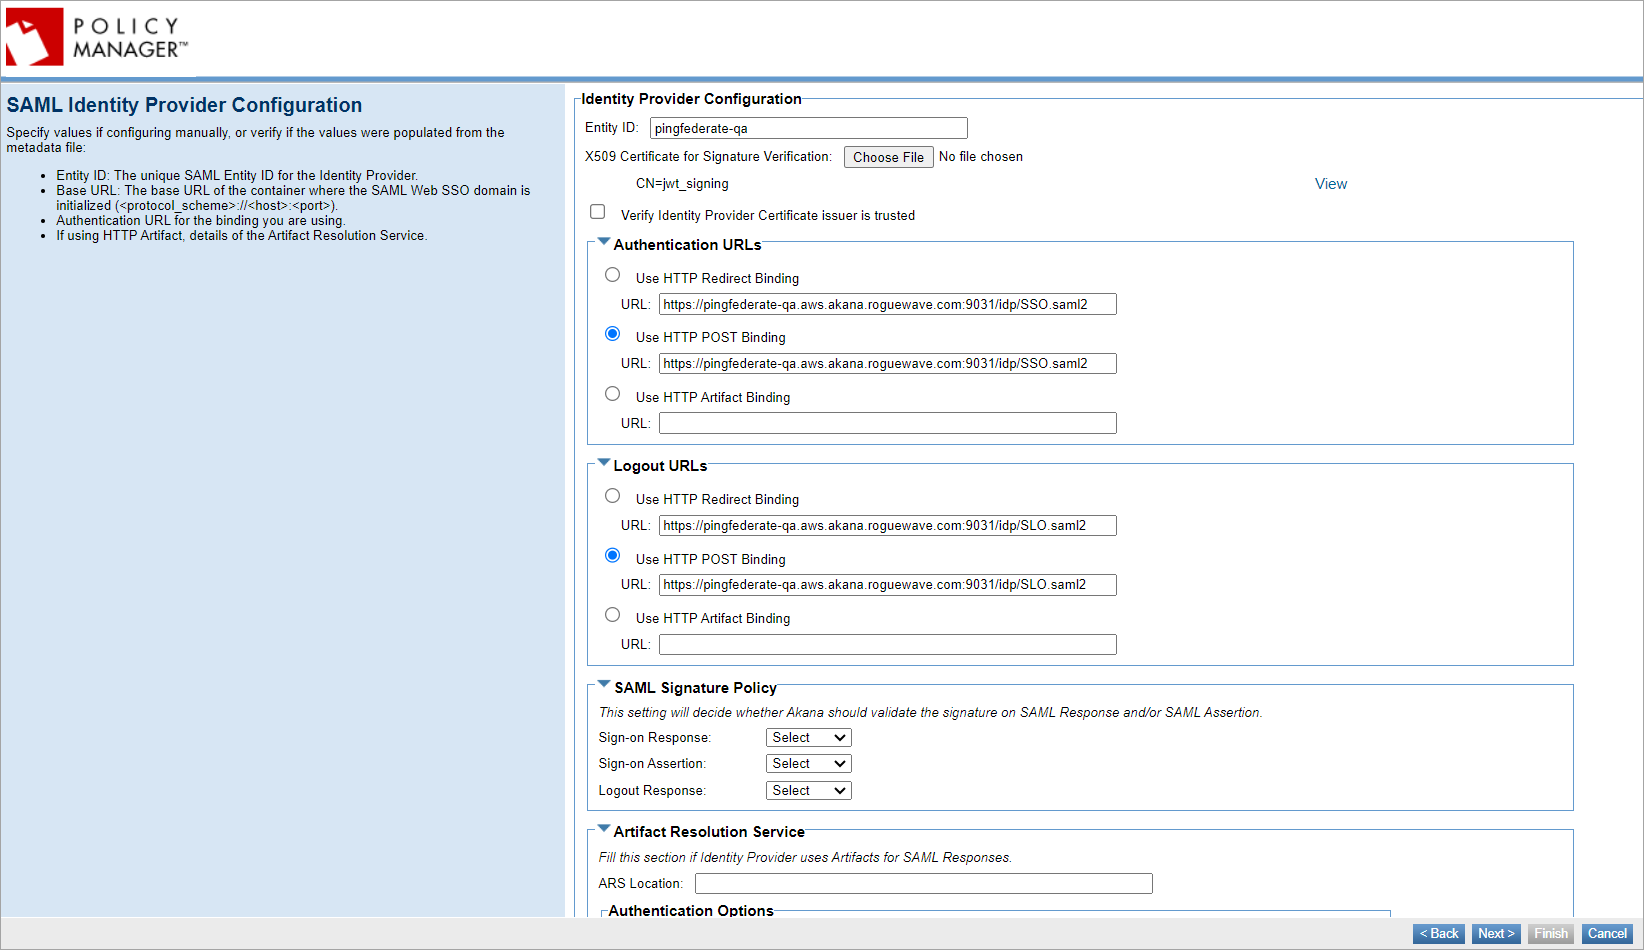
Note: If you chose to manually configure, you would need to enter the values on this page.
- Review the values, change the binding type if needed, and then click Next to access the SAML Service Provider Configuration page.
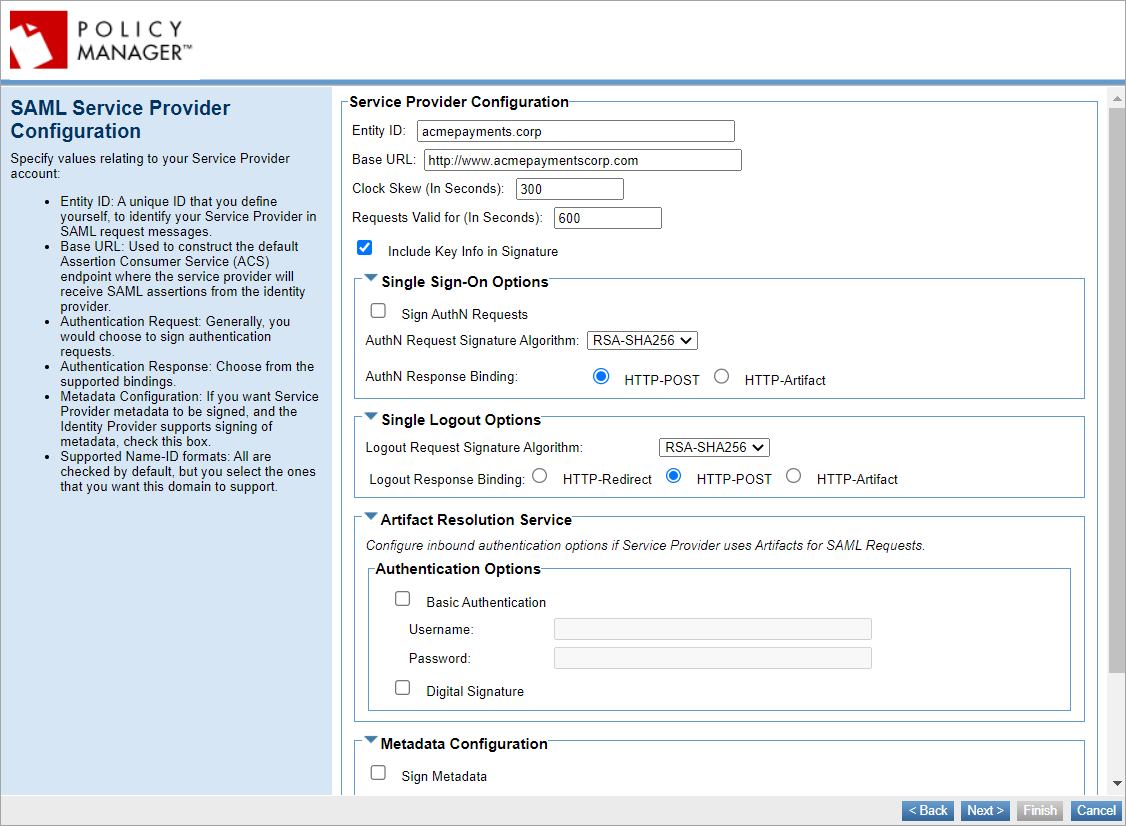
- Enter the SAML Service Provider configuration values as needed:
- Entity ID: A unique ID that you define yourself to identify your Service Provider in the SAML authentication request messages. When setting up your account with the Identity Provider you must specify the Entity ID, which must be unique within the IdP so that the IdP can identify your Service Provider; then, you set up the same value in Policy Manager.
- Base URL: Used to construct the default Assertion Consumer Service (ACS) endpoint, the endpoint where the Service Provider will receive SAML assertions from the Identity Provider. Must be the container address of the container where the SAML Web SSO feature is initialized ({protocol_scheme}://{host}:{port}). For more information, see Base URL.
- Single Sign-On Options: Select to sign the authentication requests by using response binding either, HTTP-POST or HTTP-Artifact.
- Single Logout Options: Select from the supported bindings, either HTTP-Redirect, HTTP-POST or HTTP-Artifact.
- Artifact Resolution Service: Configure inbound authentication options if Service Provider uses Artifacts for SAML requests.
- Metadata Configuration: SSO Circle does not support signing of the metadata, so leave this box cleared.
- Supported Name-ID formats: All are checked by default.
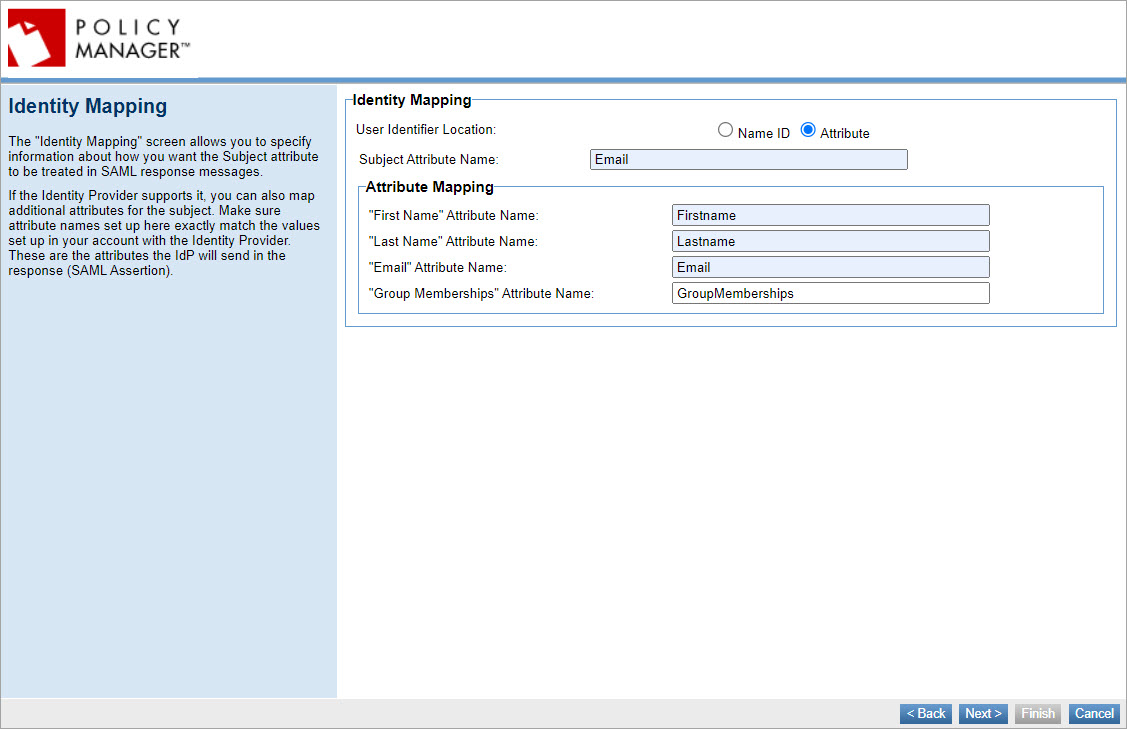
- Specify the Identity Mapping information about how you want the subject attribute to be treated in SAML response messages. Select whether to send the Name ID as the subject of the SAML assertion or to use an Attribute: if needed, define the subject attribute name. The Attribute Mapping values must correspond with those set up in your SSO Circle account.
-
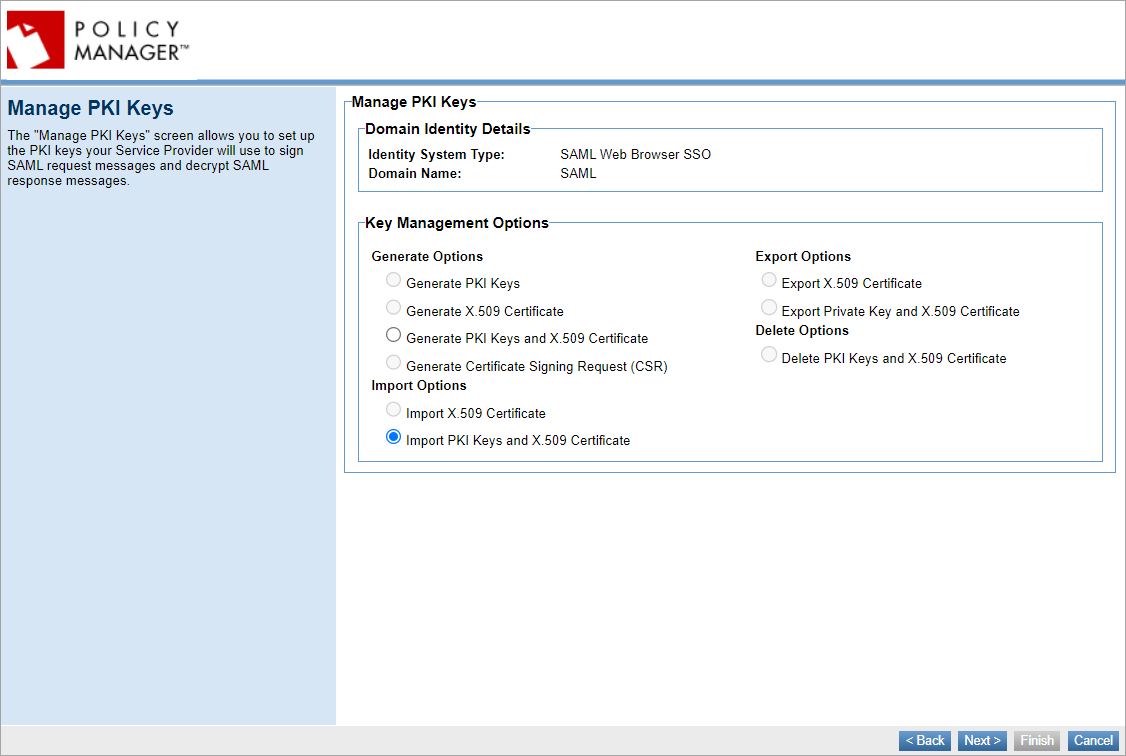
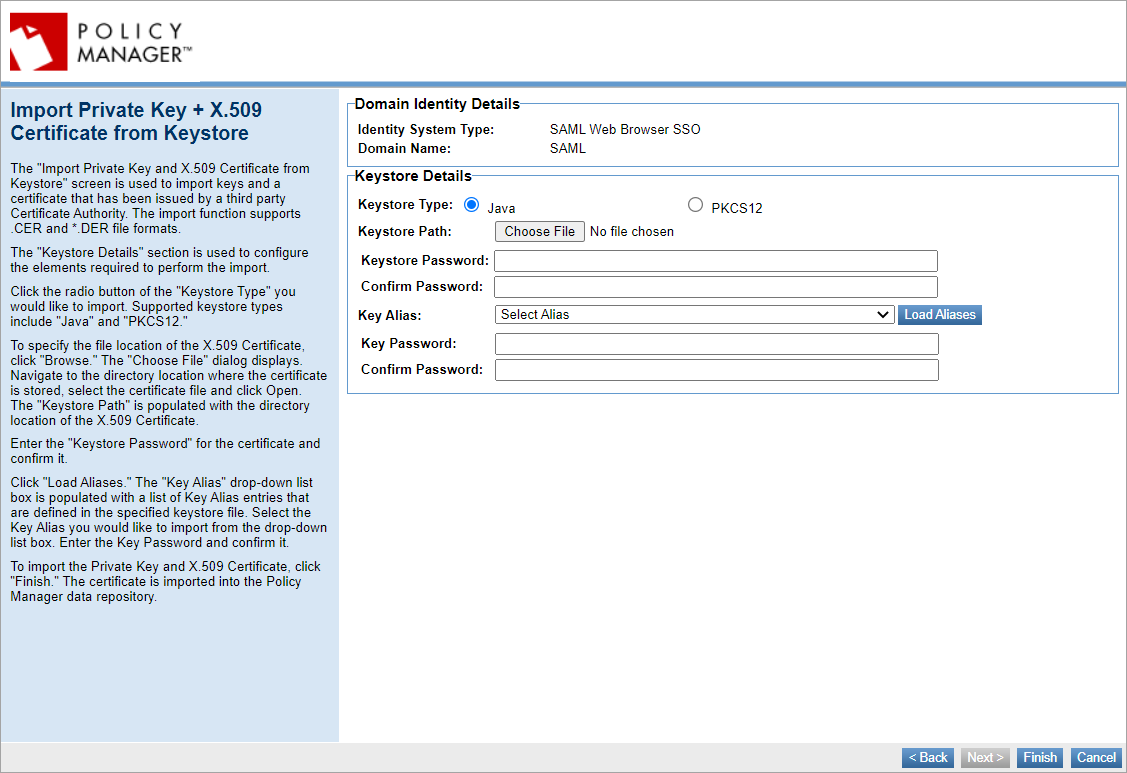
- Click Next to access the Manage PKI Keys page to set up the keys your service provider will use to sign SAML authentication request messages and decrypt SAML response messages.
- Choose to generate or import keys. If you select Generate, provide values in the Certificate Details section. If you select Import, you will need to choose a key management option and provide keystore details.
- Click Finish. The Service Provider metadata file is generated and is available at the following URL: {protocol_scheme}://{host}:{port}/saml/{sp_domain_name}/metadata as shown in the following example.
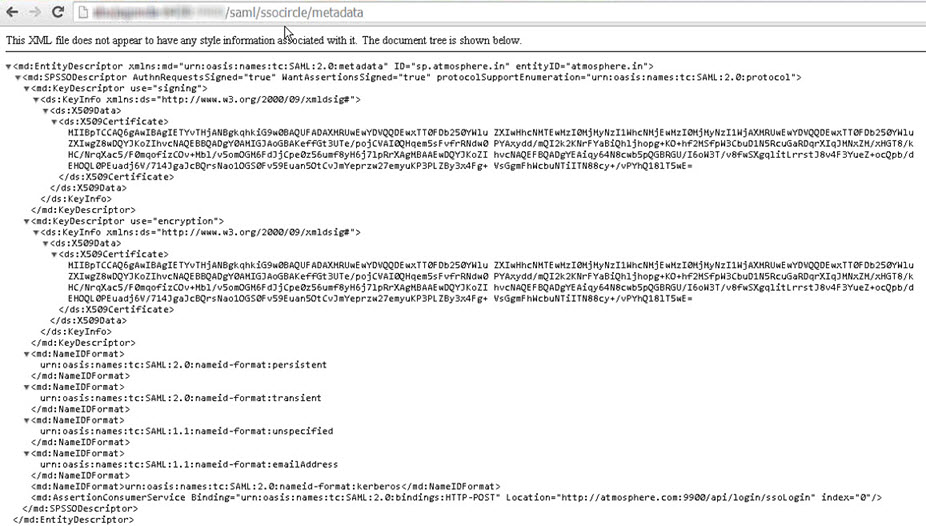
You will use this to set up your Service Provider account with SSO Circle, as shown in the next procedure.
Note: Make sure you get the metadata.xml file for the container that has Community Manager installed (if the domain will be used for Community Manager login) and/or has the OAuth Provider feature installed (if the domain will be used for Community Manager OAuth domain, for resource owner authentication for at least one OAuth Provider).
To set up the platform as a Service Provider using SSO Circle as the Identity Provider
- Log in to your account at www.ssocircle.com.
- On the left, click Manage Metadata.
- Click Add New Service Provider. The page opens.
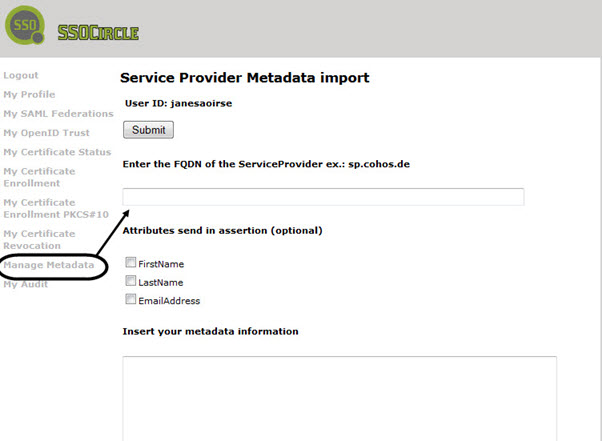
- Provide the following information:
- FQDN of the Service Provider: This value must match the Entity ID in the Policy Manager domain setup, Service Provider Configuration tab.
- Attributes: Select one or more out of the supported attributes displayed. With SSO Circle, you cannot modify attributes.
- Metadata information: Copy the content of the metadata.xml file generated as a result of your domain setup. Be sure to exclude the XML processing instruction at the beginning of the file.
Note: Do not copy the XML from the browser window. Instead, click View Source and copy it from there, excluding the XML processing instruction at the top.
- Click Submit. The XML is processed and you should see a success message when processing is complete. If there are any errors, review your information and make sure all the values were set up correctly in Policy Manager, then try again.
Note: If you make any changes, such as adding an OAuth Provider Domain in Community Manager, remember to update your SSO Circle account by pasting the revised metadata XML. If you are using the free SSO Circle account, you cannot edit your account; you will need to delete the existing SP Metadata instance and then create a new one with the same name.
To configure and test in Community Manager
Once the setup in Policy Manager and the Identity Provider is complete, the steps to configure and test in Community Manager are the same for all Identity Providers. Follow the steps given earlier in this publication:
- Community Manager configuration: see, Step 6: Community Manager configuration.
- Verify the test setup: see, Step 7: Verify the test setup.
Identity Provider Configuration Example: PingFederate
This section provides additional information regarding setting up your Service Provider(SP) in PingFederate. In some cases, screen captures are provided; these are mainly taken from PingFederate version 8.3.1 and are offered only as examples.
When registering with PingFederate as the SAML Identity Provider (IdP), here is the recommended sequence of steps for setting up the domain in Policy Manager:
- Policy Manager Admin: Collects the following values and gives them to the PingFederate Administrator:
- Policy Manager hostname
- Entity ID that PingFederate should use for Policy Manager
- PingFederate Admin: Uses these values to set up the Service Provider account in PingFederate.
- PingFederate Admin: Exports the custom PingFederate IdP metadata file and gives it to the Policy Manager Admin.
- Policy Manager Admin: Configures the PingFederate domain in Policy Manager, importing the PingFederate metadata file.
Note: If the security key you use for the account is issued by a third-party CA, you will need to set up the CA as a trusted key issuer in Policy Manager. See, Setting up credentials in PingFederate.
The following instructions provide some of the steps.
PingFederate settings:
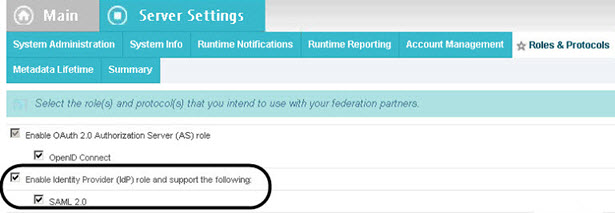
- In PingFederate, under Server Settings tab, select Roles & Protocols. Click the checkboxes to enable Identity Provider role and support SAML 2.0.
- In PingFederate, select Federation Settings, and then select Protocol Endpoints. Set up the applicable endpoint for Single Login service and copy the binding URL (either Redirect or POST). You will use this in your Policy Manager setup.
- Conditional—if using HTTP Artifact for response binding: In PingFederate, when configuring security settings for the Artifact Resolution Service (Service Provider Credentials > Credentials > Configure, only available if HTTP Artifact is enabled), make sure you choose either HTTP Basic or Digital Signature for the authentication methods, and make sure that your choice matches your choice in Policy Manager setup, SAML Identity Provider Configuration page.
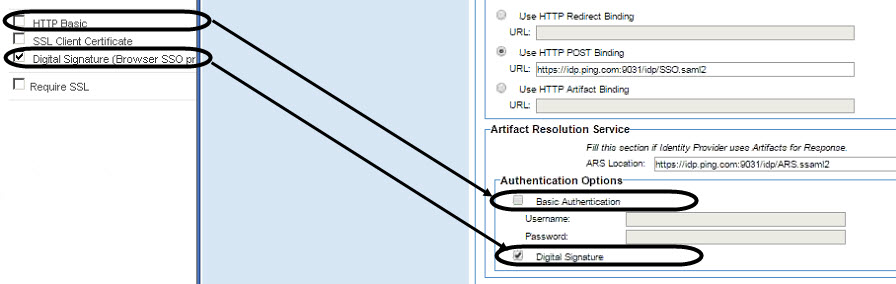
The platform does not support the SSL Client Certificate option.
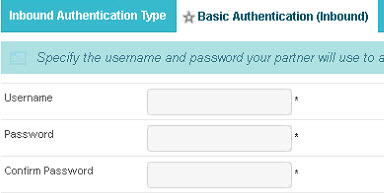
- In PingFederate, if the Artifact Resolution Service is used and if you choose HTTP Basic authentication, you will need to set up the username and password in the Basic Authentication (Inbound) tab that appears when you choose that option.
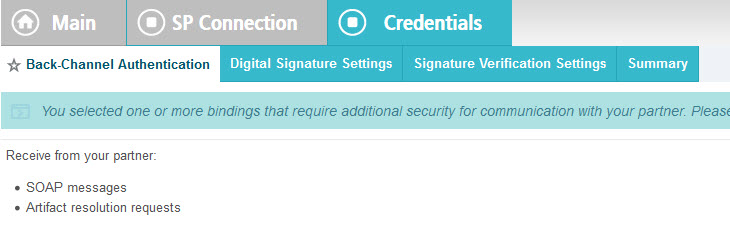
Setting up credentials in PingFederate
In PingFederate, under the Credentials tab, there are three sets of credentials to configure:
- Back-Channel Authentication: If applicable, configure the inbound authentication option for the Artifact Resolution Service at the IdP.
- Digital Signature Settings: Configure the signature certificate for the IdP, for the response (SAML assertion). Include PKI keys, not just the certificate.
- Signature Verification Settings: Configure the certificate for signature verification for the IdP to verify the SP's signature on authentication request messages.
To configure and test in Community Manager
Once the setup is complete in both the PingFederate Identity Provider and Policy Manager, the steps to configure and test in Community Manager are the same for all Identity Providers. Follow these steps:
- Community Manager configuration: see, Step 6: Community Manager configuration.
- Verify the test setup: see, Step 7: Verify the test setup.