Automation Examples
Simple examples of using automation to install the platform.
Note: Always use the automation recipes for the major product version that you are using.
On this page:
Overview
Creating a basic container
- Creating a basic container: Overview
- Download and extract the installation files
- Put the logging file in place to enable logging
- Set up the properties file
- Run the recipe using the automation script
- Run the Akana Administration Console in the browser
Creating a PM/CM container
- PM/CM container: Overview
- Steps for setting up a PM/CM container
- Properties file for PM/CM container
- PM/CM container: Automation script
- PM/CM container: Results
Creating an ND container
- ND container: Overview
- Steps for setting up an ND container
- Properties file for ND container
- ND container: Automation script
- ND container: Results
- Using the add-local-listener recipe to add a listener to the container
- Add a JMS listener to the container
Registering the ND container
- Registering the ND container: Overview
- Steps for registering the ND container
- Properties file for registering the ND container
- Registering the ND container: Automation script
- Registering the ND container: Results
- Using the register-container recipe to create a cluster and register an ND container at the same time
Additional resource information
- Providing property values at the command line
- Downloading and extracting the installation files
- Cluster support
- Setting up an SMTP email host using an automation recipe
- Configuring email group and alert code using an automation recipe
- Using the External Keystore recipe to install and configure an external keystore
- Using the install-patch recipe to install the cumulative upgrade
- Using the rollback-patch recipe to install the rollback changes
- Configure IAM on Policy Manager and Community Manager containers
- Configure grid caching using an automation recipe
- Encrypt the MongoDB password
- Configure metric attributes for the Health panel
Overview
Automation recipe examples: Overview
General notes about the examples included in this document:
- In these examples, the user home directory is /home/user. Substitute your own directory.
- In this example, the value for the install directory (INSTALL_DIR property) is /home/user/akana. Substitute your own install directory.
- You can encrypt passwords. This example does not use encryption.
The automation recipe does not support the use of '{' or similar characters for database passwords in the DB recipe.
Creating a basic container
Creating a basic container: Overview
In this example we will create a basic container using automation, at the Linux command line. This example uses a core automation recipe, bootstrap.json. This recipe is also part of many other recipes that perform more complex actions, so it's a good exercise to run it on its own.
The scenario includes:
- Downloading and unzipping the installation files
- Setting up specific files and properties so that the script will work correctly. This includes:
- Putting the logging file in place to enable logging.
- Writing the properties file.
- Using the automation script to run a basic recipe to create the container.
- Opening the Akana Administration Console user interface for the container in the browser.
Download and extract the installation files
As with any installation, you'll need to download the correct files and unzip them in the correct sequence in your installation directory.
For detailed instructions on downloading and extracting the files, refer to the sections in the installation documentation.
- Step 1: Gather ZIP file or files and download to a temporary folder
- Step 2: Extract installation files
For abbreviated instructions for the specific files used in these examples, see Downloading and extracting the installation files.
The illustration shows copying the files from another location so that the four files are in the akana directory.

Put the logging file in place to enable logging
When running a recipe, logging is very helpful to track down problems or monitor the progress of a recipe. The recipe scripts use SLF4J logging, and since no default implementation is shipped with the scripts, it is sometimes necessary to provide one. To deploy a logger implementation, you'd need to copy the file to a location accessible to the automation script.
So, the next step is to copy the slf4j-simple-1.7.19.jar logger file, which is part of the installation, to the $INSTALL_DIR/lib/script folder.
For this example, from the /home/user/akana folder, run the following:
cp lib/ext/slf4j-simple-1.7.19.jar lib/script/
For an example of calling an automation script and using logging, see Registering the ND container: Automation script.
Set up the properties file
For this example, we're going to define a few key properties via a properties file, which the automation script will reference.
The filename and location don't matter as long as you reference the file correctly in the automation script. In this example, we're creating a file named bootstrap.properties in the /bin directory.
First, in the /home/user/akana/bin folder, create the properties file. For example:
vi bootstrap.properties
Add the below contents to the file:
INSTALL_DIR=/home/user/akana
CONTAINER_NAME=pm01
DEFAULT_PORT=9900
Save the file.
Note: For information about how you could provide these properties at the command line, see Providing property values at the command line below.
Determining values for properties used in the recipe
The recipes needs certain values, such as the name of your installation directory and the name of the container you're creating.
In a manual installation, you provide these values in the installation wizard user interface. When using a recipe you can provide them:
- In a properties file. See the example above.
- System properties. Usually passed in at the command line using -D. See Providing property values at the command line.
- As environment variables.
In this example of creating a basic container, the values are defined in a properties file.
There are two scenarios for property values:
- Variables that have no default: if the value is not provided the recipe will fail.
Examples: INSTALL_DIR, CONTAINER_NAME.
- Variables that have default values defined in the recipe. If you want to use a different value you'll have to provide it. If not, the default value is used.
Example: In the bootstrap.json recipe, the default port is defined as 9900 (line 16). In this example of creating a basic container, we explicitly specify port 9900 in the properties file; however, since port 9900 is the default, it isn't really necessary to specify a port.
Run the recipe using the automation script
In this example, the properties file is bootstrap.properties.
Therefore, the script command to run from the /akana/bin folder is:
./jython.sh -Dorg.slf4j.simpleLogger.logFile=System.out -m akana.container --recipe ../recipes/bootstrap.json --props bootstrap.properties
The result of running the automation script is shown below.
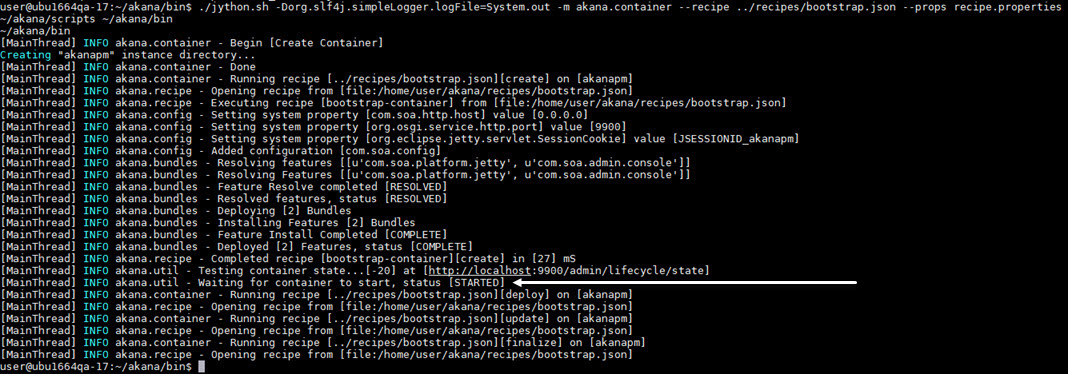
You can see that the container was successfully created and started, as indicated above.
Run the Akana Administration Console in the browser
You can now access the Akana Administration Console via the browser: {hostname}:{port}/admin/login.html.
Log in using the default username and password (administrator/password) unless you specified a different username and password.
To verify the container name, after login, go to the System tab. The container name is displayed in the panel header, as shown below. In this example the container name is pm01 (see, Set up the properties file).
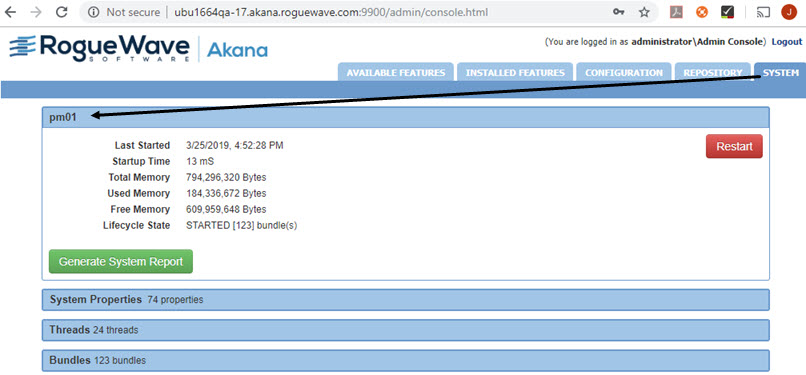
You've now created a basic container using automation. This is the equivalent of completing Step 3 in the manual installation instructions (see Step 3: Run Configurator to create the first container).
Creating a PM/CM container
PM/CM container: Overview
By following the steps in Creating a basic container, you'll get some practical experience of running an automation recipe. However, there are no features installed in the basic container.
Now it's time to take it a step further, creating a container with multiple features installed and multiple properties set.
There are these differences in the procedure:
- You're running a different automation recipe, pm-cm-all.json.
- Because it's a more complex recipe, you'll need to provide a lot more properties.
You'll also need to have your database set up. Depending on the database type and version you're using, you might also need to put a driver in place and/or modify some database settings first. Refer to these sections of the installation instructions:
Steps for setting up a PM/CM container
The sequence of steps is the same for running any recipe, as described in detail in Creating a basic container.
- Download and extract the installation files (once per installation).
- Put the logging file in place to enable logging (once per installation).
- Set up the properties file (per recipe). For this example, define the properties listed in Properties file for PM/CM container.
- Run the recipe using the automation script (per recipe). For this example, use the script shown in PM/CM container: Automation script.
Properties file for PM/CM container
In your installation folder, look in the /recipes subfolder at the pm-cm-all.json recipe.
For this example, because the recipe is doing a lot more, you must provide additional properties. To see which properties you need to define for a recipe, just look through the recipe, and any other recipes that it might be referencing.
Because we're going to run several recipes, these examples use the recipe name for the properties file. For the PM container, the recipe is pm-cm-all.json, so the properties file is pm-cm-all.properties. The filename doesn't matter as long as it's correct in the script.
In the /home/user/akana/bin folder, create the properties file. For example:
vi pm-cm-all.properties
In the file, provide values for all the properties referenced by the recipe as shown in the following example.
INSTALL_DIR=/home/user/akana
PRODUCT_HOME=/home/user/akana
PM_CONTEXT_PATH =/console
CONTAINER_NAME=pmcm01
EMAIL_TO=pmsuperuser@roguewave.com
TENANT_ID=atmosphere
TENANT_NAME=atmosphere
TENANT_HOST=ubu1664qa-17.akana.roguewave.com
TENANT_CONSOLE_HOST=ubu1664qa-17.akana.roguewave.com
TENANT_VHOSTS=ubu1664qa-17.akana.roguewave.com
TENANT_PORT=8080
TENANT_EMAIL=administrator@atmosphere
TENANT_PASSWORD=password
TENANT_THEME=hermosa
TENANT_THEME_IMPL=default
DB_NAME=UBU1664QA17
DB_TYPE=oracle
DB_INSTANCE=db1
DB_PORT=1521
DB_ADMIN_USERNAME=SYSTEM
DB_ADMIN_PASSWORD=rd57chv
DB_USERNAME=UBU1664QA17
DB_PASSWORD=password
DB_SERVER=akanaeng-oracle12cr2-1.aws.akana.roguewave.com
DB_DRIVER_LOCATION=file:///home/user/ojdbc8.jar
DB_SCHEMA_TIMEOUT=4000000000
Note: The example above references the location for the ojdbc8.jar file, needed for an Oracle database. If you're using Oracle, you'd have to have the driver in place and update the path appropriately. If you're using another type of database, you may or may not need to provide a driver. Refer to the Database drivers section of the installation documentation. There might be other steps you need to have in place for your database. Check the information in the links provided in PM/CM container: overview.
PM/CM container: Automation script
In this example, the recipe is pm-cm-all.json and the properties file is pm-cm-all.properties.
Therefore, the script command to run from the /akana/bin folder is:
./jython.sh -Dorg.slf4j.simpleLogger.logFile=System.out -m akana.container --recipe ../recipes/pm-cm-all.json --props pm-cm-all.properties
When the recipe has successfully completed, you will see a message as shown below:

PM/CM container: Results
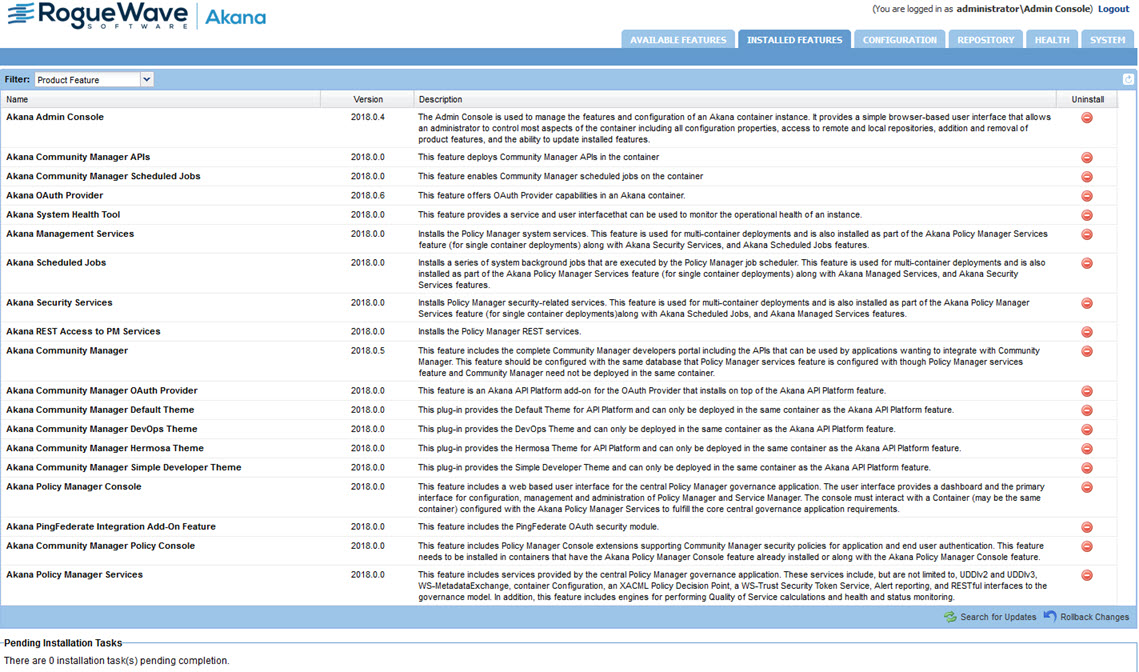
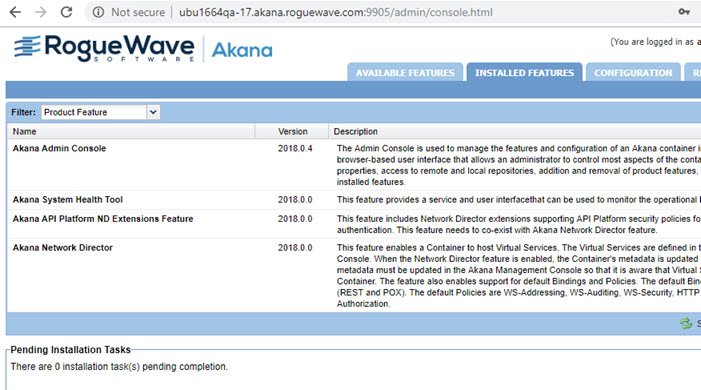
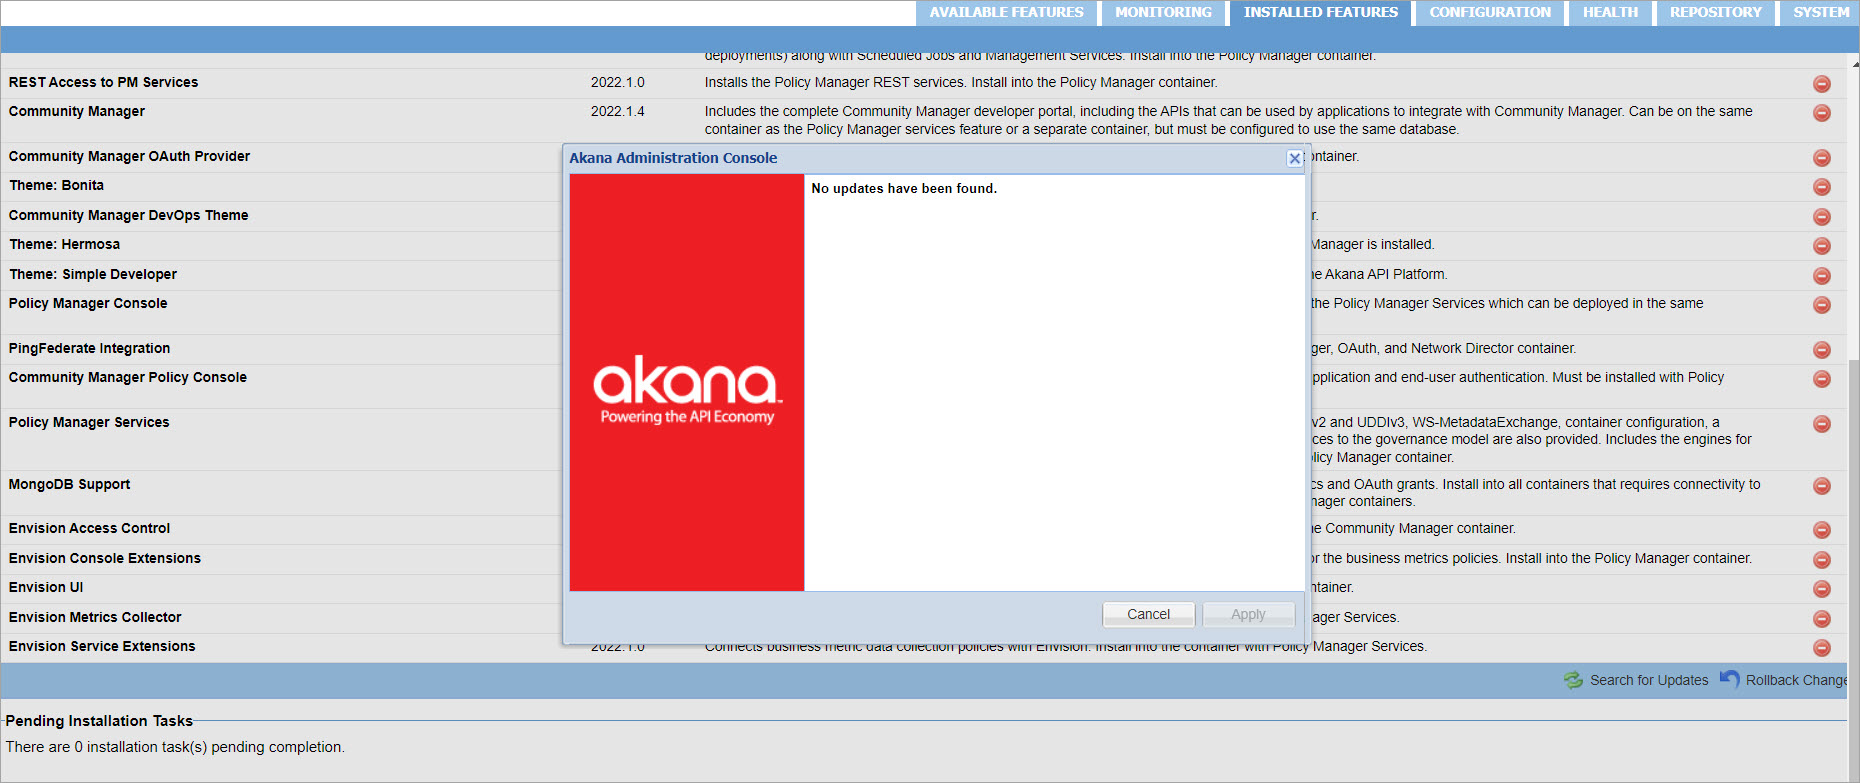
You can now access the Akana Administration Console for the container: {hostname}:{port}/admin/login.html.
You can see from the Installed Features page that Community Manager is installed and all pending tasks are complete.
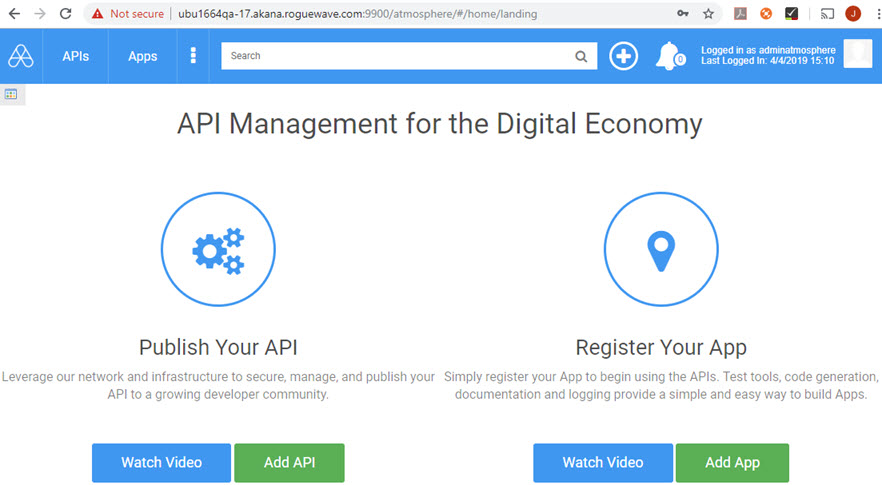
In this example, you can also access the Policy Manager and Community Manager via the browser.
Policy Manager: {hostname}:{port} (default credentials, used in this example, are administrator/password).
Community Manager: {hostname}:{port}/atmosphere/#/home/login (default credentials, used in this example, are administrator@atmosphere/password).
Creating an ND container
ND container: Overview
Next, we're going to create the Network Director container. We can then register the ND container so that it can communicate with the PM/CM container.
- Recipe: nd-cm-all.json
- Properties file in this example: nd-cm-all.properties
Steps for setting up an ND container
The sequence of steps is the same for running any recipe, as described in detail in Creating a basic container.
- Download and extract the installation files (once per installation).
- Put the logging file in place to enable logging (once per installation).
- Set up the properties file (per recipe). For this example, define the properties listed in Properties file for ND container.
- Run the recipe using the automation script (per recipe). For this example, use the script shown in ND container: Automation script.
Properties file for ND container
Properties file (nd-cm-all.properties):
INSTALL_DIR=/home/user/akana
DEFAULT_PORT=9905
CONTAINER_NAME=nd01
PM_PORT=9900
PM_HOST=ubu1664qa-17.akana.roguewave.com
ND container: Automation script
In this example, the recipe is nd-cm-all.json and the properties file is nd-cm-all.properties.
Therefore, the script command to run from the /akana/bin folder is:
./jython.sh -Dorg.slf4j.simpleLogger.logFile=System.out -m akana.container --recipe ../recipes/nd-cm-all.json --props nd-cm-all.properties
When the recipe has successfully completed, you will see a message as shown below:
ND container: Results
You can now access the Akana Administration Console for the ND container. In this example: {hostname}:9905/admin/login.html.
You can see from the Installed Features page that Network Director is installed and all pending tasks are complete.
The next step is to register the ND container with PM.
Using the add-local-listener recipe to add a listener to the container
If the administration console is required to listen on a port other than Policy Manager or Network Director listener port, then an additional listener is required for a container. Use the add-local-listener.json recipe to manage properties for the additional listener endpoints.
Provide values for the listener properties referenced by the recipe as shown in the following example.
INSTALL_DIR=/home/user/akana
LISTENER_NAME=https-new
LISTENER_URL=https://eap-cloudhsm-listener.aws.akana.roguewave.com:9904
LISTENER_BIND_ALL=true
SSL_PROTOCOL=TLS1.2
ACCEPT_CERT=false
REQUIRE_CERT=false
CIPHER_SUITES=
MANAGE_LISTENER=false
EXTERNAL_IP={external ip}
KEYSTORE=/home/user/akana_cloudhsm/eap-cloudhsm.store
ALIAS=eap-cloudhsm-listener
KEYSTORE_PASSWORD=password
KEY_PASSWORD=password
KEY_ALGORITHM=RSA
MAX_THREADS=500
MIN_THREADS=10
IDLE_THREAD_TIMEOUT=1800000
Following are the use cases and the listener properties to define while executing the add-local-listener recipe.
# Use Case 1: Akana is using the database to store PKI keys (No external keystore configured)
In this case, provide keystore details such as KEYSTORE, ALIAS, KEYSTORE_PASSWORD, and KEY_PASSWORD as input to a recipe, then the listener with all key material from a given keystore location will be imported and added to the listener configuration under com.soa.transport.jetty.endpoint <endpoint id> in the Admin console.
# Use Case 2: Akana is using the database to store PKI keys (No external keystore configured)
In this case, do not provide keystore details such as KEYSTORE, ALIAS, KEYSTORE_PASSWORD, and KEY_PASSWORD as input to a recipe, then the listener without any key material is created and added to the listener configuration under com.soa.transport.jetty.endpoint <endpoint id> in the Admin console.
# Use Case 3: Akana is using an external keystore such as CloudHSM
In this case, provide ALIAS of the key from an external keystore. The recipe will create a listener with alias and adds it to the listener configuration under com.soa.transport.jetty.endpoint <endpoint id> in the Admin Console. Once the container is registered, the actual key material for a given alias from an external keystore will be used in the SSL context for validation.
Running the add-local-listener recipe
Use the following command to run the recipe:
./jython.sh -m akana.container --recipe ../recipes/add-local-listener.json --url http://akana-qa-41.aws.akana.roguewave.com:7900 --user administrator --password mypassword --props listener_properties.properties
Add a JMS listener to the container
To add a JMS (Java Message Service) listener to a container by using an automation recipe, you must provide the values for the listener properties, including the Listener URL. This URL is crucial as it defines the connection details for the JMS listener.
The following is an example of the listener properties referenced by the recipe.
INSTALL_DIR=/home/user/akana
LISTENER_NAME=ActiveMqJMS
LISTENER_URL=jms:/queue?connectionFactory=ConnectionFactory&jndiProviderURL=tcp://akana-qa-82.aws.akana.roguewave.com:61616&initialContextFactory=org.apache.activemq.jndi.ActiveMQInitialContextFactory
LISTENER_BIND_ALL=true
MAX_THREADS=500
ENABLED_PROTOCOLS=jms
IDLE_THREAD_TIMEOUT=60000
MANAGE_LISTENER=true
EXTERNAL_IP={external ip}
KEYSTORE=/home/user/qa-keystore.jks
ALIAS=nd2
KEYSTORE_PASSWORD=password
KEY_PASSWORD=password
Running the recipe
After creating the properties file, the next step is to execute the recipe. To run the recipe, use the command:
./jython.sh -m akana.container --recipe ../recipes/add-local-listener.json --props listener_properties.properties
Registering the ND container
Registering the ND container: Overview
Next, we're going to run another automation recipe to register the ND container with the PM/CM container.
- Recipe: register-container.json
- Properties file in this example: register-container.properties
Note: If you want to register an ND container to a cluster, and create the cluster at the same time, see Using the register-container recipe to create a cluster and register an ND container at the same time.
Steps for registering the ND container
The sequence of steps is the same for running any recipe, as described in detail in Creating a basic container.
- Download and extract the installation files (once per installation).
- Put the logging file in place to enable logging (once per installation).
- Set up the properties file (per recipe). For this example, define the properties listed in Properties file for registering the ND container.
- Run the recipe using the automation script (per recipe). For this example, use the script shown in Registering the ND container: Automation script.
Properties file for registering the ND container
Properties file (register-container.properties):
TENANT_ID=atmosphere
ORG_KEY=uddi:soa.com:registryorganization
PM_PORT=9900
CONTAINER_NAME=nd01
INSTALL_DIR=/home/user/akana
In the above, TENANT_ID and ORG_KEY are both provided. You must provide one of these two, but to provide both is optional. The ORG_KEY value can be specific to the tenant.
Registering the ND container: Automation script
./jython.sh -Dorg.slf4j.simpleLogger.logFile=System.out -m akana.container --recipe ../recipes/register-container.json --props register-container.properties
Registering the ND container: Results
When the recipe has successfully completed, you will see a message as shown below.

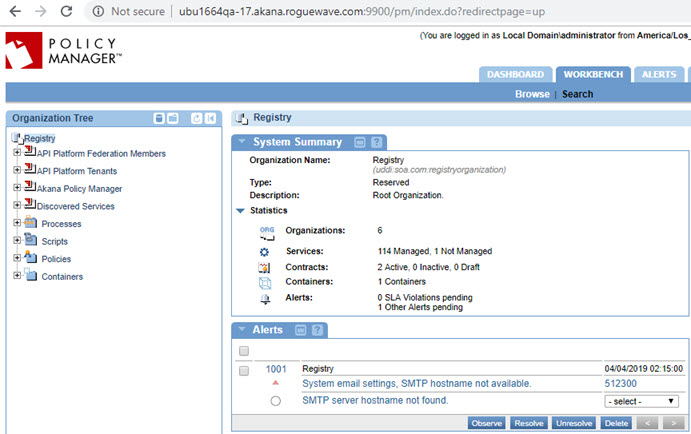
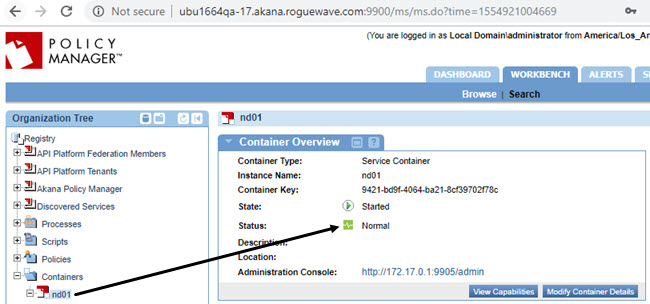
Now, log in to Policy Manager on the PM/CM container (in this example, {hostname}:9900).
You will see that the ND container is now registered.
Using the register-container recipe to create a cluster and register an ND container at the same time
Section Registering the ND container above gives an example of using the register-container recipe to register a Network Director container that has already been created.
You can also use this recipe to register a Network Director container to a cluster that doesn't yet exist, creating the new cluster and registering the Network Director container at the same time.
In this scenario, you'll need to provide the following additional properties:
CLUSTER_NAME={cluster_name}
CREATE_CLUSTER=true
CLUSTER_URL={cluster URL including name:host}
In this section:
- Registering a Network Director container and creating a cluster (HTTP): Properties
- Registering a Network Director container and creating a cluster (HTTP): Running the recipe
Registering a Network Director container and creating a cluster (HTTP): Properties
The example below shows the contents of the properties file, nd_new_cluster.properties, used for this recipe. This example creates a cluster named cl1 and registers a Network Director container named eapNd to the new cluster.
INSTALL_DIR=abs:..
DEFAULT_PORT=7905
CONTAINER_NAME=eapNd
PM_PORT=7900
PM_HOST=localhost
ORG_KEY=uddi:soa.com:registryorganization
CREATE_CLUSTER=true
CLUSTER_URL=default-http0:http://${hostname()}:7905/
CLUSTER_NAME=cl1
CLUSTER_KEY=cl1
Note: In the INSTALL_DIR property above, the The abs directive ensures that the path provided is an absolute path. See Property Substitution (Directives section).
Registering a Network Director container and creating a cluster (HTTP): Running the recipe
The command to run this recipe is:
./jython.sh -m akana.container --recipe ../recipes/register-container.json --props nd_new_cluster.properties
Note: You can also include the optional -Dorg.slf4j.simpleLogger.logFile=System.out if you want logging. See Put the logging file in place to enable logging.
Additional resource information
Providing property values at the command line
For consistency, it's a good idea to provide properties in a properties file (see Set up the properties file).
However, you could also provide properties at the command line when running the script.
Let's say you want to provide two basic properties, INSTALL_DIR and CONTAINER_NAME, which we used to create the basic container in the first example above. Your recipe.properties file would look like this:
INSTALL_DIR=/home/user/akana
CONTAINER_NAME=pm01
Your command line instruction for running the script would look something like this:
./jython.sh -Dorg.slf4j.simpleLogger.logFile=System.out -m akana.container
--recipe ../recipes/bootstrap.json --props bootstrap.properties
However, you could instead provide the above two properties at the command line. In this example, from the /home/user/akana/bin folder, you'd provide the following at the command line:
./jython.sh -Dorg.slf4j.simpleLogger.logFile=System.out -DINSTALL_DIR=.. -m akana.container --name pm01 --home .. --recipe ../recipes/bootstrap.json
In the above:
- ./jython.sh
Calls the jython script
- -Dorg.slf4j.simpleLogger.logFile=System.out
Sets the logging. See Simple Logger.
- -DINSTALL_DIR=..
Sets the INSTALL_DIR property value to one folder up (the /home/user/akana folder in this example)
- -m akana.container
Specifies the module being run
- --name pm01
Specifies that the script should create a container named pm01
- --home ..
Sets the home directory
- --recipe ../recipes/bootstrap.json
Specifies the recipe to run
Downloading and extracting the installation files
Instructions for downloading and extracting the files are in the installation documentation: for example, see Installing the Akana API Platform (Step 1 and Step 2). Abbreviated instructions are below.
The download files
The examples in this document create containers for version 2020.2.4. The files for this example, after you've unzipped the original download file are shown in the following table.
| This file... | Installs... |
|---|---|
| akana-platform-linux-jre_2020.2.4.zip | The Akana Platform, the underlying infrastructure to all Akana products. |
| akana-api-platform_2020.2.4.zip | The Akana API Platform, the API management product, which runs on the underlying Akana Platform. |
The illustration below shows copying the files from another location so that the four files are in the akana directory.
Extracting the files
In the /home/user/akana folder, unzip the files in this sequence, always choosing to overwrite existing files if they already exist:
unzip -o akana-platform-linux-jre_2020.2.4.zip
unzip -o akana-api-platform_2020.2.4.zip
Cluster support
To define your cluster, you can use automation recipes to capture the configuration of an existing container, as covered in Running Recipes Remotely and Extracting and Analyzing Recipes. Then, you can run an automation recipe against each member of the cluster.
The approach is the same as running a recipe remotely against any container, whether the container is clustered or not.
Some advantages of using automation for managing clusters:
- This approach supports the trend towards "configuration as code"—recipes and configuration can be managed as first-class artifacts.
- Recipes can be executed remotely, allowing for fine-grained control of cluster members.
- The use of recipes allows configuration tasks to be automated across the cluster, in addition to remote management of container configuration properties.
Note: If you want to register an ND container to a cluster, and create the cluster at the same time, see Using the register-container recipe to create a cluster and register an ND container at the same time.
Setting up an SMTP email host using an automation recipe
Valid in Version: 2020.2.0 and later.
The example below shows how you can configure an SMTP email host by using an automation recipe rather than using the Policy Manager user interface.
Navigation to complete this task in Policy Manager: Configure > Email > Modify SMTP Email Host. For more information, see To set up the SMTP Email Host.
To configure an SMTP email host, via the user interface or via a recipe, you will need the values as shown in the following table.
| In the user interface... | In the recipe... |
|---|---|
| Host name or IP address | SMTP_HOST |
| Port | SMTP_PORT |
| SSL Required (yes/no) | SMTP_SSL (true/false, default is false) |
| Use STARTTLS (yes/no) | SMTP_TLS (true/false, default is false) |
| From Address | SMTP_FROM |
| Authenticated (yes/no) | SMTP_AUTH |
|
If Authenticated=yes: Username and Password |
SMTP_USERNAME SMTP_PASSWORD |
To do this via a recipe you'll need the following assets:
- The recipe: smtp-settings.json, located in the /recipes/tasks folder in your installation files.
- A properties file with the properties and values set up. See the example smtp.properties file.
Follow these basic steps:
- Create the properties file. For an example, see Creating an SMTP server: Sample properties file below. If needed, add additional values from the table above (for example, port number).
- Run the recipe at the command line. See, Creating an SMTP server: Running the recipe.
- Review the results in Policy Manager. See, Creating an SMTP server: Viewing the result in Policy Manager.
Creating an SMTP server: Sample properties file
The content of the smtp.properties file used in this example is shown below.
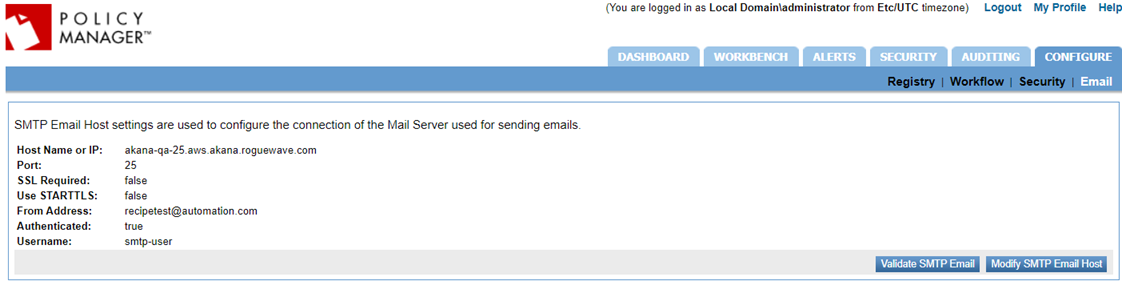
SMTP_HOST=akana-qa-25.aws.akana.roguewave.com
SMTP_FROM=recipetest@automation.com
SMTP_AUTH=true
SMTP_USERNAME=smtp-user
SMTP_PASSWORD=mypassword
Creating an SMTP server: Running the recipe
The command to run this recipe is:
./jython.sh -m akana.recipe --recipe ../recipes/tasks/smtp-settings.json --url http://akana-qa-41.aws.akana.roguewave.com:7900 --user administrator --password mypassword --props smtp.properties
Creating an SMTP server: Viewing the result in Policy Manager
Log in to Policy Manager and go to Configure > Email > Modify SMTP Email Host. The result of running the example in this use case is shown below.
Configuring email group and alert code using an automation recipe
The following example shows how you can configure an email group and certificate expiration alert code by using an automation recipe rather than using the Policy Manager user interface.
To configure the email group and alert code using the user interface, go to the Policy Manager Management Console, Alerts > Alert Codes to configure an alert code to respond in the event of an alert, see Using Alert Codes. To define and manage email groups to facilitate the alert administration process, go to Alerts > Email Groups, see Using Email Groups.
The following shows the content of the configure-pm.json recipe to configure alerts.
{
  "name":"configure-pm",
  "description":"Configure PM",
  "phases":["deploy"],
  "tasks":[
          {
            "name":"com.akana.atmosphere.configure.alerts",
            "steps":[
                    {
                      "name":"configure.alerts",
                      "properties":{
                        "emailTo":"${EMAIL_TO|}"
		       }
		     }
	           ]
	         }
	     ]
}
To use a recipe, use:
- The configure-pm.json recipe to configure alert and email notification.
- The pm-cm-all.properties file to provide a value for the EMAIL_TO parameter.
Take the following steps:
- Create the properties file, see Set up the properties file: Sample properties file.
- Run the recipe at the command line. See, Creating an email group and configuring alert code: Running the recipe.
Set up the properties file: Sample properties file
To configure an email group for trusted and user certificates, provide a value for the EMAIL_TO parameter in the pm-cm-all.properties file.
EMAIL_TO=pmsuperuser@roguewave.com
Creating an email group and configuring alert code: Running the recipe
The command to run the recipe is:
Jython.bat -Dorg.slf4j.simpleLogger.logFile=System.out -m akana.container --props pm-cm-all.properties --recipe ../recipes/configure-pm.json
It is mandatory to set the SMTP email host for email notifications, see Setting up an SMTP Email Host using an automation recipe or use the Policy Manager user interface to set up the SMTP email host.
Using the External Keystore recipe to install and configure an external keystore
The following example shows how you can install and configure an external keystore by using an automation recipe rather than using the Policy Manager user interface. For more information see, Install the HSM as an External Keystore and Install the JCEKS as an External Keystore.
To use a recipe, you will need:
-
The com.soa.feature.external.keystore recipe to install the External Keystore Feature on the container.
-
The external-keystore-config.json recipe to configure the External Keystore.
The following example shows the com.soa.feature.external.keystore recipe to install an external keystore feature on the Policy Manager container.
{
 "name":"pm-features",
 "description":"PM container features recipe",
 "phases":["deploy"],
 "features":{
           "timeout":"360000",
	    "install":[
		      "com.akana.feature.management.services.rest",
		      "com.soa.feature.subsystems",
		      "com.soa.feature.console",
		      "com.soa.feature.external.keystore"
		       ]
	     }
}
To configure an external keystore, use the external-keystore-config.json recipe. The content of the recipe is shown in the following code block.
{
 "name": "external-keystore-config",
 "description": "Configure the external keystore feature.",
 "phases": [
   "deploy"
 ],
 "configurations": [
   {
     "pid": "com.soa.admin.console.task.status",
     "add": {
       "com.soa.keystore.external.configure": "true"
   }
 },
 {
     "pid": "com.soa.keystore.external",
     "add": {
       "com.soa.keystore.external.providerName": "${EX_KEYSTORE_PROVIDERNAME|}",
       "com.soa.keystore.external.keyStoreType": "${EX_KEYSTORE_KEYSTORETYPE|jceks}",
       "com.soa.keystore.external.encrypted": "${EX_KEYSTORE_ENCRYPTED|false}",
       "com.soa.keystore.external.location": "${EX_KEYSTORE_LOCATION|file:///opt/akana/etc/keystore}",
       "com.soa.keystore.external.password": "${EX_KEYSTORE_PASSWORD|}"
  }
},
{
     "pid": "com.soa.security",
     "add": {
       "bootstrap.truststore.location": "${EX_KEYSTORE_LOCATION|file:///opt/akana/etc/keystore}",
       "bootstrap.truststore.password": "${EX_KEYSTORE_PASSWORD|}"
  }
 }
]
}
Follow these steps:
-
Create the properties file. See Creating a Policy Manager container: Sample properties file and Creating and Registering a Network Director container: Sample properties file.
-
Run the recipe at the command line. See Creating a Policy Manager container: Running the recipe and Creating a Network Director container: Running the recipe.
-
Register the Network Director container. See Registering the Network Director container: Running the recipe.
Creating a Policy Manager container: Sample properties file
The following shows the content of the pm-cm-all.properties file used for this recipe.
INSTALL_DIR=abs:..
PRODUCT_HOME=${INSTALL_DIR}
DEFAULT_PORT=7900
DEFAULT_PORT_SECURE=0
CONTAINER_NAME=eap-cloudhsm
EX_KEYSTORE_KEYSTORETYPE=${EX_KEYSTORE_KEYSTORETYPE}
EX_KEYSTORE_PROVIDERNAME=${EX_KEYSTORE_PROVIDERNAME}
EX_KEYSTORE_ENCRYPTED=${EX_KEYSTORE_ENCRYPTED}
EX_KEYSTORE_LOCATION=${EAP_EX_KEYSTORE_LOCATION}
EX_KEYSTORE_PASSWORD=${EX_KEYSTORE_PASSWORD}
CONTAINER_IDENTITY_ACTION=${CONTAINER_IDENTITY_ACTION}
CONTAINERALIAS=${EAPCONTAINERALIAS}
CONTAINERALIASPASSWORD=${EAPCONTAINERALIASPASSWORD}
TENANT_NAME=${TENANT_ID}
TENANT_HOST=${T_HOST|${TENANT_ID}}.aws.akana.roguewave.com
TENANT_PORT=7900
TENANT_CONSOLE_HOST=${TENANT_HOST}
TENANT_VHOSTS=${TENANT_CONSOLE_HOST}
TENANT_EMAIL=administrator@atmosphere
TENANT_PASSWORD=Passw0rd!
TENANT_THEME=${T_THEME|hermosa}
TENANT_THEME_IMPL=${T_THEMEIMPL|}
Creating and Registering a Network Director container: Sample properties file
The following shows the content of the recipe_nd.properties file used for this recipe.
INSTALL_DIR=abs:..
DEFAULT_PORT=7905
CONTAINER_NAME=eapnd-cloudhsm
PM_PORT=7900
PM_HOST=akana-qa-74.aws.akana.roguewave.com
ORG_KEY=uddi:soa.com:registryorganization
DB_DRIVER_LOCATION=file:///home/user/ojdbc8.jar
EX_KEYSTORE_KEYSTORETYPE=${EX_KEYSTORE_KEYSTORETYPE}
EX_KEYSTORE_PROVIDERNAME=${EX_KEYSTORE_PROVIDERNAME}
EX_KEYSTORE_ENCRYPTED=${EX_KEYSTORE_ENCRYPTED}
EX_KEYSTORE_LOCATION=${EAPND_EX_KEYSTORE_LOCATION}
EX_KEYSTORE_PASSWORD=${EX_KEYSTORE_PASSWORD}
CONTAINER_IDENTITY_ACTION=${CONTAINER_IDENTITY_ACTION}
CONTAINERALIAS=${EAPNDCONTAINERALIAS}
CONTAINERALIASPASSWORD=${EAPNDCONTAINERALIASPASSWORD}
Creating a Policy Manager container: Running the recipe
Use the following command to run this recipe:
./jython.sh -DTENANT_ID=automation2022-1 -m akana.container --props pm-cm-all.properties \ --recipe ../recipes/pm-cm-all-external-keystore.json \ --recipe ../recipes/qa-config.json
Creating a Network Director container: Running the recipe
Use the following command to run this recipe:
./jython.sh -m akana.container --props recipe_nd.properties --recipe ../recipes/nd-cm-all-external-keystore.json
Registering the Network Director container: Running the recipe
Use the following command to run this recipe:
./jython.sh -m akana.container --recipe ../recipes/register-container.json --props recipe_nd.properties \
Using the install-patch recipe to install the cumulative upgrade
Before running a recipe:
- Ensure that the required plug-ins are installed and the bundles are running on the container.
- Download the cumulative upgrade file from the Akana Support Portal and extract the content of the ZIP file.
To install the updates and upgrade the bundles for the Akana Administration Console, run the install-patch.json recipe.
./jython.sh -m akana.container --props pm-cm-all.properties --recipe ../recipes/install-patch.json
After running the install-patch recipe, execute the following commands to complete any pending tasks.
./jython.sh -m akana.container --props pm-cm-all.properties --recipe ../recipes/db-schemas.json
./jython.sh -m akana.container --props pm-cm-all.properties --recipe ../recipes/restart.json
To verify that the installation tasks are completed, access the Akana Administration Console for the PM container and click the Installed Features tab.
Using the rollback-patch recipe to install the rollback changes
If you inadvertently installed a patch or want to revoke updates for any another reason, you can run the rollback-patch.json recipe. The recipe rolls back changes and restores the system to an earlier snapshot.
To roll back the feature bundles and configuration for the Akana Administration Console, run the rollback-patch.json recipe.
./jython.sh -m akana.container --props pm-cm-all.properties --recipe ../recipes/rollback-patch.json
To roll back changes made in the Network Director container, use the following example as a guide:
- Recipe: rollback-patch.json
- Properties file in this example: nd1.properties
Assuming that the properties file is nd1.properties, you would run the following command:
./jython.sh -m akana.container --props nd1.properties --recipe ../recipes/rollback-patch.json
Configure IAM on Policy Manager and Community Manager containers
You can configure IAM database authentication on Policy Manager (PM) and Community Manager (CM) containers, by following the steps outlined below.
Before you begin:
An IAM authentication token must be generated and sent to IAM_TOKEN_PASSWORD to install the PM container as described in the Prerequisites.
Take the following steps:
- Create the properties file to enable the IAM authentication by adding the IAM properties to the recipe.properties file of the PM container. See Set up the properties files: Sample properties file.
- Create a PM/CM container for database installation. See Create a PM/CM container: Sample properties file.
- Run the recipe. See Create a PM/CM container: Run the recipe.
- Optional. Create a cross-account IAM connection. See Create a cross-account IAM connection: Sample properties file.
Set up the properties file: Sample properties file
Create a recipe.properties file that includes the IAM-related configurations. Use a file with the following structure to specify the IAM properties:
echo "IAM_RDS_AWS_ENABLED=true" >> recipe.properties
echo "DB_USERNAME=<DB_User>" >> recipe.properties
echo "DB_PASSWORD = " >> recipe.properties
echo "IAM_RDS_AWS_TOKEN_LIFETIME_IN_MINS=15" >> recipe.properties
echo "IAM_RDS_AWS_REGION=<AWS_REGION>" >> recipe.properties
echo "IAM_TOKEN_PASSWORD=<IAM_token>" >> recipe.properties
echo "IAM_RDS_AWS_PROVIDER=<AWS>" >> recipe.properties
echo "IAM_RDS_AWS_ARN_PROP=<Role>" >> recipe.properties
Create a PM/CM container: Sample properties file
To configure the database connection for the PM/CM container, create a pmcm_recipe.properties file. Use the following structure:
echo "DB_TYPE=mysql" > pmcm_recipe.properties
echo "DB_ADMIN_USERNAME=admin" > pmcm_recipe.properties
echo "DB_ADMIN_PASSWORD=password" >> pmcm_recipe.properties
echo "DB_USERNAME=eap_user" >> pmcm_recipe.properties
echo "DB_PASSWORD= ”>> pmcm_recipe.properties
echo "DB_SERVER=database-aurora-mysql8-instance-1.ck7brgzh0xju.us-east-1.rds.amazonaws.com" >> pmcm_recipe.properties
echo "DB_NAME=eap_iam" >> pmcm_recipe.properties
echo "IAM_RDS_AWS_ENABLED=${IAM_RDS_AWS_ENABLED}" >> pmcm_recipe.properties
echo "IAM_RDS_AWS_TOKEN_LIFETIME_IN_MINS=${IAM_RDS_AWS_TOKEN_LIFETIME_IN_MINS}" >> pmcm_recipe.properties
echo "IAM_RDS_AWS_REGION=${IAM_RDS_AWS_REGION}" >> pmcm_recipe.properties
Create a PM/CM container: Run the recipe
After creating the properties files, the next step is to execute the recipe that sets up the PM/CM container. To run the recipe, use the command:
./jython.sh -m akana.container --recipe ../recipes/pm-cm-all.json --props pmcm_recipe.properties
Create a cross-account IAM connection: Sample properties file
To securely allow resources in one cluster to communicate with another, you can configure the STSAssumeRoleSessionCredentialsProvider property when creating a container. This enables a cross-account IAM connection between the two clusters. The structure to use is as follows:
echo "IAM_RDS_AWS_PROVIDER=<AWS>" >> recipe.properties
echo "IAM_RDS_AWS_ARN_PROP=<Role>" >> recipe.properties
The IAM_RDS_AWS_PROVIDER property specifies which AWS provider to use for connecting to IAM. The available options are:
- Default: Uses the default AWS provider.
- STS_ASSUME_ROLE: Uses the AWS Security Token Service (STS) to assume a different role for the connection, typically used in cross-account scenarios.
The default value is DEFAULT. If no value is specified, it defaults to using the standard IAM credentials.
The IAM_RDS_AWS_ARN_PROP property specifies the Amazon Resource Name (ARN) of the IAM role that must be assumed when using the STS_ASSUME_ROLE provider. This is only required if STS_ASSUME_ROLE is selected in IAM_RDS_AWS_PROVIDER to switch to a different IAM role before connecting to IAM. This is useful in cross-account setups where resources in one account need to access RDS instances in another account. You must replace the ARN placeholder with the actual ARN of the role (for example, arn:aws:iam::123456789012:role/MyCrossAccountRole) you intend to assume.
By configuring these properties in the recipe.properties file, the containers can securely assume roles across accounts for cross-account communication.
Configure grid caching using an automation recipe
If you are deploying Network Director in an EKS (Elastic Kubernetes Service) environment or in a non-EKS setup, enable grid caching by using the grid-cache-config.json recipe. You can apply the necessary grid caching properties by setting them as environment variables, passing them directly during recipe execution, or by creating a property file that contains the grid caching properties.
The following shows the content of the grid-cache-config.json recipe.
{
  "name": "Hazelcast Grid Cache Configuration",
  "description": "com.soa.grid",
  "phases": ["deploy"],
  "configurations": [
		{
		  "pid": "com.soa.grid",
		  "update": {
		    "grid.group.config.groupName": "${GRID_CONFIG_GROUP_NAME|dev}",
			"grid.network.config.clusterName": "${GRID_CONFIG_CLUSTER_NAME|dev}",
			"grid.network.config.connectionTimeout": "${GRID_CONFIG_CONNECTION_TIMEOUT|10}",
			"grid.network.config.enableKubernetes": "${GRID_CONFIG_ENABLE_KUBERNETES|false}",
			"grid.network.config.enableMulticast": "${GRID_CONFIG_ENABLE_MULTICAST|false}",
			"grid.network.config.enableTcp": "${GRID_CONFIG_ENABLE_TCP|false}",
			"grid.network.config.kubernetesServiceName": "${GRID_CONFIG_KUBERNETES_SERVICE_NAME|gateway-service}",
			"grid.network.config.localAddresses": "${GRID_CONFIG_LOCAL_ADDRESS|0.0.0.0}",
			"grid.network.config.localPort": "${GRID_CONFIG_LOCAL_PORT|5701}",
			"grid.network.config.multicastAddress": "${GRID_CONFIG_MULTICAST_ADDRESS|228.1.2.4}",
			"grid.network.config.multicastPort": "${GRID_CONFIG_MULTICAST_PORT|47400}",
			"grid.network.config.multicastTimeout": "${GRID_CONFIG_MULTICAST_TIMEOUT|10}",
			"grid.network.config.multicastTtl": "${GRID_CONFIG_MULTICAST_TTL|8}",
			"grid.network.config.peerAddresses": "${GRID_CONFIG_PEER_ADDRESSES|}",
			"hazelcast.instance.manager.bindAnyInterface": "${GRID_CONFIG_CLUSTER_NAME|true}",
			"hazelcast.instance.manager.enable": "${HAZELCAST_INSTANCE_MANAGER_ENABLE|false}"
		}
	 },
	 {
	  "pid": "com.soa.policy.handle.quota.throughput",
	  "update": {
		 "use.clustered.cache": "${THROUGHPUT_CLUSTERED_CACHE|false}"
	 }
	 },
	 {
	  "pid": "com.soa.policy.handle.quota.bandwidth",
	  "update": {
		 "use.clustered.cache": "${BANDWIDTH_CLUSTERED_CACHE|false}"
	 }
    }
  ]
}
To enable clustered caching for the Throughput Quota Policy and/or Bandwidth Quota Policy, set either of the two properties, THROUGHPUT_CLUSTERED_CACHE and/or BANDWIDTH_CLUSTER_CACHE to true. Caching for these two policies defaults to false.
Grid caching configuration in an EKS environment
Prerequisites
Before configuring grid caching in the EKS cluster, ensure the following Kubernetes resources are created.
Option 1: Create a cluster role and cluster role binding
Use the following YAML to define a cluster role that grants necessary permissions for grid caching.
apiVersion: rbac.authorization.k8s.io/v1
kind: ClusterRole
metadata:
	name: hazelcast-cluster-role
rules:
  - apiGroups:
	- ""
	# Access to apps API is only required to support automatic cluster state management
	# when persistence (hot-restart) is enabled.
	- apps
resources:
	- endpoints
	- pods
	- nodes
	- services
	# Access to statefulsets resource is only required to support automatic cluster state management
	# when persistence (hot-restart) is enabled.
	- statefulsets
verbs:
	- get
	- list
	# Watching resources is only required to support automatic cluster state management
	# when persistence (hot-restart) is enabled.
	- watch
- apiGroups:
	- "discovery.k8s.io"
resources:
	- endpointslices
verbs:
	- get
	- list
Next, use the following YAML to bind the role to the appropriate service account that applies cluster-wide.
apiVersion: rbac.authorization.k8s.io/v1
kind: ClusterRoleBinding
metadata:
	name: hazelcast-cluster-role-binding
roleRef:
	apiGroup: rbac.authorization.k8s.io
	kind: ClusterRole
	name: hazelcast-cluster-role
subjects:
	- kind: ServiceAccount
	name: default
	namespace: default
Option 2: Create a namespace specific role & role binding
Use the following YAML to define a role and role binding within a specific namespace.
apiVersion: rbac.authorization.k8s.io/v1
kind: Role
metadata:
	name: hazelcast-role
	namespace: default
rules:
	- apiGroups:
		- ""
		# Access to apps API is only required to support automatic cluster state management
		# when persistence (hot-restart) is enabled.
		- apps
	resources:
		- endpoints
		- pods
		- nodes
		- services
		# Access to statefulsets resource is only required to support automatic cluster state management
		# when persistence (hot-restart) is enabled.
		- statefulsets
	verbs:
		- get
		- list
		# Watching resources is only required to support automatic cluster state management
		# when persistence (hot-restart) is enabled.
		- watch
	- apiGroups:
		- "discovery.k8s.io"
	resources:
		- endpointslices
	verbs:
		- get
		- list
---
apiVersion: rbac.authorization.k8s.io/v1
kind: RoleBinding
metadata:
	name: hazelcast-role-binding
	namespace: default
roleRef:
	apiGroup: rbac.authorization.k8s.io
	kind: Role
	name: hazelcast-role
subjects:
	- kind: ServiceAccount
	name: default
	namespace: default
Configure grid caching
In an EKS environment, grid caching properties for the gateway Pods must be configured by using the environment variables. These variables must be set in the gateway deployment YAML file, see Grid cache configuration properties example.
Example: Grid cache configuration properties
Add the following environment variables to the gateway YAML file to enable grid caching for the gateway container.
GRID_CONFIG_GROUP_NAME=dev
GRID_CONFIG_CLUSTER_NAME=EKSGridCluster
GRID_CONFIG_ENABLE_KUBERNETES=true
GRID_CONFIG_KUBERNETES_SERVICE_NAME=gateway-service
GRID_CONFIG_LOCAL_PORT=5701
HAZELCAST_INSTANCE_MANAGER_ENABLE=true
Where:
- GRID_CONFIG_KUBERNETES_SERVICE_NAME: Replace <gateway-service> with your actual gateway service name.
- GRID_CONFIG_LOCAL_PORT: The default port used by the grid server.
- GRID_CONFIG_GROUP_NAME: A custom group name that must be consistent across all gateway Pods.
- GRID_CONFIG_CLUSTER_NAME: The name of the grid cluster (not the EKS cluster name).
Embedding the grid caching recipe
The grid-cache-config.json must be included in the postStart script that creates the gateway Pod. This recipe can either be invoked independently or embedded within a broader configuration recipe.
The following example shows adding the grid caching recipe within an existing recipe that is called in the postStart script:
{
	"name":"Properties",
	"description":"Properties Recipe",
	"phases":["deploy"],
	"includes":[
		{ "location":"security.json" },
		{ "location":"performance.json" },
		{ "location":"performance-nd.json" },
		{ "location":"hardening-common.json" },
		{ "location":"hardening-nd.json" },
		{ "location":"nd-hardening.json" },
		{ "location":"logging.json" },
		{ "location":"usage.json" },
		{ "location":"setwsmex.json"},
		{ "location":"binding-http.json"},
		{ "location":"setcontainername.json"},
		{ "location":"grid-cache-config.json"},
		{ "location":"script-caching-properties.json"},
		{ "location":"rollup-properties.json"},
		{ "location":"platform-jetty-properties.json"},
		{ "location":"client-servlet-properties.json"},
		{ "location":"contexts-panel.json"}
	]
}
Run the recipe
After the environment variables are configured, the next step is to execute the recipe. To run the recipe, use the command:
jython -m akana.container --recipe ../recipes/grid-cache-config.json --props nd-cm-all.properties
To apply the grid caching configuration changes, restart the container by using the restart.json recipe. This step must be included in the postStart script to ensure changes take effect.
Grid caching configuration in a non-EKS environment
To configure grid caching in a non-EKS environment, use the nd-cm-all.properties file.
Follow these steps:
- Create a properties file. See Create a Network Director container: Sample properties file
- Run the recipe at the command line. See Create a Network Director container: Run the recipe
Create a Network Director container: Sample properties file
To configure the grid caching for a Network Director container, create the nd-cm-all.properties file and provide the values using the following structure.
GRID_CONFIG_GROUP_NAME=dev
GRID_CONFIG_CLUSTER_NAME=dev
GRID_CONFIG_CONNECTION_TIMEOUT=10
GRID_CONFIG_ENABLE_KUBERNETES=false
GRID_CONFIG_ENABLE_MULTICAST=false
GRID_CONFIG_ENABLE_TCP=true
GRID_CONFIG_KUBERNETES_SERVICE_NAME=gateway-service
GRID_CONFIG_LOCAL_ADDRESS=10.250.24.136
GRID_CONFIG_LOCAL_PORT=47500
GRID_CONFIG_MULTICAST_ADDRESS=228.1.2.4
GRID_CONFIG_MULTICAST_PORT=47400
GRID_CONFIG_MULTICAST_TIMEOUT=10
GRID_CONFIG_MULTICAST_TTL=8
GRID_CONFIG_PEER_ADDRESSES=10.250.24.136:47505
HAZELCAST_INSTANCE_MANAGER_BINDANYINTERFACE=true
HAZELCAST_INSTANCE_MANAGER_ENABLE=false
Create a Network Director container: Run the recipe
After creating the properties files, the next step is to execute the recipe that sets up the Network Director container. To run the recipe, use the command:
jython -m akana.container --recipe ../recipes/grid-cache-config.json --props nd-cm-all.properties
Encrypt the MongoDB password
To store the MongoDB password, use the mongo.json recipe that supports encryption. This ensures the password is not stored in plain text.
Take the following steps:
- Add the MongoDB properties to the properties file. See MongoDB properties: Sample properties file.
- Run the recipe: See Run the recipe.
MongoDB properties: Sample properties file
Include the MongoDB connection configuration in the pm-cm-all.properties file. Use the following structure.
MONGO_URL={hostname}:{port}/Akana?authMechanism=SCRAM-SHA-256&authSource=admin&connectTimeoutMS=15000&socketTimeoutMS=1500000&minPoolSize=0&maxPoolSize=100&waitQueueMultiple=5&waitQueueTimeoutMS=10000
MONGO_USERNAME={username}
MONGO_PASSWORD={password}
MONGO_PASSWORD_ENCRYPTED=true
Run the recipe
The next step is to execute the recipe. Depending on whether you want to store the password in plain text or an encrypted format, use one of the following commands.
Use the following command to store the password in an encrypted format:
./jython.sh -Dorg.slf4j.simpleLogger.logFile=System.out -m akana.container --props pm-cm-all.properties --secrets-file=secret.key --recipe ../recipes/mongo.json
For more information about generating and using encrypted passwords in the recipe file, see Including Encrypted Passwords in Recipes.
Use the following command to store the password in plain text format:
./jython.sh -Dorg.slf4j.simpleLogger.logFile=System.out -m akana.container --props pm-cm-all.properties --recipe ../recipes/mongo.json
Configure metric attributes for the Health panel
To enhance the Service Container Readiness and System Health panels with additional health attributes, you can use an automation recipe. The recipe allows you to:
- Make standard panels editable
- Add custom panels with specific metric attributes
- Extend existing subpanels with new metrics
- Create new subpanels under existing panels
The following shows the content of the recipe to make the Service Container Readiness and System Health panels editable.
{
	"name":"edit-standard-panel",
	"phases":["deploy"],
	"description":"Recipe version of the standard service container readiness Health Check.",
	"configurations": [
		{
			"factoryPid": "com.soa.admin.health",
			"selector":"(id=akana.service.container.readiness)",
			"update": {
				"editable":"true"
			}
		},
		{
			"factoryPid": "com.soa.admin.health",
			"selector":"(id=akana.system.health)",
			"update": {
				"editable":"true"
			}
		}
	]
}
The following shows the content of the recipe for creating a new custom panel and adding metric attributes.
{
	"name":"add-custom-panel-metric-attributes",
	"phases":["deploy"],
	"description":"Recipe version of the standard service container readiness Health Check.",
	"configurations": [
		{
			"factoryPid": "com.soa.admin.health",
			"add": {
				     "name":"custom panel",
				     "id":"add.panel",
				     "editable": "true",
				     "auth": "false"
			}
		},
		{
			"factoryPid": "com.soa.admin.health",
			"add": {
				     "id":"com.akana.transport.messaging",
				     "parent":"add.panel",
				     "variables":"message.listeners",
				     "threshold.normal.message.listeners":"value le 20",
				     "threshold.failure.message.listeners":"value gt 20",
				     "editable":"true"
			}
		}
	]
}
The following shows the content of the recipe to add a new metric to an existing subpanel and create a new subpanel with metric attributes under the standard panel.
{
	"name":"add-metric-attributes-and-subpanel",
	"phases":["deploy"],
	"description":"Recipe version of the standard service container readiness Health Check.",
	"configurations": [
		{
			"factoryPid": "com.soa.admin.health",
			"selector":"(id=com.soa.container.config.stats)",
			"update": {
				        "variables":"configuration.state, time.since.last.config",
				        "threshold.normal.time.since.last.config":"value le 5",
				        "threshold.failure.time.since.last.config":"value gt 5"
			}
			},
		{
			"factoryPid": "com.soa.admin.health",
			"add": {
				     "id":"com.akana.transport.messaging",
				     "parent":"akana.system.health",
				     "variables":"message.listeners",
				     "threshold.normal.message.listeners":"value ge 20",
				     "threshold.failure.message.listeners":"value lt 20",
				     "editable":"true"
			}
		}
	]
}
Take the following steps:
- Create a properties file. See Create a ND container: Sample properties file.
- Run the recipe: See Create a ND container: Run the recipe.
Create a ND container: Sample properties file
Properties file (nd-cm-all.properties):
INSTALL_DIR=/home/user/akana
DEFAULT_PORT=9905
CONTAINER_NAME=nd01
PM_PORT=9900
PM_HOST=localhost
Create a ND container: Run the recipe
After creating the properties file, the next step is to run the appropriate recipe based on your configuration needs. Use one of the following commands to execute the recipe:
./jython.sh -Dorg.slf4j.simpleLogger.logFile=System.out -Dorg.slf4j.simpleLogger.defaultLogLevel=DEBUG -m akana.container --recipe ../recipes/edit-standard-panel.json --props nd01.properties
./jython.sh -Dorg.slf4j.simpleLogger.logFile=System.out -Dorg.slf4j.simpleLogger.defaultLogLevel=DEBUG -m akana.container --recipe ../recipes/add-custom-panel-metric-attributes.json --props nd01.properties
./jython.sh -Dorg.slf4j.simpleLogger.logFile=System.out -Dorg.slf4j.simpleLogger.defaultLogLevel=DEBUG -m akana.container --recipe ../recipes/add-metric-attributes-and-subpanel.json --props nd01.properties