Perform the Installation
This section guides you through the process of installing the platform, creating your first container, installing features and plug-ins, configuring the container, setting up additional containers, integrating Network Director with Policy Manager, and creating and running the API Platform tenant.
On this page:
- Step 1: Download ZIP files
- Step 2: Extract installation files
- Step 3: Run Configurator to create the first container
- Step 4: Install Policy Manager/Community Manager features on the container
- Step 5: One of the following, depending on the user interface version you are using
- Step 6: Complete pending tasks to configure container features
- Step 7: Create and configure additional containers
- Step 8: Add Network Director to Policy Manager
- Step 9: Create Community Manager tenant using the Jython script
- Step 10: Run the Community Manager developer portal
- Step 11: Configure certificate expiration alerts
Step 1: Download ZIP files
Prerequisite:
Before you begin, create a folder for your installation; for example, AAP202602.
To download the installation ZIP file or files
- Log in to the Akana Support Portal. If you don't have login credentials for the site, contact Akana technical support.
- Go to Product Downloads > Akana - Product Downloads > Akana 2026.2.0 Product Downloads.
- Choose your Akana Platform + Akana API Platform download file, according to your desired version and operating system. For example:
- Linux (includes JRE): api-platform-linux-jre-2026.2.0.zip
- Windows (includes JRE): api-platform-win-jre-2026.2.0.zip
- Windows, Linux, or Solaris (does not include JRE; provide your own JRE version): api-platform-no-jre-2026.2.0.zip
For information on the platform versions for different operating systems, see Akana Platform: Operating system versions.
- Optional: If you are using one or more option packs, download the option packs ZIP file for the version you are installing. For example, option-packs-2026.2.0.zip.
Step 2: Extract installation files
Extract the necessary installation files. A password is required to unzip the files.
To unzip the installation files
- In your installation folder, unzip the Akana Platform + Akana API Platform ZIP file. It includes two embedded ZIP files. For example:
- akana-platform-linux-jre-2026.2.x.x.zip
- akana-api-platform-2026.2.x.xx.zip
- Unzip both the Akana Platform and Akana API Platform ZIP files.
- Optional: If you are using one or more option packs, unzip the Option Packs ZIP file (same password as for Akana Platform). Then unzip the embedded Options Pack ZIP file.
Akana Platform: Operating system versions
The Akana Platform 2026.2.0 ZIP file contains within it ZIP files for each operating system. Choose the appropriate file that matches your operating system:
- Linux (includes JRE): akana-platform-linux-jre-2026.2.x.x.zip
- Windows (includes JRE): akana-platform-win-jre-2026.2.x.x.zip
- Windows, Linux, or Solaris (does not include JRE; provide your own JRE version): akana-platform-2026.2.x.x.zipIf you are running on Windows and using your own JRE, make sure to set the JAVA_HOME system variable. This is required for the platform to register Windows services.
Step 3: Run Configurator to create the first container
The Configurator guides you through the process of creating your first container by entering some basic configuration values. After the container is created, you can access its Admin Console to install and manage features.
There are two ways to create a container:
- Using the GUI: A Windows-based wizard that walks you through the installation process. See Create a container via the GUI.
- Using silent install: By using a properties file. See Create a container using silent install (Linux).
Follow the method appropriate for your environment to create the first container and then proceed to the next step.
Step 4: Install Policy Manager/Community Manager features on the container
Follow the instructions to install the Policy Manager/Community Manager features on the first container in a two-container scenario (one PM/CM container, one Network Director container). For additional information on features for other deployment types, see Sample deployment scenarios.
To install Policy Manager/Community Manager features on the container
- In the Admin Console, go to the Available Features list.
- Install the following features:
- Akana Community Manager—This feature includes several bundled components that are installed automatically:
- Akana Community Manager APIs feature
- Akana Community Manager Hermosa Theme plug-in
- Akana Community Manager OAuth Provider (Must be installed for any Community Manager container)
- Akana Community Manager Scheduled Jobs
- Akana Management Services
- Akana OAuth Provider
- Akana Policy Manager Console
- Akana Policy Manager Services—this feature bundle includes the Akana Scheduled Jobs feature, which adds jobs to the Quartz scheduler and Akana Security Services. This feature must be installed on all containers except Network Director.
If you are following the sample deployment scenario, see Community Manager/Policy Manager container features with access to MongoDB.
- Akana Community Manager—This feature includes several bundled components that are installed automatically:
- Click Install Feature. After the Resolution Complete summary page appears, click Install Feature.
- At the Installation Complete summary page, click Configure (if you are installing plug-ins, click Close and install plug-ins first).
The next step is to install any additional features required for the container to support the initial group of features. See Step 5b: (as needed) Install additional features on the container.
Step 5a: (as needed) Install plug-ins on the container
Depending on the installation scenario, you may need to install one or more plug-ins on the container to enable certain features.
To install plug-ins on the PM/CM container (traditional Admin Console)
- In the Available Features list, use the Filter drop-down list at the top left, and select Plug-Ins.
- Install the following plug-ins:
- Akana Community Manager Policy Console plug-in
- Optional: Akana OAuth Plug-In (must be installed on the Community Manager container if OAuth is installed on a separate container)
- If needed, install one or more additional themes from the plug-ins list:
- Akana Community Manager Bonita Theme
- Akana Community Manager DevOps Theme (applicable only if Lifecycle Manager integration is used)
- Akana Community Manager Simple Developer Theme
The Hermosa Theme is installed as part of the Akana Community Manager feature.
- Click Install Feature. After the Resolution Complete summary page appears, click Install Feature.
After installation, review the installation summary. To continue to the configuration step, click Configure.
Step 5b: (as needed) Install additional features on the container
Depending on the installation scenario, you may need to install additional features on the container to support the initial group of features.
To install additional features on the PM/CM container (redesigned Admin Console)
- In the Available Features list, install the following:
- Community Manager Policy Console
Provides Policy Manager Console extensions supporting Community Manager security policies for application and end-user authentication. Must be installed with Policy Manager Console.
- Optional: OAuth
Provides OAuth server integration ensuring OAuth tokens to stay in sync with changes to apps and APIs. Install into the Community Manager container and Policy Manager container when the Community Manager OAuth Provider is deployed in a standalone container.
- Community Manager Policy Console
- If needed, install one or more additional themes:
- Theme: Bonita
- Community Manager DevOps Theme (applicable only if Lifecycle Manager integration is used)
- Theme: Simple Developer
The Hermosa Theme is installed as part of the Akana Community Manager feature.
- Click Install Feature. After the Resolution Complete summary page appears, click Install Feature.
After installation, review the installation summary. To continue to the configuration step, click Configure.
Step 6: Complete pending tasks to configure container features
The next step is to configure the features you just installed on the container. You can perform either of the following:
- Click Configure at the end of the installation process in the previous step. The process steps you through the wizards for each configuration step.
- Manually start the configuration tasks at any point. In the Admin Console for the container, click the Installed Features tab. Locate the Pending Installation Tasks at the bottom left. Click Complete Configuration to start the process.
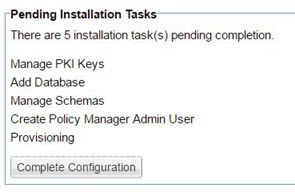
- Manage PKI keys: Specifies key management options.
- Add Database: Creates the database for the installation.
- Manage Schemas: Manages the database schemas for the container.
- Create Policy Manager Admin User: Creates the top-level Policy Manager user.
- Provisioning: Initializes resources associated with the features installed on the container.
To configure features for the PM/CM container
Start the configuration step either by clicking Configure at the end of the installation process or by choosing Installed Features > Complete Configuration. The configuration steps may vary depending on which features were installed. The following tasks are specific to the PM/CM container setup.
- In the Manage PKI Keys wizard, select key management options and other values and then click Finish. Review the summary and then click Go to Next Task.
For more information on this wizard, see Installation wizard: Manage PKI Keys.
- In the Configure Database Options Wizard, specify your database and other values. Since this is the first container, select Create new database. For subsequent containers, use the same database, select Use existing database. Be sure to follow any applicable database-specific notes.
Notes:
- Ensure your database driver is located in the {installation}\instances\{containername}\deploy folder, before running this wizard. See Database drivers.
- Oracle: If you are using a new Oracle database, see Database notes: Oracle for additional Oracle-specific information about DBA permissions, password configuration, and database table updates.
- Microsoft SQL Server: For additional notes, see Database notes: Microsoft SQL Server.
- MySQL: If your installation includes Lifecycle Coordinator and/or Lifecycle Repository, add the required grants to the DB user before continuing to Step 4. See Database notes: MySQL with Lifecycle Coordinator/Lifecycle Repository.
For more information on this wizard, see Installation wizard: Add Database.
- In the Manage Schemas wizard, check the checkboxes for all listed schemas and click Finish. Review the summary and then click Go to Next Task.
For more information on this wizard, see Installation wizard: Manage Schemas.
- In the Define Policy Manager Administrator Credentials Wizard, specify administrator credentials (username and password). Click Finish. Review the summary and then click Go to Next Task.
For more information on this wizard, see Installation wizard: Define Policy Manager Administrator Credentials.
- In the Provisioning Wizard, ensure the box is checked, and then click Finish.
When the provisioning task is complete, you will see a message box prompting you to restart your system. Click OK. It's important to make sure that the Provisioning task is 100% complete before restarting. For more information on this wizard, see Installation wizard: Provisioning.
- On the Complete Configuration page, click Close.
The configuration of your first container is now complete.
Step 7: Create and configure additional containers
After the first container is set up, you can proceed to create and configure additional containers. For each new container, follow the steps Step 3: Run Configurator to create the first container through Step 6: Complete pending tasks to configure container features.
Create containers in the following sequence:
- First, create all Policy Manager/Community Manager containers.
- Then, create all Network Director containers.
You can create a Network Director container by using either GUI or Silent options. For instructions on how to install a Network Director Container (ND1), install and configure the Network Director feature, and register the ND1 container in Policy Manager, see Using Network Director Feature.
To create an additional container
- Run Configurator to create the container. See Step 3: Run Configurator to create the first container. Use a different port number for each container. For example, 9900 for the PMCM1 container and 9905 for the ND1 container.
- Install features on the container. See Step 4: Install Policy Manager/Community Manager features on the container. For information on which features you might choose, see Sample deployment scenarios. For the Network Director container in this scenario, install the Akana Network Director.
- Install any plug-ins/additional features on the container.
For the Network Director container, install the following plug-in / additional feature:
- Traditional Admin Console—Akana API Platform ND Extensions Feature
- Redesigned Admin Console—API Platform ND Extensions
- Configure the features. See Step 6: Complete pending tasks to configure container features.
- If you copied a database driver for the first container, you will need to complete the same action for each subsequent container.
- In the Configure Database Options Wizard, select Use existing database, and add the information about the database used by the first container.
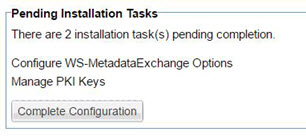
- For the Network Director container, configure the WS-MetadataExchange options. Make sure the URL is set to {PM_URL}/wsmex. For example: http://localhost:9900/wsmex. If you have multiple PM/CM containers set up as a cluster, use the URL for the primary node.
The following is the Pending Installation Tasks for a Network Director container. For more information on these tasks, see Installation wizard, ND container: Configure WS-Metadata Exchange Options and Installation wizard: Manage PKI Keys.
Follow the steps for each container until all are created and fully configured. Be sure to restart each container when prompted after completing configuration.
Step 8: Add Network Director to Policy Manager
You will add the Network Director to Policy Manager, enabling you to access the Community Manager developer portal and begin routing traffic.
To add Network Director to Policy Manager
- Access the Policy Manager (Step 3) in a browser using the URL configured earlier. For example: http://localhost:9900. This redirects you to the Policy Manager login page at {pm_url}/admin/login.html. Log in using the credentials you previously set.
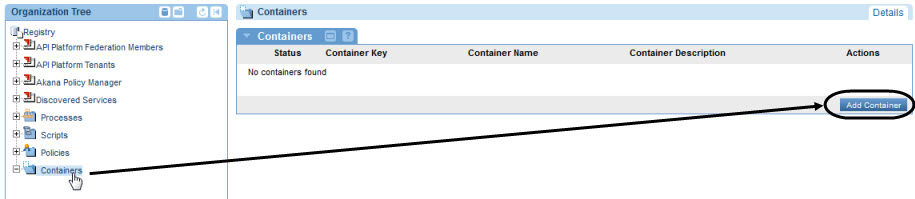
- In the Organization Tree, under Containers, click Add Container.
- In the Add Container wizard:
- Select Container Type: Select either Container or Container Cluster. Click Next.
- Specify Metadata Import Options: Set up the metadata URL for the Network Director container by using the URL you set up for the container and appending /metadata. For example: http://localhost:9902/metadata. Click Next.
- X.509 Certificate Not Trusted: If you get this message, modify the certificate or accept the default to add the certificate to the Policy Manager trusted certificate store. Click Next.
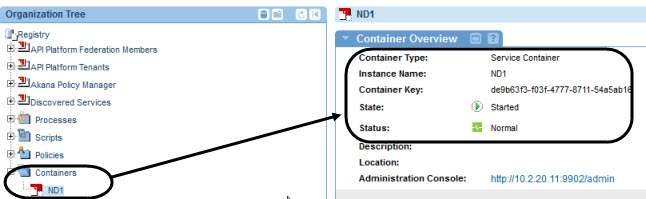
- Specify Container Details: Provide an instance name (for example, ND1). Click Finish.
- Completion Summary: Review the summary and then click Close.
- Check that the container appears in Policy Manager. The initial state value is Stopped, but after a short time, it changes to Started.
If you are using the Community Manager developer portal, the next step is to create the Community Manager tenant.
Step 9: Create Community Manager tenant using the Jython script
Create the tenant for the Community Manager developer portal. Follow the steps as outlined in the table in a sequence.
| Scenario | Action |
|---|---|
| Conditional, Linux users only | Export the JAVA_HOME location to your installation directory. See Linux install: Exporting the JAVA_HOME variable. |
| All users | Determine the values required for the Jython script. The script includes various parameters to specify the values for your tenant. See Developing and running the Jython script. |
| All users | Run the Jython script at the command line. See To run the Jython script. |
| Conditional, for custom tenant name | If you choose a tenant name other than the default (atmosphere), update a configuration setting to include the new value in the Admin Console for the Community Manager container. See Conditional: Updating configuration setting for new context root. |
Developing and running the Jython script
When creating your Jython script, use the following examples:
- Example 1: A template script with each parameter on a separate line and placeholder values.
- Example 2: A script with sample values.
- Example 3: A Jython script for Unix environments.
Hostnames used in the Jython script must be in lowercase.
For detailed information about the various parameters and their values, see Jython Script Elements.
Example 1: Template script with placeholders
The following template script outlines each parameter on a separate line for better clarity. Replace the values enclosed in curly brackets with the actual values for your implementation. Ensure to remove the curly brackets. When running the script, remove the line breaks and leave a space between parameters.
jython.bat ../scripts/Lib/soa/atmosphere/tenant.py -a -v
--url {CM_URL}
--tenantName {tenantid}
--tenantId {tenantid}
--address {CM_URL}
--consoleAddress {CM_URL/{context_path}
--theme default
--themeImpl default
--email {emailaddress}
--password {password}
--contactEmailAddress {emailaddress}
--fromEmailAddress {emailaddress}
--username {username}
--userpassword {password}
Example 2: Each parameter on a separate line with sample values
The following example installs Hermosa theme (theme = hermosa, themeImpl = default).
jython.bat ../scripts/Lib/soa/atmosphere/tenant.py -a –v --url http://localhost:9901 --tenantName acmepaymentscorp --tenantId acmepaymentscorp --address http://localhost:9901 --consoleAddress http://localhost:9901/acmepaymentscorp --theme hermosa --themeImpl default --email administrator@acmepaymentscorp.com --password MyPassword --contactEmailAddress support@acmepaymentscorp.com --fromEmailAddress notifications@acmepaymentscorp.com --username admin_123 --userpassword AdminPassW0rd123
Example 3: Unix example
./jython.sh ../scripts/Lib/soa/atmosphere/tenant.py -a -v --url http://pm84-13.local.akana.com:9900 --tenantName EnterpriseAPI --tenantId enterpriseapi --address http://pm84-13.local.akana.com:9900 --consoleAddress http://pm84-13.local.akana.com:9900/enterpriseapi --theme default --themeImpl default --email support@acmepaymentscorp.com --password password --contactEmailAddress support@acmepaymentscorp.com --fromEmailAddress no_reply_cm@acmepaymentscorp.com --username admin_123 --userpassword AdminPassW0rd123
To run the Jython script
- Open a command prompt, go to the \bin folder of your installation.
- Run the Jython script by using your customized command.
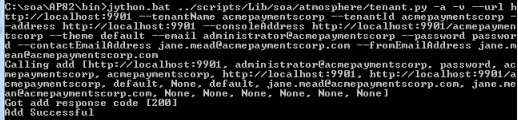
If the script executes successfully, it will return a response code 200 along with a success message. If you receive a 404 error, make sure that the container is started. Start the container and run the script again.
Conditional: Updating configuration setting for new context root
The default value for the context path in the consoleAddress parameter is atmosphere. This means, by default, the Community Manager developer portal will be accessible via this URL: {consoleAddress}/atmosphere. If you prefer to use a different value for the context path, you will need to use the value in the Jython script (--consoleAddress {CM_URL}/{new context path value}. If you make this change in the Jython script, you must update a configuration setting to the new value to access the portal using the new context path.
To update the configuration setting for the new context root
- Log in to the Admin Console for the Community Manager container.
- Click the Configuration tab.
- In the left panel, under Configuration Categories, locate the com.soa.atmosphere.console category.
- In the right panel, find the atmosphere.context.root property and update the value to your new context path.
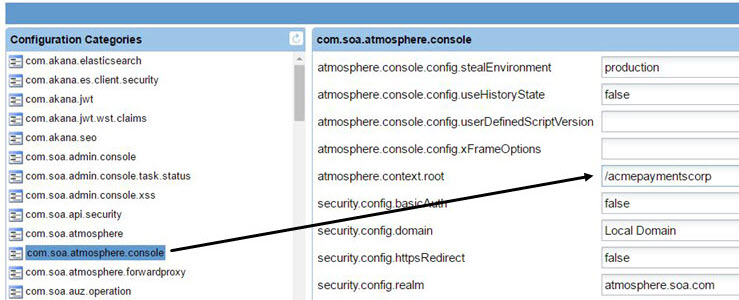
- Click Apply Changes.
- Restart the container for the changes to take effect.
You can log in to the Community Manager developer portal and start configuring settings and adding apps and APIs. See Step 10: Run the Community Manager developer portal.
Step 10: Run the Community Manager developer portal
Installation steps are complete, you can run the Community Manager develop portal and set up domains and users, configure settings, and add apps and APIs.
To run the Community Manager developer portal
- Compose the Community Manager developer portal URL:
- Take the root address of the container where Community Manager is installed. For example, http://localhost:9901.
- Append /{tenantid}. For example, http://localhost:9901/acmepaymentscorp.
- Paste the URL in the browser. The browser redirects to the default landing page. For example: http://localhost:9901/acmepaymentscorp/#/home/landing.
- Log in by using the username and password provided in the Jython script.
For information about tasks relating to the Community Manager developer portal, including Site Admin tasks such as configuring platform login, setting up domains, choosing platform settings, and user tasks such as adding apps and APIs, see Community Manager Developer Portal Help Content Overview.
Step 11: Configure certificate expiration alerts
Set up alerts to notify when certificates are nearing expiration or have already expired, see Managing Certificate Expiration Alerts. You can also use an automation recipe to configure alerts, see Automation Examples.